


Today, I want to share with you an ingenious piece of embroidery by Robin, who live in “The Land of Enchantment” (that would be New Mexico!).
Using my Lavender Honey needle book design (found in my Lavender Honey and Other Little Things e-book), Robin added a few tweaks of her own, to make the needlebook uniquely hers and more functional for her.
I love the way it came out! Just wait til you see the back!
Here are some step-by-steps on how Robin improved the needlebook to suit her needs. Hopefully, it will inspire you to do the same – to mix things up a bit and make little adjustments to make your own needlebooks from Lavender Honey (or any project, really) unique to you.
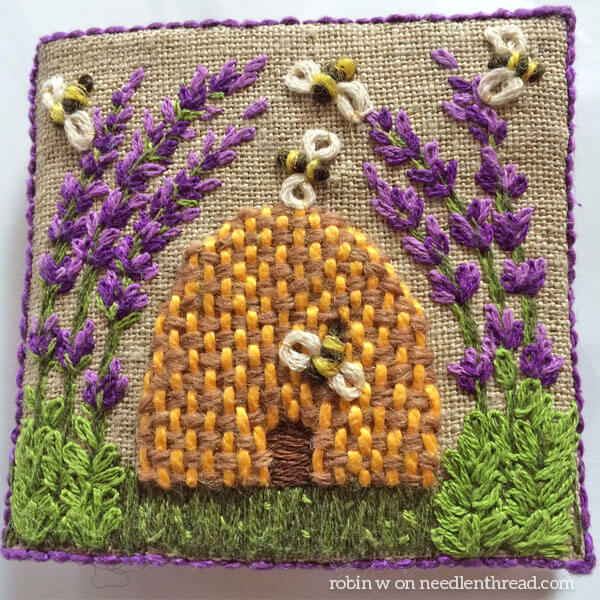
First, Robin changed the size of the needlebook pattern to 3″ square. In the e-book, the pattern is 2.5″ square, but she wanted hers to accommodate larger needles.
This is a great idea, and very easy to do. Just print the pattern pages from the e-book at larger than 100% – you can do this in your print settings, or you can print the pattern page, and enlarge on a photocopy machine.
Changing Design Sizes
Incidentally, when you’re working any kind of design, you might want the design in a different size, and there’s nothing at all wrong with re-sizing, even if it is another designer’s design.
Just remember that you might have to make adjustments in the type or weight of thread you’re using for the embroidery, and perhaps in the choice or spacing of your stitches, too.
If you go smaller, the thread must be finer and the stitches must work in a smaller space with a finer thread. If you go larger, you might have to use heavier thread to achieve the right look in the finished project, and you might need to adjust the type and size of your stitches, too.
It’s fun to experiment and take risks – so don’t hesitate, if you want to change the size of a design! Just remember to think it all the way through with the threads and stitches.

Next, Robin taped heavy duty packing tape over the stiff interfacing on the inside of the needlebook, before adding the felt lining. She wanted to prevent her needles from slipping into the interfacing. This layer of heavy packing tape helps the needles move back up into the felt without going through into the interfacing. A clever idea!
When I use felt inside a needlebook, I don’t generally pierce the entire layer of felt when I insert my needles. I just scoop up about half the layer of felt. But if you find you scoop the whole layer of felt and go deep with your needles, you might try this packing tape trick.
To anticipate some of your questions, I don’t know how long the packing tape will adhere over time. Sometimes, tapes like this get brittle and rolls back as it ages. But it will be sewn over with the felt, so that should help secure it for the future, too. You might also wonder about acid content in the tape. It could discolor fabric over time. On the other hand, a needlebook like this is intended for use, and chances are, it’s not going to be a future museum piece. It should withstand enough time to give you years of pleasure, despite any acidic content in the tape.
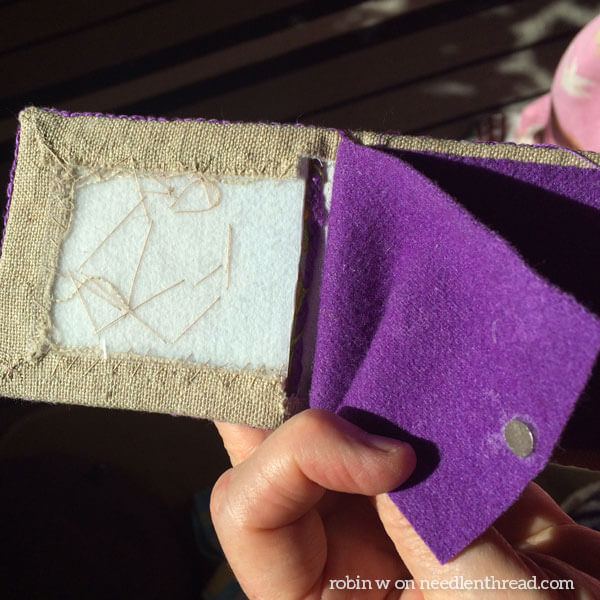
On the inside of the felt, before sewing in in place, Robin glued in two tiny (1/16″) strong magnets under the felt, on the far edges of the needlebook, to serve as closers. The needlebook snaps shut easily.
This is great idea, for a couple reasons: 1. It snaps shut easily, without having to tie it up; 2. you can use the magnets to pop the needlebook, open, on a metallic surface near your work area. I often stick magnets on my light pole, for example, to serve as a quick place to stick a pair of scissor or an extra needle when I’m working. I could see sticking this needlebook there, open, for easy access.
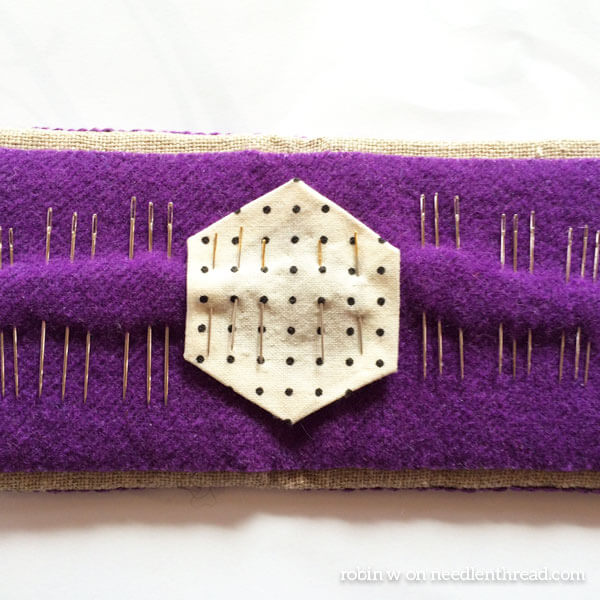
Robin also added an extra insert of fabric in the shape of a hexagon (the bee theme here!) on the inside of her needlebook.
This little contrasting bit of fabric is another clever idea! It can serve as a separate “compartment” or space for special needles or different sizes of needles and so forth. Or maybe pins, as opposed to needles. I always need a pin now and then when I’m stitching.

And then there’s the back!
Continuing with the bee theme, Robin used a hexagon frame to set off a decorative initial.
For the initial and the frame, she followed my stem stitch filling instruction on the Hummingbird project I worked last year.
She filled the background with a gorgeous lattice work, incorporating double lines of horizontal and vertical threads, evenly spaced and couched over with cross stitches. Then she worked French knots in the center of each resulting square.
Isn’t it lovely? What a great job of personalizing the whole piece!
Branch Out with Your Embroidery!
I hope this inspires many of you to branch out and personalize the projects you work on from other publications!
There’s nothing at all wrong with making improvements and adding your own embellishments to other designers’ works – it’s a great way to expand your embroidery horizons and to take risks that help you improve your skills.
Lavender Honey
If you’re not familiar with Lavender Honey & Other Little Things, do check it out! It’s one of my favorite e-books, and it contains over 20 project combinations with plenty of room for personalizing, mixing and matching, and whatnot. It also includes meticulous step-by-step finishing instructions, so you can make your own needlebooks, pin keeps, scissor pulls, and the like. This is what Robin had to say about my e-books:
I just love your books… I printed out almost all the pages in the alphabet book and all of the pages in the lavender and little things. I think you should periodically show a project from each book to remind everyone how wonderful they are. Especially the parts where you show how to make the stitch combinations. I love the alphabet letters and will make some of those this year.
Can’t wait to see what Robin does with the Stitch Sampler Alphabet letters!
Thanks so much, Robin, for sharing your lovely needlebook. I love seeing how you’ve improved on my design ideas and personalized yours so beautifully. You’ve reminded me just how much fun it was to create all the little projects in Lavender Honey & Other Little Things!
Now, everyone, go forth and create something beautiful with your needle and thread!
Have a lovely weekend!
Beautiful AND practical: the best combination there is!!
Hi Robin,
Beautiful piece of embroidery. Great ideas! Thank you for sharing.
Barbara in Texas
Really lovely work, Robin. Thanks for sharing, Mary.
Hi Mary, I just wanted to send a thanks for making us aware of the on-line classes on Craftsy! I purchased two online embroidery classes and love them! Your stitching alphabet has become a bible for me, I use it so much!!!
You have given us so many tools and great tips and info to guide us along. I feel like your website is an on going class Have a great weekend!
Beautiful! Robin did a wonderful job (cute, clever, and pretty!). Thank you Robin & Mary for sharing this with the rest of us. Great inspiration. So many thoughtful tips and ideas. (And if anyone still hasn’t purchased a copy of Mary’s “Lavender Honey and Other Little Things” publication, don’t hesitate. It’s full of beautiful ideas, guaranteed to make you smile.)
Dear Mary
What a lovely piece of embroidery I really like the back of the needle book with the embroidered initial and it is very personal and also very pretty. Well done Robin. I loved embroidering from the Lavender and Honey & other things e-book especially the bee hive I had great fun with that and they are practical as well as being pretty. Thanks for sharing Robin’s lovely bee hive and initial with us it’s really food for thought. I hope you have a great weekend.
Regards Anita Simmance
I love it! Great job, Robin, and thanks for sharing it, Mary.
Lovely piece, well worked! 🙂
Funny you should choose to talk about scaling up and down just now as I too have been doing that with my current project (which I *will* blog soon!!) I needed to use 2 of Trish Burr’s rose outlines, but about half the size and a different colour scheme. So, I’m simplifying the shading a little and using one strand of Piper’s standard silk floss instead of one of regular stranded cotton. It’s great to actually use some of the silks I collected a few years ago, although they do stretch, so I need to pay close attention.
Of course, sometimes one can just ause the same gauges, but more stitches etc.
Thank you for showing us your beautiful needlebook, Robin, and of course Mary. It is lovely work and I am beginning to feel myself inspired to take up needle and thread and make one for myself. Well done, you.
It must be so fun to see others bring your designs to life, Mary! It’s just lovely, Robin!
hi
thank you so much for all the tips and video in hand embroidery stiches I have learned a lot fron that
my humble request is can you also teach ribbon embroidery I know you are so busy person but please consider my request because you are a brilliant teacher.
The needle case is so pretty! You’ve inspired me. No more procrastinating for me..