


The other day, I filled you in on how I’m working the vines on the Secret Garden project, using stem stitch as a filling and shading it gradually by working with two shades of green in the needle at a time.
Today, I’ll show you some more vines and share some stitching tips that will help you with stem stitch filling.
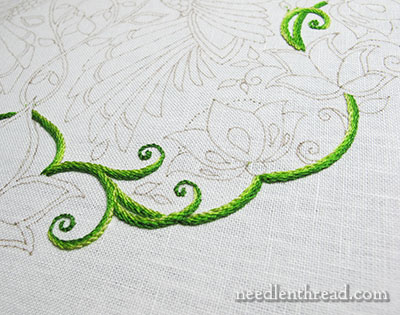
This section of vine is on the lower half of the design area for the Secret Garden Hummingbirds. I’ve embroidered the vines using stem stitch, filling the vine area with shades of green.
If you’re using stem stitch for this area as well, but you’re not quite confident with the stitch, review the stem stitch video a few times, to make sure that you’ve got the whole notion of stitch direction down.
Stem Stitch Filling & Spacing
First, a little about spacing with stem stitch filling.
Here’s the first line of stem stitch on a vine area. Since I want all my vines on this part of the design to have the darkest color towards the lower line of the vine (and on the curl at the end), I started with the darkest shades of green in the needle.
I worked the second line of filling next to the first, in the next lighter shades of green. The second line should be right next to the first, but not crowding into it – just worked next to it. You don’t want the ground fabric showing, but you don’t want the lines jammed so closely together that the stem stitches don’t have a little “elbow room” for their twist.
The stitches in each line are not necessarily right next to the stem stitches in the previous line. I generally off-set the stitches, by ending each stem stitch next to the “dip” where two stitches overlap in the previous line. So the stitches in the new line are not lined up exactly at the starting and ending point of the stitches in the previous line. They’re just slightly off-set.
Occasionally, you might end up with stitches right next to each other – in the scheme of the whole piece, that won’t be noticed. But you’ll find as you stitch the filling that you will naturally want to off-set the stitches in each line, because they just fit together better. You can see how they fit together as you’re stitching – go for that fit, but don’t pack each line in so closely that the stitches lose their shape.
Direction of Stitching & Stem Stitch
I can’t emphasize it enough! Pay attention to the direction of your stitching, when working the stem stitch.
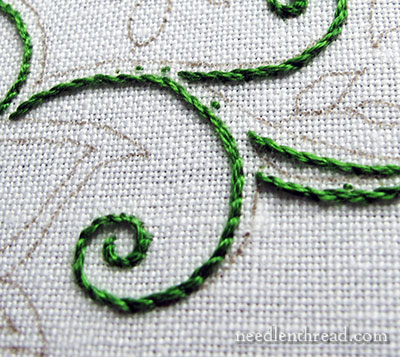
After finishing one line of stem stitch in the darker greens on the lower right half of my design, I moved to the lower left half of the design to do the same thing.
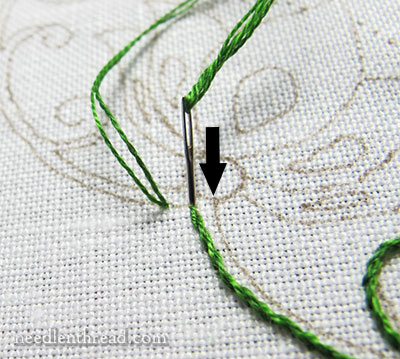
Since I’m working on the left half of the design, from the center of the design towards the left outer edge of the design, my stitch direction is now changing. I’m stitching from right to left, rather than left to right. The straight arrow in the photo above shows you the direction I’m going in, to work the first line of stem stitch.
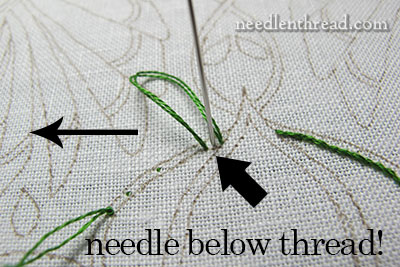
I’m taking my first stitch on this right-to-left line in the photo. Notice that the needle is below the working thread (the small loop of thread there on the front of the fabric, where I haven’t pulled the stitch all the way through yet).
Normally, with stem stitch, we keep the working thread below the needle (the needle would be above that loop of fabric, if I were stitching in the other direction). But to keep the twist consistent on the stem stitch, when working from left to right, keep the needle below the working thread.
This is very important, because if you do it incorrectly, your stem stitch filling will not blend together as well.
Stem Stitch on Sharp Corners
You can read this article on making sharp corners with stem stitch, or pick up the same information in the stem stitch video.
Here’s a refresher, to show how it works out in this design.
There are a couple areas on the design where the vines are somewhat scalloped.
Work your way to the point of the scallop, and end your stem stitch at the point of the scallop. Bring your needle up in the fabric a stitch length away from the point of the scallop on the intersecting line, and then take your needle down at the point of the scallop where your last stem stitch line ended.
Then proceed with the stem stitch, using this “backstitch” as your first stitch in the new direction.
In this way, you’ll achieve nice, sharp corners with the stem stitch wherever they’re necessary.
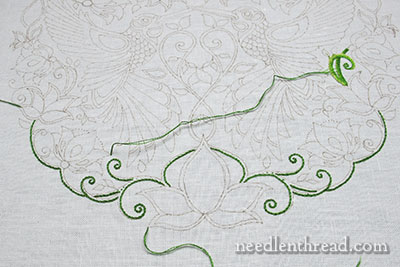
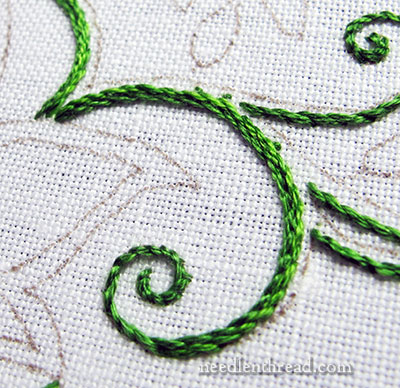
Here, you can see the first line of the darkest green in place on the vines in the lower half of the design.
With these tips, combined with the information on blending two shades in your needle, you should be able to move forward with filling your vines with stem stitch.
A little bit later, we’ll look at a couple tips that will make your stitching more efficient, too, and that will help you keep the back of your work nice and neat.
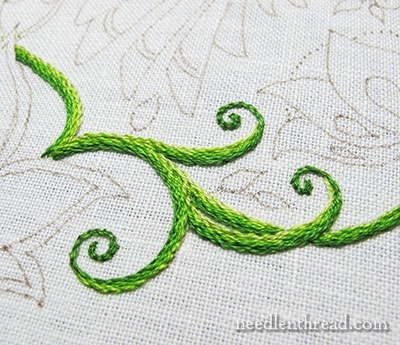
A couple points about my vines:
When I traced the pattern, I did not finish the vines in double lines with little round ends. Instead, I narrowed them to a single line and finished them in curls.
I wanted the majority of the curls on the lower part of the design worked in the darkest green, so I carried my darkest green stem stitch up around the curls. You might want your curls to be lighter. In that case, carry the lightest green up around the curls or around the rounded ends on the vines.
Questions? Comments? Suggestions? Feel free to have your say below!
If you’d like to follow this project from start to finish, you’ll find all articles pertaining to it listed in chronological order on the Secret Garden Embroidery Project Index.
I’m loving the posts on the Secret Garden, can’t wait to see all of the versions finished, you are amazing!
I was very interested in today’s post about the stem stitching in the vines, I am currently stitching your scrolly design in stem stitch. I took the design and mirrored it and oriented it on it’s point (kind of like a diamond). I was getting confused on how to stitch the scrolls and stay consistent with the stem stitching, today’s post was perfect!
I might have to do some revamping though, your shading is making me discontent with my single line of only one color!
All this detail is so timely for me, Mary, because of a new project I’m working on. I’m going to be incorporating needlepainting, layered stem stitch, and other stitches to re-create some drawings from my grandmother into quilt squares. If any turn out decent I’ll send a picture. Thanks for all the tips and explanations!
Mrs. Corbet,
Love the shading with two colours in the needle. I’ll have to give it a try sometime! Thanks for the tips and pointers. I appreciate it greatly. I’m still very interested in this project, though I’m not making it myself.
Sarah 🙂
Everything is perfect, and today I learned that yes, you really had to be careful with management points and positioning information of the needle and color work … Mary is a real delight. I agree with you on the end of the stems, the work is lighter and neater appearance. Many thanks, Mary
Dear Mary
The vines look lovely and Very informative tutorial on the stem stitch. I like the contrast of the dark and light green threads you used they really stand out. It is important to get the stitch direction right and the photo tutorial really explains how to achieve this. I can add this to my tips and techniques on stitch direction list. Thanks for showing us how to stitch correctly and sharing your tips on how to get the best out of your stitching.
Regards Anita Simmance
Hi there,
I am still lurking around the edges of this project. But I’m trying to improve my stitches before I tackle such a beautiful design. It’s a matter of feeling ready, I guess. Still, it is amazing how much I learnt just following your decision process. I think sharing your thoughts that way, letting us see trial and error, is the thing that helps most to beginners like me.
I have a question, too. I watched your stitch videos one by one and I’m working on stem stitch at the moment. But my stem stitches keep trying to come up from the fabric! I don’t know how else to explain it. But looking your perfect stitches, i can’t help but notice mine’s is not what it ought to be. I tried fixing the stress on my thread or shortening the stitch length. But especially in tight twirls they seem to intertwine each other and loose their natural look. Any thoughts or suggestions on that -from anyone- would be much appreciated.
Hi, Merve – what type of thread are you using? If you’re working with a rayon thread or something similar, then the stitches will tend to pop up from the fabric, unless you keep tension on it the whole time you’re stitching. -MC
Merve, in addition to the information that Mary sent about tension, I would urge you to do the project with everyone else. When it is complete frame it and hang it next to your normal work chair.
Treasure it as your first project, and use it to see how far you have come, even from one of the early parts to the parts as you are finishing the project.
Next, I would urge you to NOT hold off until your stitches match Mary’s. She has been doing her stitching for years and years. The more you practice the better your stitches will be, but it can still take years to even come close to matching Mary’s.
In my opinion Mary is willing to share her knowledge with us, so it can help if we view it as a class, with Mary as the teacher. I have been doing embroidery for about 60 years, self taught with the use of books. But nearly each of Mary’s blogs teach me new information. Once in a while it is one or two items, but other times it has caused me to start trying to do things Mary’s way. I have been happily surprized with how much progress I am making.
If you don’t already have a doodle cloth to practice with, make one! Just use a piece of scrap fabric. Practice a line of whatever stitch you are working with, and then do that stitch on your project.
I have yet to meet anyone born with an embroidery project in their hands, with stitches like Mary’s. This is a journey, but we are the ones who decide whether we are going to enjoy that trip, or whether it is torture.
Patricia
I think I am missing something. On the section where you are stitching to the left. Why would you not just turn the work upside down and begin stitching at the opposite end of the stem section? Wouldn’t it be easier to end the thread and start anew? Or are you trying to have the stitch directions in the two halves of the design be opposite?
Hi, Monique – the piece is quite large, the frame being 14″ square. If I turn the piece around, I’d have to reach across the project to stitch that section going in the other direction. There’s really no point in turning the frame when you don’t have to. The stitch is no more difficult to make in this direction – it’s just a matter of remembering the thread goes above the needle. Once you get used to the stems stitch in all its directions, it becomes second nature to put the thread where it belongs.
Concerning the stitch directions being opposite, they don’t look any different from either side of center. You can’t actually tell whether it was stitched right to left or left to right, because the twist of the stitch is the same (since the thread and needle are in the right place in relation to each other) and the stitch looks the same on the back.
Hi Mary,
Thanks for the detailed refresher on stemstitch filling. It always looks to great!
I’m hoping with this project that you might think about doing a joint effort again with the gal who created your Medallion Project eBook. That book was to full of detailed techniques, and from the looks of it, this Secret Garden project with the various versions, will rank right up there with useful information. Having this information in an e-book to print, or just to have in one place, would be most helpful…..
Thanks again.
Mary, again I must thank you! In my years of stitching I can not recall ever hearing tha information about stitching with two different floss threads at once. Since Friday I have been stitching away, excited about the possibilities that your suggestion points out.
I had not ever really understood the difference between a stem stitch and an outline stitch, but today’s edition of your blog it is suddenly very simple.
Wow! I wish I was following along on this piece, I can see I would learn so much. You are a great teacher!
Thanks, Irene! You can apply all the same tips pretty much to any surface embroidery project, really. So hopefully the information will come in handy even for those not stitching this particular project…
Good day!
So Ive been practicing my long and short stitch on a little piece before I start on the secret garden piece. Im having a problem with puckering. I use wooden hoops. I know you praise twill tape to keep the tension taut. Could the puckering come from me adjusting the fabric in the hoop, inadvertantly distorting the fabric that the l&s stitch then keeps forever in place? This has been driving me nuts.
Love the vine curls!
Hi, Veronica – First, I’d make sure your tension on your fabric is drum tight, and that the hoop you’re using is connecting to the inner hoop all around.
You want the tension of your fabric to be even all around the hoop – so avoid pulling just on one side of your fabric to get it tensioned up. Instead, try laying your inner hoop on the table, and closing the outer hoop enough that it just fits over the fabric and inner hoop, and then push it down evenly onto the fabric over the inner hoop. Then any other tensioning you need to do should be done equally on all sides around the hoop, only if necessary. Once your fabric is in the hoop satisfactorily, you can tighten the bolt with a screwdriver if necessary. If your hoop is very large (more than 7″), a wider hoop (wider rings, not skinny rings) will be more effective.
Then, I’d go with a lighter hand on the stitches. Don’t pull them too tightly – you want them to sit on the fabric lightly, not dig into the fabric. If you are getting little pull holes at the ends of your stitches, you’re pulling too hard.
Finally, address the density question. If you are stitching so that your stitches are very densely packed together, this can cause puckering, especially if the points above are problems. Your stitches should lie next to each other to cover the fabric, but not be densely packed together.
MC
Another point, Veronica – are you sewing the stitch or stabbing it? Stabbing the stitch is a much better choice, especially if you’re experiencing puckering.
MC
Hi Mary
I am gathering courage to start on the stem stitches. I have a practice piece which I have used for the stem stitch practice. I can see my mistakes and will be able to fix them on the final design. I have found the number of rows you have suggested fill the vines to overflowing. I was thinking of stitching less rows still using the 2 colours in a needle but maybe stopping at the third row. May I ask what you think of this?
Jude
Absolutely, Jude – do whatever “fits” and looks right to you. You might read the reply I wrote to Patsy on this post: https://needlenthread.wpengine.com/2014/02/secret-garden-working-out-the-vines.html
Hi Mary,
Thanks again for another wonderful post with so much information.
Just a quick question. I was wondering how much of this you would be duplicating on the other versions of this project. As I will only be doing one, I was going to stay a couple of steps behind and watch. Your work is so beautiful and I know the finished product will be magnificent, but I don’t want to go ahead and find that I would prefer stitches or threads you incorporate into the next version.
Yes, I could wait, but I have the linen all prepared and the pattern traced and am itching to go, but don’t want to regret not waiting.
I’m sorry if I seem impatient and probably shouldn’t ask, but…
Hi, Lorraine – It’s quite alright to ask! I’m delaying the start of the next one right now. I’m wavering between starting the whitework piece next or the silk. Truth is, I’m still waiting on some silk threads I want to test for the silk version. I can tell you this much about them: the approaches will be different. The whitework will involve more textured stitching, some pulled and drawn work, and the like. The silk – well, I don’t know how to explain it, really. It’s not going to look like this one. Some of the stitching techniques may be the same, but I’m interpreting the overall design differently. Let’s put it this way: black is going to figure prominently in the design. With the silk version, I want to pay tribute to the artist’s original intention. ~MC
Hi Mary, I have been working the secret garden project and am almost finished with the stem stitching like a mad man and am finished with this portion. I look each day with excitement to see if you have posted the next portion of the lesion . Thank you so very much for doing all that you do for free for the world of embroidery. PS. I have bought three of your patterns . Thanks. David
Hi Mary, I’m trying to follow the SG project. I’ve now managed to trace the pattern, fix the fabric onto a frame and have just completed the first couple of vines. Its not as neat as yours, but for my first surface embroidery for many years I’m pretty pleased with it.I’d really love to use some shiny beads on the birds and some of the flowers (I’m aiming to keep the greenery quite muted) do you think that might work?
Sure, Jacky! Why not? Sounds fun!
Hi Mary!
I have been following your blog for weeks now and it is so inspiring! I actually decided to stitch the Secret Garden project along with you. This is my first really serious embroidery project that uses more than 5 colors and isn’t on a handkerchief or pillow. I am a little nervous and out of my depth, but having lots of fun!
I had a question for you that has really been causing problems for me. The vines that “branch off” from other vines separate from the main vine(s) so smoothly and naturally on your project. I have tried a few different ways of stitching these “offshoot” vines on my project, but the joins I do never work out. They all look clunky and unnatural.
I have looked at all of your different “vine” Secret Garden posts and can’t find anything about these vine joins. This post was the only one where I could see anything about it, with some of the offshoot vines I am describing beginning to be stitched in the 2nd and 3rd photos of this post.
Mary, how do you get your vine joins to be so smooth and natural? I know this question is a little late, but I would truly appreciate any help you can give. This part of the project is really stymieing me!
Thank you!
Kate
Hi Mary,
Regarding the stem stitch, it seems like if I start from the bottom of a branch and went up to the top one row left to right then when I get to the top of the branch I will come back down without turning my work and just put my thread the opposite way either below my needle or on top of my needle. I don’t stop and restart the second row where I started the first row correct?
I hope this makes since and thanks for your help. Betty
That’s up to you! Some people find it easier to return to the beginning and start a new thread, because they they aren’t stitching “against” the previous row by coming up between the previous row and the working thread. But yes, as you describe it is how you do it, if you’re coming back down the row – just put your thread in the opposition situation to the needle.