


After selecting colors and threads to get started with, I was super eager to get into stitching on the Secret Garden project.
You might think that I’d start with the hummingbirds, since they’re in the middle of the project, and they’re the focus of the project. After all, a jeweler starts with the stone before creating the setting, right?
Well, call it backwards, but I’m starting with the setting, and specifically with the vines, because they are the continuous force in the design. They go everywhere. They hold it all together.
Besides, I’m still ruminating on those hummingbirds. I haven’t conquered them yet in my mind, and working on the rest of the project will give them time to work themselves out in my head.
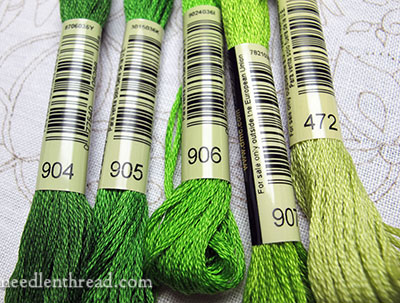
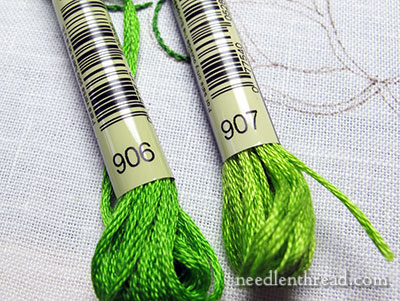
These are the vine colors I’ll be using, in DMC. Notice how they all belong to the same string of numbers (except the last one on the far right), and that the lower the number, the darker the color. This is a very convenient way to pick out shades. I wanted a nice grassy spring green, so I picked 906 out of my thread drawer, and then I selected the colors in the same number family right around 906, knowing they’d give me a good range of shades.
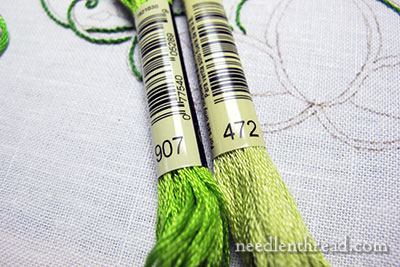
But I needed something that springs out a bit in a lighter yellowy green, so I picked that 472 on the right to top off the greens.
I wasn’t sure if the 472 would work, but why not try it, right?
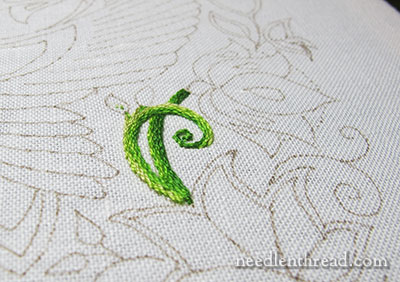
I selected a small area of vines on the project – it’s on the outside to the lower right of center – where I could test some stem stitch shading without having to complete a whole long section of vinery.
I think the 472 works just as I wanted it to work.
The stems are “thickened” quite a bit by the embroidery, but on this version, I’m happy with that – it’s the look I’m after for the 101 version of the project.
Now, you might be looking at that little section of painted vine, thinking, “I thought this was the beginner project. That looks like complex shading.”

It’s not complex shading. It’s simply stem stitch, worked in rows, using two shades of green in the needle.
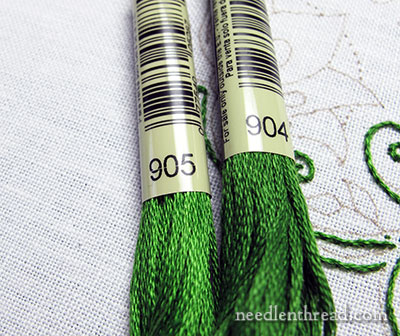
For this section, I started with 904 and 905, one strand of each, in the needle. I worked stem stitch along the lower edge of the farthest back section of the vine (the vine part that doesn’t cross over).
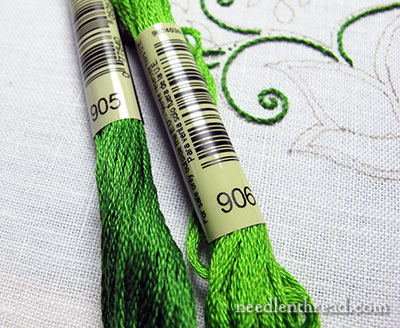
Then I combined 905 and 906 in the needle, one strand of each, and worked that for the next line of stem stitch, right next to the first line, on the farther back part of the vine, and I also used this combination for the inside lower edge of the cross-over vine.
Then I combined 906 and 907 in the needle and continued to fill both vines.
And then I ended with 907 and 472 in the needle, which took me to the other outside edge of the vine, to finish filling.
On the top edge of the vine that crosses over, I finished with one strand of 472 in the needle, because my design line was just barely visible, and I wanted to highlight that top vine with a little brighter color.
Mastering Stem Stitch
I intend to work all the vines in stem stitch, but you might opt for a different stitch.
These are the reasons I like stem stitch for the vines:
1. I can make the line thick or thin very easily, by increasing or decreasing the lines of stem stitch filling.
2. I can shade without doing anything more complex than stitching the stem stitch.
3. Stem stitch has a nice texture. It’s not super-textured, but it’s not smooth and super shiny, either.
4. For beginners, it is much easier to work a stem stitch filling than it is to work a perfect satin stitch or a long and short stitch.
Stem stitch is one of the basic embroidery stitches, but there are some tricks to it that are good to master if you want to create a beautiful stem stitch line.
The first trick is to master the stitch itself, and in order to help you do that, watch the stem stitch video.
The second trick is to understand that there is a difference in the stitch when stitching from left to right or from right to left. The difference is explained on the stem stitch video page and in the stem stitch video.
As you watch the video, notice how the thread position changes in relation to the needle, depending on the direction you’re stitching. That’s what you need to master!
Lefties and Stem Stitch
For left handed stitchers, if you are “stabbing” your stitching rather than “sewing” it (that is, taking the needle and thread all the way to the back of the fabric before bringing it back to the front, as opposed to “scooping” up a piece of the fabric), then you can stitch the stem stitch in the same way a right handed person stitches it.
If you are “sewing” the stitch (scooping the fabric), then you’ll need to watch the video and concentrate on the top part of the rectangle, where the line is traveling from right to left. Notice that the thread is above the needle at that point. That’s the method for lefties – working from right to left, with the thread above the needle, if you are “sewing” the stitch.
Whether you are a right or a left handed stitcher, if your fabric is taut in a hoop or frame, it’s better to stab than to sew, because you won’t distort your fabric, and your stitches will sit up plump and pretty on the top of the fabric.
So that’s my starting point – stem stitch, shaded by working with two shades of green in the needle at one time.
Next time we visit the project, we’ll look at some tricks to help you to stitch efficiently, to keep your stem stitch neat, and to keep the back of your work tidy. In the meantime, a nice thread give-away coming up! Keep an eye out!
Questions? Comments? Suggestions? Feel free to have your say below!
If you want to follow along with the Secret Garden Hummingbirds Project, you can find a list of all the articles relating to the development of this project in the Secret Garden Hummingbirds project index.
Hi Mary, I’m gazing jealously at your vines – I love the shading. You see, I’ve been working on a crewel piece, using stem stitches for the stems and it’s come out looking a bit flat. If you’ve got a spare minute, I’d really appreciate it if you could take a look and tell me if there’s any way to fix it rather than ripping it all out? It’s the latest blog post: http://thecraftersapprentice.blogspot.com
thank you x
Hi, Wendy – I think a higher contrast between the shades, and a broader range of shades, in the stems would help lift it a bit, with more area devoted to each shade. I’m not sure what to do at this point. It depends on how you really feel about it. Are you at the point where you are saying, “I’m definitely going to rip this out if I can’t find an alternative?” Or are you still willing to leave it as is?
If the former, then here’s something you could try, but I don’t know for sure how it would work. You could take a lighter shade and maybe work a little sketchy cross hatching down the stems, perhaps on one side (whichever you consider to be the lighter side) over the stem stitch. If you choose to do it off to one side or the other, maybe consider a smaller area of cross hatching in a slightly darker shade than the prominent shade, on the other side. If you look up cross hatching in sketching, you’ll see what I mean.
The difficulty might be, though, that the stitching there is already very dense. But it might be worth a try. Again, not sure how it will work, but lifting the whole stem with a little lighter color that contrasts a bit more with the main color might help.
Another thing that might be lending to the flat look is the stem on the right, coming off the main trunk. See how the dark line from the main trunk runs down the right side? And then that branch comes off it? Now look at the one on the left, a little lower down. The one on the left, a little lower down, sits in front of the main trunk, and the transition between the two is quite nice. Maybe a similar approach on the right would make the overall “tree” part look less flat?
Of course, you could just soldier through it – you might find, when it’s finished, that it looks just fine.
Love those blues in the flowers! They really pop out!
How do you like working on the q-snaps? Do you find they hold your fabric taut enough? If they aren’t holding your fabric really drum tight, you might try adding some strips of felt into the area where they grab. The few times I’ve worked with q-snaps, I found that adding something to the grabby area was necessary to keep the work really drum tight. That might also help a little with the puckering, too.
MC
I don’t have Q-snaps but heard they don’t hold fabric taut. I was wondering if you could cut some of that “open weave rubbery shelf lining” into strips to put between the frame/fabric. That stuff is wonderful for things you don’t want moving, like my laptop, etc. I don’t know if the stuff it’s made out of would hurt the fabric (as opposed to cotton, etc)though so I would take the project out if not working on it for a while. Just wondering.
It’d probably be worth trying! I’m not a huge fan of q-snaps, myself, but I know other people just love them, so anything that will make them work better and provide better fabric tension sounds great to me! ~MC
Mary, I’m just loving this project series. I am a beginner and find your suggestions very helpful. I like the simple way you have explained the shading, it really adds a new dimension to the piece. Thank you for listening to your readers, great ideas!
I am so excited to get started on this but will have to play “catch-up” because I am still waiting on the ground material.
Dear Ms. Corbett,
I only recently came across your web site, and it is a delight. I enjoy your daily messages immensely.
I am in awe of your skill; your work is exquisite and so very beautiful. I look forward to reading your daily messages.
I thought I was an experienced embroiderer. but I learn something new every day while reading your words and examining the excellent photos of your current project.
Thank you!
I LOVE green !!!! ANNIE
Will you be using some flat stitch in this project? I just prepared a talk on the flat stitch for my EGA chapter and I found it a misunderstood and little used stitch. I’d like to send you my handout (9 pages).
Hi, Susan – ah, flat stitch is a great stitch for leaves, come to think of it. And there are plenty of leaves here… I may incorporate it. You’re most welcome to send the handouts. I’d love to see them. My email address is mary (at) needlenthread (dot) com. Thanks for the suggestion. – MC
Mary,
I really like the colors you picked out and thank you for showing us how to do the shading with the stem stitch.
Maureen
Did I miss something? When using DMC floss for the stem stitch, did you separate the floss , using one strand for the stem stitch or did you use the floss as it comes from the skein? (Using all six strands of the floss?)
I’m using two single strands, one of each shade, in the needle at a time…
Mrs. Corbet,
Happy St. Valentine’s Day!!!!!!!!!!
I am sooooooooo thankful for you and your website and everything you put on it! Just to think, I probably wouldn’t know a thing about surface embroidery without your help! You are amazing!
God bless you!
Thanks, Sarah 🙂
Thanks, Sarah – glad you’re enjoying it!
Hello Mary
Please, do you do embroidery over the “normal” design, or over the design you reduced at 90% ? Perhaps I forgot something ? Thank you so much for everything you give each day, and so I can learn …
I used exactly the same size design as the one in the book. -MC
Mary Love the way you do your shading. Question I do a lot of Canvaswork Can I shade the same way with two strands of different colour in my needle would it work the same?
Absolutely, LaRaine – if you use stranded cotton in canvas work or cross stitch, you can definitely shade this way. With canvas work and cross stitch, though, a laying tool will help keep the threads flat and smooth, which is more desirable in those techniques than with stem stitch in surface work. If you look at Irene’s comment and my reply, you’ll see what I mean. ~MC
You took me by surprise when you said you were blending floss colors together. I do that often in cross stitch for a textured look. I never considered it in embroidery. Your colors are very close together so it may not be an issue but I wonder if you make any effort (laying tool?) to have the colors show up more evenly. When I do cross stitch with blended threads I fuss and fume because it seems one color always wants to lay on top and hog the show. LOL
H, Irene – with stem stitch in surface embroidery, it’s characteristic that there’s a twist in the thread. And I think that twist helps to enhance this kind of shading, so I don’t use a laying tool. I do, however, keep tension on my working thread (usually with it looped around a finger) while I close the stitch (pull it to the fabric) just to keep the threads from separating and one going into place before the other. So I don’t mind the twisting, but I don’t want one strand to pop up higher than the other, and tensioning the working thread as the stitch goes into place helps avoid that. I like the way the colors mingle this way, and I think it helps it look a little more natural and less rigid. Hope that helps explain it! ~MC
Two different threads on the one needle- genius and so obvious when you explain it. And using threads from the same number group? Why didn’t I get that years ago? Thank you Mary for one article which gave me a great leap forward in blending colours
Dear Mary
I really like the green thread colours you have chosen for the vines lovely and the different shades certainly enhance the vines. I like the way you have chosen to use a selection of the same family coloured thread and intertwined them on different areas for different effects on the design, really nice. I must remember this on my next project as I can see it enhances the design as you are using just a small selection of same colour threads but mixing them in different areas which gives a contrast to the pattern. Thanks for sharing this with us. Have a great weekend.
Regards Anita Simmance
Hi, Mary,
Well, I did sort of gulp when I first saw your project today! Your vine stitching looked very complicated. Thank you for teaching us another technique, step by step. Your detailed explanation makes it look easy. Thank you, too, for the tips on mastering the stem stitch.
I can’t start stitching quite yet – still gathering supplies – but this gives me a chance to read about what you’re doing and really absorb it before I give it a try. In the meantime, I can watch your video again and practice my stitches.
Thank you so much! Have a great weekend!
Lauri
I love the greens even 472. They are wonderfully bright and cheery– a very refreshing palette. Also, wanted to thank you for the two Stumpwork book reviews. I love that technique and appreciate getting a chance to “look” at these books before making a decision to purchase. Thank you!
Hi Mary,
Are you going to start version 102 alongside 101? I want to get going but not sure which version to go with. I have been thinking of doing the birds in silk to get a nice shine and a contrast to the background. At the moment too much planning and no stitching!!!
Thanks again for your generosity in sharing your ideas and skills with us all, we will have to have a show and tell at the end of the project.
Hi, Lizzie – I’ll start the silk version a little farther down the road. I’m still working out the silks and a different approach to the design. The silk version will not be quite like this one – I’m approaching it differently. So I need to work out the threads and some techniques first, to make sure that what I envision will actually work! ~MC
I am a beginner beginner and thrilled that i found your website. So far i am just learning the stiches but gain so much knowledge from your well written detailed stories about your beautiful work.
I am “hooked” already!
Sincerely,
Alene
Alene, when I started out in surface embroidery I decided to go through each video of Mary’s How To Videos. I stitched along with her, stopped the video and reworked the stitch again until I was satisfied with my results. Not only will you gain experience but a reference of what stitches look like. Sort of a Sampler, if you will.
Hi Mary! I am so excited to get started with this project… One question, and I apologize if I missed it, but what size needle are you using? Thanks! Love the greens!
I’m using a #8 crewel needle here. Didn’t mention it, though. The sizes of needles vary somewhat, depending on whether it’s an English needle or a French needle, so it depends on the brand, but if you shoot for a 7 or 8 you’ll be good.
Ooh gosh it looks great, the stems you did. I went to JoAnn’s and bought a ton of floss yesterday, and I think I have all the colors you used. I still have to wrap my new embroidery hoop today, I found the cotton twill tape yesterday by the yard. Previously I’d only found the packages which were polyester. So I’m about ready to start, and the beginning is not too intimidating. I was practicing long and short stitch yesterday after watching and reading your tutorial. The L and S stitch is what I feel intimidated about, and I know that will be coming. Cant wait to start and see some color on the piece.
Hi Mary, When you stitch with two colors of thread, do you attempt to always have the colors laying the same for every stitch (for example: darker on the bottom and lighter on the top)? Or do you let them fall where they may?
Is there some trick to control the way the threads lay? I often have a problem in this area.
Thanks for your wonderful web site. I am encouraging my sister stitchers in EGA to follow your blog. It is very informative, even though I have been stitching for many years, I learn something new every day.
In surface embroidery, I don’t really worry about it, especially with stem stitch. The twist of the threads and the stitch are characteristic of stem stitch. With cross stitch or canvas work, you’d pay more attention to that and use a laying tool to achieve it. You can see Irene’s comment above and my response for more info… MC
I love today’s post! Actually I enjoy every post, but now you are teaching me something I’ve needed to know. As a weaver, I fell into embroidery in a haphazard manner because I’d always liked vintage embroidered things and because it’s so easily portable. I would love to be able to do really precise work, but given my vision problems, bigger is better. Even so what you share with your viewers/readers can be transferred to a more mixed media with ease. Thank you!
Mary,
You are never afraid of color and know how to use it well in exciting ways. I’m afraid of color so this project will take me out of my safe,
neutral palate.
Stem stitch is what I was going to use also for the vines. Can you show a close up of the end of the vine where it curls a little? I’m not sure how to fill that in.
Thank you,
Wendi
Hi Mary,
When you are working on an embroidery that has a mirror design how do you work out your light source? In the sample of the stem work it looks as if it is coming from the top left. But in order to get it rounded you would do the opposite on the other side. Am I correct? Or in this instance just forget your light source and work each element to get its best dimensional look. Thanks,
Barbara La Belle
Hi Mary, I was really glad to read that you are still “ruminating” on the hummingbirds since it is their design that is keeping me from joining you on this project. I love hummingbirds! I keep coming back to the beaks and throats. Their beaks should be very long and very narrow. The throat in the drawing almost looks like a mouth/teeth. Their throats are where they wear their beautiful field markings. I guess I have to play with those parts of the drawing and decide if I’m good enough to alter those parts and then what stitches would fit (e.g., long/short satin stitch for the throat?).
Mary,
Thank you so much for doing this project!
Question. If I have completed one row of stem stitch on a stem/leaf, and want another row of the same color next to it,…should I just turn around and stitch right to left, or should I end my thread and start another row at the beginning?
Thanks.
Sally
We can feel, almost touch the roundness of the rod. Know how to give life to a work is not easy thing. Thank you for putting your talent to the scope and demonstration to support us all. I also became “addicted” to your letter and now I use Google translation … THANKS
Mary,
Soooo, just to clarify…..You have made three rows of stitching on the stems? Two double colors & one single thread color? Or three rows, three double stitches and the fourth a single?
I think I’m over-thinking and afraid to begin for fear of messing up. But I will for sure start.
Hi, Patsy –
Much depends on your stitch tension, the size and depth of your stitches, and even your design lines. Instead of figuring how many rows I used, you need to work with what fits on your design.
For this explanation, let’s name the color shades A, B, C, D, and E, with A being darkest and E being lightest.
Start with A and B in the needle work the stem stitch exactly on your design line. Then, with B and C in the needle, work another row right next to it. Then, with C and D in the needle, work another row. At this point, you might not need a fourth row – your design line might be filled up! But in some areas, you might, if your lines were not perfectly even all along. Wherever you need a fourth row, work D and E in the needle, and if you need a fifth row, work with just E in the needle. In my case, I wanted to highlight that area with the lightest thread, but I really didn’t have enough room to work with two threads in the needle, so I just used one strand of E.
In some cases, you can start with B and C in the needle as your darkest colors, and then work C and D, and finally D and E, or just E and E. It depends on the look you want and the amount of room you have to fill. On the main scrolly parts on the lower part of the design, I used A and B as my first starting colors, and I was able to work up to D and E without a problem, working four rows. You can see the results here: https://needlenthread.wpengine.com/2014/02/secret-garden-more-vines-stitching-tips.html
So it really depends on what you can fit. If you don’t think you can fit all four rows, then you’ll adjust the colors accordingly. You might jump to D and E and skip C and D, although that would make a more noticeable line in the colors. Or you might skip A and B and start with B and C as your darkest colors.
Hope that helps!
~MC
I read with great interest the lower vine shading article today. How do we think of shading for this hummingbird piece: Should we assume there is a light coming from a certain angle? The way the lower vines are shaded it looks like the light is full on the center with the bottom in shade. Thanks for your help, sandra huzyk
I’m thinking more top down, but center out works, too…
You have done a wonderful job of writing about stem stitch – and the videos are great. I am using stem stitch to fill in a shape in my embroidery, and it is working very well. I am stitching a drawing I made of my ginger cat, and was trying to think of a good way to shade some of the darker areas. Your idea of putting two colors of thread in the same needle is exactly what I needed to know. I haven’t tried it yet, but I am sure it’s going to work. Thank you for taking the time to explain details so clearly. I am inspired by your website.
Mary, your work is beautiful — thank you for all the great information you share in your emails.
Rita
Your shading tips for stems has another application. I like to start needlepoint with a painted canvas and I change things around as I go along. My past attempts at shading tulips never satisfied me. Now I know how to handle shading those flower petals. I had already used and liked the effect of outlining a single blossom with a fine line of thread to “crisp” up the edge. Since I use wool 99 % of the time, my outlining is,
usually done with buttonhole twist laid rather loosely over each stitch so it doesn’t bury it’s self in the wool.
This isn’t necessary for each flower. Sometimes just using a quite a bit darker wool thread on the outside does the trick. It’s your canvas and your call! Following multiple hand surgeries, I have found that wool is easier on my hands and I am blessed with a great stash of DMC Medici.