


Gingham lace, chicken scratch, gingham embroidery, snowflake embroidery, Depression lace – whatever you want to call it, embroidery on gingham, using a combination of cross stitches, double cross stitches and laced stitches, is an endearing, easy, cheerful type of needlework!
While it’s often seen worked on 1/4″ gingham or larger, I like working gingham lace in miniature, on 1/8″ gingham. The smaller gingham makes for a more delicate design that looks great on children’s clothing, household goods, and other accessories made out of gingham. Anything we do here, though, can also be worked on 1/4″ gingham or larger – just remember to increase the weight or thickness of the thread, to compensate for the larger stitches.
If you’ve never dabbled in chicken scratch but you want to – after all, summer is a perfect time to sport some gingham for picnics and parties – you’ll find several tutorials and patterns here on Needle ‘n Thread for gingham embroidery.
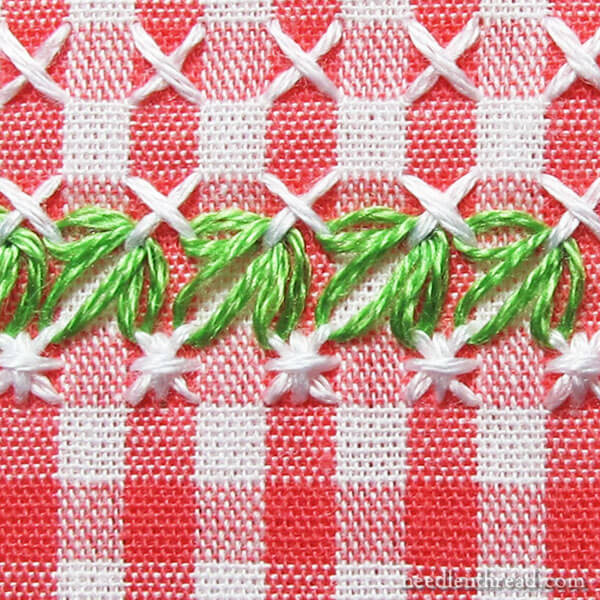
Today, I’ll show you step-by-step how to work a leafy border in gingham embroidery, that’s perfect for dressing up your chicken scratch with a little color and flair!

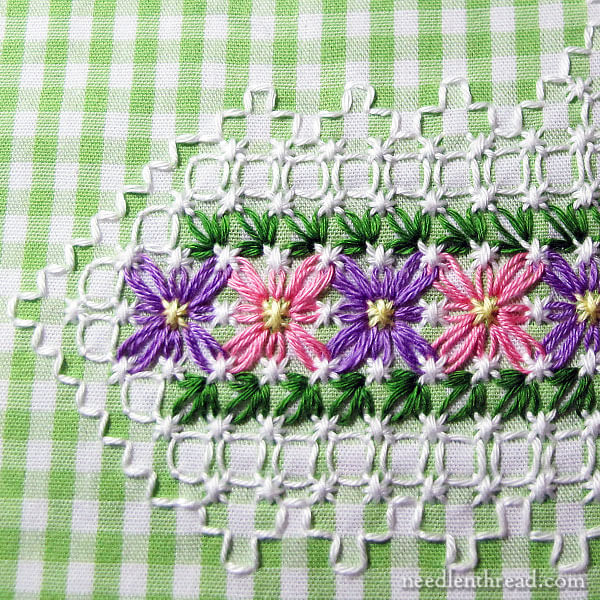
While I’m calling this particular design element a leafy border, you can always change the color up and make it a floral border or just an interesting border for chicken scratch embroidery – it doesn’t have to be floral, it doesn’t have to be leafy. You can also mix up the way you lace the petal shapes or ovals, to produce other designs.
Once you know the principle of what’s going on with the stitches, you can play around with the concept and develop your own variations.
Materials
The materials used for this particular tutorial are:
1/8″ cotton gingham check fabric
DMC stranded cotton in white and green
#8 crewel needle & #24 or 26 tapestry needle
Step-by-Step Instructions
To begin, you’ll need to know how to work the two basic stitches that form the foundation of all gingham embroidery, the cross stitch and the double cross stitch. They’re not difficult!
Foundation Stitches for Gingham Embroidery
For this particular design, I’m working my cross stitch and double cross stitch foundations in white on the darkest squares of the gingham.
Where you choose to work your foundation stitches, and what color you use to stitch them, will change the whole finished look of your embroidery, so you might test different approaches to see what look you prefer.
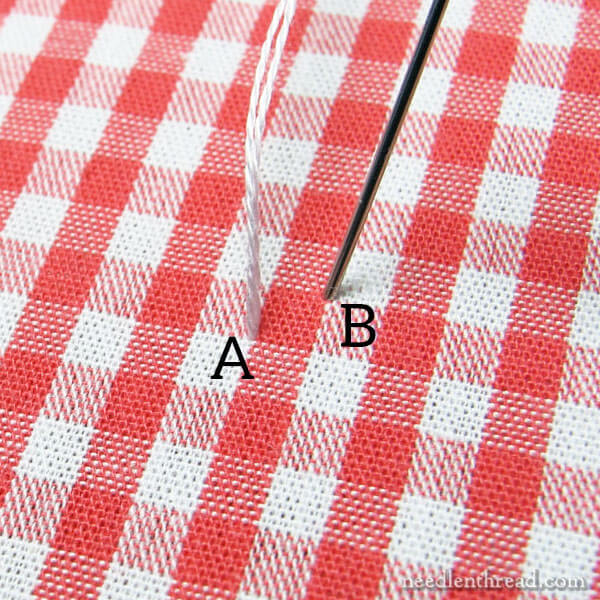
Using a crewel needle with two strands of DMC floss in it, bring the needle and thread to the front in the lower left corner of the square (A) and take it down in the upper right corner (B) to create a diagonal straight stitch.
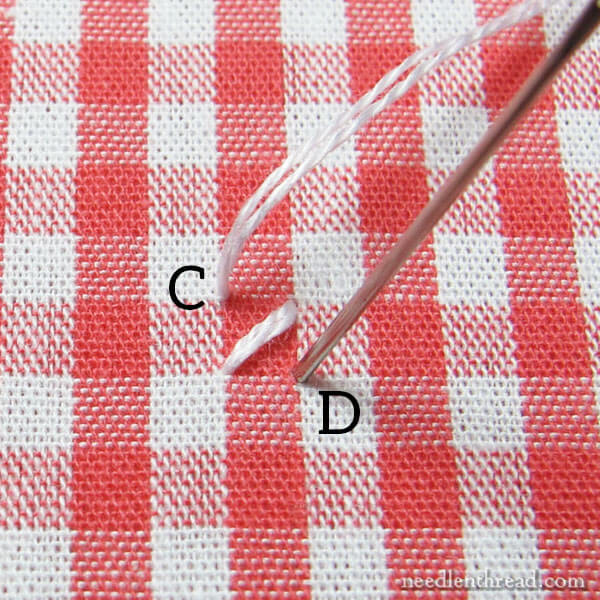
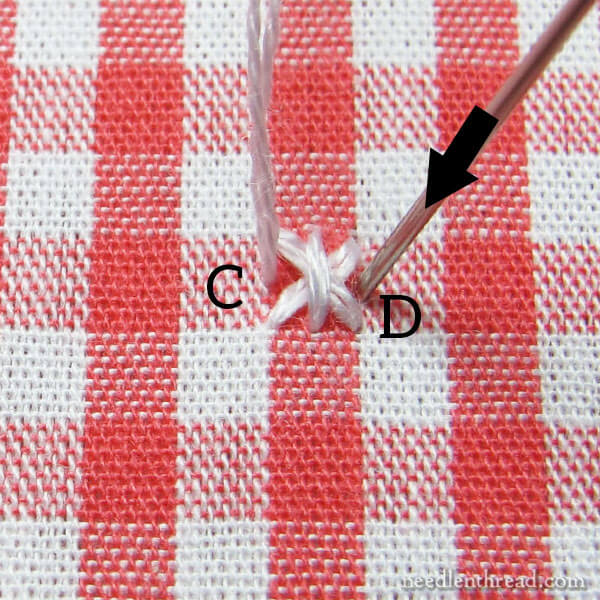
Bring the needle and thread to the front at C and take it down at D, crossing over the first diagonal straight stitch to form an X.
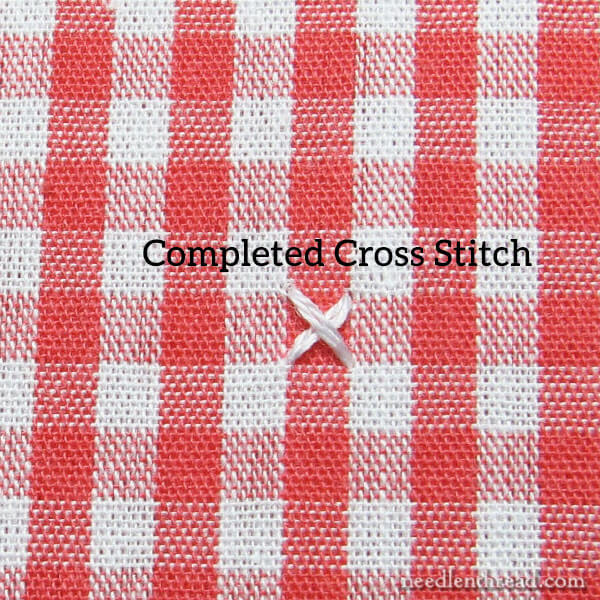
Voilá! You’ve completed a cross stitch!
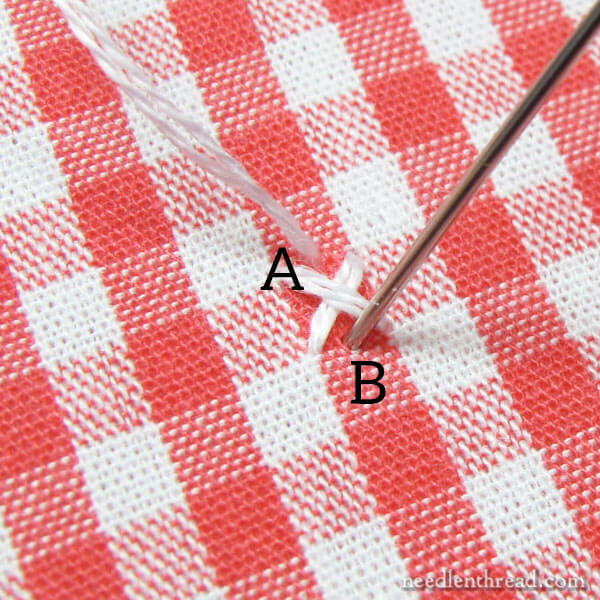
For the double cross stitch, work a vertical straight stitch from the top center line of the square to the lower center line of the square (A to B), over the middle of the previous cross stitch.
Work a horizontal straight stitch perpendicular to the first, starting in the center side of the square and crossing over all stitches to the opposite center side of the square.
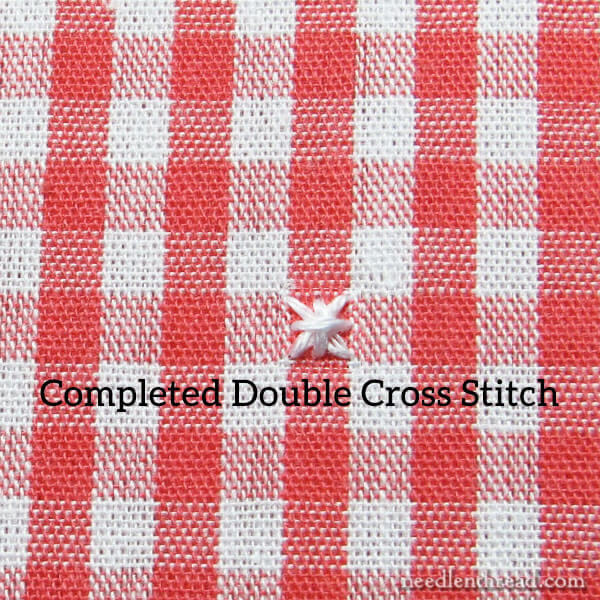
Voilá! It’s a double cross stitch!
You’re now a pro at the foundation stitches for gingham embroidery, so let’s move on to the leafy clusters.
Looped Leafy Clusters on Gingham Embroidery
To work the leafy border, you’ll need to work one line of double cross stitch on the dark squares at the outermost edge of the area you’re embroidering. Above that line (skipping one line of gingham squares), you’ll need to work at least one line of regular cross stitch directly above the double cross stitches.
In the photo below, you can see what I mean. I’ve worked several lines of regular cross stitch above the double cross stitch boarder, but technically, you only need two lines of foundation stitches to work this technique.
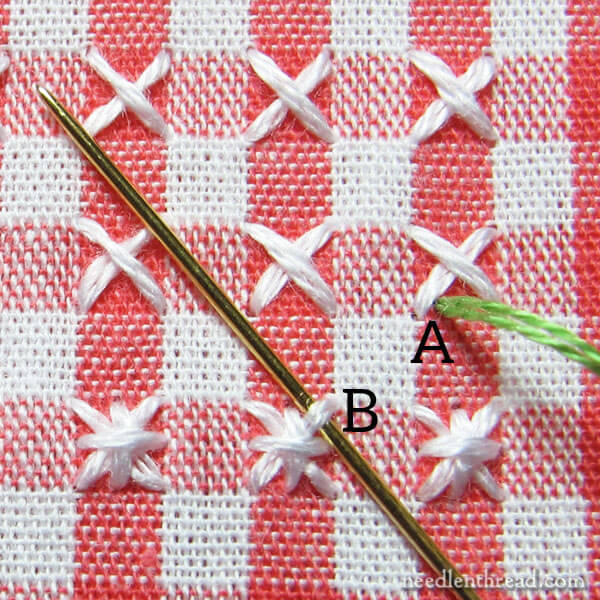
Switch to a tapestry needle and thread up two strands of green DMC floss.
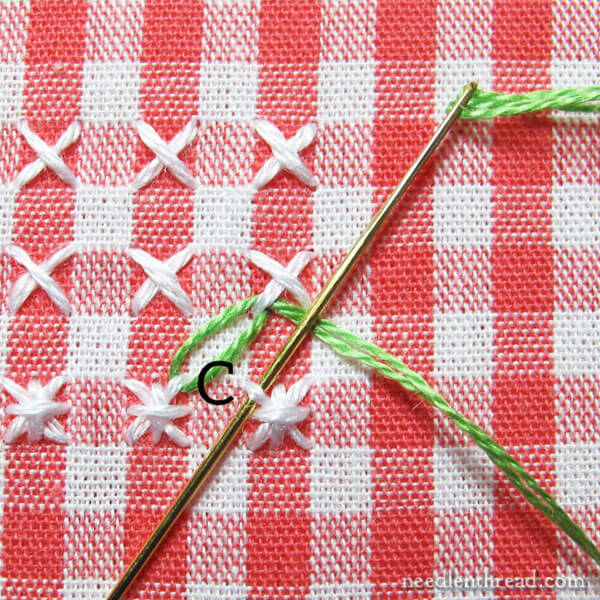
Bring the needle up at A, behind the lower left leg of the first cross stitch in the row above the double cross stitches, as shown in the photo above.
Take the tapestry needle under the upper right leg of the double cross stitch below and over one on the double cross stitch row, at B, as shown in the photo above. You won’t pick up any fabric here – you’re just running the thread under this leg.
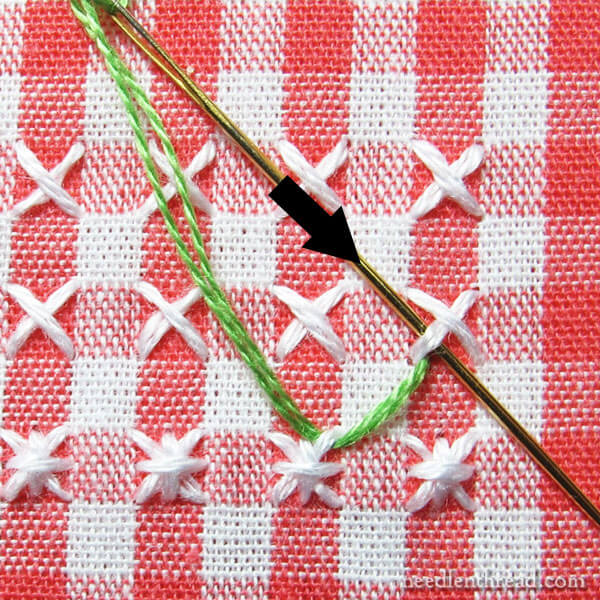
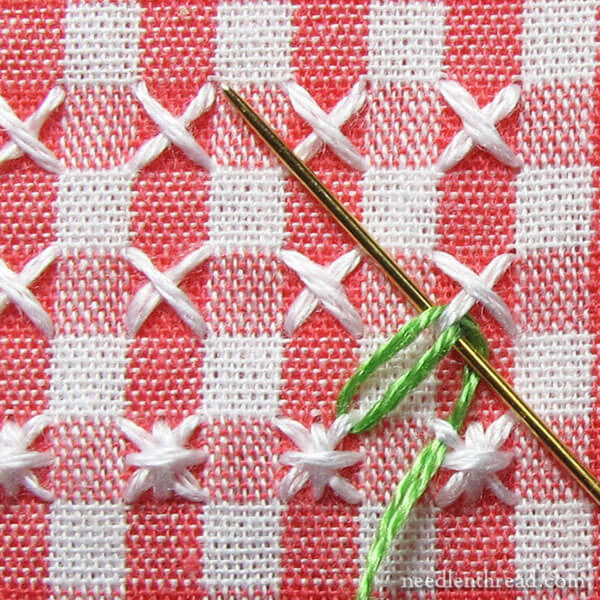
Return to A from the top left, and run your needle under the leg, without picking up any fabric, as shown above.
Now, run your needle and thread under C, the upper left leg of the double cross stitch directly below A. Don’t pick up any fabric!
Return back to A, passing under the lower left leg of the cross stitch, moving the needle from lower right to upper left, as shown above.
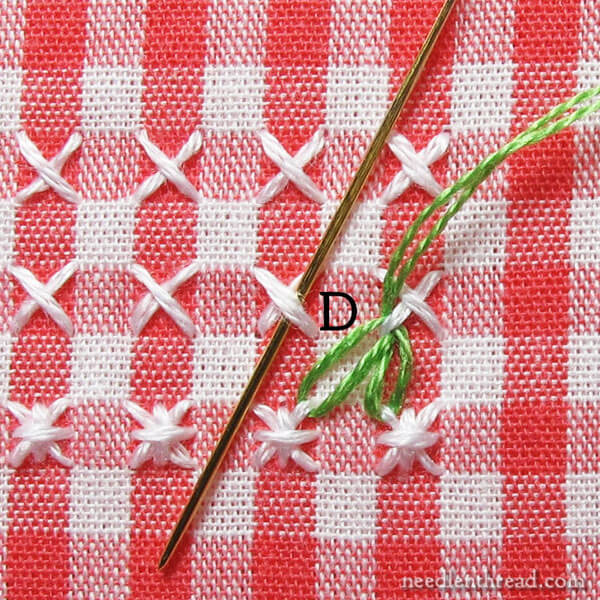
Take the needle and thread behind D – the lower right leg of the next cross stitch to the left – to create the last loop on the three leafy petals.
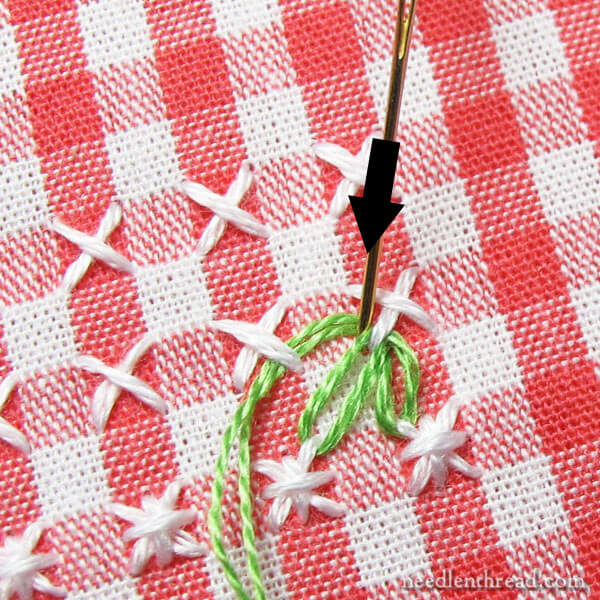
Now, take your needle and thread down into the fabric behind A, to complete the three petal loops.
Move to the next cross stitch, starting the next group of three petals behind the lower left leg, and repeat the process.
Continue down the line, creating as many groups of three lacy loops as necessary to finish your border.
Once you get the rhythm down, creating the three laced loops goes quite quickly!
You can use this lacing loop technique to create all kinds of petal-like arrangements in chicken scratch embroidery!
More Information on Gingham Embroidery
For more information and tutorials on chicken scratch, plus several free patterns that include these leafy clusters, feel free to visit my Gingham Embroidery Tutorial Index, here.
Coming up, I’ll share a free pattern for a gingham watermelon design that was previously published on DMC, but has been archived over there. I’ll give you a brief run-down on how to work it, too, in case you want to embroider your own gingham watermelons for summer decor!
Hope you enjoy it!
I just LOVE these tutorials you do. I haven’t done Chicken Scratch in several years but you brought back memories of the pleasure in doing in and makes me want to use some of that gingham I have laying around to re-visit an old friend. Thank you for these. I really enjoy them ALL!!!
Thank you, Mary, your tutorial photos are always so good!
Hi Mary,
I find the names of stitches interesting. The double cross stitch you show I learned as a Smyrna stitch in needlework. So many names for the same stitch!
That’s right! In most chicken scratch instructions I’ve seen, they call it double cross stitch. I’ve also seen it called “star stitch” in one old pamphlet. It’s essentially the same stitch that, in needlepoint, is called the Smyrna stitch, or the Smyrna cross stitch.
Beautiful
So pretty!
So CUTE!! Thanks for the inspiration and reminding me there are so many different way to do embroidery!!
That double cross-stitch is also called a ‘smyrna’ stitch, right? Just double-checking for my sanity here. 😀
I do have to say, it’s always most interesting to me how changes in color in the same 2 or 3 stitches can end up making wildly different impressions. ie, the flowers vs the leafy border – same techniques, different colors, et voila! different motifs. Possibly I’m a bit nerdy, but I’ve always loved things like that.
-Monika in Mobile
‘Tis! I think “Smyrna” is more often used in needlepoint. In simple old chicken scratch, they refer to it as a double cross stitch. But it’s essentially the same thing! 🙂
This is so pretty! I can’t wait for the watermelon tutorial to do something for summer. But in the meantime, I think I’ll start on a dresser scarf to take on a road trip. Thanks!
Mary, are you using yarn dyed cotton gingham or a cotton/linen blend?
I’m just using a regular cotton gingham – pima cotton, from Farmhouse Fabrics. It’s either 1/8″ or 3/16″. I think it’s 3/16″, actually. Slightly larger than 1/8″.
The leaves look a little like chicken feet scratching around the flowers.
I did some chicken scratch a few years ago when you last posted about it. So fun! So easy! So versatile! Love your tutorials, Mary.
Thanks, Maureen! 🙂
Very pretty design – I do some chicken scratch so this is something that I will add. I’m going to try using mute tones on very muted checkers to give it a lace appearance. If possible I will send a pic, but the last one I sent to you wasn’t clear (I’m NOT a photog!)
Me gusta todo lo referente a lo bordadopunto español y gracias x ponerlo y esplicado bien
This website is awesome. I do chicken scratch but have trouble with counting off the stitches. Thank you for the tutorials.
Hello! I just love all of your creative work and am just beginning to work with the gingham and chicken scratch. I was wondering if you have ever used the chicken scratch stitches on non-gingham fabric. My daughter just had a baby and I’d like to sew one of your patterns on a onesie
Hi, Kim – On a non-gingham fabric, I think you’d lose the color aspect that the gingham provides. The finished piece wouldn’t look quite the same. But I suppose, with the watermelon, you could do it on a non-gingham fabric. You’d definitely want something, though, that would provide you with a grid, because it is a gridded design.
Hola, veo tus trabajos y son hermosos, quiero aprender a bordar en punto Cruz algunas guardas para mantel, seria tan amable de indicarme como lograr encontar un modelo o patron?…desde ya muchas gracias…soy Graciela de San Juan
I love it! im gonna try to teach myself