


Lately, I’ve been working in starts and stops on what I call an “embroidery archeology” project.
For those who are new to Needle ‘n Thread in the past few weeks, you can read the backstory on this project here, where you’ll find all the articles about the project so far arranged in chronological order.
Keeping in mind the whole point of this particular project – which is to salvage the figure embroidery off an old piece of ecclesiastical (or church) embroidery and to remount them on a new ground fabric – today, I’ll share with you the removal of the first figure, some considerations about how to tackle remounting it and some problems I foresee along the way.
When we last looked at this piece of church embroidery, we explored the back of the decoration around it, but not the back of the figure. At that time, I hadn’t accessed the back of the figure yet.
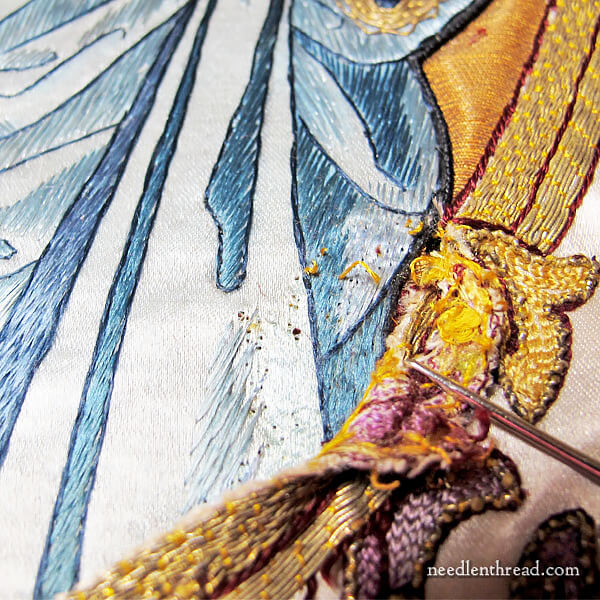
Parts of the floral motif (shown around the figure embroidery in this article) and parts of the goldwork frame overlap the figure.
In order to separate the figure from the whole piece, my first task was to remove very carefully the overlapping leafy elements and the goldwork frame.
To do this, I snipped threads from the back of the whole piece and picked them out bit by bit with tweezers, folding back the overlapping parts of the design to expose the figure and see how far I had to snip things to uncover it.
Deep down inside, I had hoped that I could salvage even the parts of the figure that were stitched over with the surrounding decorative elements.
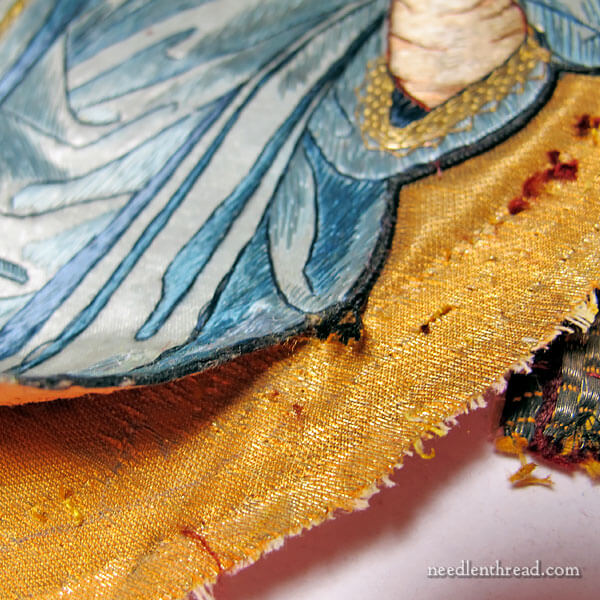
Once I had all the overlapping elements released, I folded those back out of the way to assess the damage to the figure. It’s not all that bad in the scheme of things, but the holes are still pretty evident, so this area will definitely need to be covered with a new frame.
Notice the difference in the colors of blue between the exposed figure and the part of the figure that was covered with the goldwork frame! It makes the exposed figure look pretty dingy, doesn’t it?
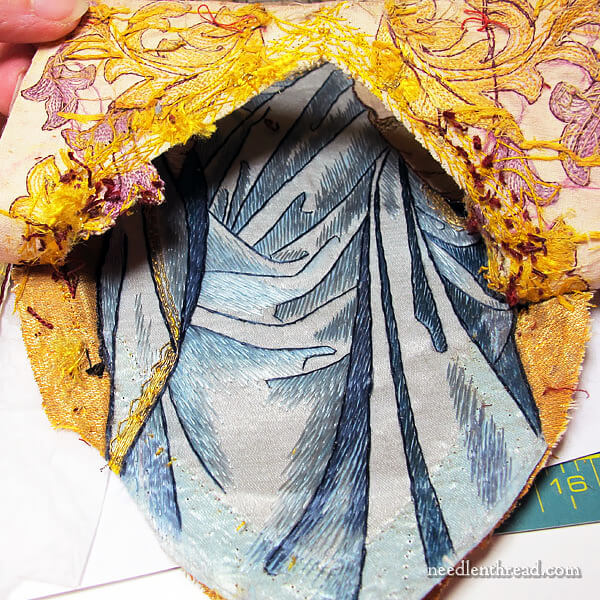
With the overlapping embroidery removed from the top of the figure, I cut the cloth of gold around the figure and removed it from the whole piece.
With the figure cut out, it would be much easier to manage removing it from the cloth of gold ground fabric.
The figure is an appliqué stitched onto the cloth of gold lined with linen, as revealed by looking at the back of the cloth of gold.
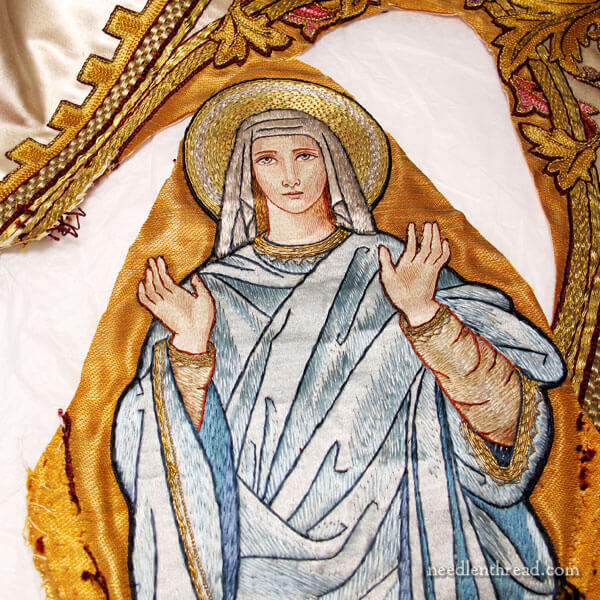
The figure is actually comprised of several layers, one of which may surprise you!
First, the embroiderer would have stretched a fine linen on an embroidery frame. Onto this linen, the design would be transferred.
Then, on top of the linen, silk fabric is applied to the relevant parts of the design area. There are two colors of silk – a flesh tone and blue. The hands and head (including the face, neck, hair and veil) are all a light flesh tone silk.
According to some old books, the appliqué process here could include gluing the silk to the linen. I’m not taking this piece apart enough to determine for sure whether or not glue was used. But I’m guessing no, because I think there would be a little more brittleness or stiffness to the surface of the piece.
So the flesh toned silk, imprinted with the design details, would be appliquéd to the linen. And then the blue silk for the gown – also detailed with the design – would be applied to the linen. Then, the whole piece would be stitched over, with all the edges of the various fabrics hidden in the stitching details.
I’d love to take this figure apart to determine certain things about the order and method of work, but doing so would be disastrous. It would be Humpty Dumpty for sure, despite the best efforts of the king’s horses, men, or me to get it back together!
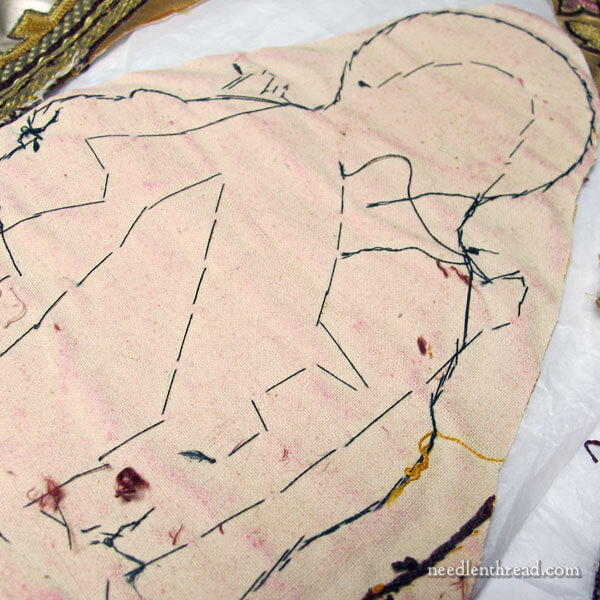
Before the figure is cut from the linen, two things apparently happened:
1. The edges were stitched with a close stitch (overcast, satin, slanted stem – they all turn out pretty much the same, depending on the angle they’re worked) in a fine, dark silk thread. This provides the cutting edge for the appliqué and pretty much holds all the layers together.
2. Then, before the piece is removed from the frame and cut from the linen, the frame would have been flipped and a thin smear of glue – probably wheat paste – was applied to the back. Onto this smear of glue was adhered a piece of parchment paper.
The parchment paper and glue provide stiffness and stability for the figure appliqué. Once dry, the appliqué would then be carefully cut from the linen.
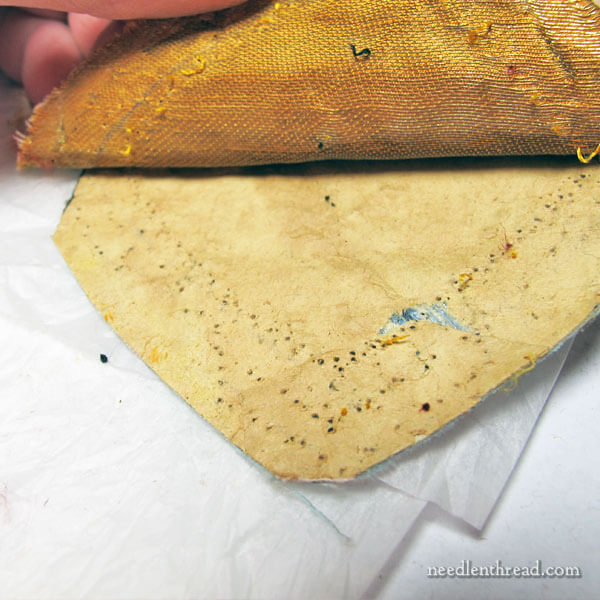
In the photo above, the figure is face down on the table. The cloth of gold backing is peeled upwards, and you can see the parchment paper covering the back of the figure.
You can see one spot where the parchment paper is missing. At first I wondered if perhaps it had deteriorated, or perhaps it was eaten by bugs!
But there is no other evidence of deterioration or hungry bugs, and, upon examination with a magnifying glass, it looks like the paper is actually torn. My guess: in the process of cutting the appliqué from the original ground linen and fixing it to the vestment, the paper just got torn. Maybe it was sticky still from glue and put backside-down on something, and the glue adhered through the paper. Whatever the case, the rest of the paper is very much intact and there doesn’t seem to be any damage from external rot or other causes.
In short, the appliqué is in good enough shape (so far) to remove from the old cloth of gold and place on a new cloth of gold ground.
The figure is applied to the cloth of gold ground using a couching technique, wherein a heavier black twisted silk is couched around the outline of the figure with a fine black silk thread. The couching stitch is worked from the outside of the figure (coming up in the cloth of gold ground fabric), passing down into the very edge of the appliqué, where the darker outline is stitched.
To apply this figure to a new cloth of gold ground, I will first remove it from the old cloth of gold completely. I’m going to ruminate a little bit about improving the figure somehow, especially in regards to creases. There are a few creases in it, that retain their presence due to the glue and the paper. Not sure how I’ll tackle that yet, or if I even will. I’ll do some reading and research first.
Then, I’ll use a twisted black silk and a very fine black silk thread (most likely Au Ver a Soie’s Soie Perlee couched with Soie de Paris) to re-attach the figure to the new cloth of gold ground fabric, which will also be backed with linen.
Finally, I’ll work a new frame around the figure in goldwork.
That’s the plan.
It’ll take a while to execute the whole thing, but I think it’s an exciting process and I can’t wait to get on to the next stage!
Questions, comments, suggestions? Have your say below!
On Cloth of Gold
You can read an earlier article about cloth of gold here. There’s a link at the end of that article to a newsletter on medieval textiles that will give you even more information on the fabric.
The cloth of gold used in this old vestment I’m working on now (and the new cloth of gold that I’ll be mounting the figures on) is a fabric blend of natural and synthetic fibers. I’ll talk about it a little later when we get into the appliqué process.
Wow! As I’ve said before, this embroidery “archaeology” is just fascinating. And you’re the perfect person for such a restoration. Have you worked in restoration for textile museums? Thank you for bringing us in on such an exciting and important venture.
OMG, this is so fascinating to watch unfold. Thank you so much for sharing your expertise and photos with us. There’s so much to learn just from following along. Go Mary, Go Mary!
I have been following this project with great interest. I am also “researching” icons at the moment with a view to creating one. I have almost made up my mind as to how I will approach the icon, except for the fact. The face in this icon is exquisite and I am wondering what technique and what thread has been used.
I salute you Mary you have Been blessed with talent. Plus hard work to be such an exquisite embroiderer
Good morning Mary
My, this does look exciting but also a lot of work.
Do keep us informed on your progress.
Sharon
“Holy Mother of God!” to use a pun. You have your work cut out for yourself. When you announced you had been given the piece to redo. I really thought you had to do the whole piece. Glad I was wrong. Thanks for bringing people into the loop on how these pieces are put together in the first place.
I’m drooling. What talent and patience. Thank you for sharing your journey.
Fascinating! I love reading about your investigations, what you learn and surmise from them, and how you will restore the piece.
Do you ever get ‘colly wobbles’ in your tummy
when you have to cut into such old and precious embroidery? I had them when I had to cut out my daughter’s wedding dress of pure silk. At least I did know that if a disaster happened there was more fabric in the shop if v expensive!