


Oh boy, oh boy! I’ve actually finished a whole entire embroidery project, and we’re only a week into 2018!
Of course, the design is only about 2″ high. And it’s not all that detailed. And it takes a whopping 6-7 hours to stitch…maybe.
Yes. Well. So much for bragging.
But I’ll show it to you, anyway! I have mixed feelings about it. I like the outcome, but there are some things that I wish I had done differently, and there are some things I did do differently.
So, let’s take a look at this tiny needlepainted bird. I’ll tell you a bit about the kit, how I approached the stitching, the mistakes I made, and the things I changed.
Updated 2025: The little bird is one of three birds that come in an embroidery kit by Maison Noel, and I don’t know if it is available anymore. The link I had previously provided does not work.
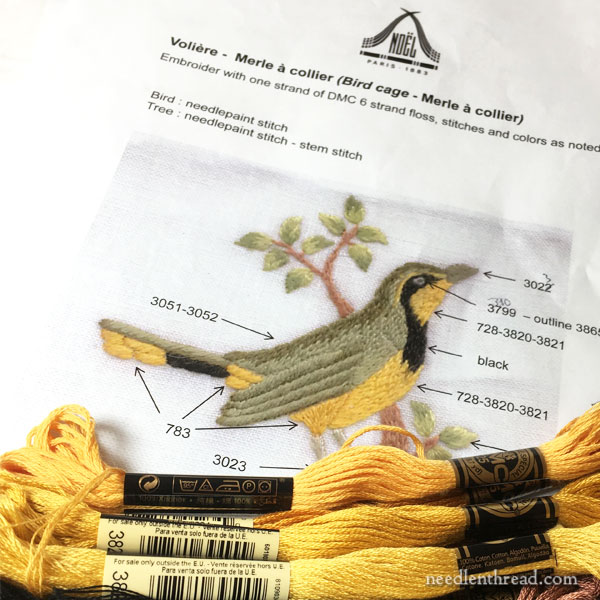
It’s a partial kit. That is, it includes three pieces of linen with a different bird transferred on each of them, along with an enlarged photo of the finished embroidery for each bird, the colors used (DMC stranded cotton floss), their general placement, and the stitches used. The kit doesn’t include the thread or needles, which makes sense because DMC floss is easy to come by, and not including it keeps the cost down. (In the US, DMC floss is decidedly less expensive than it is in Europe.)
The designs are suitable for intermediate embroiderers and beyond. A determined beginner who has had some experience stitching – and especially stitching with one strand of floss at a time – could probably handle them, too.
They are small and they take a little bit of stitching judgement, which is always easier if you’ve had a little experience or if you have someone on hand for advice.
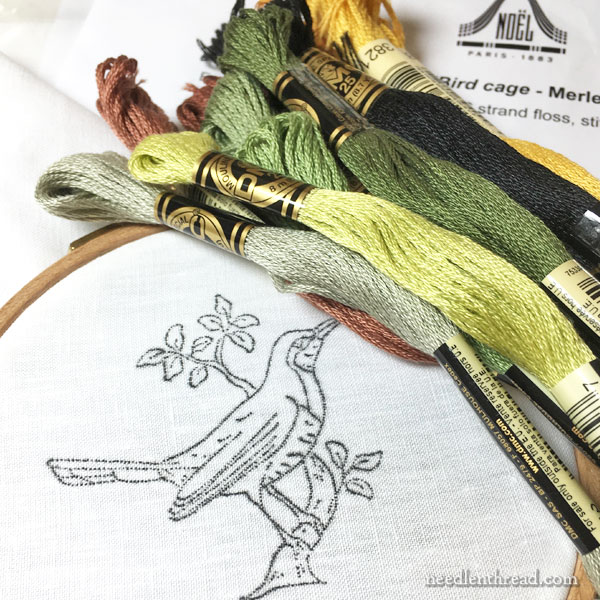
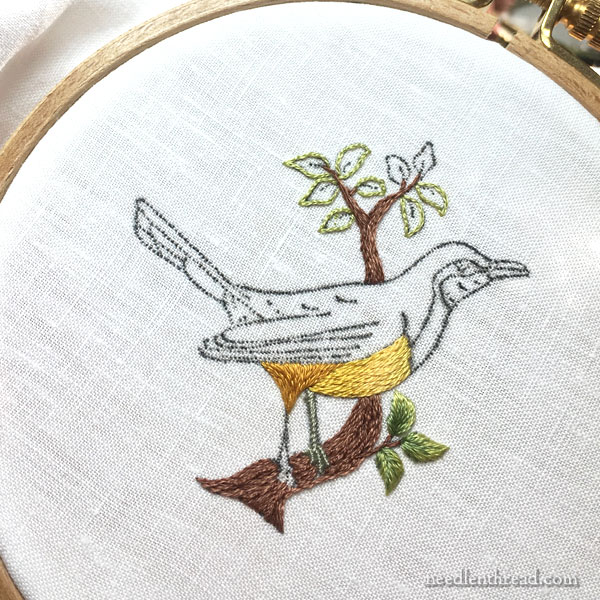
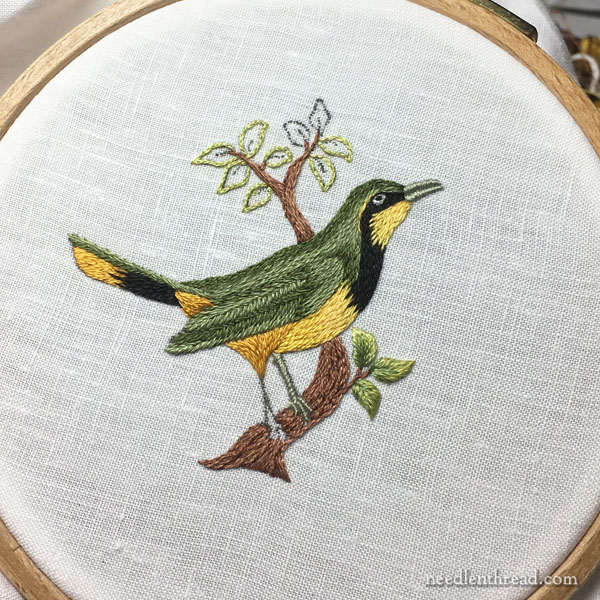
In the photo above, I’ve mounted the linen with the pre-transferred design in a 4″ hoop. The whole design, from the bottom of the branch to the tips of the highest leaves, is just over two inches high.
As far as instructions go, that’s it, above. Well, that, and the enlarged photo of the finished bird, so that you have an approximate idea of what it should look like when stitched.
So a little knowledge of stitchery does help, when tackling these little feathered beasties!
Since there’s no order of work indicated, you need to make that decision yourself.
If you’re working these birds (or the other animals in the same series of kits), look over the design carefully. Break the design down into the elements that are farther back in the design, and go forward to the elements in the forefront. This should be your order of stitching.
Working from the back (elements that are overlapped by other elements) and going forward, you’ll be able to create a better overall dimensional effect with your design.
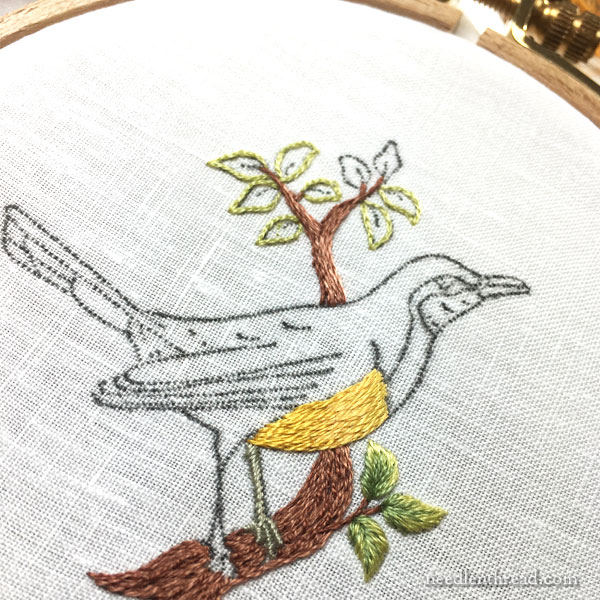
So I started with the branch and then I worked the breast of the bird.
On the branch, I added a few little areas of whipped stitching, to give some texture to what was otherwise a very smooth branch. The two shades used for the branch are very similar, so there’s not a lot of contrast. I figured working in a little texture might pick it up a bit.
After I worked the bird’s breast, I worked the colored part of the leg in the forefront (the thigh).
When I finished the thigh, I realized that, had I thought ahead, I would have made a change.
I would have arranged the colors a little differently. Instead of a darker yellow thigh in the forefront and the lighter colored belly further back, I would have blended that dark yellow used on the thigh into the yellow on the belly, and then I’d use one of the lighter yellows on the thigh – or even a medium yellow on the edge of the thigh, and a lighter yellow in the middle.
This, I think, would lend a little more realism to the shading.
Since I didn’t think ahead, and since I wasn’t really keen to pick it out, I left it and moved forward!
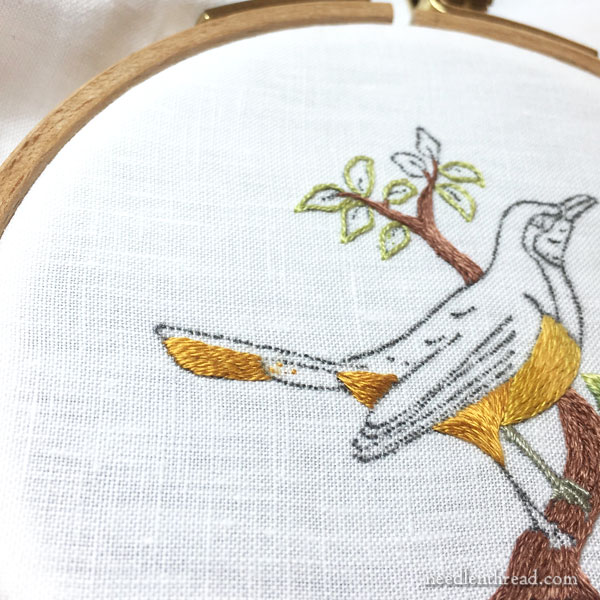
Then I moved on to the underside of the tail, which I stitched differently from the picture. In the picture, the underside of the tail area (the vent – or birdy butt – and undertail coverts) are somewhat blocky. I blended these all into longer stretches of long and short stitch.
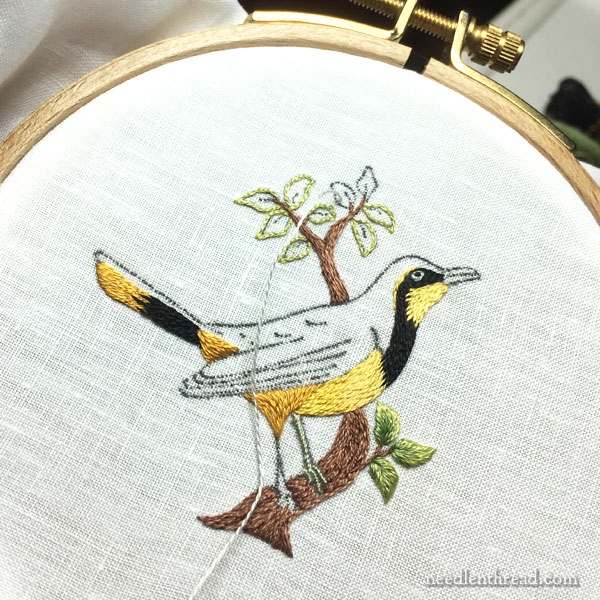
I worked the black next, on the underside of the tail and on the head and breast, making sure to stretch the stitches down over the breast a bit to get a blend so the color change didn’t look to blocky.
I substituted black for the eye, rather than the reddish brown color originally called for. I have A Thing about birds and beasts whose eyes are reddish….!

Then, I moved on to the wing.
At this point, I should have moved on to the back and rest of the body, because the wing sits over the body, but the wing was troubling me all along, and I just wanted to tackle it.
I started out attempting long and short stitch on the lines of the wing that are supposed to be long wing feathers.
I consulted the photo, and tried to mimic what I saw there.
But in fact, I didn’t like it at all! The space between the lines is not even 1/8″ – just a tiny, tiny space – and trying to fit two layers of long and short stitch in there with one strand of DMC floss just didn’t work. It was too much in too small a space.
So I cut it out.
And then I tried it again, increasing the width of the long feathers.
But I still didn’t like it.
So I cut it out.
And then I tried it again, in satin stitch, with a small line of dark stem stitch between each feather.
But I didn’t like.
So I cut it out.
(There’s a point to this!)

Then I tried this conglomeration, which was stem stitch, alternating light and dark, with the larger feather on top in fishbone stitch.
Guess what?
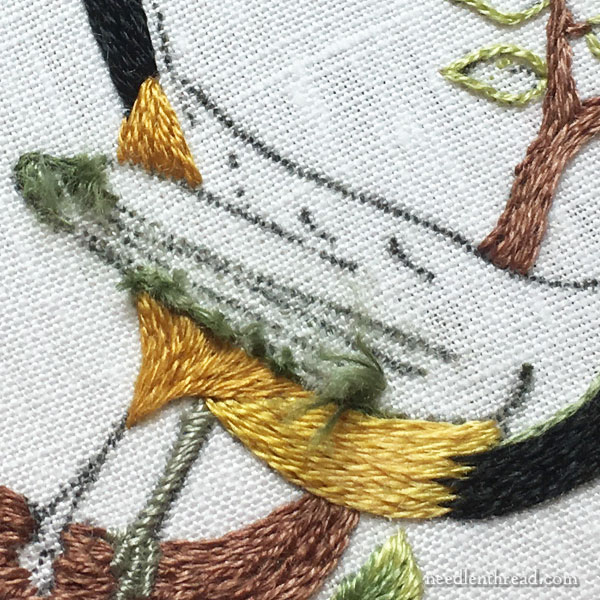
I didn’t like that, either!
So I cut it out!
And that brings me to this point:
The linen in these little kits is just fantastic. It’s a really nice linen. And it’s a good, sturdy linen. After cutting out no less than four times and picking stitches out and tweezing fuzz away and so forth – all in a tiny space, heavily stitched – the linen still looks fabulous!
Finally, I settled on feather stitch for each long feather, in alternating shades.
Now, if I were doing this again, I’d probably still use this stitch choice, but I’d do a couple things differently:
1. I’d stitch the rest of the body first, leaving the wing for last.
2. I’d work some horizontal padding stitches (just long split stitches) along the feathers where the overlap is, and along the top feather, where it overlaps the body. Then I’d work the fishbone stitch over those long padding stitches. This would help bring the wing forward visually.
Down the back fo the bird, I would be more careful about blending the dark stripe into the lighter shade, to soften that stripe a bit. It needs a little more blending there, in my opinion.
I added the shading around the wing (especially behind the neck) and on the coverts or area of the wing above the long feathers, because otherwise, all of that looked somewhat flat to me.
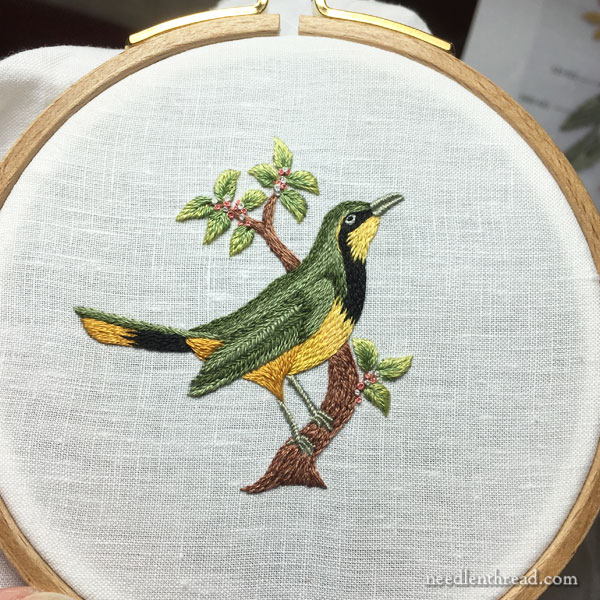
The beak of the bird called for “needlepainting stitch” as well, but it was such a small narrow space, that I stuck with plain old satin stitch.
The leg (tarsus) and the toes… well, they are funny! If I were doing this again, I’d approach them a little differently, though I’m not sure how. I’ll find that out on the next one.
After finishing the whole thing, I decided it needed just a touch of texture and color in the branch, so I added a few French knots in pink and white.
Kit Advantages
The advantages to these kits, in my mind, are:
1. They’re on excellent linen.
2. The design (which is small and detailed) is already transferred, so you don’t have to fiddle with the transfer.
3. They can be stitched as is, or you can make changes as you go. Either way, the result is a sweet little bird, needlepainted.
4. They’re small enough that they’re fairly quick stitching. You get the satisfaction of a fast finish!
5. You don’t have to decide on colors. (Color decisions always take me forever!)
6. If you’re keen to needlepaint more advanced birds (like Tanja Berlin’s or Trish Burr’s beauties), but you’re a little hesitant or intimidated by the thought, these little ones give you a dip into needlepainting to get a feel for it, without having to tackle a much larger project. I took out one of Trish Burr’s bird kits after finishing this, and it seems enormous by comparison! So these will give you a taste for detailed needlepainting, before you undertake a larger and more advanced design.
Questions?
And that was my first finish of the year! Overall, a very satisfactory little project – so much so that I’m looking forward to working a second one!
If you have any questions, comments, or suggestions, feel free to chime in below!
Oh Mary…..you just do the loveliest work. How sweet! I so admire you and love seeing what you do!
Thanks, Donna – This was a fun project! It was quite satisfying, since there was a bit of a challenge to it, but it still worked up quickly.
How delightful, Mary! I really like the choices you made, and really, really appreciate the process you shared with us. Thanks!
Linda
Thanks, Linda! Once I worked through this first bird, the second one was much easier to make decisions on – I’ll show that one a little bit down the road….
Good morning Mary
Very nicely done!
Thank you for your notes and comments. Very informative.
I have one of Tanja’s Owls on my ‘to do list’ for 2018.
And yes, they are challenging!
Sharon
Ah, I love Tanja’s little burrowing owl – one of my favorites! Her instructions are so good, though, and so very thorough, that they are easier to tackle than you might think. Best of luck with it – I hope it’s a fun adventure!
The little bird is very nice. I like it
I love seeing how you adapted this little kit to create a much more polished finish than the example showed. Looking at the design as it is, I wasn’t particularly drawn to it, but seeing how you stitched it makes it seem much more appealing. I love the depth your shading created and the little French knot details are just delightful! I look forward to seeing the other bird designs in time. 🙂
Thanks, Kathryn! I really enjoyed working through this one and making little changes. Overall, I like this one better, too, just because it isn’t quite as blocky!
After looking at the French Needle website where you got your adorable bird kit, I have to say your stitching is far superior and beautiful than what was stitched by them!!!!!!!
Just saying……
LOL! Thanks, Kathy! I think the point of the little birds is to give someone a starting point for needlepainting. They’re definitely stylized, you you’re not necessarily meant to get a super realistic bird, but I found the original a bit flat, admittedly. It’s fun to play around with things like this, adjusting to suit your own preferences. It’s a good exercise!
You really made that little bird sing! I love the way you mixed the colors to give more depth and realism. Great finish for 2018!
Thanks, Susan! Now let’s just hope it isn’t the ONLY finish for 2018. :-/
It doesn’t matter if it is 2″ or 20″ high – you finished it!!!! I currently have 3 hand projects going – embroidery, applique and hand quilting. This is the year – they will all be done!
Yay, Janet! I hope you can stick with them and finish them – and that you enjoy the journey immensely!
P.S. Your bird is beautiful.
Mary, this was a very helpful post. I love kits, because I am hesitant to trust myself with transfers. I am so liberated to discover that I can make my own choices about stitches and colors, and pick things out if I don’t like the results.
Hi, Lori – the transfer on something this tiny can be a bit daunting. It was nice to be able to just plop the fabric in the hoop and start stitching right away!
now, what will you do with this BEAUTIFUL bird?? Will he hang in a frame? Will he become part of something functional???? What becomes of your work?
I’ll probably frame it in a little frame, or frame the two together (I’m doing s second one). They would make nice little accent pieces for a bird lover, and would make a great little gift.
Mary do you have a utube on needlepainting ? I love your work. Its just beautiful…..
Hi, Teri – you’ll find a whole collection on needlepainting, including videos, here: https://needlenthread.wpengine.com/2009/08/long-and-short-stitch-lessons-index.html
Didn’t look to see what day this was posted, I get to e mail when I get to it with my job and no computer at home. However, your breadth of experience shows up in this little bird. Your bird is much better than the sample bird.
Thanks, Cynthia! I’m glad you like it!
What a lovely bird! I agree with taking on a small, quick project — after working for weeks on some large complex projects, I was getting very tired of them and felt bogged down – would they ever be finished? I finally stopped to make some quick-to-finish projects, and that breathed some life back into my stitching. Also, your tip about adding the French knots to the branch for interest is brilliant! I’ll remember that. Thanks!
Hi, Marty! I’m a firm believer in switching out to a new project when you’re feeling a little bored or overwhelmed with one. It’s definitely a good way to bring back the enthusiasm, especially if the new project is relatively quick, lots of fun, and finishes well!
Do you provide instructions anywhere on how to do needle painting, such as how to decide where to change colors and how to blend them? Forty some odd years ago I did a beautiful crewel pillow kit with woodland animals and the most challenging part was the long and short stitch on the animals’ bodies.
Sorry, I see you answered this same question for someone else while I was composing my query. I look forward to checking out your lessons!
I have to say Mary that with all that frogging and stitching I would probably have said something like “OK, this is looking good” much sooner than you did but the results are so worth it.
Yes, I probably could have gone forward sooner, but it just wasn’t grabbing me. I ALMOST took this result out again and restitched with a little padding, but I got over that notion pretty quickly! 🙂
Hi Mary: Doing a small project in the first week of January is pure genius! Getting it finished gives a great sense of accomplishment and motivation to keep going on other ideas. Thank you Mary for all your great advice.
Susan
That’s exactly it, Susan – when you start the year with something manageable and small, especially in the “cool down” after the hustle and bustle of the holiday season, it’s motivating. You get the satisfaction of a finish, and it carries you through till you’re ready to tackle something a little larger! 🙂
Congratulations! and Thank You. I like you telling of NOT liking something and removing it. And changing your mind about how THEY said to stitch. I also like you adding the French Knot Flowers, that did give it character.
What an excellent breakdown! Needlepainting intimidates the dickens out of me but this does seem to make it more approachable. Thanks as always for sharing.
Oh Mary, you made me look! Your bird is adorable & perky & I felt certain I had seen him before. Then I checked The French Needle to view the other birds in the kit. Bingo! There is a huge collection of water color birds (1793) at Musee Buffon in Montbard, Fr—sort of like Audubon in the US. Those birds inspired a set of china that I own, called Jardin de Roi. The full name of your bird is Merle a Collier de Cap de Bonne Esperance. The blue one is Martin Pecheur & the red is Lory des Indes. The birds are beyond wonderful & would be exquisite embroidered on a napkin corner. Thanks for reminding me that time is flying by so make & use the “good stuff” now!
You’re right! They’re the work of naturalist George Leclerc of Buffon, from the 18th century. (I want your china! LOL!)
Dear Mary
What a great, helpful post you always surprise me the way you change and create designs and how beautiful they become. I love the changes you made on the bird, especially the wing, using the feather stitch was a great idea and it really stands out. I would never have thought to use the feather stitch and adding a few french knots just makes the design also changing to satin stitch on the beak really improves the project. Thanks for sharing your tips and techniques on kits with us and for giving us ideas on how change stitches on a design.
Regards Anita Simmance
Hello Mary,
This little bird is a great bonus for me this morning. I am stitching a tablecloth and there are 4 large birds to embroider. I had no idea how to go about it. But with your newsletter today I can finally look at them with a new eye. And less fear I may add!!!!
The little bird you stitched would have come out super great what ever you decided to do. I love the colors and the stitches. I don’t like red eyes for birds myself.
Thank you for everything Mary.
Best regards
Louise
The bird is lovely Mary! I stitched a set of needle-painted Goldfinches, a design by Loretta Holzberger, and she provided a small felt patch for the wings, to give them that added dimension. They were tacked down before the needle-painting was done.
For the legs, you might have considered bouillons! That would give roundness and dimension to the legs and toes!
And congratulations on completing your first project for 2018! No matter the size, a completed project is still a completed project, and you are off to a rousing start! 🙂
Hello again
I just returned from visiting the French Needle site. Those birds do not look anything like yours Mary.
Very poor stitching in the first one. Especially the legs, not impressed at all. Choice of colors in the 2 others not good.
So you know what that means ? I will continue with you for sure on my embroidery journey.
Thank you Mary.
Louise
Hi, Louise – 🙂 That’s very kind of you to say! But… in defense of the birds in the original kits (especially the color choices) I think they did a really good job with the colors. The birds are from “The Natural History of Birds” by the French naturalist George Leclerc, who drew them back in the 18th century. They’re not exactly photography-perfect, true, but instead, they’re typical of the naturalist’s approach to sketching specimens. I really like them a lot!
I think the entire work is beautiful! I love birds and this one just “sings” to me!
I am truly a beginner embroiderer so I find it frustrating on which stitch to use and for various projects.
Thank you for sharing your work and your knowledge!
Mary, your work is exquisite, and this bird is stunning! Beautiful!
I love your bird. I have stitched a bird from Trish Burr book – I love the shading that can be achieved but for me I have to take it steady and think about my colours etc,.
One question may I ask – have been given various colours of DMC Broder Flower thread, it is very fine, never seen this in UK shops – any ideas for use please??
Irene Dean
Flower thread is usually the name used for a matte embroidery thread that can be used like regular floss. It’s generally non-divisible. It’s kind of like the floche that I talk about now and then here on Needle ‘n Thread, but without the shine.
Do you know where to buy this type of linen in the states?
Hi, Ann – no, I don’t know where to find it. It’s not as light as the linen cambric by Legacy Linen (Access Commodities), but it’s not as heavy as Alba Maxima, or as high a thread count as the ecclesiastical. It’s much finer in the warp and weft threads compared to Alba Maxima. It’s finer in texture and weave than the Graziano linen available at French Needle. It’s very similar to a Belgian ecclesiastical linen I used to use pretty frequently. But tracking it down on the States is a little tricky.
Beautiful results! I loved walking with you through your experiments, mistakes, and trials.
I wonder if you have ever considered using a coral stitch for tree trunk/branch bark. I’ve used it quite effectively and can shade nicely, placing the knot of a second row in between the knots of the adjacent row. The knots give bark a nice texture, and they can be done with varying numbers of threads, depending on the size of the trunk/branch, and the distance from viewers.
I so admire your skill with short and long stitches. Those are my greatest challenge~
Thanks again for sharing your process with us!
Hi, Elizabeth – Yes, that’s a great use for coral stitch! I’m not sure I’d try it on these pieces, because they’re so darned small. But I would definitely do it on larger projects!
Arrgggh!
Eight days into the new year, and you’ve already got a finish!
*Looks over at collection of UFOs in the queue and hangs head in shame.*
LOL! Well, Liz, don’t feel too bad. I actually started this one in 2017 (on New Year’s Eve). It’s a small, relatively quick project. And, admittedly, I was working it by way of procrastinating on other larger things I need to address! 🙂
Very nicely done, Mary. I agree about red eyes, in general, and had a chuckle about “bird butt”! Happy New Year
Your work is beautiful.
I just found your site last night searching for info about a new-to-me thread, the DMC memory thread.
I am HOOKED!
I’ve been reading so many of your posts, but this has to be my favorite so far.
I’m rediscovering my love for embroidery and planning so many projects for this year, 2018, but I didn’t know where or how to start.
This little bird is exactly what I needed.
I want to do a larger bird embroidery, so starting out again with this set seems like a perfect fit for me.
Thank you so much!
I really like the way you blended the black into the yellow & the addition of the French knots which seems to add just the right touch of color & interest!
I am impressed – it is only 9 Jan and here is a completed embroidery. Happy New Year to you and yours. ttfn
Mary your online needlepainting instructions and sampler are an excellent way to learn L&S stitch. Tanja Berlin and Trish Burr’s needlepainting designs and instructions were excellent. You have given me such inspiration over the last 6 years.
Your description of your thought processes are so very helpful and insightful thank you Mary
I really appreciated this email. This is what I like to get from other embroiderers – their take on how a project could be done be it colour, stitch or materials. Your description of doing this project was one of the best embroidery things I’ve read – I’m inspired; must now go an do some stitching…
A beautiful finish Mary. I look forward to seeing the next one.
My first impression is that in needlepainting you never use fancy stitches if you want to blend your colours perfectly. The green wing of your bird should have been in long and short stitches as the rest of the body with one single strand of thread. The end result gives you a piece of embroidery but not in needlepainting in my humble opinion. Sorry for the negative comments but if you enjoyed doing it, that’s all that matters.
I have the little mouse and fox from French Needle but have hesitated starting needle painting. This gives me a great place to practice.
Thanks Mary.
Mary, you are both an inspiration and a temptation! Your bird is beautiful and something similarly small might be what I need to overcome a mental hurdle with l&s. A visit to my local needlework shop is in order! A large current WIP is mostly satin stitch, which I’m gradually messing my way through, but there are some large areas that need to be l&s and I know I don’t have the skill to tackle them. Now, if I can sidetrack myself with some cute little birds or something similar I can put it off for a while longer and justify it as ‘learning’! (Yes, I have stitched through your tutorials. I probably should go back to the beginning and do it all again, using what I’ve learnt. I also have Trish Burr’s Colour Confidence, but it’s intimidating rather than confidence-building.)
Hi Mary,
What a lovely little project. I agree totally about the changes, when I looked at the photo both the wing and tail areas jumped out at me and was rather jarring. I really like what you did with them.
Cheers Judy
S E Qld
Aust.
Wow! So charming… (I am stil finishing up from 2017.)
The little bird kits are just lovely. Thanks for sharing.
Thank you Mary for detail explanation. Can you illustrate the feather stitch that you did on the padded stitch.
I have a chick project to stitch, the instruction is asking long and short stitches, whatever I do the outcome does not look like a little chick.
Thanks
Hi, Sophia – you can find a video for fishbone stitch here: https://needlenthread.wpengine.com/2006/11/fishbone-stitch-video-tutorial.html
hola feliz año me gusto mucho el diseño del pajarito felicidades por su trabajo le mando un fuerte abrazo desde México
Beautiful bird, thanks for showing all your steps and decision making, it’s very helpful.
Not having seen these kits my only comment would be that for a beginner Trish Burr’s would be better because she gives detailed instructions.
I read this item with a lot of interest as i will be taking a thread painting class with Tanya Berlin in May. did you consider using bullion knots for the toes? Y ou can achieve a slight curve with them to overlap the branch and give some dimension. Just a thought.
do you have names of needlepoint stores in the Toronto Canada area
Thanks, Mary! I love the finished piece, and loved following how you got there.
Happy New Year, Mary. Lovely to see you have stitched a little bird so early in 2018. Thank you for going over the steps you encountered. It helps – and lifts the spirits – of us ‘we mortal’ embroiderers!!
Dear Mary, Loved the wing. Almost plumped and ready to fly. I also meant to say that your 3D embroidery inclusions enliven the little bird and set him in place. Looking forward to seeing his little companion.
I darned some socks that have been hanging around way to long. Not done with all of them but I love the socks so will darn all of them. It is a relief to get 2 1/1 pairs done.
Happy New Year Mary,
As always your work is exquisite.
Every year I promise myself, it will be the year where I spend time on embroidery rather than making clothes. Will 2018 be the year. In fairness, I have taken up tambour work, all because of your wonderful tutorial.
Thank you, as ever for your wonderful blog and tutorials.
Hi Mary! I like your finished bird better. I suspect that overall, you were missing some shading to provide depth -below the wing and perhaps on the breast. Perhaps you have been bitten by the same bug that gets me from time to time? The “This is too simple, a project this quick is not really going to be satisfying” or something like that. When one most needs something quick, one complicates it the most! I got this from my dad – you?
Regards
Maggie
Hi Mary
I love that bird story that has taught me a lot.
Thanks so much
That is so beautiful. Thanks Ana-Maria
Thank you. I am going to try it
This little bird is stunning! I read through your stitches and was curious how the fuzziness was going to be cured. I gasped when I saw the change. You are amazing at this. I love reading everything you write but I adore looking at your stitches.
Kindly,
Barb K