


So, you know how on Monday, I showed you my first embroidery finish of 2018?
Well, this morning, I’m going to show you my first start of 2018.
Now, you might think that the little needlepainted bird from Monday would fall in this category, but in fact, I started it on New Year’s Eve, so it doesn’t count.
But this adventuresome project I’m going to show you today was my first Big Start in 2018!
It’s not a huge project, size-wise, but I suspect that it’s going to be a time-consuming (and attention-consuming) one. I’m excited about it, I’m having a lot of fun with it, I’m learning a lot from it, I’m making some decent mistakes along the way, but I think, in the long run, it might actually turn out ok!

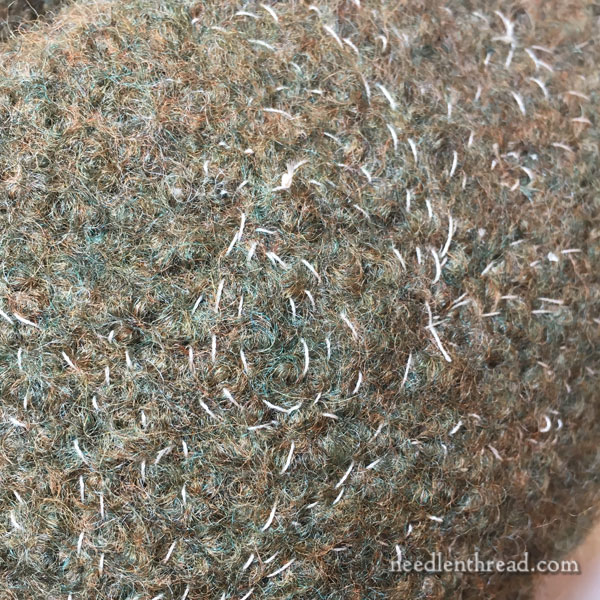
This is a thumb.
It’s probably not the most attractive thumb in the world, as embroidered mittens go. But it’s a start!
If you have a chance, search “Swedish embroidered mittens” on Pinterest, and you’ll probably see what sucked me into this idea in the first place. I’ve long wanted to embroider a pair of felted mittens, just to see if I could pull it off.
After a conversation with my sister about my deep, inner desire to embroider felted mittens (dropping obvious hints that I needed someone to knit some a pair for me), a pair of gargantuan mittens knitted in worsted wool arrived in the mail.

I said, “Wow. These are huge.”
She said, “Just wait.”
And so I went about felting them.
I used my washer, set it on “mini” and hot, dropped the massive mitts into it, dumped in a bit of soap, and let the machine work its wonders. I have an agitating washing machine – it’s the key to felting in the washer – and it really didn’t take very long. I alternated hot and cold, returning the dial to the setting where it would start agitate a couple times in each “load,” and ran the things three times through. In the third pass, I boiled a kettle of water on the stove and dumped it into the machine, too, just to kick up the heat.
In less than two hours, I had a perfectly fitting pair of felted mittens! I shaped them and left them to dry.
The Design
Then, I contemplated a design.
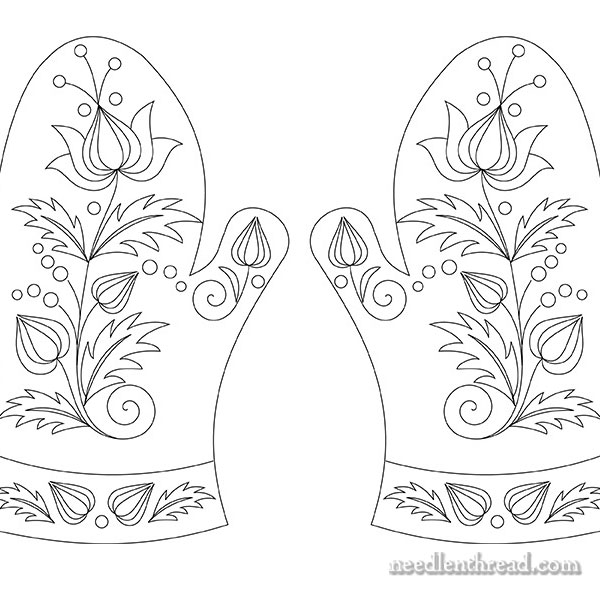
Messing about with this folk flower design, I tweaked it a bit and came up with the above.
Perhaps a bit ambitious for the first try? something said in my head.
Naaaaah! I replied with a fanatical grin.
Design Transfer – A Tough One!
Then, I contemplated the whole transfer question. This was a tough one!
I could try to wing it free hand, but unless my plan is totally random stitching, I’m not so good at that.
I could try prick and pounce, but the wool is very boingy, so I didn’t bother. I figured it would be a bit of a mess.
I could try something like Transfer-Eze or Sticky Solvy, but there were two things against this:
1. I’m stitching with wool. I’m not so keen on the feel of cotton passing through Sticky Solvy or Transfer-Eze (although I will use it occasionally), but I can’t even imagine how much I’d dislike wool passing through the stuff. I think the stabilizer would unduly fuzz the wool up, anyway.
2. This type of water-soluble stabilizer requires good soaking to get all the bits out. Now that my mittens are a practically perfect size, I don’t really want to have to do any long soaking with them again.
The Tissue Paper Tacking Method
So I decided to use this tissue paper tacking method of transfer – or at least, to try it to see if it would work.
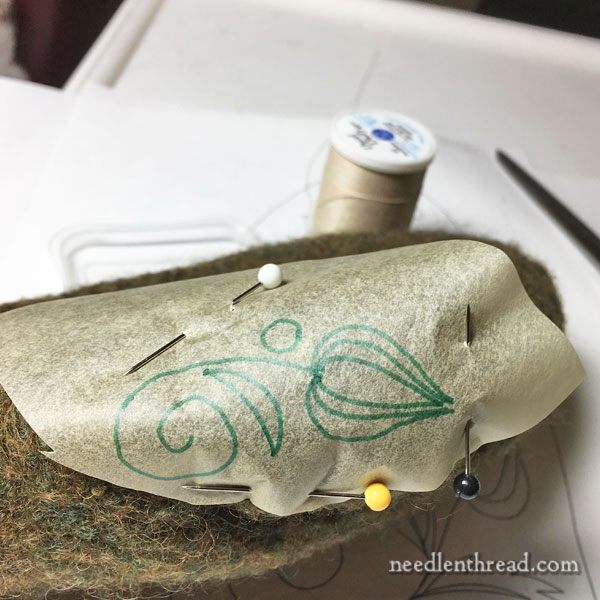
I started with the thumb.
This is not my favorite method of transferring a design, because it adds quite a bit of time to the front end of any project.
But, in a pinch, it’s usually a very accurate and good way to transfer a design. On dark fabrics, on items – like mittens – where other transfer methods won’t work very well, tissue and tacking can come in very… um… handy.
Well… it took a while, but it did work! At least, it worked well enough that I have a good idea of what the design is and where to stitch it!
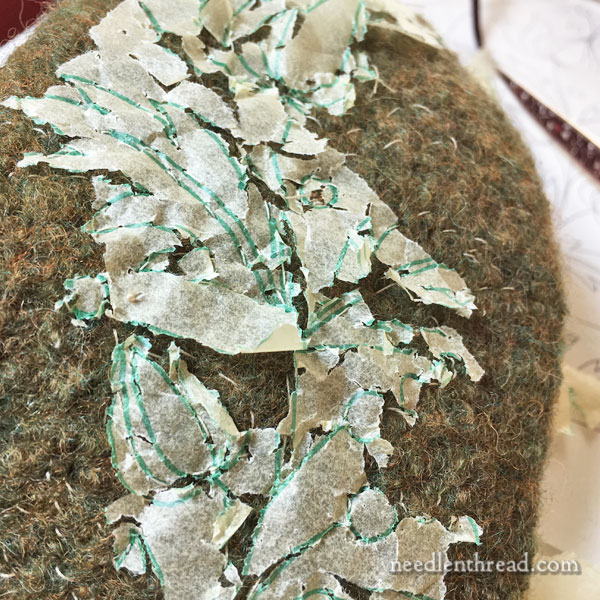
In fact, it took me 2.5 hours to transfer the design onto one mitten.
With the next mitten, I have a few ideas for making the process a little less time and labor intensive.
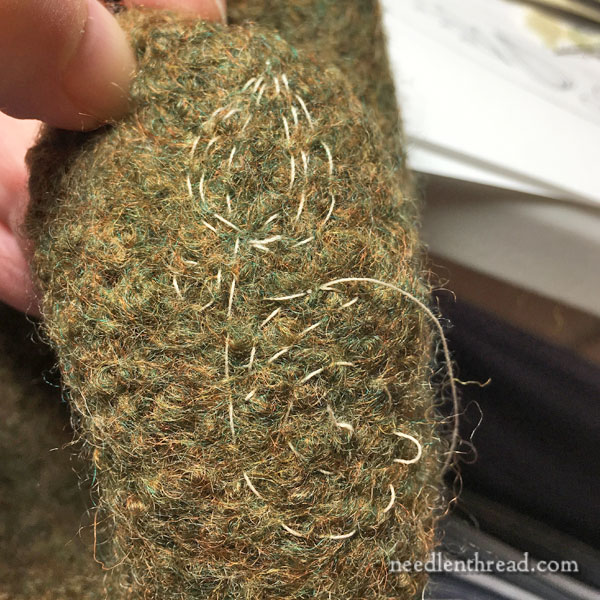
Wool Threads
Once I had the design on the gloves, I foraged for some wool threads. I’m using Fine d’Aubusson wool, and for the most part, I’ll probably be stitching with two strands in the needle. We’ll see!
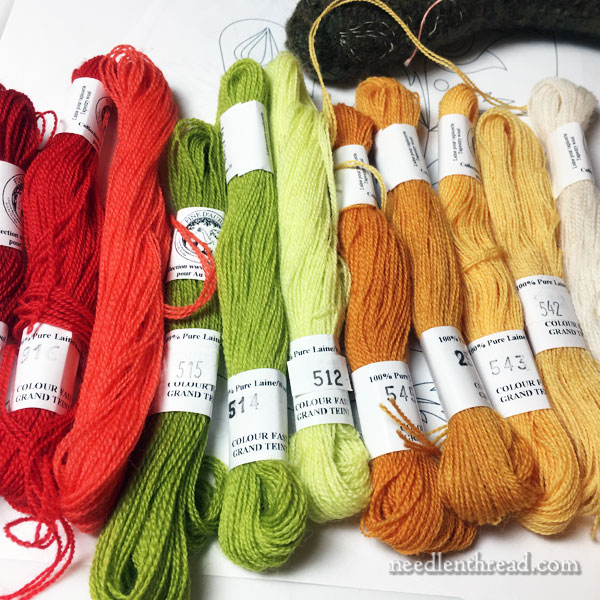
I really, really, really wanted to do a coral, green, and yellow color scheme on these moss green mittens, but I don’t think there’s a coral range available in the Fine d’Aubusson here in the States – though I haven’t checked on new colors recently. So I just used what I had on hand, that would show up on the moss green mittens.
The Beginning
In starting out on the stitching, I decided to start on a thumb, since it’s a small part of the design, and since, if it took me a while to get the hang of it, it’s not the most noticeable part of the mitten.
I did make a couple mistakes, especially in padding under the stitches. I over-padded.
I think, with satin stitch or any similar stitch when working on a ground fabric like this, a little bit of padding is a good idea, because it’s difficult to get the stitches to lie perfectly, due to the irregular and tight but spongy nature of the very thick felted wool. But at first, I thought I’d really have to build up a good couple layers of padding. This is completely unnecessary and it tends to make things lumpy.
Now that I’ve worked a tiny section, I have more of an idea of what to expect with the design and with the whole process.
I’ll share progress – and anything I learn in the meantime!
Any questions, comments, tips, suggestions? Feel free to chat it up below!
Knitting Pattern for Felted Mittens
The knitting pattern for these felted mittens can be found in the book Knit One, Felt Too by Kathleen Taylor, which is available through the following book affiliates:
In the US, you can find Knit One, Felt Too here on Amazon
World-wide with free shipping, it’s available here on Book Depository.
Wow, what a great idea! (wanna some, too *drool*) I have a couple of questions: After felting, was it coincidence that the mittens fitted so perfectly, or did your sister know what size to knit them in order to fit after felting? Did you stitch right over the basting? I would have traced the basting with a pen and deleted it, but when stitching with wool perhaps this is not necessary, is it? And how on earth do you handle the needle and the thread WITHIN the (tiny, narrow!) thumb?! I will be following this project with keen interest.
Angela from the Ore Mountains
Hello, Angela! Ahhhh – lots of questions! Yes, I’ll cover these points as I go along. As for the size of the mittens, I stopped the felting process when it was evident they would fit me. I could have kept going and they probably would have gotten even a little smaller, although the felt is pretty compact right now, so it worked out well. I don’t know if she knitted for a particular sized hand, but I will ask! The nice thing about these mittens is that they have an inside, under cuff that’s knitted and a bit stretchy. Once I’m finished with the embroidery, I’ll sew that cuff into place, underneath the small cuff of the felted mitten, and that way, they are really snuggly mittens, perfect for winter! Chances are, though, they won’t be finished until the cold of Kansas passes on for the year…
Have you tried the iron-away stabilizer to do the thread tracing? I’ve never used it but it looks interesting. I love how much more tweedy the mittens look after felting, they’ll definitely keep your hands warm.
Hi Mary: Have you seen Sue Spargo Folk Art quilts? She does this kind of embroidery in all different kinds of applications. If you get ‘sucked in’ it’s a slippery slope!
Susan
How are you stitching on a finished product without catching the bottom and how are you starting and ending threads? I can’t seem to wrap my mind around how you are doing this
Hi, Jennifer – Good questions! We will cover all that!
I’m always impressed with your energy! It’s exciting to see so much exploration in fiber art . Your emails keep me engaged in stitching until my project is complete. Thank you so much for your wonderful patterns, friendly emails, terrific instructions beautiful inspiration .
OESD (available at BERNINA sewing machine dealers) makes a water soluable stabilizer called Aquamesh. I have used that to draw a design when I can’t mark the surface. Once I stitch, I rinse the stabilizer away.
You give me an idea-have a felted purse that I knit and felted. I would love to do embroidery on it like you’re doing to the mittens. Where might I purchase the Fine d’Aubusson thread?
Needle in a Haystack carries it, and they have all the colors shown, too. It’s here: http://www.needlestack.com/WebStore/Thread/AVAS_Wool.html
Thank you!
Hi Mary, I have often embroidered directly onto the well-tacked-on tissue-paper pattern. Have you tried that?
I hope the cold snap isn’t affecting you too badly.
Felted wool has such a sweet innocence. I love the feel of it. It reminds me of the time my son went to a Waldorf preschool and the teacher made little felted people and animals. Then she would use them to tell a story.
Your folk design is beautiful. Keep at, Mary, I’m very interested to see your wheels spinning with the fluid inspiration that drives and helps with problem solving. Please show more!
You are absolutely amazing! Love the mitten design, and can’t wait to see them finished!
How did you stitch the mittens, did you use a wooden spoon inserted in the mitten or something else?
The stitches definitely enhances the look of them.
Teri
Wow love it! You got me thinking about the recycled sweaters I have felted. Could I cut out the mitten parts, embellish and then sew into the mittens?
Yes, indeed! This idea is in the air — and it’s been done before years ago as well. I called a friend in Alabama today, an English lady, and she told me her daughter in Massachusetts is doing that. Thrift shop sweaters — the classic Shetland ones that were trendy in the 50’s — if they have not been ruined by the first owner, they can be shrunken by us and then mittens, purses or slippers cut out and enhanced up the kazoo. Or leave the sweater body whole and use it — with embellishment of course — for a throw pillow.
You are so clever. These will look wonderful. I like the colors a lot. Have fun. Can’t wait to see the finished product.
Hi Mary,
So Pinterest got hit with a whole bunch of searches for “Swedish embroidered mittens” this morning – they probably wonder what gives! The mittens are beautiful, and I like your design transfer method. I always learn something from you! I can’t wear wool, but I can see this kind of embroidery on a needlebook or tablet cover or something. It will be fun to try.
I hope you get your mittens done in time to use them this winter!
I am a knitter and also do embroidery enjoyed the project.
Could you pad it in a similar shade in cotton for less bulk?
Mary—I am a knitter also and LOVE this project. Could you please provide your design for purchase! I know lots of knitters up here in Minnesota who would love it! I was thinking you could baste an outline of the design? I find that embroidering wool mittens is tricky but that using a shorter needle, and the “sewing” method works best and I always put a piece of cardboard inside the mitten to ensure they don’t get sewn shut (done that!).
Best,
Margaret
Hi, Margaret – The pattern for knitting the mittens is in this book:
http://amzn.to/2ExagbI
I’ll probably share the embroidery design here on Needle ‘n Thread once I work through a bit and make any changes.
I LOVE this project!!!! Thank you for sharing a project worked with wool on wool….my favorite fiber. Can’t wait to learn from your expertise!
I learned a good lesson today reading Your post. Instead of jumping in, break down the process., then I can make my mess. Plus I’ll enjoy instead of stressing. Thanks so much. Gerri
I think wool embroidery and knitted garments go hand in hand! Have you tried used fabric softener dryer sheets for transferring your design? I find they work really well.
Those will be lovely when done. My question is – are you planning on dry cleaning the mittens? Is the thread “super wash?” Otherwise the thread will shrink when mitts are washed. I wonder how it would work to embroider before felting and then felt the whole thing at once so that the embroidery shrinks at the same time as the mittens…. You would lose definition but it might make the embroidery easier and create a different effect.
I am interested in doing this. Where can I find a pattern for knitting a pair of mittens to felt to embroider. Thanks
Diane
Hi, Diane – you’ll find this mitten knitting pattern in this book on Amazon.
http://amzn.to/2ExagbI
Dear Mary
Late today I went to the William Morris gallery to see May Morris embroidery absolutely beautiful pieces on display. Anyway an interesting project embroidering on mittens I like the way you shrunk and felted them a great idea. I’m really looking forward to learning which stitches you used and your ideas/tips and techniques on wool mittens. Your design on the mittens is lovely I can’t to see what you do with the rest of the mitten.
Regards Anita Simmance
Anita, did you see the gallery at the Cleveland Museum of Art, or elsewhere? That’s where I saw a wonderful array of May’s embroidered pieces last month. Mary, I can email you photos if you’re interested!
Oh! I’d love to see them, Heather!!
Hi Heather/Mary
No I haven’t been to the Cleveland Museum of Art but it sounds amazing. The pieces I saw at the William Morris gallery were just amazing so large goodness knows how long it took May to complete a piece. There was one piece which she had embroidered on very thin silk how she accomplished it without making holes I don’t know. I did take some photos but I don’t know how good they are. I will post them on Mary’s FB.
Regards Anita Simmance
Mary!!!!! I love this! I want to do this too! Thank you for posting about all the details. I may have queations as I move along! ~Darby Logan
Mary,
This reminds me of one of my husband’s favorite sweaters…which accidentally got felted. After which it fit me perfectly. Alas it had a number of holes from wearing it during winter rose pruning, so I fixed the holes. But, it still didn’t look quite right. So I grabbed a stack of analogous colors from Renaissance Dyeing and made random leaves. I didn’t know about the tissue paper transfer then!
When I finished it looked like a subtle tapestry. I loved that sweater to death. But I remember it fondly.
I do a lot of felting purposefully, not normally my husband’s clothes, and here’s my tip for when you wash them again. Wash by hand, roll in a towel to dry and put them on again before they are completely dry. The will conform nicely to your hand. This works for hats, sweaters and mittens!
Really lovely! Fun to see you working on wool!
Thanks, Holly!! Will do that!
Love to make mittens. Look forward to learning this technique. Do you think your sister would share her pattern for the mittens so I can get started?
Hi, Deborah – if you scroll up on the original article on Needle ‘n Thread (here: https://needlenthread.wpengine.com/2018/01/hand-embroidery-on-felted-wool-mittens.html), I’ve added the information on where to find the mitten pattern at the end of the article. Thanks!
Question – that may have already been asked.
Do you plan to ever wear the mittens? If so, how did you avoid stitching completely through the thumb, thus making it impossible to put on?
Hi, Linda – Yes, I play to wear them!! I scoop the wool felt for the stitches, rather than stab them, and I only pick up enough to hold the stitch. I don’t necessarily go all the way through the whole layer. And if I need to go through the whole layer for any reason, then I pinch the thumb, so that it is “cupped” open – so that it’s round and open on the inside – and then do the stitching. The wool felt is really sturdy and not floppy or anything, so it will hold its shape (with the thumb open) easily.
Are you using something inside the mitten to keep the layers separate, something like a darning egg?
Thanks, Mary, for all you do!
Hi, Rebecca – No, not really. I’m just careful not to go through the whole layer into the other layer. Occasionally, I put my hand in, if it’s in a position where I can put my hand in it and stitch at the same time. But mostly, I’m just careful to hold the layers apart from the outside when necessary, or just to scoop enough of the layer of wool I’m stitching, without going all the way through.
Please try Press and Seal! It is a wonder for transferring designs! I do wool applique all the time and this stuff is wonderful. It’s kinda like Saran Wrap, only it has a sticky side. Just trace your design on the P&S and then place on the mitten – stitch through it, cut around the design closely, then “carefully” tear away. You may need tweezers in a few places, but all in all it’s great stuff!
Thank you! I had a feeling there was something better than tissue paper. This sounds great!
Absolutely Adorable!! You amaze me. . . and, yes, would purchase 🙂
I think i would have found a thrift store wool sweater to felt and worked on a flat surface,making The mittens after. I did embroider on polar fleece to make faux crazy quilt mittens some years back and sewed the mittens once done. They hang on my door in winter.
Thanks, Elaine! That’s a good idea! What I like about the knitted then felted mittens is that you don’t have seams, really. I like that rounded thick look. But that is a great idea – to felt a flat piece first, embroider, then cut and assemble.
Mary, this definitely looks like an interesting project. More than anything, I love and appreciate it when you come right out and admit you don’t know or are not sure of a process. It makes your project more interesting to me and it gives me more confidence to try things I am not sure about. Thanks for all your show, share and tell. I love getting your newsletter.
It’s all the experimentation! 🙂 Thanks, Mary!
I’m wondering how you managed to not stitch through the other side of the thumb. Did you have something inside to prevent that?
Hi, Marilyn – I “scooped” the stitches, and I held the thumb so that it kind of “cupped” open, rather than holding both layers flat. Thing is, when stitching on felt this thick, you don’t necessarily have to scoop through the whole layer. In fact, the stitches tend to look better if you don’t – they don’t sink in as much.
I don’t know how the crewel embroidery thread will wash as I have next-to-no experience with it. But you needn’t worry the mittens will shrink further as long as you don’t agitate them. Soak in warm water with liquid dishwashing detergent (you can use expensive name-brand wool-washing detergents but it’s not necessary), swishing it a little. Drain a bit, rinse in cool water, then rinse again in cold. After the water runs clear, let it drain some more, then put the mitts flat between layers of bathtowels and do a little dance on them to squeeze out most of the water. Lay flat to dry on a surface that won’t be harmed by dampness. It will probably take a couple days unless the surface is warm 🙂 This process works for anything handmade of wool, knit or woven – I’m a handspinner, weaver, and have made quite a few felted items, including embroidered mittens – but those were woven and felted and sewn together, not knit, and I handspun and dyed the yarn I used for embroidery. The limiting factor is the thread you’re using for your embroidery and what handling it can take.
Thanks, Holly! Wool threads will wash, and they’ll be fine as long as they aren’t agitated, either. 🙂
Hi Mary, I found this on the web about a method to transfer designs onto the mittens. I have long admired these mittens and you may have finally inspired me to give this a try. Enjoy the learning process….it’s half the fun.
https://www.ravelry.com/projects/EvaL8/winter-mittens-dala-floda.
Hi, Susan – I saw that, too, but a little too late! I had already started the tissue paper process. When I came across those mittens on Ralvelry, it was a forehead-slapping moment. I use silk organza as a design layer on velvet, because 1. it’s a great way to see the design clearly, but – more to the point, perhaps – 2. it “lifts” the embroidery, and it keeps it from sinking into the pile. This would be great on the felted wool, which tends to be a bit sink-ish! Well, this pair is experimental. The next pair, I’ll experiment with other methods and threads. Can’t wait! My mind is already moving forward to the second pair…
My MIL has a pair of emerald green gloves with absolutely gorgeous folk-style embroidery on the backs – every time I see them I feel I turn as green as they are! She said she’s had them since she was a teenager (late ’50s) and they’re still in beautiful condition. I look forward to see how your mittens turn out.
Hi there,. I used the Press and Seal method of design transfer onto wool. It appears that it was a little less cumbersome than tissue paper. It was still not an easy process. It still pull your stitches away a little bit. It did mean that you didnt have to baste.
Happy stitching
I have been being haunted by a pair of embroidered wool mittens I saw at a craft fair last fall. Your new project brings a fresh surge of inspiration. They are charming already! I will follow your mitten adventure with glee! Another reminder that the joy and range of possibilities of embroidery know no bounds. I love the thought of these as much as your goldwork pomegranate…and I really loved that! It still lives patiently on my to do list…
Cheers,
Linda
Thanks, Linda! The goldwork pomegranate was a favorite, that’s for sure! The mittens are pretty fun – I’m learning a lot, and I have already been developing a plan in my head for changing things up a bit on the next pair. Different transfer ideas, different wool thread, and different approach to stitching. We shall see!
Hi Mary Corbet! Those mittens look amazing! I just wanted to let you know that you can wash the felted mittens without felting them more by washing them without agitating. I cannot wait to see them finished!!
What did you put inside the mitt so you did not stitch it together?
I’m just being careful not to. Occasionally, I put my hand in there! But when scooping the wool felt, I don’t necessarily go through the whole layer.
G’day,
Whoa! Thumbs up to you Mary.
Cheers, Kath
LOL! 🙂 punny, Kath!
Hi,
Some tips directly from Sweden. You could use Appelton crewel wool, then you dont need to work with two strands. There are a lot of coulors. Some good books to this topic
Ingrid Eggiman Jonsson, yllebroderier
Helene S Lundberg, Helene S yllebroderier
Eva Berg, Carina Olsson, Anna Wengdin, Annhelen Olsson, Brodera på yllebroderier
And the Books of Karin Holmberg, they are also availibel in English.
I wish you Nice stiching
Elisabet,
Thank you for the information. I have quite abit of Appleton Wool, so it’s terrific to find I will not have to purchase other materials!!
Gayle in Maine
Hi Mary,
I’m very excited about following your mitten progress. I would LOVE to try this myself. Can you share information about the knitting pattern (name of pattern & maker) & where your sister obtained the pattern ?
Gayle in Maine
Hi, Gayle – the Pattern is available in this book: http://amzn.to/2CUXUK9
I am excited for this project and look forward to reading along with your progress. I like the design you picked, your mittens are going to be so pretty.
I know you are concentrating on the embroidery aspect of the felted mittens, but I was wondering what knitting pattern you found for the felted mittens. I have several books with felted hats and slippers but I do not have any with mittens.
Please share that pattern. Thank you.
Hi, Barbara – the pattern is available in this book: http://amzn.to/2CUXUK9
Ooooooooo, this would be PERFECT as a Christmas gift for my MIL next year. I will have to try them out on me to work out the kinks. Couldn’t give her an inferior mitten after all.
Is it possible to have a pdf of the design on the gloves that you tweaked? Thanks!
Hi Mary,
I’ve been most interested in your fun embroidery on felted gloves project. At EGA National Seminar, I’m taking
a similar class, “Wool Appliqued Fingertip Gloves”, a one day class on Wednesday. Have you seen the project?
Stay warm and keep stitching.
Kathleen
Hi, Kathleen – thanks! I haven’t seen that, but I will look it up!
Mary- I have seen many pairs of mittens made by first shrinking sweaters and then cutting out the mitten shape and machine stitching it back together. Although that really doesn’t change the design transfer problem. It might make it easier to stitch the thumbs!
Nice! Im getting ready to do something similar on a hat and fingerless gloves. I hope to keep up with your work. Thanks for sharing your project!
I’m reasonably new to embroidery ( returning to it after 40 years!). I have mastered a few basic stitches and everything looks alright, but I feel stuck in place…
I need to force myself to learn new stitches, transfer images, etc. I could use some helpful advice.
Hi, Holly – my advice is pretty simple: find something that excites you – a design, a kit, a finished piece – and dive in! You can’t really “fail” at embroidery. Yes, you can make mistakes, you might have to experiment with different approaches, but it’s all just a process. So just find something you REALLY want to do, and dive on into the process!
Beautiful gloves and perfect stitching. Too beautiful to wear and possibly damage.
Came across beautifully knitted gloves the other day. Made as a gift for me by my new MIL 53 yrs ago, they were really too beautiful to wear, so I only wore them when we visited her in Maine. Happy to still have them, and just as she made them.
i have a nice pair of felt gloves I would like to try to embroider. I was wondering if you put cardboard or some such inside the glove so you would not stitch through the other side.?
How do you hide the knots?
I didn’t use knots, but even if you did, you would just make very small knots and let them catch on the inside of the felt, in the mittens. They would definitely sink into the felt wool and catch there. But normally, I don’t use knots. I would just take the thread in and out to make tiny catching stitches along the line I was going to embroider, or within a space I was going to embroider, and then embroider over those stitches.
A FREE knitting patter for an oven mitt is available on Ravelry.com!