


Happy Friday!
Today, we start the actual stitching on Party in Provence! Yay! For those just joining in, this is the embroidered kaleidoscope project we discussed week before last, when we talked about the materials and supplies needed to embroider the design.
If you plan to embroider Party in Provence and you’re not ready to start yet, no worries! The articles will be available on Needle ‘n Thread when you’re ready, and they’ll be indexed under Tips & Techniques in the main menu, where you’ll find other step-by-step embroidery projects and tutorials that have been previously covered on Needle ‘n Thread.
In this installment, we’re going to launch into the first stitched layer around the kaleidoscope, which actually might not be the layer you expect! I’ll tell you why I started with this particular layer, explain how I stitched it and what threads I used, link you to pertinent tutorials for techniques, cover some tips to help you stitch the round successfully, and even show you a failed experiment on this layer of the design and talk about why the attempt didn’t work for me. At the end of the article, I’ll mention some supply information, for those looking for supplies for Party in Provence.
Even if you’re not working Provence, I hope you find the tips and musings in these follow-along articles helpful for your own embroidery projects!
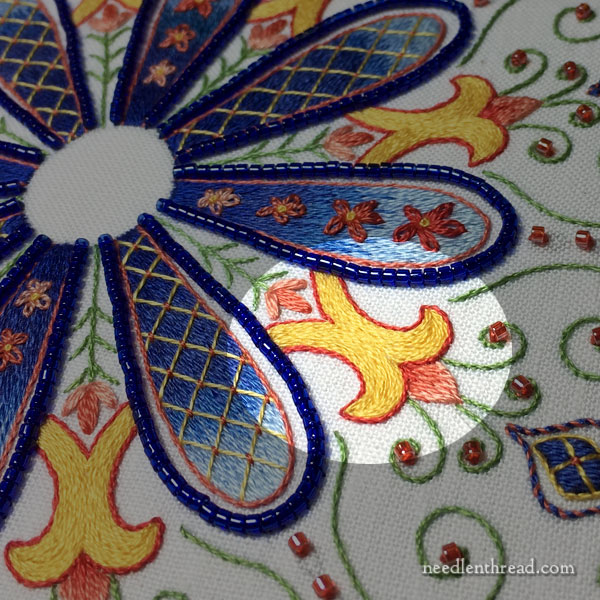
In the photo above, the highlighted element is what we’re going to address first on the design.
You might very legitimately ask Why? Why not just start with the large petals in the very center?
When you look at the design (which can be found in my e-book Favorite Kaleidoscopes), you’ll notice that the large central petals seem to overlap this little yellow fleur-de-lis element. This element, in the scheme of the design, seems to pop out from behind the larger blue petals.
Since the stitching of the petals overlaps just the edge of the yellow element, I wanted to make sure that I had that element stitched before working a petal on top of the edge of the yellow elements.
Now, it isn’t entirely necessary to work the whole round of yellow fleur-de-lis elements before tackling any of the petals. But you want to work the yellow element on each side of any particular blue petal before you stitch that blue petal, so that you don’t have to worry about working the edges of the fleur-de-lis underneath an already-stitched area.

In order to stitch the fleur-de-lis element, though, you have to take it apart. The central little bump on the fleur de lis is a different color, and if you consider the design as a whole, the yellow of the fleur de lis overlaps this little central bump.
So we’re going to start there, with the central bump on the fleur de lis.
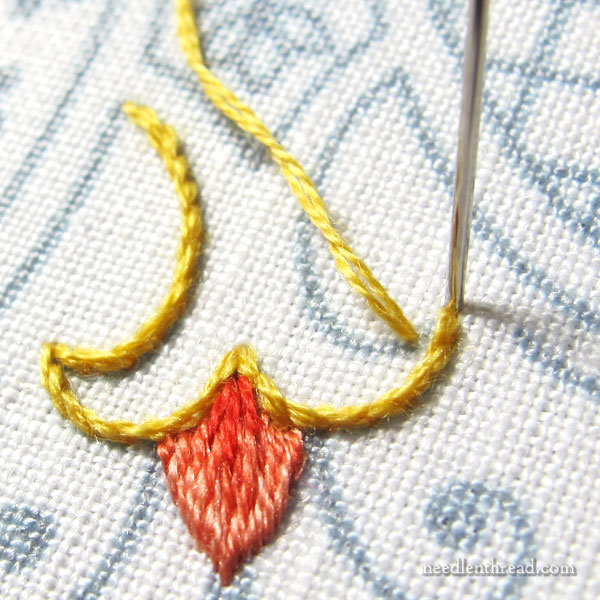
This little element is embroidered with one strand of floss in the following DMC colors: 353 (the light shade on the edge), 351 (the medium shade) and a couple tiny stitches of 349 (red).
You’ll start stitching this element by working a split stitch line in 353 over the line of the peak, but not on the line shared by the yellow.
Then, work the first layer of long and short stitch over the split stitch line in 353, filling more than half the shape with the first layer. Finish filling the shape with long and short stitch in 351. Then work about three more long and short stitches in 349 on top of the second layer, right in the center of the petal shape.
Long & Short Stitch Tutorials
You can find tutorials for long and short stitch shading here, and specifically, the video tutorials for long and short stitch are located here.
With this particular element, the size is quite small, so just keep your stitches vertical and straight when filling across the element. It won’t take many stitches!
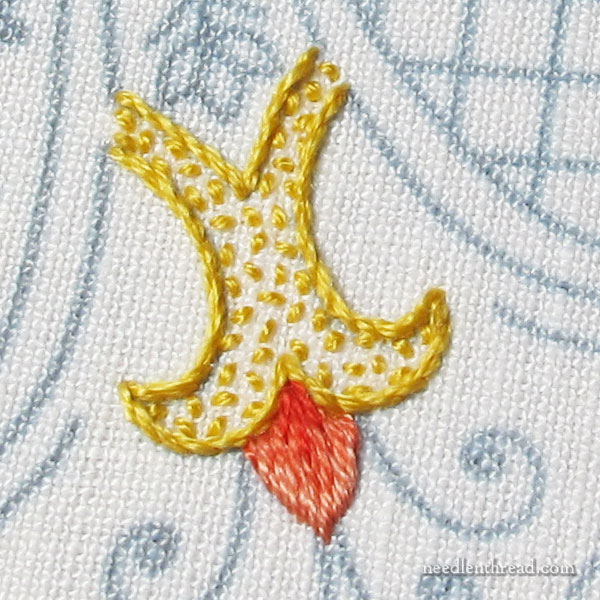
In the photo below, you can see a good shot of the element with the three red stitches in the center.
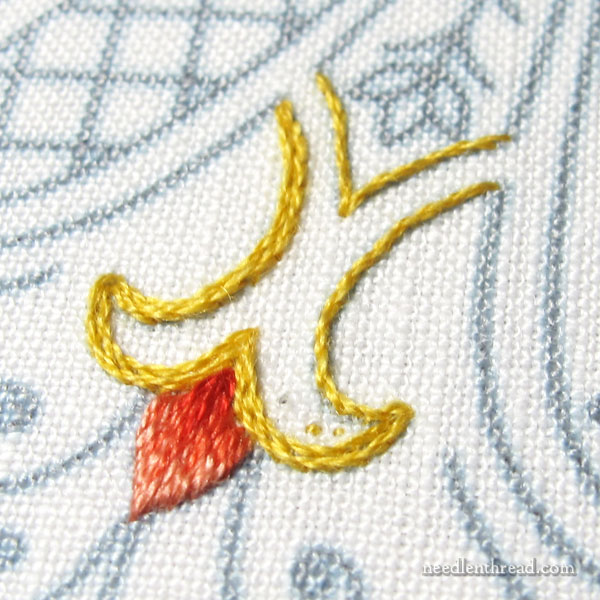
The yellow part of the fleur de lis shape is stitched with two strands of yellow (743), using stem stitch as a filling.
Start on the outline of the design element, and cover it with stem stitch. When you reach the sharp tips of the element, start a new line of stem stitch (as shown in the photo above), bringing the first stitch of the new line up a stitch length away from the corner, and back to meet the previous line at the corner. Treat each segment of the shape, in other words, as its own little line.
You can find a thorough photo tutorial on how to stitch sharp stem stitch corners here.
You can find a video tutorial for stem stitch here.
To fill the shape, continue working from the perimeter towards the center.
As you approach the center, the areas to fill will become progressively smaller until the two sides meet in the middle.
You don’t want to crowd the filling super-tight, but you don’t want it loose enough that you can see the ground fabric.
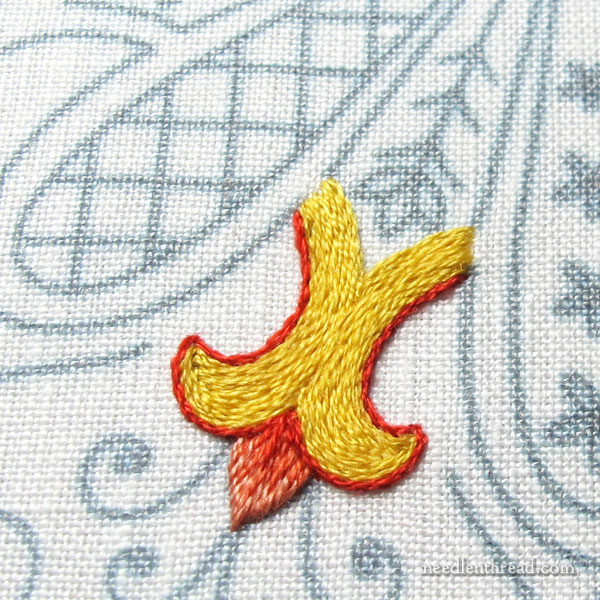
In the photo above, you can see the general “movement” of the stem stitch filling and how the two sides of filling eventually meet in the middle. When the two sides meet as you fill, just move to the areas that aren’t filled, and continue to stitch your stem stitch lines. In some very small areas, you might only fit one straight stitch in to cover the final bit of fabric.
When you’ve finished filling the fleur de lis with the yellow stem stitch, outline the whole yellow part of the shape with one strand of 349, using stem stitch worked very close to the yellow shape.
What Didn’t Work and Why
When I started working out this design, I knew I wanted this fleur de lis element to be bright yellow. But I didn’t know if I wanted it entirely filled.
I played a bit with the idea of texture, too – maybe I wanted some of the elements a little more textured than others?
So I tried a combination of seed stitch and stem stitch on the element:
As soon as I stitched that, I knew it wasn’t what I wanted! First of all, it didn’t pop with the notion of Sunshine! It seemed insipid. An obvious reason for this is because it isn’t outlined with the red (which always makes yellow explode). I really wanted this ring on the kaleidoscope to look like a burst of sunshine, so I knew the seed stitch wasn’t going to do it.
There’s also the problem with the texture here. Sunshine isn’t bumpy! And I realized that the texture of the seed stitch would clash with the texture of the beads around the large blue petals – it would be too much. So the choice was a long and short stitch filling or stem stitch filling.
I went with stem stitch because it worked for what I wanted. It provided a relatively smooth burst of sunshine! And, using two strands, it worked up fairly quickly.
However, if I were doing this project again, I would probably fill the yellow part of the fleur de lis with long and short stitch filling, using one strand of floss. It would be slightly smoother and it wouldn’t have quite the same “movement” to it, because it wouldn’t split down the middle where the two sides of stem stitch filling run into each other.
So, that’s up to you! If you’re comfortable with long and short stitch, you might prefer to try long and short stitch to fill this yellow element. It’s a little trickier on the two sides of the shape coming towards the center, but once you work through those, working down the center of the shape would be a breeze.
If you’re relatively new to embroidery and you haven’t done much long and short stitch filling, you’ll probably find the stem stitch filling easier.
On Supplies
I’ve heard from many who are looking for Alba Maxima linen, as Needle in a Haystack is out. They are, however, taking orders for their next shipment coming in next month, I believe.
In the meantime, though, you might find the fabric still available at other shops online. Threadneedle Street in Issaquah, Washington, might have it. And A Stitching Shop in Denver, Colorado might have it. If you really want to use Alba Maxima, you might check either of those, and if you don’t see it listed on their websites, you could always give them a call.
But you don’t have to use Alba Maxima! You can use any good linen with a nice full weave. The French Needle carries this Graziano linen that’s nice to work on and would work great for this project.
And you might have your own favorite high count linens by other manufacturers that you like to work on. That’s fine! You can substitute!
On thread colors: I listed 743 as the yellow that I used in this project. In fact, I used 725. I made a note of the switch in my little project notebook, but forgot to change it on my original thread list! It won’t make that much of a difference in the finished kaleidoscope, as both shades of yellow are quite similar. But if you want to be very very accurate in replication, then you might switch to 725.
Questions & Discussion
If you have any questions or you want to discuss the project with me or other stitchers, feel free to use the comment form below.
If you want to send me photos of your progress to ask questions or get feedback, you can email me at mary (at) needlenthread (dot) com, but for follow-along projects like this, the best way to interact about the project is in the comments below.
I hope you have a terrific weekend! I’m working on my embroidered mittens this weekend. What are you working on?
Mary – I was so pleased to open your email this morning – I just love it when you do one of your projects! The tips are great – and they apply to stitchers and projects everywhere – and I really like the photography. It explains every detail beautifully. I am not stitching this particular project – but rest assured I’m going to soak up every tip and I’ll be with you every step of the way!
Please provide your recommendations for fabric preferred for making a tablecloth using Hardanger stitches. This tablecloth will be used. The fabric should be 28 Count, a color of white, should have qualities to be bleached/laundered and should hang nicely/be supple.
Thank you.
I enjoy reading/viewing your embroidery information.
Ann
Hi, Ann – I suppose I’d look for a good 28 count linen.
Dear Mary
A really good post full of tips and techniques and good instructions on the design Party in Provence, which is a very complex design and a lot of different elements to it. I think I prefer the stem stitch on the yellow area because it compliments the long and short stitch on the fleur-de-lis. Your stitching on the above is beautiful. Thanks for sharing with us your tips and techniques on party in provence and for the information on supplies very helpful. I hope you have a great weekend.
Regards Anita Simmance
So fun to watch you through this project! Thanks, Mary.
I’m really looking forward to starting this. I hope I can find a way to work while my “shoulder impingement” (from knitting, no less) heals. Otherwise I’ll have to let everyone else get a head start on it.
Mary, your comments on what to stitch first reminded me of applique, of which I’ve done a lot. Always start with the element that is “on the bottom” is the way I put it. And then stack as patches “overlap” in the design. Never thought of embroidery that way. Glad to get such a useful tip.
Dear Mary, ever since I started following your columns a long time ago, I have admired your skill, your sense of color, your techniques and the beauty of your projects. Most of all, I admire your extremely positive attitude about your health issues and your continuing cheerfulness. I am a five-year survivor of two types of breast cancer, so I really do know some of the issues you have faced with such courage.
I do have one request of you. Please, please publish a “paper” book of all your wonderful columns and patterns.
Wishing you the best of health and blessings, Sue
Thanks, Sue! Ahhhh…..a paper book! Well, i will keep that in mind! Bit swamped right now with the challenge of making a living day to day, but who knows what the future may bring!
“If you plan to embroider Party in Provence and you’re not ready to start yet, no worries!”
That’s me… :-/ But I’m desperate to catch up! Just didn’t manage to apply myself to the preparations which is ironing and cutting the fabric first, then printing out and transferring the design… and – oh! – I guess I’ll have to order DMC threads for the first time in my life, because my cheap stash will surely be lacking in some colors… and to buy beads, right, but that can wait, since several shops in town are carrying beads…
Boy (or rather ladies!), I’m dying to stitch along with you! 🙂
Angela from the Ore Mountains
This project is so appealing! I really love the movement in the design and your color choices. I can’t add it in right now, but at some point I would like to make a set of three of your kaleidoscopes into a set of pillowtops. I do agree with Anita: I like the stem stitch and the little dividing line it created. Thank you so much for this post, Mary, and the detailed process you shared. I will be keeping tabs on this one for sure.
Linda
Okay, I’m going to admit it:
Every time I read “Party in Provence,” I envision a bunch of embroiderers slightly drunk on French wine and arguing over the best way to stitch French knots.
For some reason, Daniel Craig is also there.
LOL!!!
Well, sure! You got to have Daniel Craig!
Don’t forget the acres and acres of lavender all around us! It doesn’t take much wine to get drunk here, I guess. ;D (I can just picture the resulting French knots *lol*)
Mary, I have an important(for me), question. I am looking for a heavy duty quilting frame about 18″ to 24″ in circumference and about 1″ deep or more. Do you know of a source where I can get one from Germany. The only source I have located is a 12″ hoop and that is just not big enough and also they want about $50 for the 12″one. I think that is a little overpriced but I may be wrong. Your comment on this will be greatly appreciated. Thank you so much! Kay H
Hi, Kay – I don’t know of one off the top of my head, but hopefully someone out there will see your comment and be able to help you!
Do you think this design would work using crewel instead of cotton?
Hi, Mary – You’d have to really enlarge it quite a bit for crewel work. In fact, I’d say it would have to be almost twice the size (so, around 15″ in diameter). Otherwise, the weight of the thread would overwhelm the design.
I ordered a bunch of silk thread (goy carried away by the beautiful colors) and now I find it almost to work with them. did all the hints from you and others but one said to iron it first. am hesitant on this one. some thoughts from you?
It depends on the silk you’re using, really. Best tip, especially if it is flat silk (like Chinese silk) is to use a laying tool! You really shouldn’t have to iron silk thread, and often, if you do, you end up with extra static in the thread.
Good evening, Mary! I just received my materials for this project – DMC cotton floss, Mill Hill beads and a linen coupon. Now, I have absolutely no practical notion of fabrics, and this is the very first linen I ever had in my hands. I don’t even know how a good hand actually feels. It’s a 40 ct. Newcastle linen from Zweigart. Do you happen to know this kind of linen? Can you tell me whether it’s a good fabric and suitable for this project? I don’t actually plan to wash it. Should I pre-shrink the linen anyway? Thanks in advance!
Angela from the Ore Mountains
Hi, Angela – Yes, I’d go ahead and pre-wash. With Zweigart linens, the threads are often a bit “uneven” in thickness – some thin, some thick – so I’d definitely back the fabric with cotton, so that your stitches always have fabric to hold onto and you’re not left at the mercy of uneven threads in the linen dictating where you place a stitch. You can end up with stitched curves and lines that aren’t as smooth. I’ve not used the Newcastle linen from Zweigart in a long time, so I can’t recall its exact features, but just in case, I’d definitely back it.
You’re right, Mary, there are stark differences in the thickness of the threads. Now, when you search for “Musselin” (muslin) on German sites, you never find a fabric other than the loose stuff that diapers are made of. I have no idea how they call here what I imagine it should look like. (Can anybody help me along? Some ladies from German-speaking countries over here?) But I found the perfect backing amongst my cheap (very cheap!) stash from a second-hand market: a delicate pale lilac cotton – perfect for a lavender party in Provence, isn’t it? 🙂
Next problem: the design transfer. I’ve ordered some dressmaker’s carbon paper today, in red and blue. Please keep your fingers crossed that it will work, else I’ll be at my wit’s end. (Iron-on pens don’t work, tracing an extensive design like that at the window pane is worse than a pain in the neck (even one of the little Christmas trees was sending cramps in my arm), Prick and Pounce seems to be a method unknown over here, and basting such a lot of teeny-tiny details … ? *shudder*)
The pre-wash at least went pretty easy. Thanks for all your advices, like straightening up the edges of the fabric, basting a cross for centering or binding a hoop – I bound mine yesterday and believe it or not – it was real fun! You have no idea how much I already learned from you.
Oh – just one more notion – for all non-Anglo-American folks around here: The “Hardwicke Manor hoops” (you won’t find them under that name in Germany) are made by Klass und Gessmann (they’re not always declared as such, though – look for the manufacturer’s logo on the hoop).
Angela from the Ore Mountains
That’s right – same hoops! I wish you could get your hands on the Sublime Stitching fine-tipped iron-on pens over there. They really work well for projects like this. Or, a light box or light pad? Once upon a time, before I finally invested in a light pad, I used a piece of plexiglass, set it between two tables, and stuck my stitching lamp under it, and that’s how I’d trace my designs onto linen. And before that – I had a glass topped coffee table at one point, and I’d lay my stitching lamp down on underneath the glass top, and work on that. So, if you can finagle something like that with plexiglass or maybe even a framed piece of glass or something, you might be able to set up a tracing area that doesn’t wear your arms out. It all depends on the weight of your fabric, though. If you’re using something that’s medium weight or heavier, it could still end up being a pain in the neck to trace. I hope the dressmaker’s carbon works! I’ve had good luck with it on smooth fabrics, like silk satin. I’ve not used it too frequently on linen. The bumpier the linen, the more difficult to transfer that way. But if the linen has a smooth hand, it should work!
The fine-tipped pens – yes, I would wish that, too. As yet I didn’t found them here. If nothing else, maybe I’d give it a try and place an order with Sublime Stitching, as long as the shipping doesn’t exceed the price. (can’t find the shipping charges on their site)
As to the dressmaker’s carbon – I have some in white and yellow available, and the yellow one showed up quite decently, though the Newcastle linen isn’t smooth at all (as far as I can judge). It was just too faint, because of the yellow on white. That’s why I hope (hope so dearly!) that the blue paper I ordered will do the job.
Lightboxes or lightpads are terribly expensive, some hundred Euros, so… nope, not for my purse.
But Mary – you are simply ingenious, did you know?! A plexiglass?! Of course! And best of all – I have two panes of plexiglass available PLUS a brand new LED magnifier lamp! Just have to give the panes a thorough cleaning (I used them for painting). Thanks a million for this splendid idea! 😀
LIGHT BOXES – especially for Magaluisa (sorry about the spelling I can’t reply to the question below) I ordered a very inexpensive light box on the US Amazon.
https://www.amazon.com/gp/product/B074QMTX2B/ref=oh_aui_search_detailpage?ie=UTF8&psc=1
It was only about $18 and must be plugged into a USB adapter. Which means you can use it worldwide (hmm… just realized that is probably why they do it that way) I looked at the German version of Amazon and they also had inexpensive light boxes. Anyway.. I looked for the ones that had the most positive feedback from a lot of people. Then I read the bad comments about why people didn’t like it. For this one, they said it was fragile… well… I am not tracing that much stuff & I am gentle & careful with my stuff. And that if you accidentally laid your arm on the on/off button on the corner, the light gradually dimmed (which it is supposed to do, but is a bit to sensitive for some) So far I have been VERY happy with it. Yes, it is cheap. Yes, it is delicate. OH MY Yes it is waaayyy better than a window! And I don’t end up with pounce dust or pen all over everything (has to be operator error..) I can spend my saved pennies on beads, silk, goldwork supplies, linen… yum!
In one of your posts you talked about Hoops to buy that we’re good I can’t remember the name of any of them and I can’t seem to find the post can you help me
Hi, Bobbie – Here’s my hoop article: https://needlenthread.wpengine.com/2009/07/embroidery-hoop.html You can also use the search feature in the top menu of the website, and type in “embroidery hoop” – you’ll get several articles on binding hoops, etc.
Hello Mary,
When you back your linen with white quilter’s cotton do you just layer them and stitch them together as you go or is there a way that you baste them together? Not sure about this step and I couldn’t find a reference to it in tips and tricks. Thanks, Anne
Hi, Anne – I make sure that their grains are aligned (warp and weft threads – you want the threads in the backing fabric to match the directions of the warp and weft on the ground fabric, so that neither is turned on the bias in relation to the other) and then I mount them both in the hoop or on stretcher bars at the same time, and tighten them equally. Make sure to check the back so you can see if there’s any wave in the backing fabric. And then I just start stitching. You can baste the two fabrics together, but I find that, when I baste them when they aren’t under tension, when I put them in the hoop or on the stretcher bars, invariably, the backing fabric will ripple. So I just hoop them up together. Once you start stitching, they’re joined, anyway.
Mary, I have a quick question about the Party in Provence project. I think I have everything I need to start the project but before I transfer the design onto my fabric I wanted to make sure that we are using the design on page 5 of “Favorite Kaleidoscopes” and not the corner split on page 33. The pictures you show on your web site look bigger than the design on page 5 so I just wanted to make sure. Thanks Dale
Yes, the full design! It’s not as large as you might think – the photos tend to make it look larger, though. Remember, much of it is done with a single strand of cotton.
Bought the designs, bought the thread and fabric. Painstakingly transferred the design and began to sew. Unfortunately, I don’t seem to be able to work with one strand of floss. It is too fine for both my fingers and my eyes. I suppose I would have to enlarge the design if I wanted to use more strands. The photos make the threads look quite thick. it was a good learning experience though.
Hi, Jennie – have you thought about using a magnifier? They really come in handy!