


Thanks to a bit of home-bound weather on Thursday, a bit of determination on Friday, and a bit of down time on Saturday, I’ve made some progress on the wool mittens I started last week!
This project is an ideal project for deep winter, especially when you live in a house that’s about 150 years old. There’s nothing quite like being able to stick your hand inside your embroidery project for a quick warm-up!
I’m learning a lot as I work through the first mitten, and I’m keeping track of little tips to share with you, should you decide to embark on a similar project. So, let’s talk progress!
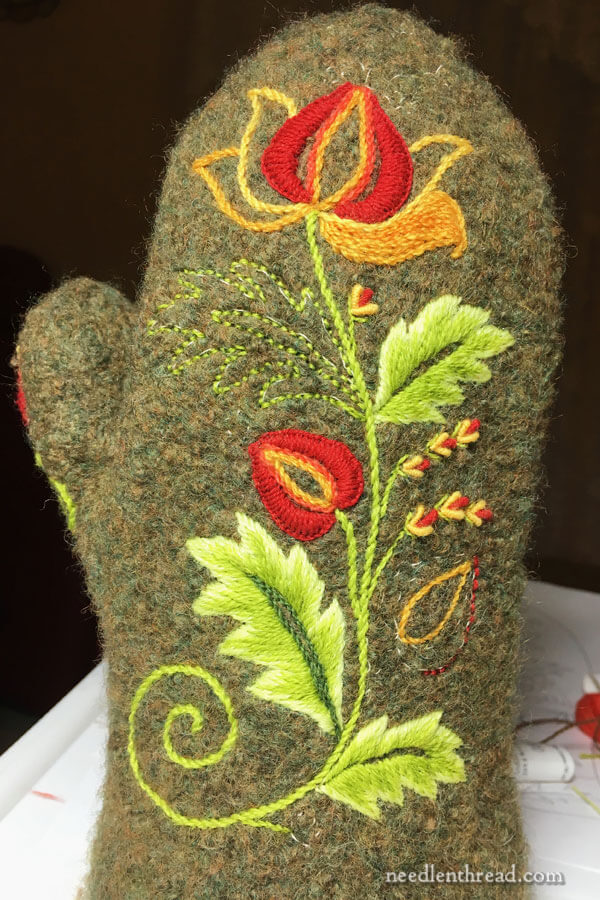
At the end of the weekend, this is where things stood with my embroidery on these felted wool mittens.
The Mitten Pattern, for Knitters
For those who didn’t catch it and were asking about a pattern, I updated the first article on this project to include the source of the mitten pattern. You can find that information at the very end of Hand Embroidery on Wool Felted Mittens. Just scroll down to the end of that article for the pertinent info on where to find the pattern.
What I like about this mitten pattern is that it includes a knitted second cuff (unfelted) fitted inside the outside felted cuff, that I’ll sew into place after finishing the embroidery. In cold weather, this inside cuff keeps your hands super toasty, it blocks out stray snow that might sneak in, and it fits the mittens nicely to your hands.
There are a couple changes I’d like to see on the knitted pattern, and I’ve put my knitting sister onto that. I think she’s going to experiment with a second pair and change the pattern up slightly to customize it.
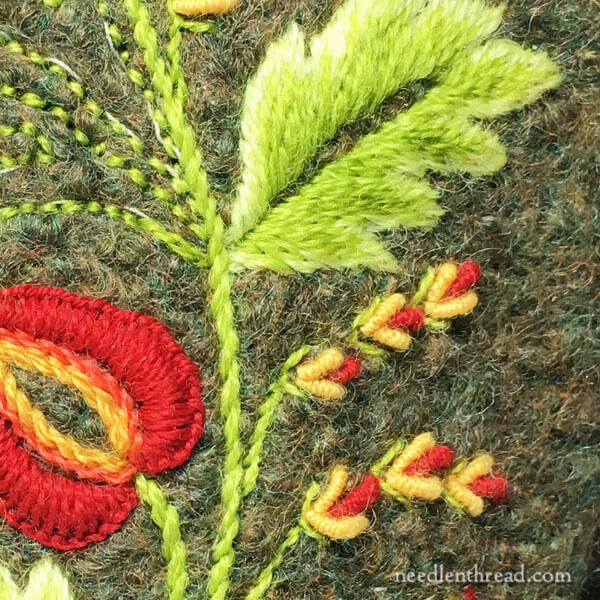
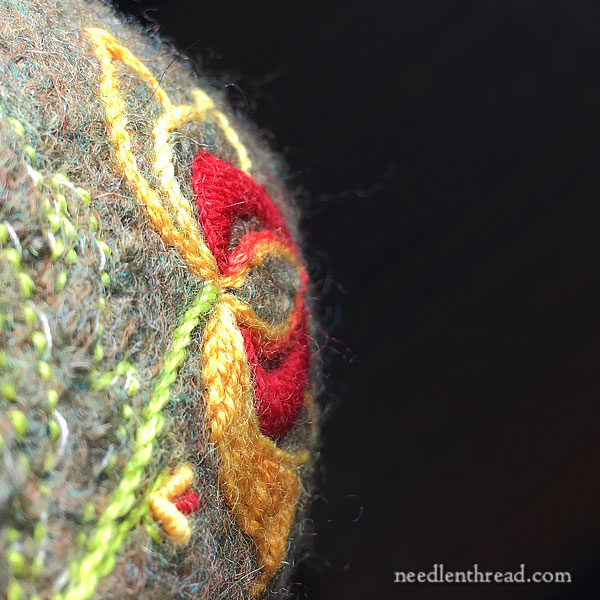
In the original design that I tweaked up for the mittens, these little sprays are actually round dots on the pattern. I like to put dots on a pattern in situations like this, because I’m not exactly sure what to do there yet. Dots would be ok, but I really wanted to pull in both the red and the yellow in the rest of the design.
So, instead, I worked up these little bullion stitch bud-like thingies.
I discovered that, in the scheme of All Things Wool Mitteny, bullion stitch is actually a super-easy stitch to work on the mittens, since the stitch is always done from the front, anyway. Relatively speaking, it is easier to execute than most of the other stitches!
When I started these little buds, I wanted the bullion knots to taper towards the base, and it worked out pretty well with most of them.
I found that, ironically, when I tried to concentrate on getting them to taper, the knot wouldn’t tighten up on the end. I’d end up with a “perfect” bullion. So I decided to stop thinking about it and just pull with a will and see what happened. That’s when I got the taper. Not a very precise explanation of how to get bullion knots to taper, but it seemed to work!
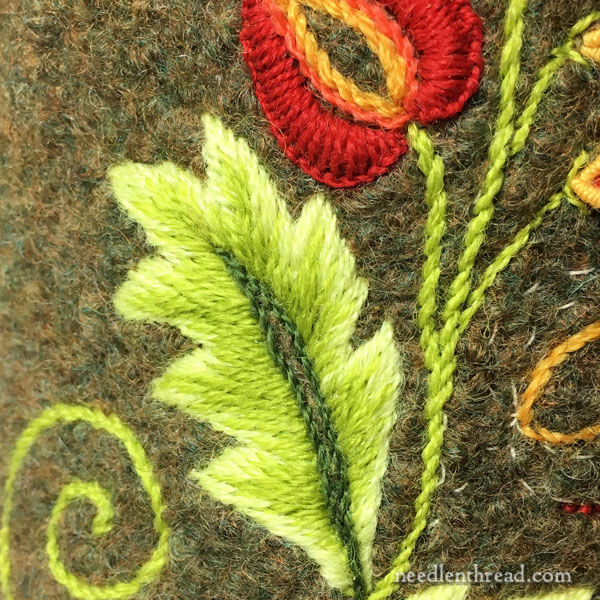
This long and short stitch leaf came out ok. It’s worked down near the cuff end of the mitten, so it’s very easy to access the back of the embroidery, allowing me to be more precise in my stitching.
I didn’t have to “scoop” each stitch – I could actually stab it, grab the needle, turn it around and send it back up. It’s not so easy to do this deeper into the mitten, so I started with this leaf just to get the feel of the long and short stitch on the felt.
I thought it turned out ok.
The dark green stem stitch up the center was added for two reasons: it neatens the inside edge considerably and evens it out a bit, and it adds a little more depth and contrast, even though it’s pretty much lost on the darker background! But it’s still an improvement over not having a bit of dark color in there.
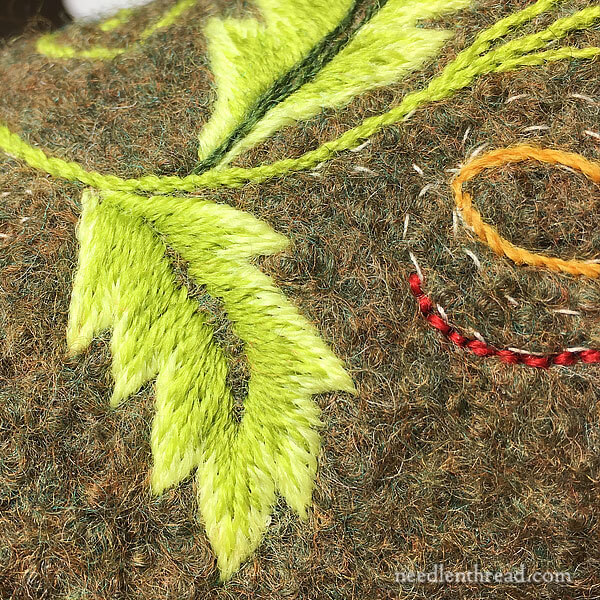
This is the Ugly Leaf. It doesn’t have that dark green down the center yet, which would be helpful in tidying things up there. It’s also a bit cramped. And it looks like part of the leaf was sliced off on the upper edge.
I thought this would be the easiest leaf to stitch, since it’s the closest to the edge of the cuff, but after being super careful and stitching super slowly on the leaf at the top of the design, I think I tackled this one with a little too much laxity. I figured I’d fly through it, and I did. But it came out a bit of a mess.
I’m not going to pick it out. This is all by way of experiment for me. I’m not fussing over a perfect finish.
This shot is just to give you a sense of the way the embroidery sits on the felted wool. I like it! I like the way the wool embroidery feels on the felted wool, from both the inside (when my hands are in the mitten) and the outside.
I hope to finish Mitten 1 this week and get Mitten 2 underway. I’m eager to experiment with a different transfer approach that I have in mind.
Questions?
Want to ask any questions or join in the discussion? Feel free to use the comment form below!
Later this week, I’m going to show you something Really Pretty, really informative, and really worth a look – you historical embroiderers and book-loving stitchers and garden-enthusiast-needlers will just love it, I’m sure!
Hope your week’s off to a grand start!
I love the progress so far. This looks like such a fun project. I do have one question that you probably can’t answer yet. I assume you will pick out the pattern stitches where they show; how hard is that going to be with the texture of the felt and the stitches over the top? I had never seen that method of pattern transfer before and I’m curious how it all works.
Hi, Joyce – I either stitch just outside those lines so that they’re covered in filled areas, or I pick out the threads as I go. Occasionally, a thread sticks because it’s stitched over, but there’s an easy solution for starting and ending (and removing) threads with this type of stitching. A lot like quilting, you pretty much sink your stitches inside the wool (running them through it in an irregular line), pull and cut. The end pulls inside the wool and you never see it. So when there’s a pattern stitch that I can’t get rid of, if I pull on it, and cut it close to the mitten, it just sinks in and disappears. I’ll cover this kind of stuff when I put together a list of tips.
Wow it looks amazing!
Dear Mary
The embroidered mitten is lovely I really like the design and I like the bright colours of thread you have chosen and the bright bullion stitch where the dots were is a great idea. I can see these unusual mittens becoming a topic of conversation. I look forward to more progress on these thanks for sharing with us the embroidered mitten and for the tips and techniques you have applied to the embroidery.
Regards Anita Simmance
Mary,
Your mittens are lovely. The colours really perk up the neutral knitting yarn. This is a great idea for embroidery a very useful item.
I think you are way too hard on yourself! Your work is just beautiful! It gives me something to aspire to!
🙂 Thanks, Sharon!
Good morning Mary
It is cold here too. -38C this morning.
I do not think your ‘ugly leaf’ is ugly! It is lovely!
You have done a marvelous job on the mittens.
I have been doing hand needlework for decades and have tried almost all techniques.
Presently I am working on a Blackwork Sampler with running stitch. This is difficult for me; I prefer surface embroidery – crewel, needle painting.
The other day I was thinking of the many ways I have learned to finish and to start a thread.
Would you be interested in writing up and showing your fans all the ways that you know to start and finish threads?
I do enjoy all of what you do. It is all ‘first class’.
Sharon in Canadian Winter
Thanks, Sharon! Yes, I could do that. I have the basics on here already, here: https://needlenthread.wpengine.com/2008/09/beginning-and-ending-threads-photo.html
As usual your embroidery is beautiful – even the parts you say you are messed up! 🙂 I’m curious how stiff the mittens are? How fitted? Are they much larger than your hands or a perfect fit? I’m a knitter but haven’t ever done felted slippers or mittens like this. (Cat toys don’t count). Thanks!
Hi, Nancy – the mittens are stiff enough that, to take the first picture in this article, it’s standing up by itself on my little worktable, with the cuff as the base. They’re a good fit for my hand – in fact, yes, I’d say a perfect fit. During the felting process, I kept turning the mittens right side out (they’re inside out while you felt them) and sticking my hands in them to check the fit. Once they were just right, I stopped felting them. The thumb looks incredibly large because it’s very thick as far as the felted wool goes, but the inside is just right. The wool on the whole mitten is very thick! If you live in northern climes and you like warm hands, they’re really ideal, whether embroidered or not!
Hi, the mitten looks so pretty and it has given me some food for thought. I have an embellishing machine and so am thinking maybe I could felt up an old jumper, embroider a design then cut out mittens and stitch them around. I might try this and let you know if it works. I really enjoy your posts and have learned such a lot from you.
What did you do to give the gold a reddish color? This is a most interesting project. I like what you teach when you are experimenting. Thanks.
Hi, Carol – that’s just the color of the thread. It’s a deep warm yellow.
Quite frankly, I don’t see any faults in that “ugly leaf”.
Mary – you are WAY TOO hard on yourself – your wool mitten embroidery is FANTASTIC – so beautiful….there is nothing ugly or wrong. I love the colors you used and the stitches too. Thank you so much for sharing – too bad I cannot knit.
LOL! I can’t knit, either. I keep thinking I’ll make an effort to learn, but it just doesn’t grab me. Fortunately, though, I have a wonderful sister who is a wonderful knitter. And she is always super enthusiastic and supportive of my Needle ‘n Thread adventures, so she took the time to knit up a pair when I told her what I wanted to do. I’ve talked her into a couple more pairs, too (I think). We’ll be meeting up at the end of April in New England. I can’t wait!
Hello Mary,
Wow! This is so nice, love the colors and the design. Hope they keep you warm all winter.
Have great day.
Louise
Very pretty, Mary!
Thanks, Ann! I’m glad you like it!
You are an inspiration Mary. When you were doing your felting did you put anything inside the mitten so that the front and back wouldn’t felt together? ttfn
No, I didn’t. You don’t really need to, except between every felting session (it took three times) I inserted a chopstick inside the thumb and opened it up, to make sure it wouldn’t felt together. The other parts of the mitten are large enough and loose enough that they don’t felt together. But in any case, I did insert my hand between every session just to check to make sure of the fit.
Hi, I like your ‘ugly’ leaf. When you finish darker centre it will be great. After all nature is not always perfect. It has character, sort of I’m here. In spite of any perceived faults. Tell your leaf that it’s an individual 🙂
Thanks, Coral! 🙂
Mary really love your work. Remember we can be our worse critic. Just a thought for the knitting, if they are knitted with the two needle method then felted (it would make a flat piece except for the thumb) then after embroidery you would have a side seam to sew up. I have done small coin purses this way.
Those are the prettiest mittens I’ve ever seen! I just love the colors! – Ugly what? You must be joking! Yesterday, I was searching for the German name of the Long and Short Stitch and found out that they call it an interlocking Satin Stitch – and indeed I saw that they all work needlepainting here in a stepwise offset Satin Stitch, they don’t split the thread and every stitch has the same length. I didn’t like the resulting needlepainting I found googling around, it looks really clumsy – AS for instance in comparison to your leaves! Your so-called “ugly” leaf is a thousand times prettier and more elegant than what I saw yesterday! Like as not we won’t need any mittens this year, since we’ve got no winter, so I’m gonna make up for the absent snow by looking at yours. They brighten my soul on dark days like these. 🙂
Angela from the Ore Mountains
Love the mitten!!! Can’t wait to see the next installment.
Charming, charming, charming!
Joyfully,
Linda
Love the design, love the colors Mary! It seems like a modern twist on Scandanavian national costume to me. Fun, fun, fun. Thanks for sharing & hugs to your sister!
Hi Mary,
You should give yourself more credit, your stitching looks perfect. Love what you did with your mittens. Your ugly leaf is not ugly, it looks great to me. The colors you chose are perfect. You do so a beautiful job on all your projects.
Thanks for sharing this one with us also. I have learned so much from you and have given myself a little more confidence to do the stitches that seemed so challenging to me in the past. I look forward to seeing the next post.
This looking really good! Can I say I saw a picture of the finished project tonight? It is amazing! I’m going to lengthen the felted cuff and put a flatter closure at the top of the mittens. They are knitted from the cuff to the end of the fingers and I’m going to stray from the pattern and use the Kitcheners stitch to end the mitten. WOW these turned out so nice! I love the detail you put into the pattern! Someone is going to have some beautiful mittens!!
These are just gorgeous! These mittens make me want to curl up and flip through a Jan Brett book. “The Mitten” anyone?
Erin, how funny! That’s it *exactly*! 🙂
Mary, these are so lovely! I’m definitely tempted to try this out!
So Much Fun, Sheila! Now, I’m not sure how much use you’d get out of wool mittens in California (these things are toasty warm!) but if you venture to Tahoe or somewhere similar, they’d definitely keep your digits warm and dry!
Love this pattern and the colours, it so a harmonious combo, that is so simple, so natural, but also so elagant.
Thanks, Rose! I’m glad you like it!!
Gosh, Mary, you are clever! The mitten embroidery is just gorgeous – but then all the embroidery you do is! Thank you for being such an inspiration!
Shucks, thanks! It’s really rather an engrossing project! I’m working on Mitten 2 now (or M2, as I call it), and still learning loads! I’m looking forward to stitching another pair, with different techniques.
Greetings Mary,
I just love, love the tea cup with the delicious looking tea,
it’s a feel good pic.
Looking at it , the cup with the pretty pink flowers, the color of the tea, the meringue,
the everything, just takes someone away to happy imaginings.
It’s the whole scene, but think the color of the tea is just right.
This mitten is so sweet. The design looks like a traditional Scandinavian design with a modern style tweak. The colors are poppin’!