


Thank you all so much for your Christmas wishes, for the greeting cards, the comments on my Merry Christmas post, and the influx of so much very nice e-mail, which I’m trying to answer! You certainly made my Christmas even cheerier! I hope yours was merry and bright!
After the brief holiday hiatus, it’s time for me to move forward on several embroidery-related endeavors that I hope you’ll enjoy! This week, for me, will be dedicated pretty much to needlework and blog work. What could be better? I’m so excited!
First, though, let’s finish up that Transfer-Eze experiment!
Last week, I showed you the beginning of a little embroidery project, using Transfer-Eze, an adhesive water-soluble, printable stabilizer sold for hand embroidery. This is the finish of that project, with the clean-up and some reflections on using Transfer-Eze.
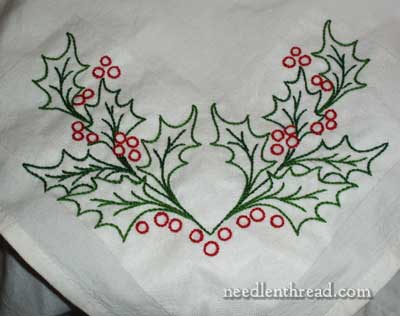
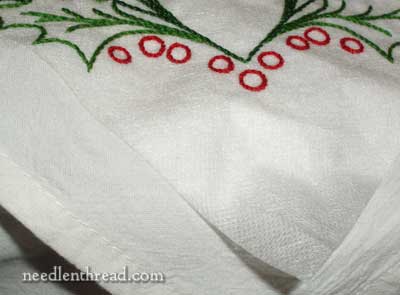
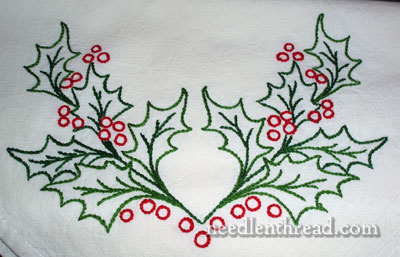
Here’s the embroidery – it’s the Boughs of Holly pattern I posted last week, stitched on the corner of a flour sack towel, using two colors of green stranded cotton embroidery floss and one color of red, and entirely stitched in stem stitch. I finished it on Christmas Eve, with enough time to clean it up and press it, for gift-giving on Christmas Day.
Stitching on the Transfer-Eze was not as easy as stitching straight onto the fabric. Transfer-Eze stiffens up the fabric just enough to make a noticeable difference in stitching. It’s not “difficult” to stitch on, mind you, but it definitely requires a little more effort than it does to stitch directly on the fabric. It’s a little harder on the fingers, too.
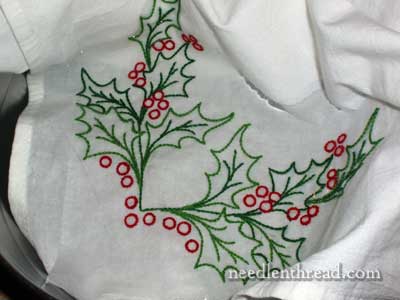
You can see the extra Transfer-Eze here, where I began to peel it off the fabric. It was fairly well adhered, and in the long run, I decided not to bother cutting away the extra.
Next step after stitching: submerge the piece in cool water to soak. For how long? It depends.
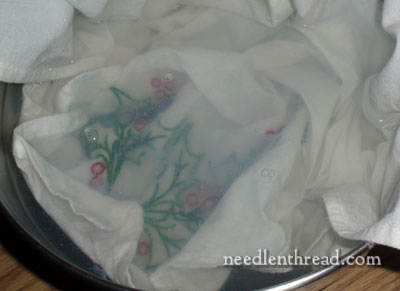
After a few minutes, the water gets murky.
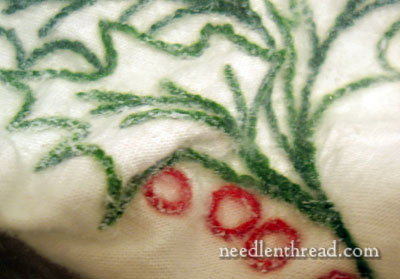
After about 15 minutes, the bulk of the Transfer-Eze was gone from the fabric, though still visible all over the embroidery. I switched out the water at this point, but didn’t rinse the piece yet. I wanted to see how much of it would dissolve by just sitting in water.
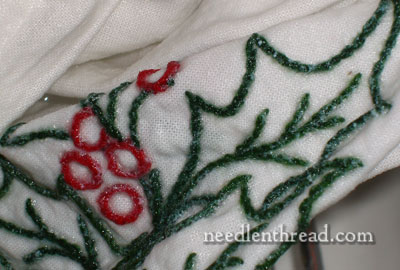
After about 30 minutes, I took it out of the water, and the Transfer-Eze was pretty much gone, except for little bits clinging to the embroidery. At this point, I rinsed the piece under running water, and the rest of the residue washed away. I noticed a few areas of stitching that were a little looser, but nothing drastically off.
I tossed the towel into the laundry, with other white kitchen towels and so forth, and washed it on a regular setting with regular detergent, and then I stuck it in the dryer with the same stuff. Why? Because I know that’s how it’s going to be washed after it’s given as a gift, and I wanted to make sure nothing went amuck with the piece when it went through the laundry. (If you’re absolutely counting on a towel like this as a gift, then you might not want to do the laundry thing at this point, the day before giving it away, just in case something does go amuck! I was confident, though, that all would come out well.)
When it came out, it was fine – a touch of ironing finished it up. When ironing an embroidered project like this, it’s a good idea to iron on the back side of the project, with the embroidery face down, using some folded pillow cases or flour sack towels on the top of the ironing board, to cushion the embroidery and keep it from flattening. For ironing embroidery, I use a couple layers of soft flannel sewn together and topped with a clean (used just for ironing) flour sack towel or pillow case. Works great every time!
My final thoughts on using Tansfer-Eze:
It worked fine for this type of embroidery: cotton on cotton, on a washable item. Would I use it again for this kind of work? Probably at some point. Generally, I use a pencil to trace corners on towels and so forth, and even though the Transfer-Eze is pretty darned easy, I prefer stitching directly on the fabric, rather than through the stabilizer. When it comes to the stitching part, it’s easier to stitch directly on the fabric – it’s easier on the fingers, it’s easier to gauge stitch tension, and so forth. The only part that’s not easier is the actual transfer of the design. But yes, I probably would use it again, for this type of project. And I can see how it could be handy for working on dark cotton with light threads. I would not use it for anything that can’t be washed.
Incidentally, there’s a product available by Sulky – it’s called Sticky Fabri-Solvy, and it comes in printer-sized sheets and in larger rolls. I suspect that it’s probably pretty much the same thing, so I ordered some just to find out. If it is the same thing, it’s a little less expensive than Transfer-Eze, especially if you buy it in bulk and cut it yourself. Several readers e-mailed me with the heads-up on that (thank you!), and I figured a comparison would be interesting. I’ll let you know!
Thus ends my Transfer-Eze experiment. I think it was pretty successful and I’d definitely use the product (or Sulky’s variation) again, especially on flour sack towels and other “casual” cotton embroidery projects.
Where to Find It
You can find Transfer-Eze available in the US here on Amazon, in a 10 sheet package.
You can find a 30-sheet package available on Amazon, here.
Sulky’s printable Sticky Fabri-Solvy is a similar product that works equally well. It can be found in a 12-sheet package on Amazon, here.
Thanks for the review of the Transfer-Eze. I do model embroidery work for an online designer and I have to do the transfering so anytime something comes along to make that easier, I’m all for it. After reading your review and some of the comments by your readers, I think I will stick to doing my own pencil transfers. Some days it’s hard enough to do the work with arthritis without it being harder to sew through the transfer medium. Also, even tension is a must when you are working for someone else. I really appreciate you testing this and letting us know how it works. Thanks.
Brenda Schiesser
G’day Mary,
You did it! Good on you. It looks bright and Christmasy, fresh and neat. The stem stitch sure was a good choice. Will be glad of the stem and outline stitch revision videos. You’ve covered the circles and points in stem stitch nicely previously. I’ve just looked them up again. They look so good in the holly and berries that you’ve done. Appreciate the Transfer-Eze experiment thanks.
Cheers, Kath.
I have been following your site for only a couple of weeks. I wanted to take the time to thank you for all the wonderful information. I have learned so much. I must admit I quilt more than I embroider but I really like the combination of the two. I am making a peony quilt and am thinking maybe I will try to embroider the leaves and stems. Is there a stich you would recommend that would fill in the stem and leaves? Again, thankyou so much for sharing your knowledge on this website!
Hi, all – thanks for your comments on the transfer-eze finish!
Carla – Well, there are lots of filling stitches out there – it depends on a lot of things. What size are the flowers and leaves? What kind of look do you want? Are the peonies on the quilt already printed on the fabric (are they part of the design of the fabric?) or are they appliqued? Feel free to drop me an e-mail if you want to discuss further! (Use the contact link in the website footer…) Maybe we can come up with a workable stitch for your leaves and stems!
Kath, thanks! Glad you like the finish. I’m editing that video again today, so hopefully….. (It’s taking more time than I thought!)
Brenda – I think it depends a lot on the type of stitching you do, whether or not you use the transfer eze. For me, the rule is pretty much cotton-on-cotton, washable. If that’s not what you’re stitching, I’d not use it either.
~MC
Looking forward to re-visiting stem vs outline stitch 🙂
WHERE do you get your enthusiasm and momentum, lady??? Lordy! The last time I was that vigorous about life, I think I was about 15….!
A very happy holiday to you and may your New Year bring memories both old and new to make you smile.
Hi Mary,
Now that you’ve completed the Transfer-Eze process, how does it compare to the process using Solvy water soluble stabilizer?
So far, this Solvy process is the easiest for me
(rather that the more traditional transfer processes) but I’m always interested in what else is available!
Thanks,
Terry
Hi, Terry – Well, since they’re both water soluble, and since they both have a different “feel” to them when stitching (compared to stitching directly on the fabric), I think I like Transfer-Eze better. It’s more pliable, while staying where it’s supposed to be, it doesn’t require any tracing, it doesn’t feel like stitching through plastic, and on this type of project, I found it didn’t require a hoop at all. I think, between the two, I’d opt for Transfer-Eze. I’m eager to take a look at Sulky’s sticky-solvy stuff, which is also printable. I ordered some, which should arrive this week, so we’ll see if it’s the same stuff.
~MC
Thanks so much, Mary for all the reviews you do. I’m still a beginner in embroidery and find it difficult to make small stitches. I think this would make it more difficult. I tried a tissue pattern once and it drove me nuts .
I use Saral paper for marking dark fabrics for applique. It’s difficult to get a thin line, so it wouldn’t be good for detailed embroidery.
Do you prewash your threads. I would have been afraid of the red running. I prewash all my fabrics when quilting for that reason, but wasn’t sure if I should do it with the threads.
Thanks again.
Hi, Cynthia – Yes, I think it would be hard to stitch tiny stitches through the Transfer-Eze. I’ve used Saral paper quite often. I actually use the white on light-colored silk. It leaves a matte line that can be seen very well against the shine of the silk, without the line being really visible once embroidered, even if not totally covered.
No, I don’t pre-wash regular cotton threads like these (DMC). I have treated other threads before stitching with them, though – threads that I’m not sure about their colorfastness. Rinsing the threads well helps, but I’ve also found that a little soak in a bowl of water with a spoonful of white vinegar can fix the color on threads. I wouldn’t do it with silk, but it works fine with cotton.
Hope that helps!
MC
Your posts are so helpful Mary! You have done a wonderful thing for all of us, and in such a thorough and easy to understand way – Thank You! I only do the simplest kinds of embroidery and needlework, but your website is so inspiring that now I want to learn more. I am so glad I found you – it happened when I wanted to learn about transfer methods for a vintage pattern I posted on my blog. I liked your article so much that I sent readers over here to see what you had to say.