


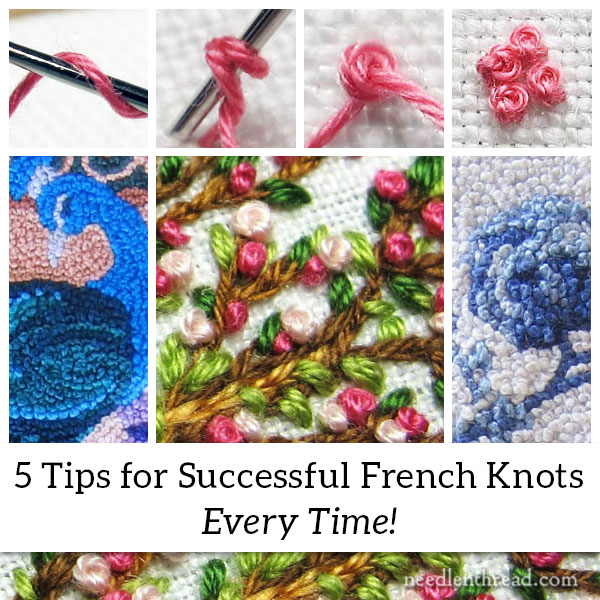
It’s time to overcome, once and for all, the Fear of French Knots – to achieve mastery over this tiny bump of an embroidery stitch, to claim it as your own, so that each French knot you make for the rest of your life is a successful French knot.
French knots are one of the most frequently used embroidery stitches. I rank it right up there among my Top Ten embroidery stitches you should know. Nothing adds a dot or a bump – or creates a whole carpet of textured filling – quite like a French knot does.
So it’s definitely worthwhile to take the time to master the little booger!
If you aren’t perfectly satisfied with your own French knots, here’s a lrefresher course so that you can create perfect French knots with ease.
Before we get into the nitty-gritty on French knots, you might check out my how-to video for French knots here. Sometimes, seeing a stitch worked out in video is a good place to start. Once you understand the movement of the stitch, the little nuances that help make the stitch successful are easier to adopt.
Common Difficulties with French Knots
Some of the difficulties that you might run into with French knots include the following:
1. The working thread knots up before it’s pulled through the wraps on the French knot. Once the working thread is knotted, it’s hard to get even a simple slip knot out, because of the wraps, so the whole thread has to be cut.
2. The resulting French knot comes out lopsided or loose on the fabric.
3. The whole French knot pulls through to the back of the fabric as you end the stitch.
4. The knot is too small and tight.
If you follow the tips below, you’ll avoid these difficulties and your knots will turn out great! As with any stitch (or pretty much any endeavor!), practice is the key. The more you practice the stitch, the easier it will become and the better the results.
Tip #1: Number of Wraps
When you set out to make your French knot, consider the number of wraps that you’ll use on the needle.
Stitch dictionaries vary on this subject, and pretty much every stitcher ends up sticking with a preferred number of wraps.
In some instructions, you’ll see one wrap, two wraps, or three wraps around the needle.
When I make a French knot, I wrap my working thread around the needle twice. I know many stitchers who prefer three wraps, and that’s ok, too!
But I have seen a lot of examples of flamboyant knots out there, where the creator advises “as many wraps as you want” – using up to four or five, or even more! If you’re going for a sloppy look in your knots – if you want, for example, looseness and irregularity – go for it!
But if you want a nicely balanced, regular, consistently shaped, neat knots, don’t wrap beyond three wraps on the needle. The loops can end up loose, they can snag, and they will definitely end up irregular.
I prefer two wraps. If I want a heavier knot or a tinier knot than the two wraps will produce, I change the weight of my thread.
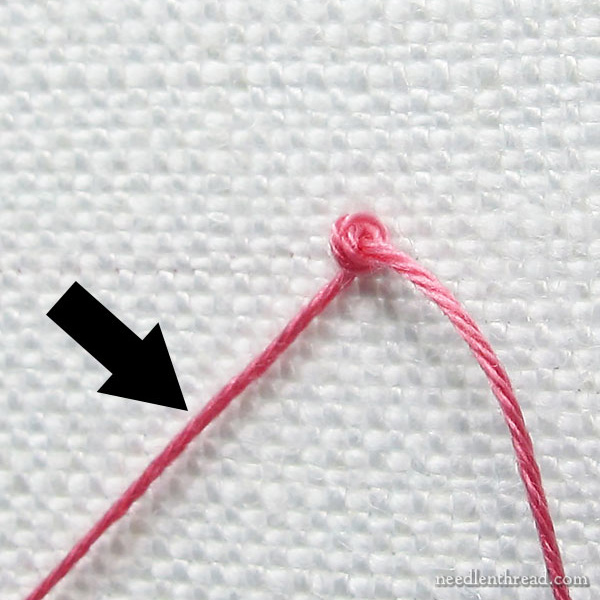
Tip #2: Leave a Space
You might be under the impression, when you make a French, that the needle and thread go to the back of the fabric down the same hole they came out of to start the stitch.
If you go down the same hole, this is where you run into problems with the knot pulling to the back of the fabric.
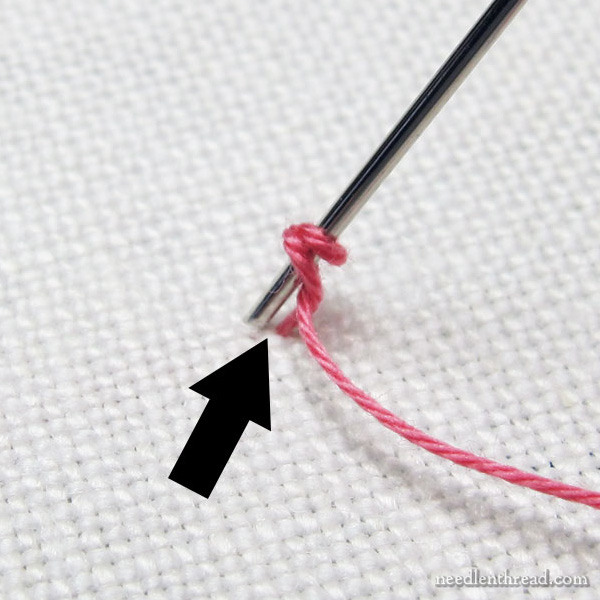
So instead of taking the needle and thread to the back of the fabric through the same hole, always leave a little space. That space will ensure that your knot sits up on the fabric where it should!
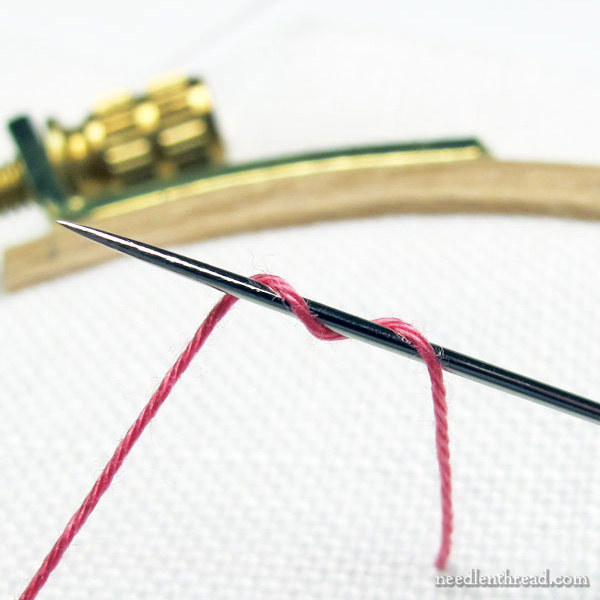
Tip #3: Tension
You want the wraps to hug the needle, but you don’t want them to choke the needle to death! Hold the working thread so that the wraps are snug on the needle, but not so tight that the thread thins out and loses its natural plumpness. If you’re really pulling tight on that working thread to keep the wraps on the needle, it’s harder to pull the needle through and your knot will end up looking skimpy.
So, once you begin to pull the working thread to the back of the fabric while forming the knot, keep a constant, even tension on the working thread on the front of the fabric.
In the photo above, I’m holding onto that working thread on the front of the fabric, using a finger or two of the hand that’s holding my hoop.
You want to keep that tension on the thread until the last possible moment, when you only have about an inch or so left to pull through the wraps.
This will ensure two things:
a. that the wraps don’t come undone; and
b. that your thread won’t knot!
Tips #4: Slow Down!
While you’re pulling the thread through, pull slowly – especially after you’ve let go of the working thread.
Yanking the thread through quickly can result in a misplaced or oddly shaped knot and perhaps even one of those rascally slip knots. So take it easy as you pull the thread through.
Tip #5: The Needle and The Alternate
If you’re going to be working a lot of French knots, consider investing in a range of sizes of milliner (also called “straw”) needles. These needles have a long shaft with an eye that is the same size as the shaft. This helps the needle pull through the wraps more easily.
The milliner needle is used especially for bullion knots, but if you’re working a bunch of French knots, it can come in handy.
You can read more about milliner needles (and other hand embroidery needles) in my article Hand Embroidery Needles: How to Choose Them and Use Them.
And finally, if the French knot still evades you after you’ve put these tips into practice, then you can always consider working the colonial knot in place of the French knot. Some folks have better luck with the figure-8 wrap of the colonial knot. You can find a video for colonial knot here.
French Knots in Hand Embroidery
There are lots of ways to use French knots in hand embroidery.
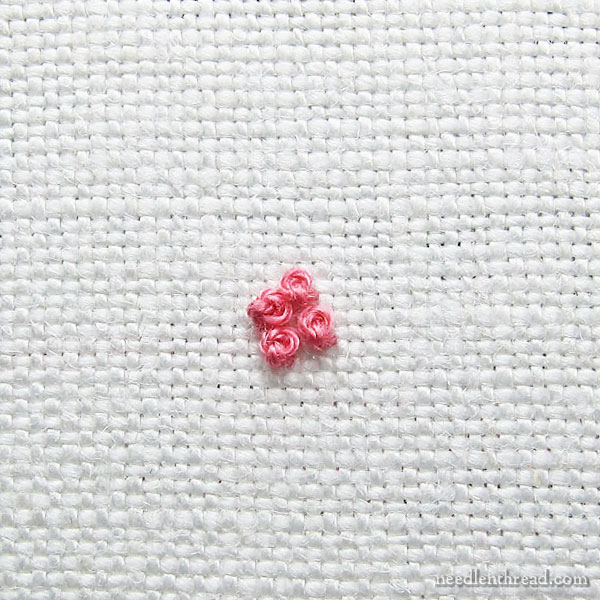
They’re probably most often seen as flower centers, as single accenting dots and so forth, because they’re perfect for those situations.
But you can also use them as the key component in a piece of embroidery.
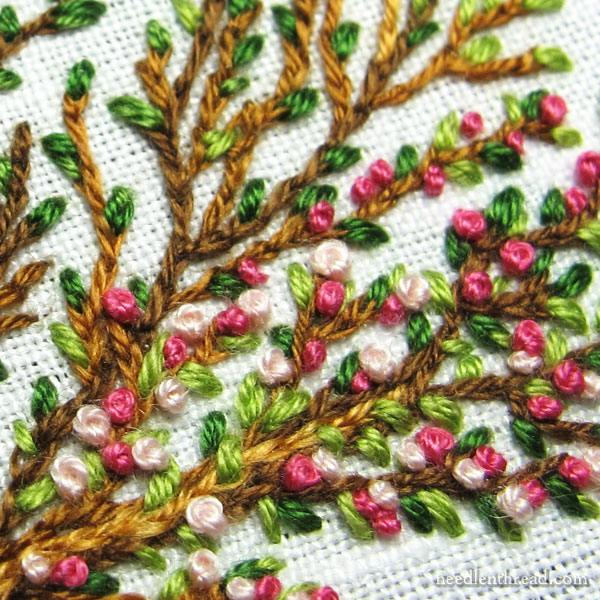
For example, in this spring tree above, I used them as the blossoms. They are the flowers, rather than just a little accent on the flower.
And some folks go much farther with French knots.
For example, Sue Resseguie’s miniature embroidered rugs are made entirely from French knots. They’re gorgeous!
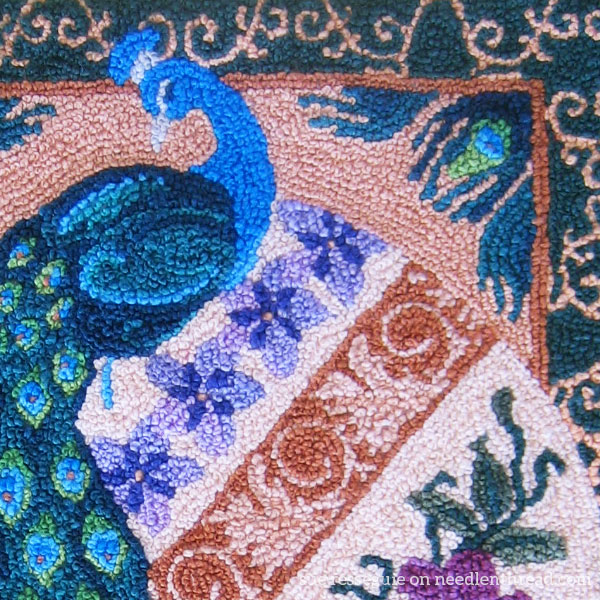
This is an excerpt from a rug Sue embroidered in French knots, using a black and white coloring book page she found online, featuring a glorious peacock.
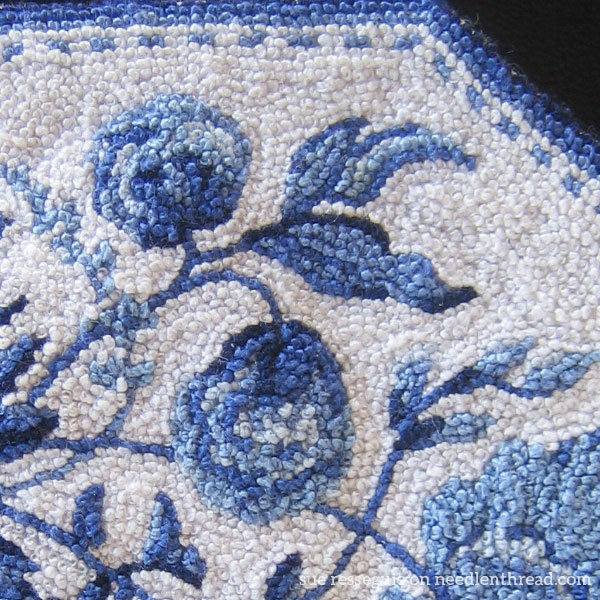
And this one – which melts my little blue-and-while-china-loving-heart – is an excerpt of a French knot masterpiece based on a design from a plate.
I’m pretty sure Sue is a master of the French knot! Aren’t they beautiful?
Practice!
Don’t give up on the French knot, if you’ve struggled with it in the past. Just a little practice, and you’ll get it! And once you’ve got it, it’s like riding a bike – you won’t forget, and it’s definitely worth it!
If you have any questions, comments or suggestions, feel free to join in the conversation below!
Now go forth and have a little bit of knotty fun this weekend!
I hate stitching French knots. They’re pretty, they’re a wonderful part of embroidery, they’re a pain in the neck. I get much more consistent-looking knots doing a colonial knot. Another alternative to the French knot is a bead. Always a consistent size, less headache, and a lovely little sparkle. Thanks for the tips! Perhaps, some day, I will master the French knot!
Phoebe, I think you just saved my sanity with your suggestion of the colonial knot. I have invested endless hours into learning the French knot with no success. I was able to make a colonial knot after my first try. THANK YOU!
Thanks for the compliments, Mary. I’m glad you could use the photos. By the way, mine are all single strand, single wrap knots.
Sue Resseguie, I am in absolute awe of your work with French Knots. Stunning.
This was very helpful
Thank you
French knots make me stabby but Colonial knots are the best. I made that switch years ago when I was working with rayon threads on a project. I tend to work in silk most of all and depending on the silk the french knot can make me crazy so when I found the colonial knot on that rayon project I just went forward with it and never looked back.
I saw another knot yesterday, a Japanese Knot. It does require a laying tool of some sort but I want to try it on a project.
I’m very excited to re-enter the world of embroidery after a long hiatus. I was really into smocking 40 years ago or so, and have only recently been inspired to pick it up again in a desire to make my granddaughter a Christmas stocking. I am waiting for your Stumpwork book to arrive as that looks exactly what I want to include for a ballerina on pointe. I will be working on the stocking over the next year, playing with beading, embroidery and lots of new skills. Really glad to have found you online!
French knots are probably my favorite stitch of all time! My grandmother taught me how to make them when I was a young (impatient) girl and I hated them then. Now they are a staple that I use on almost every piece of embroidery I undertake–and especially pieces with sheep! French knots are the perfect texture for the wool. Sometimes I do two wraps and sometimes three, and they come out about the same, usually. I’m so glad I grew to love them, and I think of my grandmother every time I make them.
My great grandmother who lived to be 105 taught me how to embroider. She taught me to go through the knot and I have not ever been able to get the hang of French Knots. However your suggestion to have a little space is brilliant and is working to well in my current project. Thank You! Celia
Hello Mary,
Thank you, for the French Knot Tips!!! I have a miniature rug kit from Theresa Layman, for my dollhouse, which is entriely French Knots.
I have wanted to begin this project, but have been intinidated by the sheer volume of FKs, which have challenged me in the past.
This will actually be my 4th or 5th Miniature embroidery project, in 1/12th scale.
Thank you for the help & encouragement.
Where can we go to see more of Sue’s work. These miniature rugs look exquisite. Makes me want to see the entire piece.
Thank you
Toni
Hi, Toni – well, I’ll follow up with Sue. I have photos of the whole pieces. I might ply her with questions and then write up a whole article for you! They really are very pretty!
For years, I could not manage a French knot. No matter how many books I looked at or how many times I watched my mother do them- just couldn’t. Then one day when I was learning ribbon embroidery, I figured I’d give it one more shot- and managed it. SOmething about the huge size (3mm) of the ribbon made it visible to me and I could see the mechanics and managed to do them. Since then, no problem even with 1 ply of silk floss!
Does it matter which way (clockwise or not) you wrap the thread around the needle? Does the z-twist or s-twist thread need to be treated differently? Thanks.
Hi, Marilyn – with some stitches (bullion knots, cast-on stitches, etc. included) I’d say yes. With the French knot, because they are so small and the wraps are so few, it really does not matter in the overall scheme of things!
Great tips! I now know why some of my knots are sloppy….
Have you seen Teresa Layman’s designs? Her miniature knot work kits are on Etsy, but I first saw some at my LNS. They’re perfect take-along projects.
Yes! They’re very pretty – and fun!
What a great tutorial. It took me a long time to ‘master’ the French Knot. I’ve been making it a long time and there are still times when I mess it up.
The easiest thing for me, in the beginning, was the teacher telling me to use 1 wrap only. If I wanted a bigger knot, use more than one thread. I now feel confident to sometimes use 2 wraps, but that is how I learned.
Before I learned to make this stitch, I often sewed a seed bead on in place of the knot.
Thanks, Mary. This is very timely for me. I am doing the cover picture on the “Cross Stitch Antique Style Sampler” book by Jane Greenoff. It has many flowers with a lot of French Knots. Your hints will make this so much easier. You have given me confidence that I can do this. Thanks. Alice
I forgot to mention that after I was able to make consistent French Knots, I started working on Teresa Layman’s miniature designs. One thread, one wrap. They take awhile to make, but I love doing them.
I notice you only mention using a hoop as a side comment Mary. I always use a hoop when doing French knots. It’s much easier to achieve a consistent tension when your fabric is taught and you have something to hold on to. Beautiful work from Sue. I’d love to see more.
Are you aware of Teresa Layman’s line of “miniatures” using French knots and Colonial knots. She has a line of patterns available (printed on fabric). She is primarily a miniature artist, but multi-talented in all the fiber arts.
Oh yes – they are charming!
Years ago I did a lot of Candlewicking projects. Should I have used French knot or the Colonial Knot? Just one of those silly questions.
You did not mention one tip that I have found solves my frustrations with French knots – ensure your fabric is taut in a hoop or on a frame.
Tip number 1 – how many wraps – I also do only two – if I want a heavier look (I can’t imagine I want a lighter look, as I usually use one strand of either embroidery cotton or a thin silk thread) I use more than one thread. But definitely, more wraps doesn’t make a “fatter” knot – just a taller one, that will fall over.
A very interesting piece Mary, I agree, practice is the way to go. Patience as well I find. They are very useful little things. I also use colonial knots, they are easier but not such a nice knot, I like the little dip in the centre of a French knot.
Best wishes from New Zealand, Judy.
Hi Mary, I love French knots…. I recently finished a tree of life which contained at the base of the tree a lamb. From tip to tail was all done in little blue/grey French knots. I do the two wraps. My philosophy to change thread weight is in alignment with your tutorial. The highlight of my email is receiving your newsletter. Thank you for all you do for us stitchers.
I have been demonstrating needlework at the local 3 county, county fair for a couple of decades. I used to set up a floor hoop and just work different stitches alone and in combinations as my eye and head thought to do. (I would bring stitch books with me to help me get ideas.)
One of the most common subjects I would get questions about is French knots and problems with same. (Which surprised me as this is not a big area for doing embroidery, especially other than counted cross kits.) I used to keep a spare needle and thread parked on the side of the fabric to show how to do French knots for people.
I work with regular embroidery needles when stitching French knots and have not had a problem. I also find that unless I am doing a kit which specifies the number of wraps in the directions, the number of wraps from one situation/piece to another changes depending on what I am working with and on, the threads used, and the look I want.
Something I would mention at the fair was that the needle one was using for the French knots needed to match the thread and the fabric used. Too big a needle would make too large a hole in the fabric and the knot might pull through. Too small a needle and the thread might not pull through the fabric easy enough.
Great video Mary. I have always wrapped my French knots clockwise and put the needle back through the fabric in front of the thread. Your method looks to give a much more consistent knot. Will definitely give it a try.
Teresa Layman has some great miniature knot rug kits available. She also has a great video showing how to do a successful French Knot along with the Colonial Knot. She is a great resource along with NeedlenThread for French Knots. I’m pretty much addicted to them! LOL!
Hi Mary and all!
I used to make mistake #2 by not leaving a space. My main one, however, was to go in the wrong direction. I used to try and work down the thread in the direction of the fabric, whereas it should be up the thread away from the fabric. It was my engineer husband who worked it out from book diagrams for me!!!
I feel the best looking knot is produced by only one or two wraps. If I want a bigger knot, I use a thicker thread. 🙂
Funny thing – French Knots have been always frustrating for me to do – until stitching your Christmas Trees on the gift stockings. They required a fair amount of French Knots, which I dreaded in the beginning. But after three or four failed knots, all of a sudden, I got the hang of it: I discovered that you have to apply a GENTLE but consistent tension to the working thread AND to pull the needle GENTLY and slowly through. I discovered that French Knots are SENSITIVE STITCHES, indeed. 🙂 So, that’s exactly what you say under tipp #3 and #4. 🙂 The number of wraps wasn’t an issue, however. I was using one, two, three or even four wraps as needed, and all of them came out nicely.
So, as you say: With practice I finally came to LOVE French Knots – and Spider Webs, besides, which I found equally frustrating until then. One stitch I still have difficulties with were those tiny Fishbone Stitches in tree #8.
Sue Resseguie’s rugs remind me of the painting technique of pointillism. Not really my cup of tea, if truth be told, but very interesting and a stunning piece of art, nonetheless. (Love aside, I would go nuts if I were to stitch even a small image solely in French Knots!)
Angela from the Ore Moutains
Thanks for the tips, Mary! I’ve made all these mistakes, sometimes more than one mistake on the same knot 🙂 Since I normally work from kits, changing needle, thread, or number of threads never entered my mind.
Thank you, Mary! Even us more experienced embroidery enthusiasts can learn something new, and people like me may have forgotten some of the basics or never learned the “why”. My French knots will rock, thanks to you!
Dear Mary
A great article I love the French Knot they look so pretty on a piece of embroidery. These are really great tips and very helpful, although I don’t have problems with the stitch, they don’t always come out perfect, but I will follow your tips and try to slow down and go gently with the stitch. Sue Resseguie’s rugs are lovely it must have taken forever to complete the above projects. Thanks so much Mary for sharing with us your tips and techniques on the french knot and for the photos you always give clear instructions and easy to follow tips.
Regards Anita Simmance
I’ll be using your tips! French knots have always been my Nemesis. I can do SO MANY things, but French knots….they always do something weird.
Thank you so much.
I have also loved, but not yet accomplished the French knot; but with our clear hints and the photos I may yet! I’m am practicing it today.
Thanks again.
Really great tips, Mary! French Knots have always been my favorite stitch. I once made something where the main motif was all from French Knots. You can see it here: http://debbiesfiberwork.blogspot.co.il/2012/04/tast-week-16.html
I also love bullion knots and made something where very long ones were the main feature.
Mary,
Thank You soooo much for your list of 10 tips for French Knots! I admit I am a beginner, and now I can see right away why I was having such problems with them.
Going down the list… I was using too many wraps (4), Holding the working thread so that the wraps were too snug, and I was pulling the thread through too quickly. I want to thank you for all the helpful tips you give to us amateurs!
I got too excited about the tips and wrote 10 tips instead of 5 tips!!
Guess it just hit me double! LOL
I just adore your website, Mary! I’m currently working on some wool pennies and often jump on your YouTube page to find another stitch!! It is a priceless resource. I want to join into this project you are starting, but fear if I do, I’ll never finish what I’m working on now. Thanks again for all you do in the world of needlecrafts!
If you are really crazy (yes I have thought about doing it) you could try using french knots as a form of pointillism.
Thank you Mary for the refresher. I struggled with french knots until I watched your video. Its been awhile since I have done some, so the refresher was great. I have learned about needles a lot lately. Some of my strugglers were due to using the wrong type or size of needle. This was true with my applique and english paper piecing as well as embroidery. Your tutorials are my go to place whenever I need to learn a new stitch. Thank you so for sharing your well of knowledge with us. By the way I find two wraps makes a better french note for me.
Hi Mary, many thanks for the wrap up on French Knots. I do have a question, if you are doing your own design (or something that doesn’t suggest what stitch) when and where would you use colonial knots over French knots (and I know there are several other knots that produce a very similar effect)?
Thanks for your thoughts.
Cheers Judy
S.E. Queensland, Australia
Hi, Judy – I like the look of the French Knot a little better, because it has that little dip in the middle, which the colonial Knot doesn’t always produce. Plus, French knots are kind of habitual for me. So I tend to use those more than colonial knots.
OMG amazing tutorial and tips, as always! I finally could stitch GOOD french knots, so happy here!!!! = )
Magnifique.
This is the most valuable and useful information I found and to the point! Thank you so much! My only question is what needle size should I buy to hand embroider French knots on MUSLIN fabric? I’d really appreciate your advice. I will buy the Milliner/straw needle and want to use 2-3 wraps around the needle but not sure what is the needle size for muslin. Also, how many strands should I use, 3 or 6 strands of floss?
Thank you!
Sana
It depends on how many strands of floss you’re using, and that depends on how big you want your knots. For 2-3 strands, use a #7 crewel needle.
I am struggling badly with French knots. Dreading next step I’ll need for my fancy expensive canvas to bouillon knots. I’m left handed mostly. Comes into play with Grench knots nothing else so far.
I’m left handed too, French knots are such a struggle.
Just wanted to say thank you! Your pictures were invaluable! I was able to do a French knot after using your pictures! Apparently I was wrapping my thread incorrectly ♀️.
What size needles do you recommend? I have been embroidering moss lately, and do a layer of 3 strand french knots, covered with a layer of 2 strand french knots, and a layer of 1 strand French knots.
Thank you!
you could probably use pretty much any needle that will accommodate your thread. I normally work with a #7 crewel (also called “embroidery”) needle for most general embroidery and they would work for you. If you want tiny knots with the one strand, then maybe a #9 or #10.
Hi,
Do you have suggestions on best fabrics to make French knits in? I used a circular embroidery hoop for my wool fabric. I did notice stretching in the fabric, even though I also used chiffon as a backing. Should interface the fabric, or change the fabric?
Most fabrics have a little give. I prefer linen for most of my embroidery ground fabric. I pre-shrink when I need to, which helps alleviate some of the give. Also, cut it on the grain, not on the bias, and keep the hardware of your hoop at noon, 3:00, 6:00, or 9:00, if you were imagining the hoop as a clock face.
I freehand embroider and i often want to edit the composition after i’m done with a thread, and french knots are always impossible for this since you can’t remove the stitches.
Is it possible to remove/cut individual french knots without compromising the rest of the thread?
Thank you for creating this wonderful resource
You can cut it from the top and pull the threads through to the back, but if your French knots are very close, then the nearby knots will also pop off from the front.
I learned this from Betty Philsberry.
After making the 2 twists around the needle, insert the needle into the fabric a thread or 2 to the right of the come up point & finish the knot. Because you’ve gone to the right, it allows the thread twist to come freely from your left hand.
If left handed, do the reverse.
I’ve been embroidering for over 35 years and I struggle with French knots. Today I had to do a French knot in counted cross-stitch and I was failing. I thought I was going to have to get a seed beads to dot an “i”. Then I found your post and in 2 attempts had a perfect French knot. Thank you!
Yay!! 🙂