


How about a little Tool Talk?
Accessorizing is a fun part of many arts & crafts. Sure, you can accomplish your needlework with the very basics. You want to hand embroider? All you really need is a needle, some thread, something to embroider on (usually fabric), and a way to cut your threads. You don’t need anything else.
But there are tools that make our needlework easier. There are tools that improve the outcome of our needlework. And there are tools that make our needlework more fun. So we accessorize! And that’s all part of the enjoyment of embroidery.
When I was cleaning up a mess of threads the other day – yes, I have thread messes! – I came across some thread keeps that I bought a while ago but hadn’t used yet for a number of reasons. And that led me to making my own set of thread keeps. And that led me to thinking I should share them with you. And that led me to this article! So here we are!
Let’s start with some basics and go on from there.
What is a Thread Keep?
A thread keep is tool that “keeps” thread – it’s an organizing (or decorative, or both) tool used to hold threads – usually cut threads. Normally, we think of them as the kind we talk about below, but a thread keep doesn’t have to involve holes, really. It could be a tool that you wind threads on. And the tool can be made out of any kind of material that will work – from mother of pearl to wood to plastic to metal to paper.
You’ve probably seen the thread winders that are made by Sajou, for example. They’re made out of a very thick paper board. You can see a whole bunch of them available here at Tres Chic Stitchery, if you’re not sure what I’m talking about.
Way back forever ago, I wrote about organizing threads and making your own thread keeps here. In that article, the very first picture is a mother of pearl thread keep from Kelmscott Designs. I also talked about how I used a mother of pearl ring inside my little felt tool kit, to hold threads. Mother of pearl rings like those are very nice as thread keeps. They’re also available through Kelmscott Designs.
So, “thread keep” is a pretty general term. I think most stitchers associate it with something with holes in it, but I pretty much categorize any device that you can keep cut threads on as a thread keep.
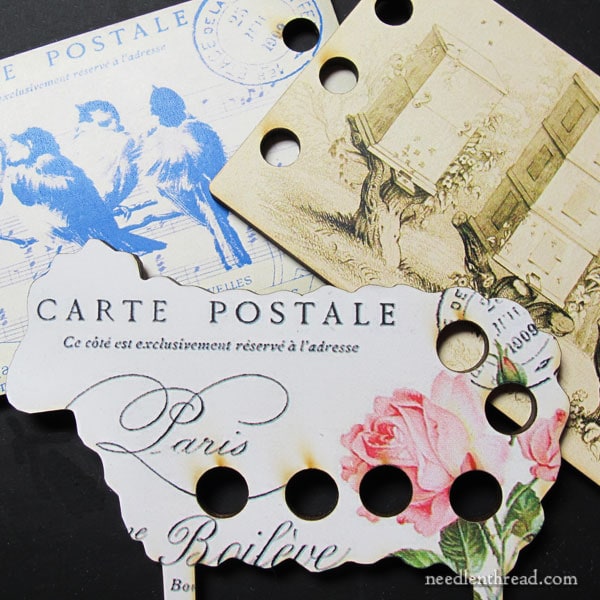
These three thread keeps above are the ones that instigated this article. They are manufactured by Whimsical Edge Designs and distributed by Kelmscott Designs.
I love the look of these thread keeps. I really want to love them, but they have a few drawbacks.
Had I actually been able to feel them before I bought them, I might not have bought them. My initial impression of them once I had them in my hands wasn’t all that great. After playing with them a little bit, I think I would use them only for some (limited) threads, but not for all threads.
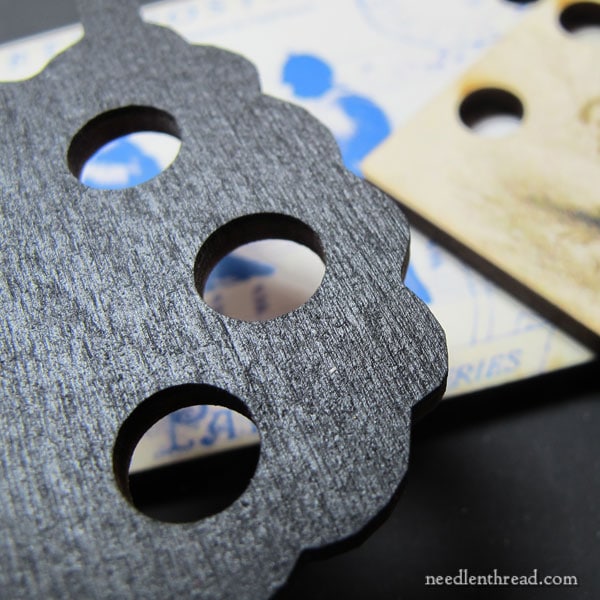
The thread keeps are made out of wood, and I think it is specifically a wood called luan. It’s a somewhat porous, lightweight plywood board. It has a kind of innate shreddiness to the way it looks and feels – almost as if it is prone to be splintery. It reminds me of the inside of a Butterfinger bar.
Because of the type of wood, it has a rough feel to it, and I really don’t think there’s any way a woodworker could achieve a glass-smooth finish with this stuff. It’s plywood, so by the time it’s sanded down in hopes of a smooth surface, you’d be into the next layer of board, anyway. And the splintery grooves and hollows that run through it make me think that such an endeavor would be impossible.
I love the glass-smooth finish that comes with a well worked piece of hard wood. I’m not sure why I expected that with these particular thread keeps, but I think it has to do with the fact that the thread keeps are meant to hold thread. And thread snags. So when I read “wood” in the description, I assumed it would be smooth wood.
When I first felt the thread keeps, my heart sank. I knew right away that they aren’t the type of tool I’d put most threads on. I was hesitant even to use them for regular cotton floss, but as it works out, that’s about the only thread (that, and perle cotton) that I’d use them with.
I tried them with floche, which is a much softer cotton thread, and pulling an individual thread off the keep adds a little fuzz to the thread. So, unfortunately, I won’t use these for anything softer than cotton floss or perle cotton. I wouldn’t use them with floche or coton a broder, for example, and silks would be out of the question.
Despite this limitation, though, these thread keeps still make me inordinately happy when I see them. I like them! I like that cute sheep with it’s flowery back end! And I like the beehives. And I like the birds.
These are all things that make me happy, and that’s exactly why I bought these in the first place.
But, when it comes down to it, I really prefer to make my own thread keeps for my projects, if I’m working with cut threads.
Making Your Own Thread Keeps
At the beginning of this article, I linked to an old post where I talk about making your own thread keeps. It’s an economical way to arrange cut threads for any project. But your thread keep doesn’t have to be boring. It doesn’t have to be plain white card stock. You can dress it up!
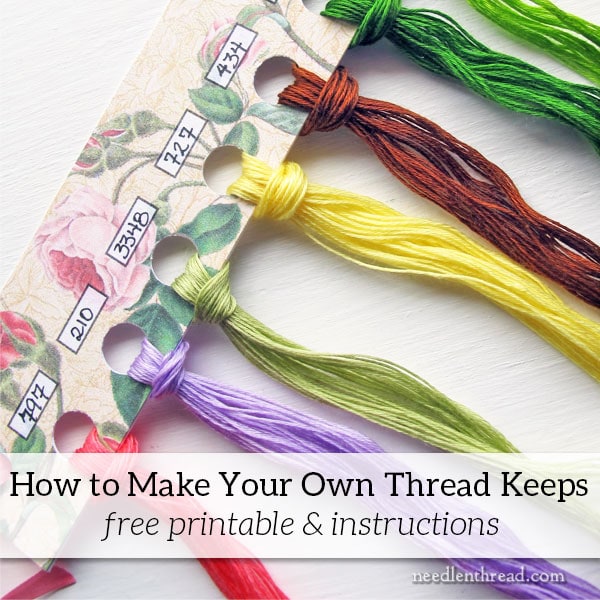
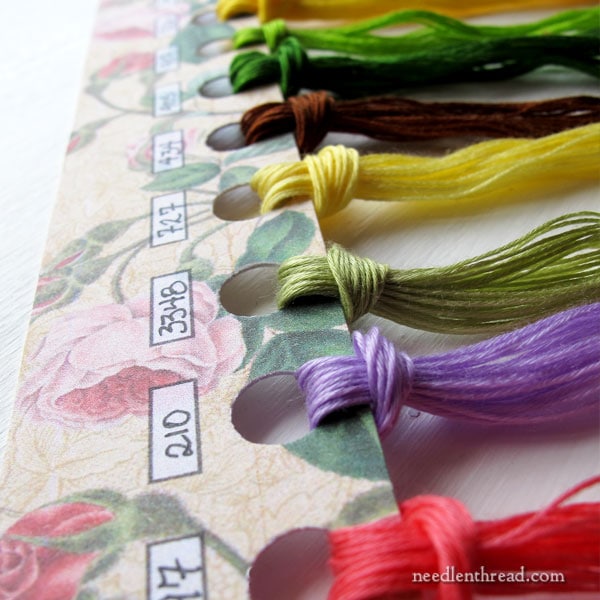
So, to that end, here’s a free DIY Thread Keep printable for you. This is what you can make with it:
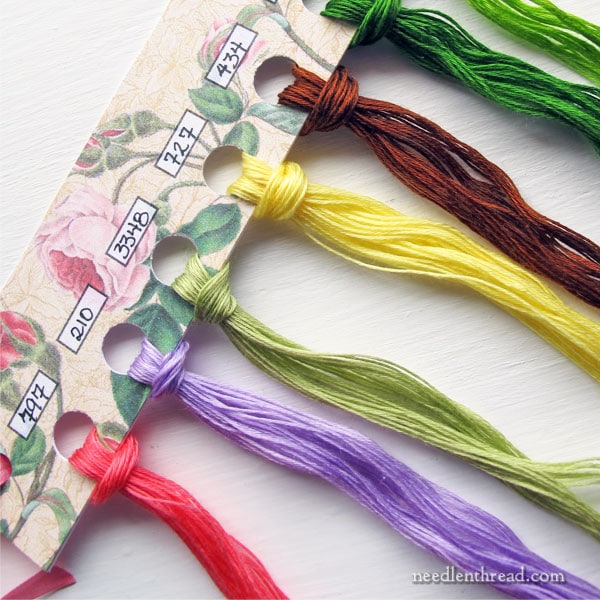
To make mine, I printed the sheet (which has three decorative strips on it) on heavy card stock. I cut out the decorate strips and glued them with strip glue to another sheet of card stock, to give a double thickness and sturdiness to the thread keeps. When I used the strip glue, I avoided the area behind the punch circles. Those are the darkish 3/8″ circles that you punch out so that you can loop your threads in the holes.
After glueing the strips to new card stock, I trimmed the new card stock down to the same size as the strips, and then I used a 3/8″ hole punch (available on the scrapbooking aisle at any craft store) and punched out the circles. To punch the circles in just the right spot, if you turn the punch over and put the design in face up (but the punch is upside down), you can line up the hole in the punch tool with the colored spot on the thread keep.
I used the spaces above each hole to pen in the color number of the threads I wanted to use.
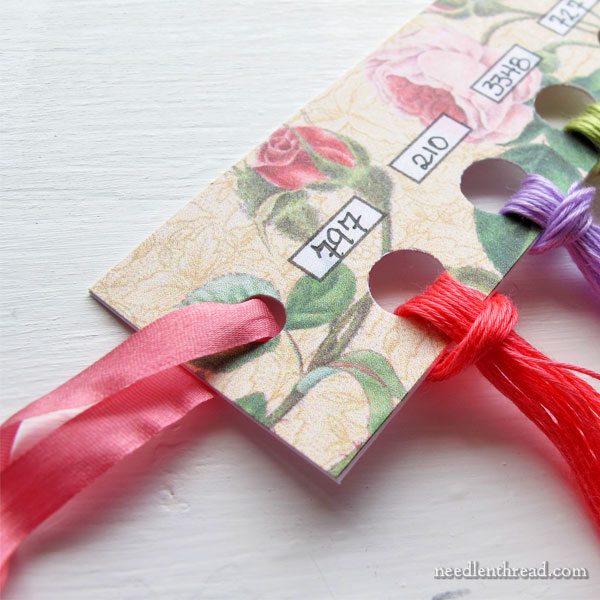
Finally, I used a regular single hole punch (the kind you use for office work) to punch a small hole on the left side of the thread keep, so I could string a ribbon through and hang the thread keep if I wanted to. I could also use the ribbon to group two or three thread keeps together. You can also use a jump ring to group several of the DIY thread keeps together, too.
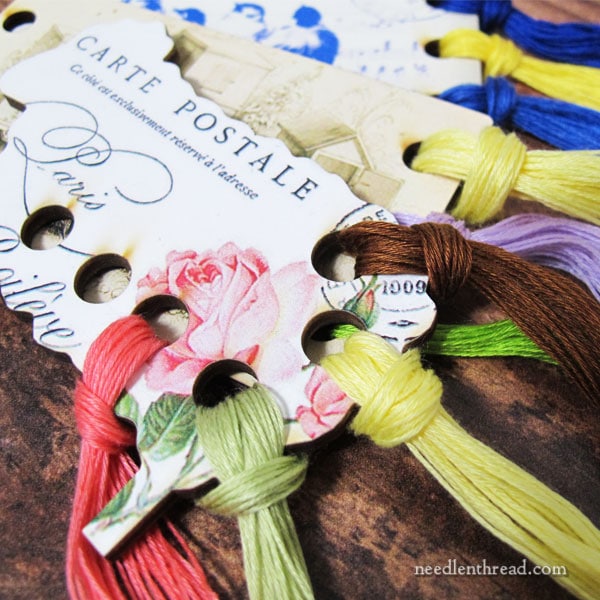
These are an easy and economical way to organize cut threads for embroidery projects. In fact, it’s my favorite way to organize pre-cut threads when I’m stitching!
I hope you enjoy the printable!
If you have any questions, comments, or suggestions about thread keeps and organizing cut threads for embroidery projects, please feel free to chime in below!
Please dont lump ALL “wood” thread winders and palettes in with the one you show above~ they are NOT created equal! I am a stitcher, and yes, I DO get a glass finish on my wooden tools and accessories that I hand make, especially inside the holes of my thread palettes, because hello, the thread is the most import part of it!
Hi, Rachael – I didn’t lump them all in with these thread keeps. In fact, I think there’s a whole paragraph up there about glass-smooth hard wood… Yep, it’s the inside of the holes and the edge of the thread keep that count!
That’s too bad about the purchased thread keeps being so rough. Is it possible someone somewhere thought if they are too smooth that threads would slide off? I suspect lower cost to produce was the major thing though. I suppose if one really wanted to use them for all threads, they could apply a finish, sand and finish until smooth. But really, why should that be up to the customer? Especially when it might take some experimentation to find a finish that wouldn’t ruin the applied pictures.
Thanks for the DIY version instructions!
Exactly! I don’t think the customer should have to finish a purchased item like this…
Hi Mary,
I have tried thread keeps. The only time I use them is when I am working with a lot of colors that’s hard to distinguish between one color or the other. Otherwise, my threads just end up on my tray in an orderly fashion. I start out with good intentions, but as I get into my work that all goes by the wayside. There are some beautiful keeps for display though.
I think this is an effective method to hold threads.
My question is –
How do you manage those hanging/dangling threads ?
How do you avoid them from tangling with each other?
Where/how do you store them to avoid such tangling?
Well… I don’t really move the threads around much when I’m working on a project, that they’d end up tangling. Occasionally, I suppose, I might smooth them out again if they looked like they might be in the mood to tangle. If I need to move the project and my stitching supplies – for example, if I want to take them somewhere – I can just slide the thread keep with the threads on it into a ziplock bag.
I tend loosely braid my threads together. I can still pull out one strand and don’t get the rats nest when I carry my threads around.
As another thought. I had a small cross stitch kit that I carried around for random stitching and hung all the threads around a smooth plastic bracelet that I had found at a thrift store. For about the 8 or so colors in the kit, it worked pretty well.
Oh Mary, these are just lovely! I don’t have a color printer, but imagine I can take the pdf on a jump drive to Kinkos and have them print out a couple! Thank you! I did make one of your previous ones and it was most useful, but we do like to handle lovely things, don’t we!
On your adorable sheep thread keep, have you considered spraying it with a clear kote of something appropriate? Or even dipping it in some polyuretherene? Might take several light coats to take away the scratchiness, but should not damage the overall appearance. Just a thought.
I may try that, Linda. Amy (in a comment above..or below..?) suggested Modge Podge as well. But, like I said, when we buy tools and accessories like this, I don’t think we should have to improve them. It’s a thread keep. I would think the manufacturers would know that a smooth surface is essential; otherwise, it will damage the thread, rather than keep it safe! 🙂
Thanks for idea and sharing. I already have a hole puncher too.
Do you precut your thread to a certain length?
Hi, Cathy – It depends on the project and the thread. I’m more prone to do so when I’m using floche (which is a soft cotton embroidery thread I’ve written about quite a bit here on Needle ‘n Thread). Floche comes in large hanks, so the thread has to be cut and prepared before stitching, anyway. Sometimes, I just braid the hank. Other times, I’ll separate out some lengths of cut threads for a project and that’s when I use a thread keep. Pre-cutting threads (even floss) can speed things up when you’re stitching on a project involving a lot of threads and colors. The problem is, if you don’t use it all, you have to store it cut, rather than just putting the used skein back in the drawer. Still, I find it worthwhile now and then!
No reply please. Just would like to tell you how much I enjoy learning from you!!!!
Have you thought about putting several coats of mod podge on your wooden thread keeps? This would smooth out the surface and make them usable. Thanks tho for sharing your version.
Hi, Amy – Hmmmm. I hadn’t thought about that. I’m not sure I’d want to mess with getting the Modge Podge into all those little holes. Maybe I’ll try it some day, though, just to see… But here’s the thing: when we purchase something like this, should we have to improve it? I would think the manufacturers would already know that, on a tool used to hold threads, a smooth finish is pretty much essential. Just my two cents!
Thanks for the article and the printable, Mary! I save birthday/Christmas cards that I’ve received. They can be cut up and glued together for thread keeps, too. How about using paperclips sticking out between layers of card stock – they can provide ‘holes’ for looping the thread through or ‘knobs’ for winding the thread around…
Oh, yeah – and if you write the thread numbers on with a frixion pen, when the thread is all used up, you can touch it with a warm iron and clear the number so it’s ready for the next one. (I do that with birthday cards so that they can be re-used.)
I love this paper clip idea and it would save me the cost of buying a hole punch.
The strip glue is it a liquid or a tape. Love the to make my own thread keeper. Thanks you . Jean
It’s like a tape dispenser that you run along the paper, and it lays down a strip of glue (the glue separates from the tape inside the dispenser as you run the dispenser along the piece of paper you’re putting glue on).
Mary
Thank you so much. I love tools and have lots of thread keepers but you can never have too many I say.
Mary
Wow, thank you for your sweet article and self helps. I must admit this is a must do for me.
Could you suggest what to do with the needles. I try to keep mine threaded but somehow the needles always get lost in my pin cushion.
Hi, Dianne – Well, I can’t really help you there, but perhaps someone else can. I use either a pin cushion or a needle book with felt inside for my needles.
Concerning the thread keeps–it looks like one side is smooth and the other side rough. You could put a layer of veneer on the rough side, or a layer of contact paper, then paint the edges, which would be smoother. Or you could paint the side and the edges, or use a layer of polyurethane to smooth the surface.
Hi, Marcia – It’s the insides of all those little holes, too. They’re not smooth!
I love the pretty design, but I would worry that my printer ink might rub off onto the thread. How about covering it with clear contact paper before punching the holes?
Hi, Joan – Yikes! If your printer ink rubs off once it’s dry, I would probably suggest finding a new brand! That would be somewhat unusual for printer ink, and it would be detrimental to the company producing it. If it gets wet, it could run, but I don’t generally have any kind of liquid around my needlework area. The contact paper would make it really difficult to punch the holes, I think. It’s already somewhat difficult to punch through two layers of card stock, so I’m not sure how well a punch would work with two layers plus contact paper. I might give it a try, though! I’ll let you know!
Love the idea, but my first thought was “what a neat cat toy”. I usually embroider in my recliner in the livingroom and my cat would be more than fascinated with all of those dangling thread. I think I better stick with my bobbins. Love your column! Judie
I was using “Thread Drops”, I loved them but they were way too expensive so I started working on my own. I tried cutting them from card stock on my Brother ScanNCut but that was not working out great. I wasted a lot of paper, mats and blades so in the end it didn’t work out any more cost effective than the “Thread Drops”.
I recently bought gift tags from Amazon and they have a small hole already in the top so I added a large one inch hole at the bottom for my thread. There is a lot of extra room to write information like the brand, color name and number on the tags since they are a rectangle. It has worked out so well I just ordered 2 more sets. I also hand theses on a shower curtain holder which is thin and doesn’t come apart like the key rings I was using. I like this system so much better than the floss bags and threads for projects are easy to organize. I have hooks on my floor light that I can hang the threads from while working with them.
I use the front of a greeting card that is hate the part with. I cut the front cover off, write who gave it to me and when. Then I punch holes down one side. I get to use it several times. When it begins to wear out I toss it. It’s a nice way to enjoy the card for a while while adding some pretty to my project.
Thank you very much for the thread keep templates. My threads are always in a terrible state so I look forward to using the thread keeps.
Dear Mary
Yes I agree that adding accessories to your craft is fun as well as being functional. The design of the thread cards above are very pretty it’s a shame they were not as good as you hoped but the printable free thread keep is lovely and bright wonderful. I don’t use thread keeps much but the design above of the free thread card makes me want to make one. Thanks for the free DIY printable thread card above and for sharing your views with us and for the photos and links very interesting.
Regards Anita Simmance
Hi I too think those card keeps are cute…but the splinter effect is a deterrent. Perhaps you could use the old clear nail polish trick on the inner circle to smooth them out…
Hi Mary
Mostly I cross stitch using a single strand from 6 just keeping threads in their original little wrappers, even the leftovers. I’ve never gotten along with thread keepers.
Good luck with yours, Jeanne
That’s the way I’ve always worked previously and winding the threads around three of my fingers and putting them back in the skein (through the wrapper) is how I store threads that are not in use in the current project. I’m not keen on the thread cards although I admire how nice and tidy they look.
These are beautiful thread-keeps Mary! I confess to using strips cut from cereal boxes! The cardboard from cereal boxes is stiff enough to not fall apart, so I just cut a long strip then punch holes in it with a paper punch every inch or so. Then I write the thread color number above the hole. These basic ones work well for me for small projects, like a kit that has the thread assortment included with it, then I just discard the strip once the project is done. I think greeting cards might make lovely thread keeps too, don’t you think? 🙂
Thank you Mary for the little bit of springtime “Thread Keep” pattern!
Although there are still piles of snow and ice in Maine, my needlework
bag has the springtime spirit – thanks to you. I do appreciate your inform-
ation and your kind spirit. I look forward to your posts. Happy stitching!
Sincerely,
Elizabeth
To make the luan smoother, just spray it with aerosol lacquer. It will take a few coats. When the finish starts to build up, give it a light sanding with 220 grit sandpaper and then one or two more spray coats.
Thanks, Bill!
In order to make the plywood thread keeps (ie. the sheep) usable, I would suggest sanding the holes from the back and then using a clear coat or even clear nail polish to smooth out the edges. It might take more than one coat of what ever you use to smooth the edges, and even a sanding between the coats, but it could make them smooth enough to be usable. Let me/us know if you choose to do this and how it works. I know it would be a little work but they are very pretty, and don’t we all like pretty.
They are pretty, Lorri! Still, I’m of the mind that, when a thread keep is sold as a thread keep, it should be ready to use as a thread keep. 🙂
Do you just wind the threads around those thread winder cards from tres chic stitchery? I’ve not seen those before.
Yes, you do, Sue – winders are very handy for threads that are leftover.
I love this idea. I’d make three suggestions / caveats.
1) don’t use wood for any long-term storage of threads. The acids in the wood can discolor the threads and / or damage them.
2) use a pH neutral / acid-free flexible white adhesive (PVA) to adhere the card stock and paper together. Don’t use products like Elmer’s glue or rubber cement. Those products either dry, shrink, and crack (Elmer’s) or ooze and discolor permanently. Use a white flexible adhesive like Alene’s. Don’t use anything tacky or non-permanent.
3) use a permanent, non-water soluable marker or pencil to mark the thread keeper.
Sorry if I sound “preachy,” I’ve been working in conservation for over 30 years and hate to see needlework and textiles damaged by acidic products.
Thanks again for the directions for a thread keep. Can’t wait to try it.
Miriam
These look wonderful….Thank you!!
When I first started cross stitching as a very young girl, I punched holes in a paper plate to hold my floss! Pretty cheap and low tech. Over many years of stitching, I tried using professionally produced floss cards which work well enough. I also purchased some of those wooden floss keeps but like you, they are delightful to look at but don’t work very well for me. Now I use my own system of punching holes in 3×5 (or larger) cards! Also, I use bobbins kept on a ring for each project. Thanks for the lovely printable thread keep which I will use.
Hi Mary, Tissue boxes have lovely designs on them these days. I cut the long sides and get 2 strips out of one side. I glue wrong sides together, punch holes and add little stickers above the holes for the numbers. Just another option! Thanks for all your tips.
Mary hi to you, hope all is well with you and your family.
Do you find that you waste thread if you pre-cut the lengths?
I know you can keep the bit when you are finished with that colour but you would need to be very organised about storing that colour with it’s mate I guess.
Thank you for the DIY system.
Sandy☺
No, on the contrary, I tend to not waste as much thread. When I have leftover threads, I wind them in small circles and put them in a box that is dedicated to my leftover threads. They don’t really build up too much because I use them. And it doesn’t even matter if they have a color number on them, because I use a lot of thread just for stitch demos and the like. I also embroider a lot of projects using whatever color strikes me, rather than following a specific color scheme by number. So I use my leftover threads up that way. If I need to know the color number of a thread I used, I can color match it with thread color cards or by going through skeins to find the same color. For the most part, though, I end up using my scraps for little things I show here on the website, or for tutorials or what-have-you, and color number isn’t really very important for those things.
Very interesting, dear Mary ! I received a thread keeper as a gift like the one in the third photo (grey-black one) and I was not so happy as it seemed to me a bit rough for the thread… I see that I was not completely wrong.
Diane
Thank you so much for these pretty printable thread keepers Mary! I started making mine out of plain white cardboard – saved from packaging mostly – after getting a presorted card in a Dimensions Gold kit many years ago. They are super useful, and now I make one for each project. But I also love pretty things, so this is wonderful! I’ve also seen a stitcher on Instagram use the decorative front of an old greeting card to make pretty keepers. I’ll have to look for one of the larger hole punches. Thank you also for the review of the Kelmscott thread holders – they’ve been on my wish list for years, but seeing the back I know I would have been terribly disappointed if I had bought them. Smooth .MDF or even balsa wood would have been better!
Great article Mary. I have made my own before but not as elegantly as yours, I do like the printed square to write the numbers on!!
One problem I’ve had is tangling of threads below the holes. Not sure how to avoid this, they seem to mingle when the lights are off and they think no-one’s home!! Do you store them laid down to try to keep the different strands separate??
Julie
Yes, I keep my work on a tray on a table, so they are lying flat, pretty much. The ends don’t tangle too much. Occasionally, I straighten them out but I don’t end up with knots or anything.
Mary, Kelmscott Designs are only sold wholesale these days. She also is boycotting mother of pearl at this time, because of the incredible jump in price! (You go, Girl! If you can’t afford MOP, then I know we can’t!!) But she is marketing some beauuuutiful painted collectors thread keeps! She started with Queen Elizabeth I, then Mary, Queen of Scots, etc. Check her website sometime!
I shall be using Mary, Queen Corbet’s loverly and affordable thread keeps!
1
Hi, Jacquelyn – Glad you like the printable!
Yes, the thread keeps on Kelmscott are the ones that I’m showing here. That’s where I first saw them. The queen images are just a variety of these that I’m showing above. I personally wouldn’t spend money for any more of them, because you can’t use them for most threads.The thread keeps on Kelmscott are not actually painted. They’re kind of a laminate on top of the luana wood – I would guess the image is heat sublimated. In any case, I like the print and punch ones better – the card stock doesn’t wreak havoc on your thread when you pull it off… 🙂
Hi Mary, thank you for the printable.
Great article. I also make my own thread keeps using interesting things like post cards from my travels, pretty calendars, etc. I also made a thread keep in my needle book using mother of pearl rings, they really add a nice touch and hold six standby colours of DMC, for the “just in case” scenario. By the way, your spring tea towels are lovely, so bright and cheery.
I look forward to your articles, lots of inspiration and courage to try something different. Many thanks
Robbin, in British Columbia
Greetings, I use the DMC floss bows, love them. When I’m putting colors together for a new project l just pull them out, and their stiff and easy to work with. My question is what to do with the leftover strands from projects. I found a way to wrap them on the floss bows, but would love some new ideas. What do my fellow stitchers do?
First of all I love everything you do ❤❤❤❤I appreciate you teaching us !!! I am not sure if you have done this before but I was wondering if you could school us on the many different fibers and threads used in embroidery today. I have seen so many beautiful and unusual fibers but not sure where to purchase them. Thanks for all you do!!!
Hi, Penny – you might read through the articles on Needle ‘n Thread that are tagged “threads” – here’s a list: https://needlenthread.wpengine.com/tag/threads I don’t write much about the “unusual” fibers out there, because I don’t use very many non-traditional embroidery threads. I’m not a huge fan of viscous, rayon, and so forth. I pretty much stick to the natural fibers: silk, cotton, wool. That said, there are lots of variety within those three! And I’ve probably written about most of them.
Thank you for a wonderful article! My day has not been wasted as I have learnt new “stuff” 🙂
These are so pretty!
Thanks!
Greetings Mary,
For a nice stiff (non-glued together) keeper, there is the option of one of the many boxes that come as containers for a variety of products, especially cereal. They are pre-printed, nicely rigid, easy to punch, plain or decorated sides available, and affordable for those on a tight budget.
My two cents.
Enjoy your ideas and hints and your completed projects.
Nancy
Rachael – I’d love to see what you make. Do you have a link to somewhere, or if not, maybe post them to the Ask & Share forum here??
Hi, Gail – The Ask & Share forum has been defunct for years. You can view it, but you can’t comment on it. You can find Rachel’s goods through Diamond Folk Art on Etsy, here.
Dear Mary
Thank you for the thread keeper! Will go to the print shop here in town, they can print on Matt or gloss card stock. Recently I had a light bulb moment. When I decided to kit up a project, I discovered my brain is use to the precut lengths of floss, so I measured the precut length of floss, cut my kitted up floss the same length. Not only does it make it worth it, it means spending less time cutting floss, while working on a project. The bonus more stitching time, just have to remind myself to stop, as it is easy to lose track of time, when the stitching has me having too much fun. Love those old fashioned mother of pearl thread keepers. Clover, Japan comes out with some very neat tools and gadgets. It would be cool if they could come out with some smooth one’s?
Mary, if you really would like to make those purchased thread keeps which are really lovely, smooth, with a bit of work it would be possible. You would need to purchase a can of spray varnish (I would get glossy). Lightly sand the backs, just enough to give it tooth to hold the varnish (it looks like they have a light coat already). Don’t try to sand them smooth yet. Then spray a nice heavy coat of varnish. Let it dry overnight. Sand, varnish again. It may take several coats – I’m thinking maybe 3-4, but this should give you a nice smooth surface. Really very simple. I spray inside a box I’ve cut away one side and the top, makes a little “spray” booth. Set them on milk jug tops or something so they don’t stick down to the box when you are spraying so they are lifted up from the “floor” of the box. Just a thought for you. Still wondering how your mom is doing!
PS. Forgot, thank you for the lovely print out. I think I just may take that, apply it to a thin board (I have that sort of thing), use my drill press to make larger holes and do the whole varnish thing I described above. I have a hard time with too small holes getting the thread in them. 🙂
Hi, enjoyed your article today. Have decided I need to quit being laze and make a thread holder for my threads instead of keeping them in a baggie.
Instead of printing something on the top piece of cardstock, sewers who work with fabric could take an extra piece of a special fabric, back it with a product like Wonder Under and fuse it to the cardstock. Thread color numbers could be written on the back of the holder. With the right needle in your sewing machine you could add another layer of cardstock and stitch around the perimeter of the thread holder or fuse it with Wonder Under to the back of the thread holder.. If you want to reuse the thread holder for another project just cross out the earlier thread number or cover it with a sticky dot. A hole punch should still work on the project.
I will make one and send a picture to you. Happing stitching. Judy
Ooo! These are pretty. Just right for Spring. There is enough room to draw the symbol for that thread under the number. Love the description: like the inside of a butterfinger.
For the past 40 years I have made my own thread holders, usually using a cardboard tissue box panel or something more substantial than that, I make a three inch scissor slice and write the thread number and anything else next to the thread. these are one time use pieces of board. Every so often I find an old one from a completed project with the remaining thread attached that I haven’t re-integrated into the stash. Very handy process. I have tried using some of the other ones, but I can take a nice size square and get all of my thread onto it with enough notes on it to orient me for the project and haven’t found anything else that works as handily.
I read with interest your article about thread keeps and will definitely disseminate this GREAT idea among our team members.
Thank you!
Dawn
Evening Mary ~ what an absolutely well timed blog post this is. I’ve just started on a SAL, a stitch pattern band type sampler and in the first two rows realized I need some pre-cut thread lengths and a way to identify them. Being me, I’ve changed one of the colors (sometimes I wonder why I can’t just stitch something as it was designed). Already I’ve had a number of short but usable thread lengths piling up on the table next to me with no idea what the color number is.
I’ll be making myself one of these thread keepers with the addition of a smaller hole to receive those ORTS. As this is a cross-stitch piece I’ll be adding the chart symbol next to the thread color too. ~~ Brenda
Now, if I could just discipline myself to put away those bits and pieces as they’re created, maybe my end table wouldn’t end up looking so messy.
I also purchased some wood thread keeps from Etsy. Same problem. I actually used them as package ornaments, since they were useless as thread keeps. I bought some mother of pearl single round keeps, and sewed a couple to the inside of my needle case. This keeps thread from going wild when traveling. I found some on Etsy and some at Marilyn’s. This is a good solution for a small project.
I tried some of the binder organizers, but really didn’t like them.
I was with my husband in Oregon and we went to a brewery. The sever gave us souvenir coasters. The heavy cardboard and small size made them excellent thread keeps. I’ve also used business cards glued together. But none of these are as beautiful as your new design. Which I will happily print out and use. Thanks Mary!
One of my favorite ways to make a quick threadkeep is with a used greeting card. Punching holes through the double thickness of the card works best. I usually use an office hole punch, but I will now look for a 3/8″ punch to buy, thanks to your article, Mary. I may even use doublestick tape to hold the two layers of card together. This idea came from my dear friend, Rebecca W. I think it’s a great way to recycle old greeting cards, especially ones you really like & want to keep. Thanks for the printable, Mary!
When using one of these thread keeps, what do you do with a thread that is only partially used? Do you stick it in the hole with the unused threads of the same color? I have several such thread keeps but have never figured out what to do with partially used threads. That’s why my threads are in snack bags when I stitch so partial threads can easily be placed back with the same color. Can you explain this?
Yes, you just loop it into the hole with the rest of the threads. With thread keeps, you don’t even have to “strip” your floss, because you take each individual strand off separately, straight from the loop. If you read the previous article on thread keeps that I linked to in the article above, you’ll see how to loop the thread on the thread keep. Then, when you want one strand or more to stitch with, you just run the eye of the needle under one strand (from the six) of the floss and remove it from the bunch. If you need more than one strand, remove one at a time and put them back together after you’ve removed them. So you don’t really end up with “unused” separate threads from the threads that are looped through the hole.
This is a great idea! Now to test if my printer will take cardstock! Thank you. I’m searching your site for suggestions on how to organize 489 DMC floss :-).
Currently I have them tied by groups and stored nicely in a channel perfume gift set box I received for Christmas. When I need a color, I go to that group and pull out the floss. I don’t always have to loosen the string. It’s not great but for now it takes very little room and it’s neat.
Thank you for the ideas regarding ‘Thread Keeps’. I am new at embroidery and recently found your website, researching ‘vectors’.
I make a new set of heavy paper keeps for each new project. I write on it the thread number and also the symbol associated with it for that particular project. When I have finished, I take off the left over threads but save the keep with the pattern. That way, if I want to do it again, the keep is ready for me. (Christmas ornaments, especially, I may do several times over.)
Thread keeps are lovely and look so organized when beginning a new project. But then I find things get messy when I have leftover strands that are still useable. How to you handle your still-serviceable thread snips?
Again, I do stitching in two different types of situations.
When I am working at home or in our RV I use the LoRan version of what you made to keep my threads organized. I have some I bought decades ago and a friend’s wife died a few years ago and he passed along a lot of her embroidery stuff to me -including more of the LoRan thread holders. I use pencil when marking the holders so I can erase and reuse.
When working on stitching at 18th century reenactments I cannot have the threads holding cards out in view. I do have my threads set up on them (my current project for events took 2 full size and a half size LoRan card to hold the assortment of threads) to keep them organized. Just before an event I will look at the piece I am working on and decide which section of it I will work on and see which threads are needed. I will take those threads off of the cards and wind them on wooden bobbins – basically sort of X shaped pieces of wood – one color to each bobbin. Since these are reproductions I can take them out in public, they fit in the small round box I have out with my work items, and one will fit compactly on the space I have to work with. My other threads are with me in a large box bench – as are the rest of the directions – just in case they are needed. After the event I unwind the threads and put them back on the card holders.
How do you pull one strand off?
Do you think using mod podge to strengthen the thread drops would harm the threads?
Hi, Madelin – I wouldn’t do it, probably – especially if your threads will be on there any amount of time.
Thanks for the advice. 🙂 I might just make a thread card or two with the small book of scrapbooking cardstock I bought a few years ago.
Love the printable! Thank you very much.
I only use cardboard-based threadkeepers. (Wish I could find a big, shell heart threadkeeper!)