


Whether you’re a newcomer to embroidery or you’ve been stitching for ages, one needlework tool that you could never deny the importance of is the ‘umble needle.
If you’re new to embroidery, you might find yourself flummoxed by the whole question of needles because there are a lot of types of needles out there, and they come in all different sizes.
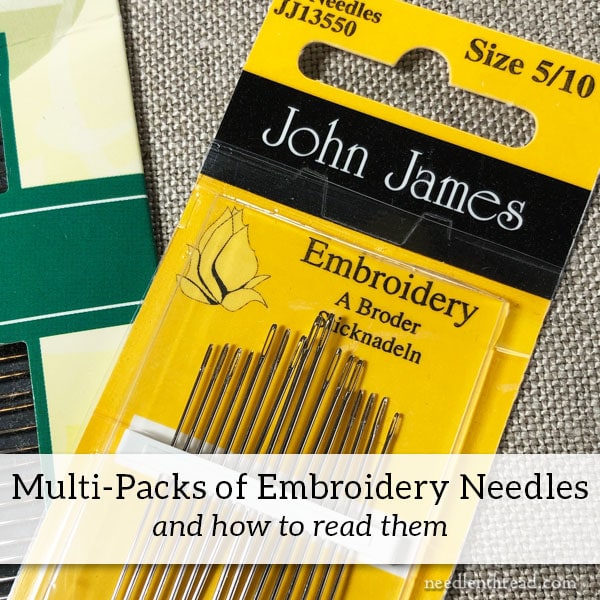
Whenever someone new to embroidery asks me What needles should I get?, I always recommend starting out with a multi-pack of embroidery needles in a variety of sizes.
Multi-packs of needles, though, can sometimes cause confusion. Let’s take a look at them and chat about how to read them.
First things first, though! Here are some basics about needles used for surface embroidery.
Needle Basics
Embroidery needles – which are also called crewel needles – are sharp tipped, with medium-long eyes. They are ideal for surface embroidery because the sharp tip of the needle is expected to pierce through the fabric and open a hole for the thread to pass through. The medium-long eye (not short and round, not very long and oval) accommodates embroidery threads well.
Embroidery needles are not the same as tapestry needles, which are blunt tipped, have long eyes, and are normally used in counted work, where the fabric features a in a grid layout with pre-determined openings that the needle and thread pass through when stitching.
Sizing of Needles
The size of a needle is indicated by a number. In the case of embroidery (crewel) needles, the numbers are 1 – 12, although size 11 and 12 needles are harder to come by. They aren’t as commonly available as sizes 1 – 10.
Because needles are made from wire, they are sized the same way wire is sized, in most cases. When it comes to embroidery needles, this is always the case, and the higher the number, the smaller the needle.
So a #10 crewel needle is significantly smaller than a #1 crewel needle. If you’re used to stitching with a #10 crewel needle and you switch to a #1 in order to accommodate a very heavy thread, it will feel like you’re stitching with a railroad spike.
Embroidery Needles in Multi-Packs
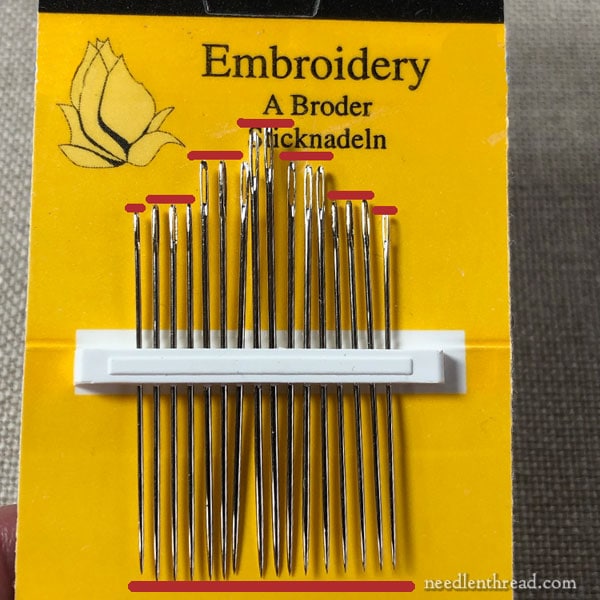
When you look at a multi-pack of embroidery needles, you’ll notice that they are generally always arranged with the largest needles in the center of the multi-pack, and then, in steps out from the center, the needles become smaller on each side.
For the sake of demonstration, I’m using a multi-pack of John James embroidery needles in sizes 5-10.
Based on the information you already have, you know that the larger needles in the center are going to be the size 5 needles, and that, on each side of those, the needle numbers are going to increase to ten.
Now, as you explore embroidery needles, you will probably realize the following points:
There is very little difference between a #6 embroidery needle and a #7 embroidery needle. The difference is in the gauge of the needle, and until you’re really used to stitching, you’re not going to notice or probably even feel a difference. You can use them for the same tasks.
There is very little difference between a #8 embroidery needle and a #9 embroidery needle.
There is a noticeable difference between a #7 embroidery needle and a #9 embroidery needle. You can definitely see and feel the difference.
There is a noticeable difference between a #9 embroidery needle and a #10 embroidery needle. You can see and feel the difference, and you will definitely notice the difference when it comes to threading the finer #10.
In the photo above, if the needles were lined up at the base, you’d end up with about this structure in the multi-pack:
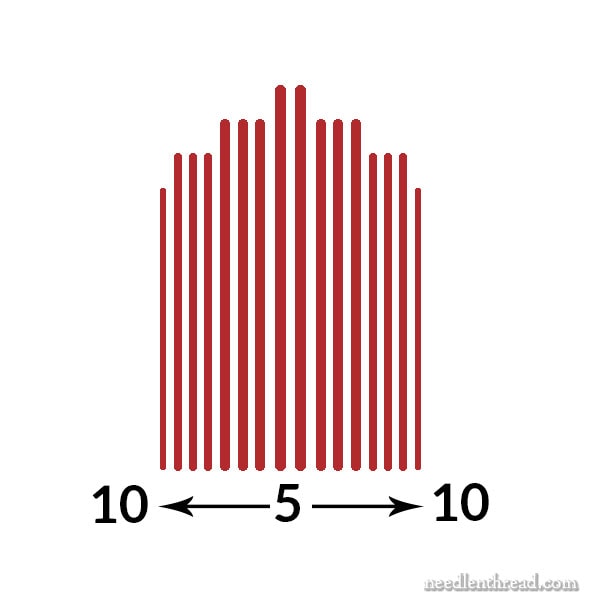
If you remove the needles in the multi-pack and line them up right next to each other, you’re not going to see a lot of difference between the first group of three needles to the right and to the left of the center needles.
You won’t see much difference between the needles in the next groups of three, either.
But you will see a difference between the two outermost needles on both sides, and the needles in the step just above.
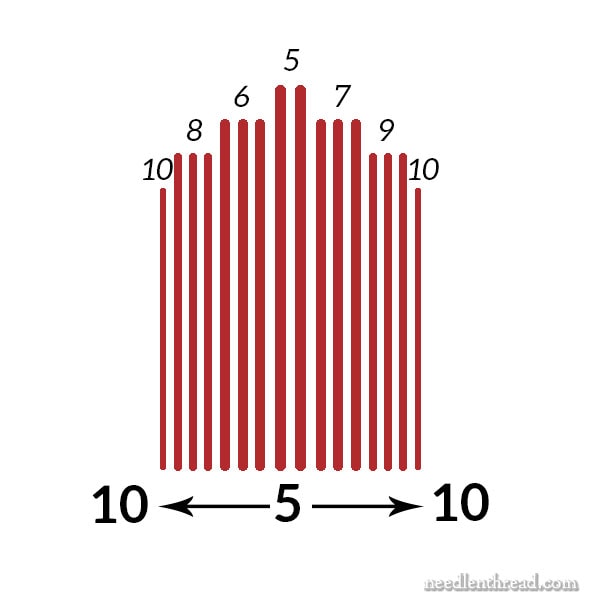
To number the needles down from 5 – 10 in size, this is how they’re arranged in the package – if the package has every size between 5 and 10, which I assume they do. There is so little difference between 6 and 7, for example, that it’s hard to tell with the naked eye if there really is a size 6. If there’s a difference, it’s in the gauge of the wire (so, the thickness of the needle), but it’s by a hair and it’s difficult to discern.
So, in a nutshell, the steps go downwards in size (though up in number), reading from left to right: 5 at the top center, 6-7 on the left and right in the next step down, 8-9 on the left and then the right on the next step down, and then size 10 on each outer side in the last step down.
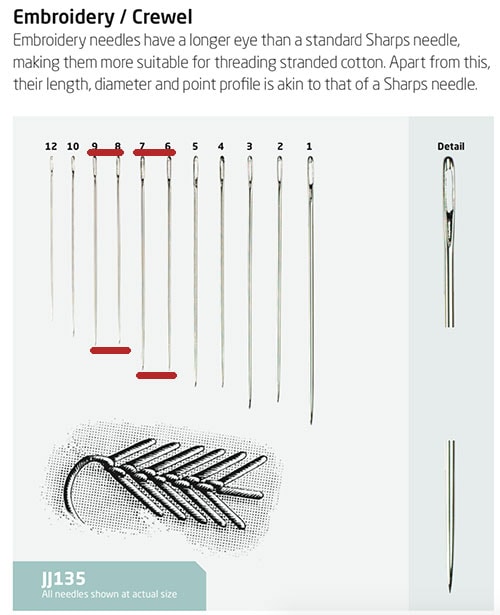
Notice that even in the Needle Guide published by John James (you can find a link to it at the end of the article), you cannot see a whole lot of difference between the #6 and #7 needles, and #8 and #9 needles. As far as length and visible difference goes, all the needles practically step down in size in pairs of two numbers after #1 and up to #9. With #10 and #12, the difference is in both length and in gauge – the #12 is a very fine gauge needle and it is slightly shorter than a #10.
So, if you want to assign numbers to the needle sizes, you can assign them that way. But truthfully, it’s not going to make any difference in your stitching if you assign a 6 or 7 to the same needle, or an 8 or 9 to the same needle. The only difference it will make is with the needles that are noticeably different, either by noticeable length or noticeable gauge.
Does Needle Size Matter?
Of course, the size of your needle matters (you don’t want to use a needle that’s too small or too big for the type of stitching you’re doing), but does the number assigned to the size matter? Not really. What you will discover as you gain experience in stitching is that you will have various needle sizes that become your general favorites. And you’ll instinctively reach for the right size needle for the type of stitching you’re doing, no matter what the number assigned to that needle happens to be.
Essentially, you get a feel for the size of needle you need for the technique, threads, and fabric you’re working with.
When I’m stitching regular surface embroidery, my “universal” go-to needle is a #7 embroidery needle. It accommodates most of the threads I use quite comfortably. If I am working on something a finer, I might opt for an 8 or 9.
I use a #10 for fine stitching with silk, and occasionally a #12, if I’m using very fine silk.
But for everyday stitching, I’ve usually got a #7 in my fingers.
As far as brands go, when it comes to affordable needles, I split my needle world between John James needles and Bohin needles. There are other needles I like, too, but John James and Bohin are both widely available, decent needles. John James has a better variety of needle sizes and types.
Identifying Needle Sizes
If, however, you do like to know what size needle you’re using when you’re stitching, you may find these aids helpful.
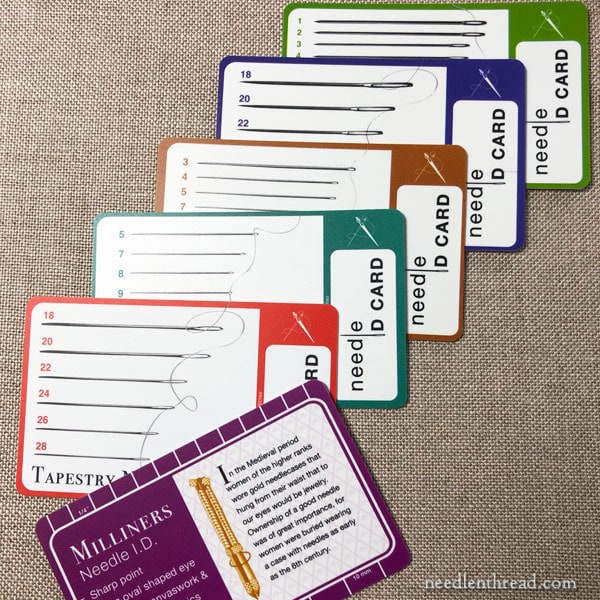
These Needle ID Cards are really nice to have on hand, if you must know your needle size.
The images on them are true to size and shape of the given needles, so you place the needle on the image and find the one it fits on. Voilá! You know what kind and size you’re using!
The other side of the card has interesting information about needles, their history, and their uses.
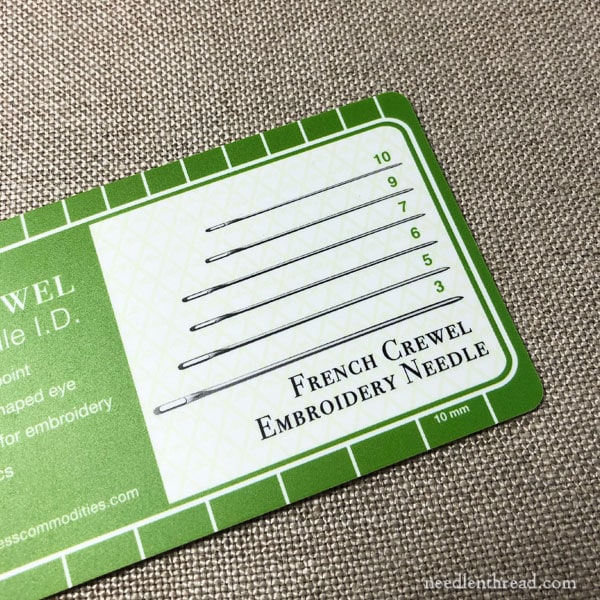
As luck would have it, by the way – and just to confuse the whole needle sizing question – French needles tend to be sized slightly differently from English. On the embroidery needle ID Card, you can find measurements for French embroidery needles on one side and English needles on the other. This is helpful if you use Bohin needles from France.
I find the cards handy when I’m kitting projects for other people. Once I’ve stitched a project, I might want to confirm what size needles I was using. I can double check the size on the ID Cards to make sure that I order the right size for my kits.
Online, you can find Needle ID Cards available at Needle in a Haystack on their needles page. Just scroll all the way to the end of the page, where you’ll find several needle accessories. They’re also available at any fine needlework shop that carries goods from Access Commodities.
John James Needle Guide
Another handy tool is this John James Needles Guide. It’s a free PDF and full of good information on John James needles.
Explore More about Needlework Needles
If you want to read more about needles used in hand needlework – different types and how they’re used – you may find the following articles on Needle ‘n Thread useful:
Keeping it Simple with Hand Embroidery Needles
Hand Embroidery Needles: How to Choose Them & Use Them
If you have any needle tips to share, feel free to chime in below!
Thanks for this article. I ordered some of these and was having trouble identifying by size #.
I love all sorts of threaded handwork. I do EPP, Embroidery, Quilting etc. My most favored needles for the majority of my are Embroidery needles size 9 and 10 depending on the size of thread I am using. I use 80-100 weight thread for my applique and size 10 works beautifully for that. Embroidery I use 9 or 10 depending on the thread. I recently bought a size 7 embroidery to use with some pearl cotton which was recommended in a class on sasiko I recently took. I use mostly Bohn brand. Although I John James as well. I have seen the difference in my work using better grade needles verses the big box store brands. Upon learning from you how important it is to change needles for hand embroidery as it is machine needles for quilting I found a supplier to buy my favorite needles in bulk which is far less expensive than small individual packs. I appreciate all the wonderful articles you provide which is helping me to grow in my embroidery. Thank you for aricles such as this. I bought the Needle ID cards and they are a valuable tool for all my projects.
Thanks for this article Mary, it came at a perfect time for me! I received a few packs of needles for Christmas and had no idea how to tell which needle was which size. Very helpful article, thanks!
Great article, Mary. I got so confused about needles when I stopped using kits and had to pick my own. I finally got a couple guides, and then put all the different types in zippered bags, writing the uses of each on the bag. This type for wool crewel thread, this type for beads, etc. In fact … that’s how I still keep them. 🙂
Great article – I have always wondered about the subject of needle sizes and have searched for the information but never had found such a thorough and easy to understand guide. Thank you so much for clearing this up. I know what needle I like to use (and what characteristics I like about certain needles) but wasn’t sure of the size of it. I have purchased a lot of needles to find the one I like best but because of the packaging was never really sure. Now I feel like I can shop more efficiently…..
Not sure if I need the needle cards or not because I don’t prepare kits for people but I’ll try the PDF file and see if that may be sufficient.
Jackie
Hi. I have a question. Do needles have any kind of marking so that you can tell your Bohin needles from John James or Tulip or whatever? Thanks.
Most of my tulip needles have gold eyes, I think. But no, there’s no kind of special marking. I can tell some brands apart, just from being familiar with them, but there’s no label on each needle.
This was such an interesting post! I didn’t know that about multi-packs. I find multi-packs of needles useful to have in my “away” stitching tool kit. That way I don’t have to have a pack of each size and I will likely have the appropriate size needle if I need one.
How about storage. There are pincushions, needlecases, etc. Mine tend to get all mixed up on some sort of pincusion. Do you have a discussion on these.
Greetings,I’m in need of a tip! How to keep track of which needle I’m using and by which company, I use about 3 different brands. On my sewing machine, I keep the needle case out to remind me, but I haven’t had the same success with hand needles. Any suggestions? Hope so, thanks
Well, if keeping track of the brands you use and the size within brand is important to you, you’ll probably need to prepare some kind of labeled needlebook or at least felt strips that you could put a labels on.
Thank you Mary for this very informative article. I never quite understood how the needles in those multi packs were arranged. Now I do!
I find that, and it could be my imagination, that in my needle stash some tapestry needles of the same size will have a different size eye. Could this be the case or is it just my imagination? And I agree once you get a feel for a needle size it’s typically your go to needle for most everything. I have one size that I like for hardanger and then obviously a different size for counted canvas work.
Sure! Different brands may have different sized eyes. If you ever get a chance to compare Richard Hemming needles to John James, you’ll see a big difference in the eyes.
Thank you Mary for this very useful information. Got the sharp and the blunt part down pat and I have a couple of needles I love to use but have no idea of their size, there’s only two left and I need to get more. I didn’t realize there were all those different sizes that were in my variety packs though.
In an effort to ‘organize’ my needles 50 years ago I put them all in a row in a long piece of felt going by the length of the needle then eyeballed the size of the eye. They look nice sitting there but some are going rusty after all this time. I believe it’s time to pick my favorites and get packets of those. Maybe I should just frame that piece of felt to hang in my sewing room, there are needles from my mum and even a couple of my Grandma’s but I wouldn’t be able to point them out to you.
Happy stitching ~ Brenda
Hi Brenda,
Yes! Frame that strip of felt with the needles, what a great idea! Perhaps you can flake off the rust to revitalize the needles a bit?
Personally, I’d use a piece of 1000(one thousand) grit WET VARIETY sandpaper (usually made from silicon carbide) and gently roll the needles on the moistened sandpaper to remove the rust. 1000grit won’t scratch, it will just impart luster as as it smoothens the surface. I’ve successfully done this with various metals far and wide (via woodworking, hardware from thrift shops and on Garbage Day Is Free Furniture Day, general restoration of random stuff, etc)
After cleaning up the rust (or not, it’s completely your choice) either way you’ll need to seal the metal so it doesn’t continue to deteriorate or oxidize any further. More oxidation means more rust, which is bad. Sealing is done using a clear, poly sealant in spray paint format. More to follow on that.
– Arrange a workspace and begin by removing the needles from the felt. Keep track of the order if that’s important to you!
– Arrange the needles in a row, 1″ apart.
– Needle by needle, stab a few mm’s worth of length, sharp end first, into a dense, foam-type surface. You’ll need something that will hold the needles upright and keep them from tipping over. What you don’t want is a surface that will allow the needles to sink in too deeply. If they are too deep they won’t get sprayed.
-Other ideas are to use styrofoam, dense packing foam from inside an electronics box, a cork-board, or even cardboard in a pinch.
-Spray an even coat of CLEAR, SATIN, aerosol sealant onto the needles. (this is located in the spray paint section at any store). Rotate yourself around the display of needles, or move it 180 degrees, so that you make contact with 100% of the metal.
-Allow to dry between coats.
-Leave to dry 24 hrs before replacing them onto the felt.
**Please make sure you go outside or into the garage to spray the sealant; it stinks and isn’t good to use indoors)
If it’s within your location, means, and desires, check out Michaels. They will frame your items using archival-quality products for you. Hint: Never pay full price for this! Their flyers have 50% off Custom Framing ALL the time.
A salesperson helps you choose the specs for the frame & the mat (design/color/size, orientation, etc).
Whether you do the framing yourself or as a service, it’s always something that will last for generations to come.
*I am not affiliated with Michaels. I’ve had 2 good experiences using their framing services.
PS: If you decide to frame, please reply so I can see it! My MIL was a dedicated crazy quilter, and I wish we had saved some of her notions, like her hand-quilting needles and tiny scissors. All those little things that make for a good memory/shadow box, right?
Best of luck!
Thank you for clarifying the sizing in the multi packs of embroidery needles – I could always identify the most obvious sizes, but struggled with the needles of similar sizes. The John James brand are the ones I use the most as they are readily available in my nearest town. I have also tried the Tulp Hiroshima – the jury is still out on those though as they are expensive compared to the others. (But, my goodness, the packaging is gorgeous!!)
My tip for knowing which size needle is which when starting a project, is to place some clear magic tape in a little magnetic needle keeper and write the needle size on the tape with a Sharpie. You could also write directly onto the magnetic base, but the tape is handier should you want to change anything.
I use several different coloured needles keepers for my assortment of hand needles for easy reference. I can’t keep a pin cushion beside me when I’m working as my cat loves to steal my needles and pins. Luckily I discovered this not long after he adopted me!
May I also take this opportunity to thank you for you wonderful and informative articles. I have learnt so much as a relative newcomer to embroidery and can’t recommend your website enough!
Thank you.
Hey, that’s a great idea, BJ!
Thanks for this very helpful article, Mary. I also have a standard size that I tend to prefer, but discovered recently the difference that size does make in terms of the effect on threads – a thicker thread was becoming fuzzy because the needle wasn’t creating a big enough hole, so I was finding that the thread was becoming frail and fluffy. What a difference changing the needle made.
Great article, thank you Mary. I teach crewel work and find that one of the most common problems for newbies to crewel work is that they use a chenille needle or a crewel needle too thin needle for Appleton’s crewel embroidery wool. I always use crewel size 1 for double thread and size 2 for single. Tulip needles of the correct gauche for crewel wool are lovely but too long for me – I stabbed my fingers too much to risk more injuries! Everyone finds their happy in the end, but ‘trial an error’ is a shortened process after the excellent advice in your blogs.
Ah thank you for explaining which needles work best with the Appleton’s wools! I have dipped into some Crewel embroidery lately and have found the wool fluffs up quite quickly. I’ll check the size of the needle I’m using before I carry on! 🙂
Thank you, Mary!
So sharps are what you’d use for hand sewing, and betweens… are between sharps and crewel/embroidery? I did get some milliner’s needles because they have that consistent diameter. (I’m sure that was on your recommendation, for French knots and so forth.)
PS Apparently my German grandmother said any needle larger than x was like “sewing with a crowbar.” 🙂
Karla, betweens are used for hand quilting. They are shorter which makes them stronger and less likely to bend while the quilter “rocks” it back and forth through the thick layers of quilt top, batting, and backing fabric to “load” several stitches at a time onto the needle before pulling the thread through. Hope that make sense. I have no idea how they came to be named betweens.
Mary, wow! Thank you for such an informative narration. I have read lots regarding needles, but never knew how the sizes are arranged in the packets, so never knew if I was really choosing the correct needle. And wow! I had no idea that English and French needles are different in sizing. I interchange them and possibly I have been using the wrong needle all this time. I appreciate everything you do Mary. Thank you.
I didn’t see a mention of my Spiral Eye Needle. Nothing beats it for burying stray threads. And for those who struggle to thread multiple threads of embroidery floss, the side slot makes it a breeze. Of course the Spiral Eye needle is not perfect for every task, but it is a unique solution for some.
Hi, Pam – I just responded to a comment above, mentioning them to someone asking about self-threading needles. They’re not really a commonly available needle sold in these kinds of multi-packs, though, so they don’t really fit the topic of the article.
Thank you for this article Mary:) I am wondering what you think of the self threading embroidery needles? I didn’t even no they existed until I stumbled upon them. I know longer spend a minute trying to thread my needle:) I know they have their pros and cons too.
Hi, Lynn – Well, the spiral eye needles are pretty good! You can read about them on the Spiral Eye Needles website. I don’t actually use them myself, but I have tried them and they work.
Hi Mary ! I found your article on spiral needles I believe it was written back in 2013:) I had to laugh, I really do live under a rock !
Well thank you Mary, for clarifying this! I have been embroidering for many years and never really understood the sizing guides of multipack needles. I do have a needle size guide which has been some help, but I have noticed that not all my needles matched the printed size exactly. I’m wondering now if I have a mixture of French and English needles in my stash. I will have to check! But especially, thank you for demystifying the sizing guide on the needle packaging, it must be one of those concepts that is assumed to be understood by everyone and therefore never explained. But I didn’t realise the stacking order of the sizes and hadn’t noticed a size difference between the left and right stacks. This feels like a Eureka moment! 🙂
Needle sizes. OK got it BUT what size are Bohin size 7 compared with John James? Thanks Gillian A,
Thanks for the information. On the topic of “does size matter”, I tell people the following: The purpose of the needle is to transport the thread thru the ground fabric or canvas. If you are TUGGING on the needle and thread to get thru the ground fabric (and it’s not leather!), then you need to get a BIGGER (larger size) needle. Tugging will cause wear on the thread causing it to eventually damage or fray the thread, thus weakening it and causing a potential future failure (hole). If, on the other hand, when your needle and thread go thru the ground fabric and leave a visible hole where the needle went thru (because the thread is not big enough to fill the hole created), then you need to use a SMALLER needle.
Love your article on needles. You missed another little pointer. When the “eye” is put in the needle it leaves a “rough” and a “smooth” side of the “eye” on the needle. Thread at the “smooth” side.
I’m currently doing a piece of needle painting work – one thread and a No. 12 – you are right, when moving to a larger needle it does feel “thick”. !!
Thank you for this information — just today I stood in a shop looking at needles and wondered what the differences could be!
This article on embroidery needles is absolutely what I needed today. I have a large box of all kind of embroidery needles that belonged to my sister-in-law.
She was a member of a stitchery gild in Montreal, Qc Canada for many years.
It was given to me when she past with all kind of embroidery fabric. (I will be waiting for an article on identifying fabric next).
I found needles on felt pieces, on some unfinished project, in pill bottles, it seems every where.
Now I want to divided them properly and gave them away. There is way too many for me. I do cross-stitch and hardanger and paper embroidery with metallic thread. I probably have too many kind of thread also but I can use those to make Merry Pod. P.S.: I first heard of your name by my sister-in-law in 1991 when I went to my first stitching seminar in Brandon, MB Canada.
Thanks for your comment, Odette! My name? In 1991? I was just starting my second year of college, and hadn’t quite broken into the needlework world. I’m afraid I didn’t show up in the larger needlework scene into 2006, when I started blogging. There’s a Nora Corbett out there (different spelling on the last name) who designs / designed cross stitch. Maybe that’s the designer you beards about!
What a brilliant page, thank you so much!
Thank you so kindly for taking the time to show the many different needles and their sizes and uses. I do lots of hand embroidery and many times a finer smaller needle will work the stitches better than a bigger needle. Your web sight is wonderful, easy to read and understand. I learned a lot here and I am grateful I now know more about needles. Thank you !
Thanks, Teresa! I’m glad this came in helpful for you!
I cannot thank you enough for this information and how thorough and informative it is. Everyone talks about using the correct needle but not one website or needle manufacturer had the common sense to put a picture number or diagram in the package. I almost gave up on my very first embroidery project but thanks to you I’m back in the game!