


Today, we have to deviate slightly from our normal course of embroidering strawberries.
In this installment on How to Embroidery Strawberries, we’re going to stitch Strawberry #4 – which is the largest strawberry in the design.
But two things happened that detoured the original planned approach:
1. A photographic oversight – there are no photos for Strawberry #4 as it was worked on the original project (whoops!); and
2. Since I had to re-stitch Strawberry #4, I ended up adjusting the design a little bit.
I’ll explain as we go – but don’t be alarmed that this particular strawberry looks a little different from the one in the original design, or that it is isolated.
You can apply all the concepts you learn in this lesson to the original strawberry, or you can adjust your design to match this strawberry. I supply an adjusted design at the end of this article.
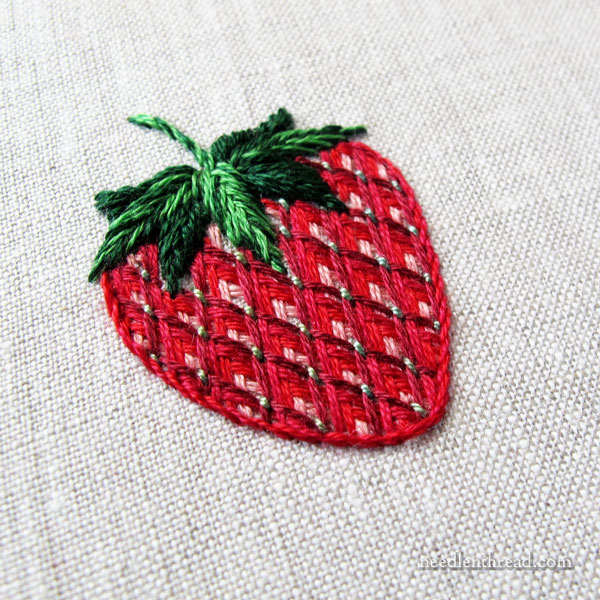
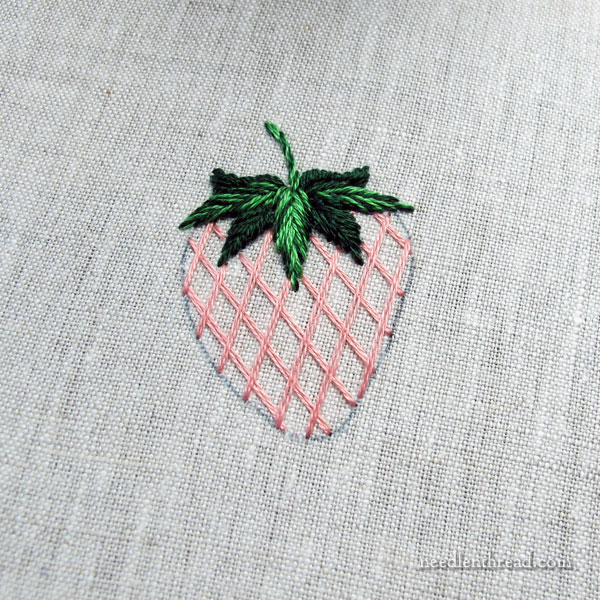
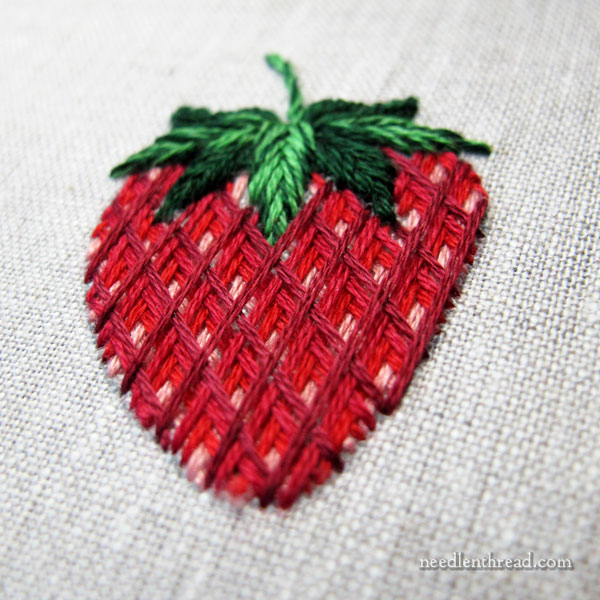
Here’s the finished strawberry for this particular tutorial.
I like this adjusted design better than the one on the original design, personally, because I like the sepals a bit better. That said, you can use the same methods for battlement couching that we use here on the original design, filling the whole strawberry shape, and then work the sepals in woven picot as on the previous strawberries.
If you want to adjust your design and make it like this one, the fruit itself is the same exact size and shape. The leaves are different, and you can sketch them in by sight or trace them from the adjusted design provided at the end of the article.
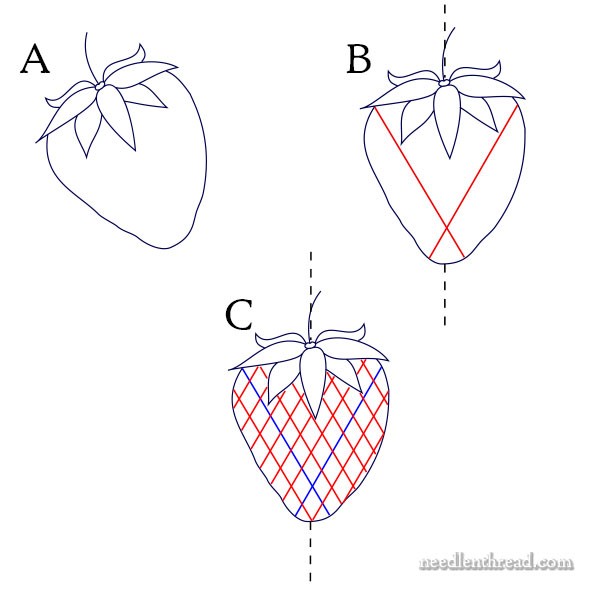
In the graphic above, “A” is the strawberry with the newly drawn sepals.
On the full design, you’ll notice that the strawberry is at an angle, if the design is situated vertically right in front of you.
When considering the individual strawberry and battlement couching, you’ll want to either turn your embroidery so that the strawberry aligns vertically with you (“B” in the graphic) or at least, in your mind, picture the strawberry in that orientation, so that the lines on the battlement couching are situated correctly.
What you want to happen is this:
You want the battlement couching to form a diamond grid inside the strawberry. When you couch the final layer, you want the tiny green couching stitches to run vertically down the strawberry, so that they work well as representative seeds.
In order for this to happen, you have to get the angle right on the grid formed by the battlement couching.
On the graphic, the blue lines on “B” demonstrate the correct angle for the lines on the grid, in relation to the strawberry viewed vertically.
In “C,” the red lines show the full grid, built off those two initial blue placement lines.
Just keep all this in mind as we work through the tutorial.
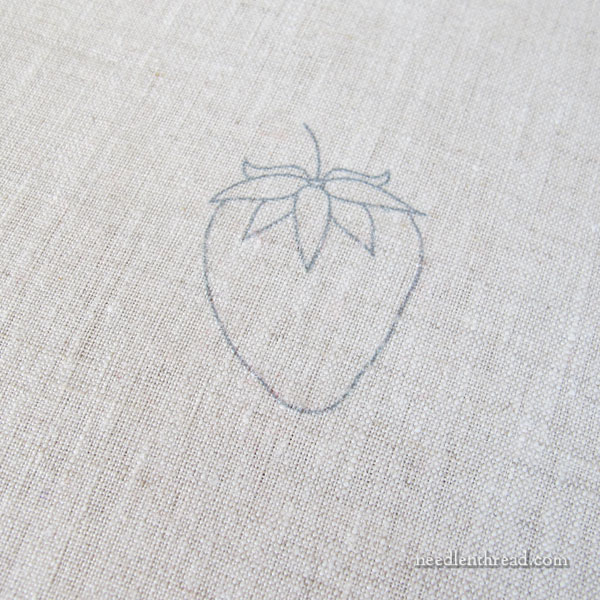
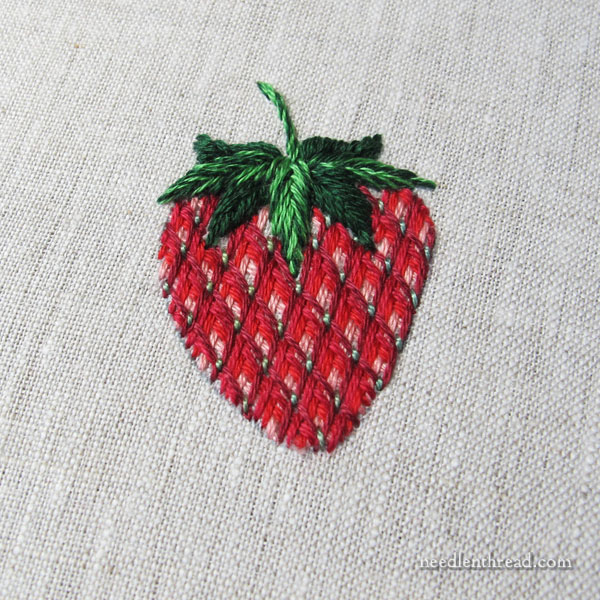
Here is the strawberry, with the work turned (imagine the rest of the design there, please!) so that it is situated vertically to you as you stitch.

Now, if you are going to do the leaves as I did them in the newly adjusted design, then I’m going to defy all the procedures I would normally recommend (“stitch the strawberry and then the leaves, since the leaves are on top of the strawberry”), and advise you to stitch the leaves first.
Why?
Because when you’re working with a grid of laid threads, stitching right up next to the grid can cause the laid threads to shift. To avoid this happening, I worked the leaves first, so that my laid threads would not be disturbed by adjacent stitching.
I used three strands of dark green in the needle at once, and stitched the leaves farthest back and the two underneath the front leaves, in fishbone stitch.
You can find a tutorial for fishbone stitch here.
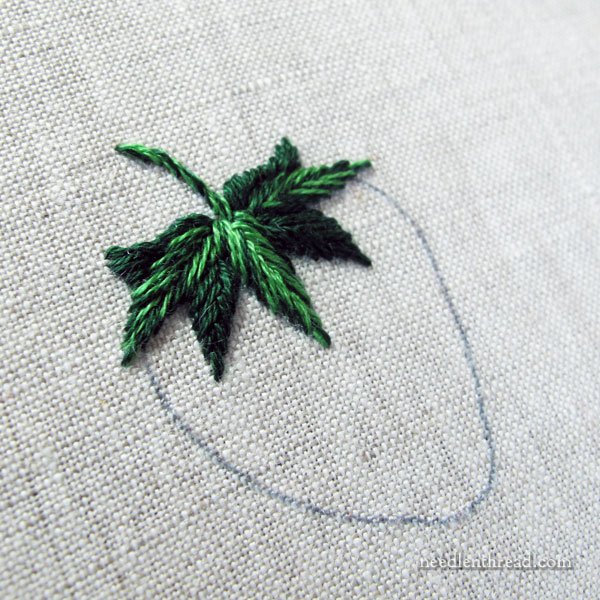
Then I switched to two strands of dark green and one strand of lighter green in the needle at once, and worked the two side leaves in fishbone stitch.
Finally, I switched to two strands of light green and one strand of dark to work the center foremost leaf in fishbone stitch.
I stem stitched the stem with the same thread.
I used three strands for two reasons:
1. I wanted the leaves to sit up quite a bit off the fabric, because: a. battlement couching looks dense, and I didn’t want the leaves falling to the back against it; and b. all the other strawberries have bold, dimensional leaves, and I didn’t want wimpy leaves on this one by comparison.
2. I was only working with two shades of green, but I wanted three different intensities of green out of those two shades. With three strands, I could combine the threads in the ways mentioned above to achieve three different intensities of green.
Now, for the battlement couching.
Use two strands of floss in the needle at once, starting with a medium pink, followed by three shades of red from lighter to darker.
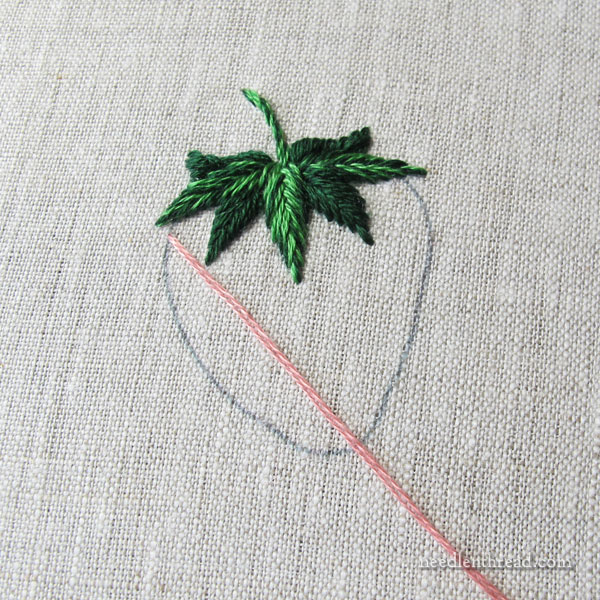
Establish the angle of your stitches first, by taking one long diagonal stitch down one side of the strawberry as shown above.
Pull your working thread over the opposite outline of the berry, to see exactly where you want it to end, and put your needle in there to take the stitch.
It is important that these stitches lie flat and smooth.
Place the first stitch well inside the berry (represented by the blue lines in “B” on the graphic), and then build your other stitches in relation to the first long stitch. This helps establish the angle. You’ll probably add at least one stitch to the lower side of this first stitch, and then fill upwards across the strawberry.
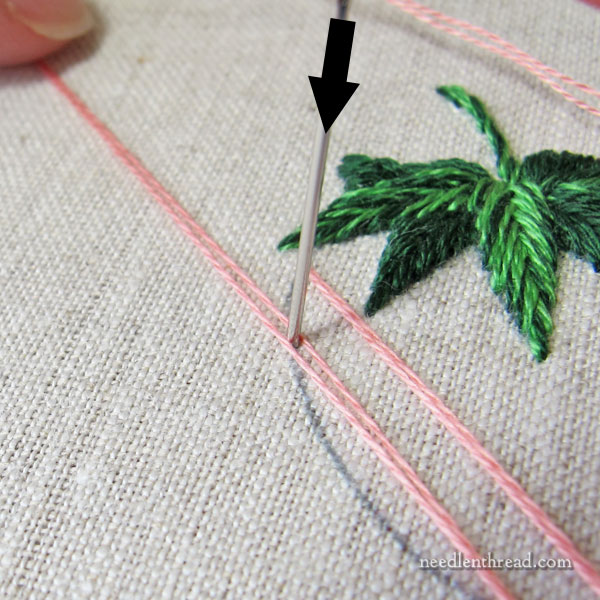
To help your stitches lie flat and smooth, you can railroad them by taking your needle down between the two strands of floss, where you plan to end the stitch. This helps hold the two strands of thread apart and parallel as you pull the working thread through.
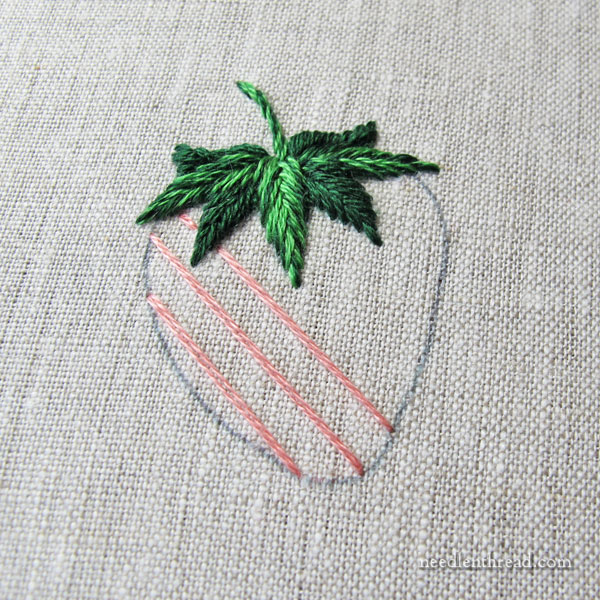
Work parallel stitches in one direction across the surface of the strawberry. These stitches are about 3/16″ apart – not quite 1/4″ apart, but not as close as 1/8″.
I fit seven parallel stitches across the strawberry.
Work the second layer on top of the first, in the opposite direction.
Notice that the stitches are not perpendicular. Instead, they are at enough of an angle to create a diamond pattern on the strawberry.
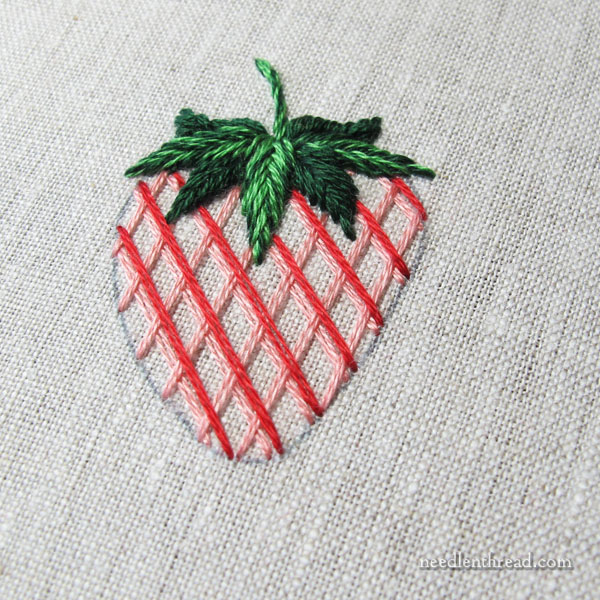
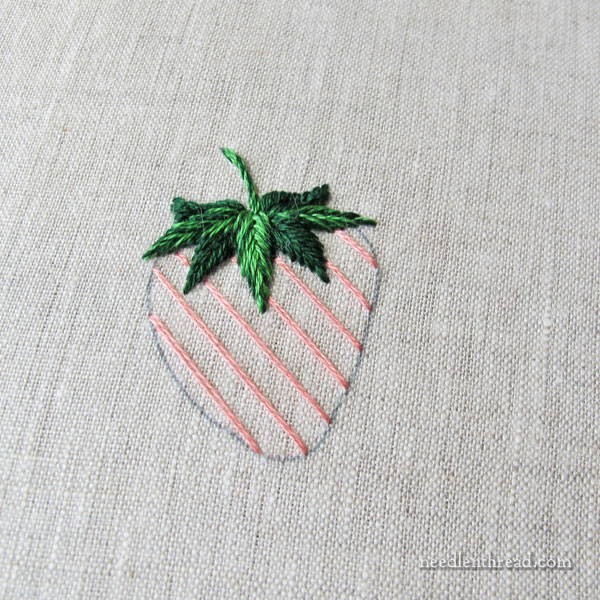
Switch to two strands of the lightest red, and work the next layer in the same direction as the first layer, and just slightly higher on the strawberry (moving towards the top of the strawberry) than the first layer of pink stitches and perfectly parallel to them.
You want these stitches to lie next to the first layer, without much space between the two colors. You don’t want to overlap the first layer of pink, either.
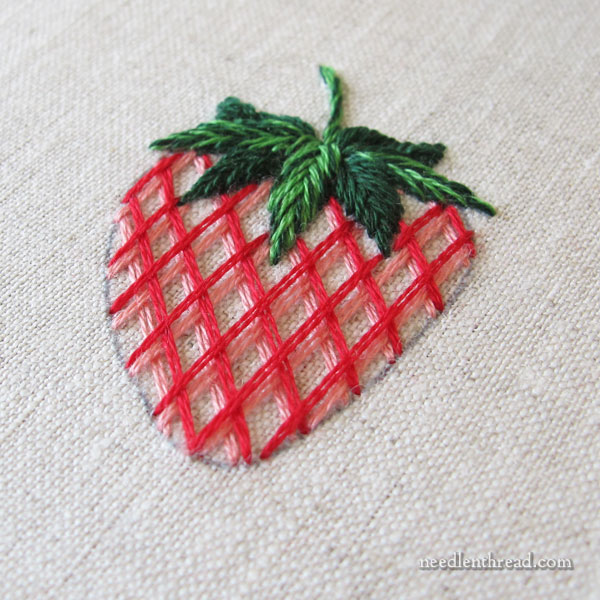
Then, work the next layer in the same direction as the second layer of pink, parallel and slightly higher towards the top of the strawberry.
Now work the medium shade of red in the same manner, moving slightly higher up the strawberry.
At this point, you may also need to add filling stitches towards the base of the strawberry, to ensure that the whole shape is filled.
Finally, work the darkest shade of red in the same manner, parallel and next to the layer before, moving slightly higher up the strawberry. This should practically fill the whole diamond.
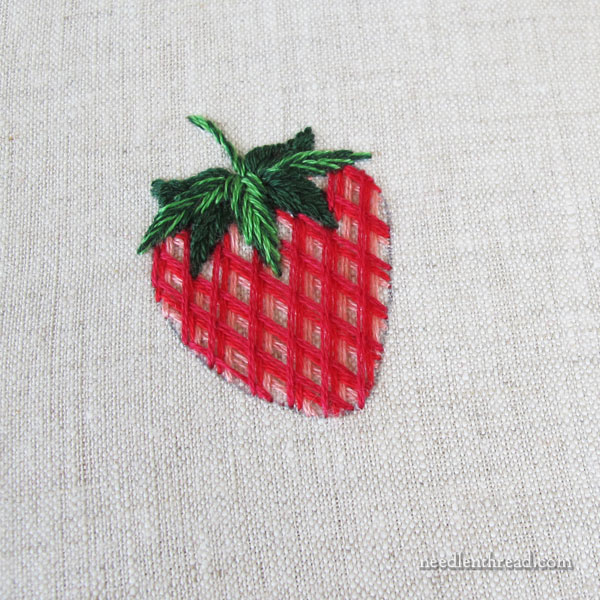
Now switch to the green #12 perle cotton and couch over the intersections of the topmost, darkest red layer only, with small couching stitches.
Make certain that your couching stitches run vertically down the strawberry, so that they look seed-ish.
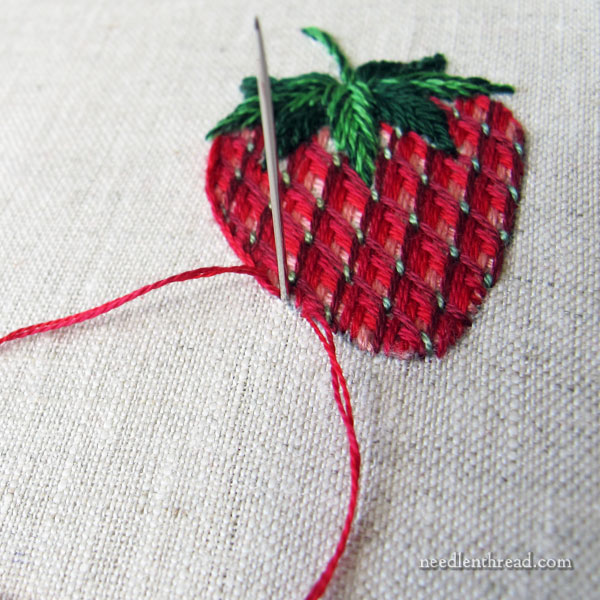
Finally, using two strands of floss in the needle (I used one strand of the lightest red and one strand of the medium red), stem stitch around the outline of the strawberry.
This last step is not essential, but it does give the strawberry a much smoother edge, especially if your battlement couching doesn’t fill the entire diamond.
Voilá! Strawberry #4!
Adjusted Design
Here’s the PDF for the design, with the adjustments I made for this version of Strawberry #4:
How to Embroider Strawberries, with Alternate Strawberry
Next Installment
In the next strawberry installment, we’ll stitch the final strawberry and the blossoms.
In the final installment, we’ll tackle the vines and the leaf.
Members on Patreon, please keep an eye out later today for the PDF for this installment, which also includes the final strawberry!
We’ll finish up the strawberry project shortly after Easter! Yay!
Looking for More?
You can find all the articles in this strawberry series listed here, on my How to Embroider (Blank) index. As the year progresses, I’ll be adding a few other projects to that page, too. Right now, we have wheat and strawberries.
I hope you’re enjoying them!
Amazing! Like in 3D.
This strawberry looks really good, and it’s just in time because it is just the stitch I need to fill a space on a piece of embroidery on felt which I am doing.
Thanks.
Ann
Oh, my!! That’s absolutely gorgeous!!
Using battlement couching for this is a stroke of genius; it looks so strawberry-like. Wonderful, as ever, Mary.
Dear Mary
A lovely stitched strawberry, it looks so nice with all the different colours of red and green and it was a good idea to use battlement couching the stitch blends well with the strawberry and the green fly stitched leaves sit beautifully on the strawberry. I am really enjoying these tutorials on the different series How to Embroider I’ve learnt so much so far, thank you for sharing with us these beautiful projects and for all the tips and techniques incorporated into the different designs.
Regards Anita Simmance
LOVE these sepals. Woven picots are not my favorite stitch to do. Love the look of these with the battlement couching. Thanks for another fantastic lesson.
I love this approach to strawberries!! I did two crewelwork strawberries on an 18th century pocket project with battlement couching, and it looked great!
Hi Mary, could you please tell me, how you anchor your threads when the stitches are almost only at the surface of the motif, as in the strawberries #3 and #4 (padded satin stitch and battlement couching)? There are far too few stitches on the back to anchor all the threads without creating thick lumps. And especially with the satin stitch on such a large strawberry, you need a lot of threads!
I just run the thread under as many stitches as I think will help secure it, and then I do one hitch over the last stitch I run under. Or, I run it under to area that has more stitches, and I anchor it there.