


Today, we venture into a new little project: embroidered strawberries!
In this series of tutorials, we will journey through embroidering a stylized, simplified bunch of five strawberries. Each strawberry is embroidered in a different technique, so that you can experience several ways to stitch your own scrumptious berries.
The series is suitable for beginners and beyond. I’ve tried to keep everything, from the design to the techniques, accessible to all levels of stitchers. You should know how to transfer a design and set up your project for stitching.
Today, we’ll talk about materials and I’ll give you the design! Let’s go!
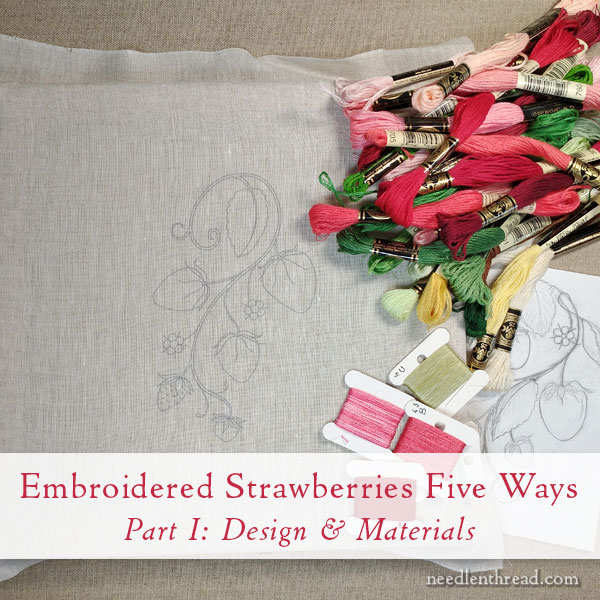
Whenever I start a project and I have the design and fabric situated, the big chore is picking threads.
For these tutorials, selecting threads involves foraging through my DMC stranded cotton drawers. I want these tutorials to be as accessible to as many people as possible, with as little trouble as possible when it comes to getting threads. DMC stranded cotton is fairly widely available!
But what I don’t have is a good selection of perle cottons in the finer weights, 8 and 12. While foraging, I came across a few House of Embroidery perle cottons that worked for me.
There are several choices for the perle cottons:
1. If you have stash, substitute from threads you have in your stash that you think will look great, because they probably will!
2. Pick from among the DMC stranded cottons you have, and either use a few strands of those (3 for perle #8, 2 for perle #12). The finished look may be slightly different, but that’s ok!
3. Take the DMC stranded cotton numbers for colors like red or light pink that are already on the list, look for DMC perle in #8 or #12, whichever is relevant, in the same color number or something very close. DMC’s colors across the perle cottons and stranded cotton are the same, so you might be able to find the same reds or light pinks that we’re using in DMC stranded cotton also available in DMC perle. Perle doesn’t come in as many colors, but they’ll have something close.
4. You can try get your hands on the House of Embroidery threads I’m using. The problem with HoE threads is figuring out how they actually number their threads. They always seem to be numbered differently, depending on how you’re buying them. I have never quite been able to get my head around their numbering system. So I’ll describe the collections the threads I used came from, and the color number within that collection, and you can try to hunt it down. I didn’t have a chance to touch base with retailers or distributors to try to figure out their thread numbering.
Really, the easiest approach – and it wouldn’t make that much difference – is #2, unless you have stash.
Ground Fabric
For this project, I chose a natural colored linen called Manuscript Vellum here in the States. It is the same linen used on the Sea to Stitch projects in Elisabetta Sforza’s book.
It is also part of the natural colored linen sampler pack that I launched last Friday and subsequently ran out of (I’m re-stocking those – if you emailed for advanced notice, I have you on the list!)
You can use whatever fabric you want to use! Just understand that the outcome may be different, as is always the case. If you’re just practicing, and you don’t want to invest a lot, use cotton muslin or twill or something similar. If you’ve got fabric in your own stash, pick something you like. If you only have white linen or green linen or pink linen – go for it! If you want to work on black, work on black! Use whatever fabric you like or you want to use.
I chose natural colored linen because I love reds and greens and pinks on the natural background, and I was also considering some white blossoms, which stand out more on a natural colored background. I picked it, in short, because I like it. You pick what you like.
Embroidery Threads
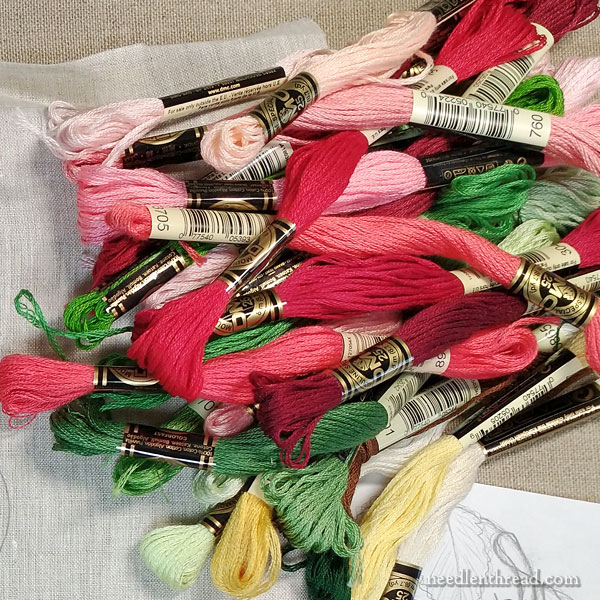
Let’s start with DMC. I pulled a massive amount of threads for this, but didn’t use as many as you see in the photo. Still, it’s quite a few!
Yellows: 725, 727
Whites: 3865, Ecru
Greens: 772, 890, 986, 987, 989, 702, 703
Pinks: 967, 3705, 760, 761
Reds: 321, 304, 815
Brown: 801
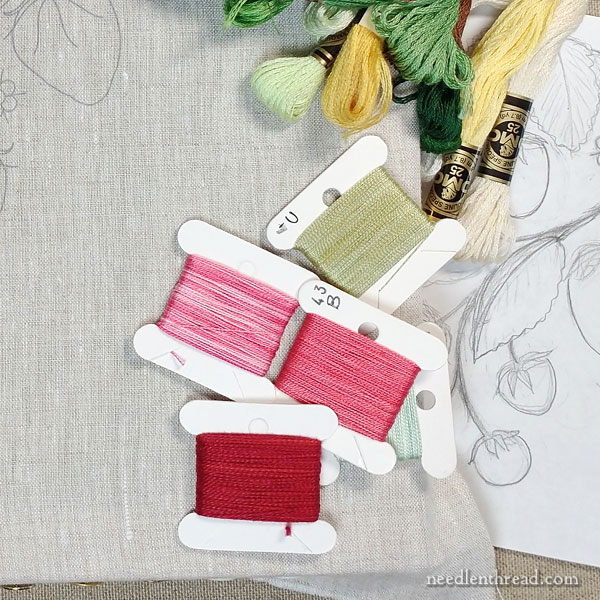
The House of Embroidery perle cottons I used are:
#12 perle cottons in green:
4C from the 72 color collection box
6A from the Green Collection
5 from the Green Collection
#12 perle cotton in pink: 43B from the 72 color collection box
#8 perle cotton in red, #78B from the Vintage Collection
Tools
You’ll want a hoop or a frame to mount your embroidery in while you stitch. A 7 or 8″ hoop will work fine.
You need scissors! Small and sharp!
Needles: #9 crewel, #7 crewel, #24 or 26 tapestry.
Free Design
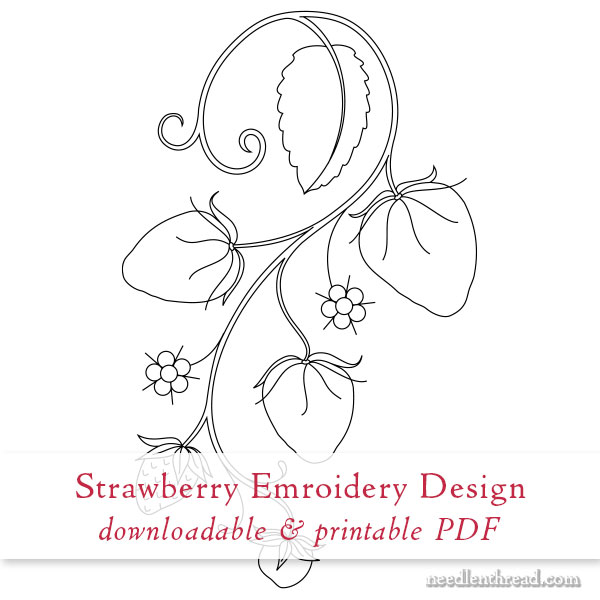
The link below will open the PDF of the design. The bunch of strawberries will print at about 5.5″ high, if you choose “100%” or “actual size” or something similar in your printer dialog box.
Five Ways to Embroider Strawberries – PDF printable
First Steps
Your first steps, if you’re stitching along: Print the design, gather your materials and tools, transfer your design!
If you’re not stitching along, I hope you enjoy the progress of the project nonetheless. I’ll be sharing tips, techniques, and troubleshooting as we go.
Next time we visit this project, we will start simple with a little strawberry, and then we will grow from there.
If you are a member on Patreon, I’ll be publishing these episodes of the Strawberry Series as printable PDFs for you, with little extras along the way. Look for this first episode on Patreon later today!
Happy Monday!
Linda Reinmiller has instructions for using floss to make a twisted cord that approximates pearl cotton. It’s a great way to get a perfect match and have that texture change. lkreinmiller.com/uploads/8/4/7/1/8471259/makingperlecoton.pdf
Really thanks for posting this. I make cord for things, but I’d never thought to try this. (As you say, the big benefit is a perfect match — that and the ability to make a small amount of something immediately.)
I would have never thought of that! Thanks for sharing! I’ll give it a go
The idea of making your own Perle is great! However, following the directions as explained in the link above there is a caveat. The result is a Perle with a twist opposite to how the threads are naturally.
First I tried making #12 Perle.
The example in the link uses 2 strands of floss that are 1 yard long and using 30 rolls each. I used typical Cotton Floss, which is has an S-twist. When you follow the directions the result is a Z-twist Perle. It’s not bad (btw. I liked 40 rolls better), but it looks a bit off.
There is a fix: do the procedure by starting to twisting the floss in the opposite direction. Yes, meaning untwisting the floss, then basically turning it into Z-twisted floss first.
To get the results I liked it took ~100 turns. Which shouldn’t daunt you. It’s quick!!
I compared that to store bought DMC #12 and can’t tell much difference.
For making #8 with 4 strands of floss: because the floss is now in a “bundle” it can’t be untwisted first. And doesn’t need to be!
I used 40 rolls (again using the opposite rolling direction as shown in the link) and it looks great in my opinion.
Try it, it’s fun!
For what it’s worth I didn’t like the results of making #5 (I did it both with 6 and 8 strands). It looks too much like cording and not Perle.
Hope this helps!
Regina
Morning Mary – Oh boy am I excited, I’ve just discovered that this piece of embroidery will fit perfectly into a hexagon for a Crazy Quilt I’m (very) slowly putting together. Gonna check the size on the Wheat Sheaf before I leave the computer and peruse my stash for supplies.
Yep, just checked – it too will fit. Thank you so much Mary, insert happy face here.
Happy stitching – Brenda
Hi, Mary. I’m eager to stitch along with you on the Embroidered Strawberries- 5 Ways tutorial. Can you suggest some DMC alternative colors for the Perle cotton House of Embroidery flosses you selected?
I can’t, because I don’t have a supply of DMC perle cotton on hand. As mentioned above, I would just take the DMC floss numbers and look for a red, pink, dark green, and light green that work with those colors … or just use the stranded cottons that are already listed.
Beautiful. Makes me think of a lovely little poem. “Tell you what I like the best —
‘Long about knee-deep in June,
‘Bout the time strawberries melts
On the vine, — some afternoon
Like to jes’ git out and rest,
And not work at nothin’ else!”
~ James Witcomb Riley
Ah! And in autumn, the one that always comes to my mind is “When the frost is on the pumpkin and the fodder’s in the shock….” His poems are great for reading aloud!
Hello Mary,
You always have such great ideas, each of your newsletter is full of good vibes and knowledge, I love them !
Just excited to see how you will embroid this project. I might not be on time but I will follow it and maybe participe later. Thank you for sharing !
Take care, all the best.
I am looking forward to this! Thanks!
Thanks Mary, I love opening up your emails when they appear. You are a very kind and giving person.
Fond wishes, Alain Louise
Love it!
Dear Mary
A lovely design I like strawberries and the design is lovely. I love the colour threads you have chosen. I am looking forward to the next steps of this project especially all the different tips and techniques that go with it and I look forward to the stitches you will choose for each strawberry. Thank you for sharing with us the free strawberry pattern and for the future tutorials.
Regards Anita Simmance