


Today – woohoo! – I’m introducing the first of the 2022 Stitch Snippets, a series wherein we explore together some embroidery projects from start to finish.
The projects in the Stitch Snippets series will be of varying degrees of smallness. Some will be finished items. Some will be decorative springboards for your own ideas.
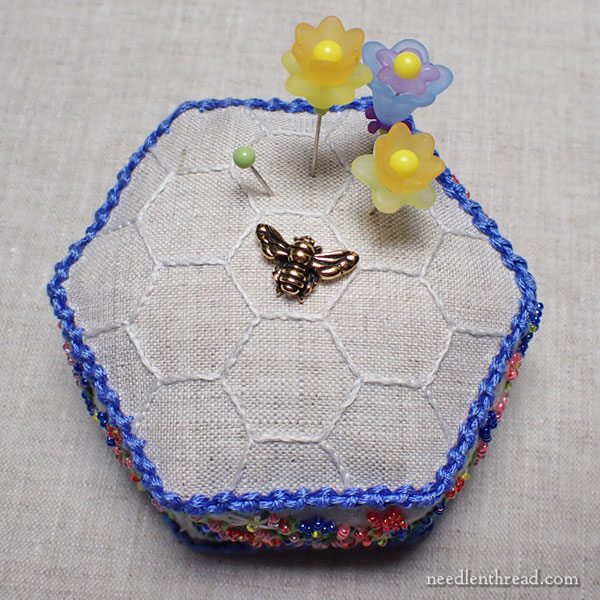
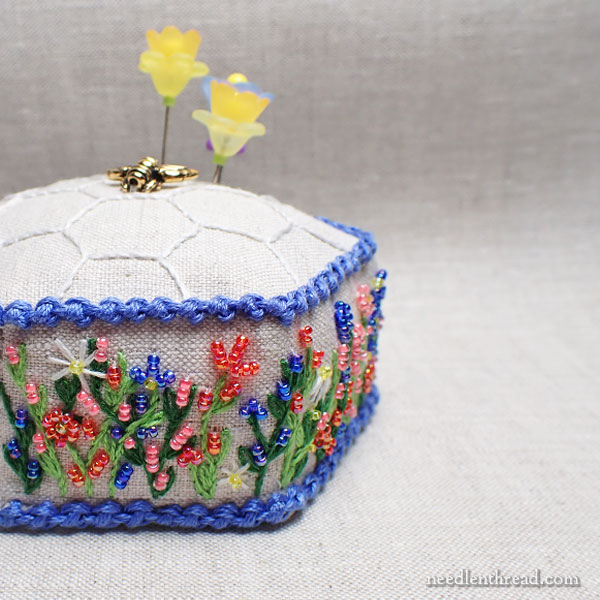
To kick the series off with a big ole bang, we’re starting with a project that I’ve named Bee-Jeweled Pincushion – a hexagon shaped embroidered pincushion embellished with beads and a little bee charm.
I’m so excited about this project! It’s a lot of fun to work, without taking too long to get to a very satisfactory and usable finish.
Let’s chat about what you can expect from the series, including when (date & time) the kits for this project will be available and what they entail.
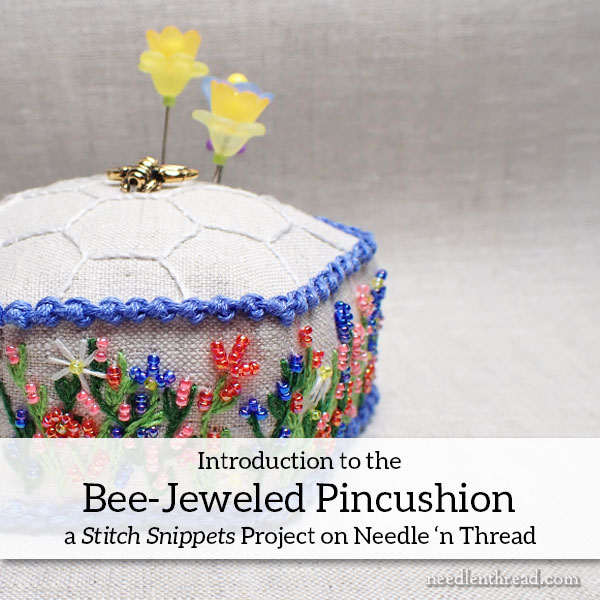
Some of the things that we’ll learn while exploring the Bee-Jeweled pincushion include setting up an embroidery project, stitching the project with simple stitches, embellishing with beads, methods of constructing the pincushion (including the whys and wherefores of the materials I chose), and finishing.
The project will be broken down into a number of separate lessons, taken a little bit at a time. They’ll be published right here on Needle ‘n Thread, so that you can follow along online. Downloadable and printable PDFs of each lesson will be available for members on my Patreon page.
In between the lessons, other content will show up as usual here on the blog, so that we have a bit of variety for everyone.
Stitch Snippets Kits
When possible, I plan to have small kits available for the different Stitch Snippets projects this year. For some projects, kits might not be necessary. And for others, we might put together a small collection of specialty threads, or we might just make embellishments or fabric available. It just depends on the project and the availability of supplies.
For the pincushion, though, I have a limited number of kits assembled and ready to go. If they prove popular, we’ll try to do a second run. With the supply situation being what it is, though, a second run is tentative.
Each kit includes all the materials involved in making the pincushions, except for the filling. So, you’ll find fabric, thread, beads, Fireline for sewing on the beads, a lovely little bee charm, needles, interfacing (stabilizer), and board for the base.
You’ll need your own tools (embroidery frame or hoop, scissors, a ruler, utility knife, and so forth), an adequate filling of your choice (we used poly-fil to keep it accessible), a PVA or similar glue, sewing thread, and pins, clips, or clothes pins for construction.
The convenience of the kit is that you have everything on hand to get going and you don’t have to search for the same or similar items. Also, if you purchase your supplies online, you won’t have to pay for shipping from a variety of sources.
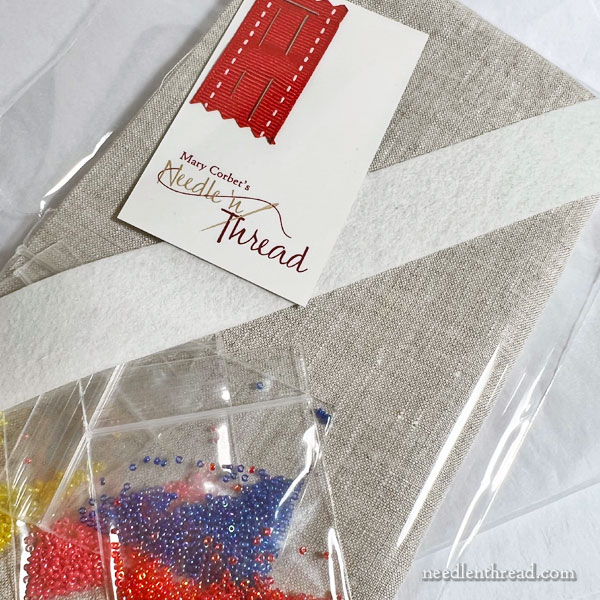
I’ve packaged these kits very simply, to help keep them more affordable. I’ve included enough supplies for the project, but not excess. So, for example, instead of full skeins and spools, you’ll receive partial skeins of thread looped in a thread card and labeled. The fabric is cut so that the design layout will fit on it in a condensed and concise way, with enough room to mount on a frame, but we will also talk about how you can enlarge the fabric if you want to use a large hoop.
You don’t have to buy a kit to work the pincushion. I’ll provide a list of supplies as we work through the project, and you can also substitute your own supplies. We’ll talk about substitutions and so forth along the way. This way, those who don’t live in the US or those who have resources at hand can source their supplies locally, or they can make substitutions based on what they have available.
Kit Launch
The Bee-Jeweled Pincushion Kit will be available in my shop here this coming Tuesday, January 25th, and 10:00 AM Central Time. This means that, for the East Coast, look for the kit in the shop at 11:00 AM on Tuesday; for Mountain Time, look for it at 9:00 AM; and for Pacific Time, look for it at 8:00 AM.
I regret that I’m not shipping the kits internationally, except to Canada and Australia (for those willing to pay the shipping – which is sadly higher than the cost of the kit).
If you have questions or comments as we work through the project, feel free to use the comment form at the end of each blog post. That way, you can get input from the wider Needle ‘n Thread community.
You can also post photos and progress in the Needle ‘n Thread Community group on Facebook, if you’re on Facebook and you want to join the group there.
On Monday, I’ll be sharing the pattern with you and we will get this project underway. And on Tuesday, the kit will be in the shop at the time mentioned above.
I can’t wait! I’m really looking forward to working through this project with you, and I hope you’re excited about it, too!
Have a wonderful weekend!
I’m so excited for this project! Will any of the fabric squares in your linen sampler packs work for this project?
Yes, I used Manuscript Vellum, which is in the natural linen sampler pack. But the kit piece is 9×15. The sample pack piece is 12×12. It can still be used – you’d need to extend the fabric size for hooping or framing, by adding strips of scrap fabric on the side. There’s enough fabric in the sample pack piece, but not enough for it to be held by a hoop or frame and be able to stitch comfortably. You might have to slightly arrange the design layout. But there’s definitely enough fabric there to make the pincushion.
I had the same question! Thanks for the answer Mary – now I have a plan for my sample. I was thinking of substituting for the bottom and maybe the top anyway.
I would like to join
I’m so excited for this project!! I can’t wait to stitch along!
This looks…do-able for a newbie! YAY! If you wouldn’t mind sharing, what is the name of the blue stitch on the edge? I’d like to try to learn it!
Dear mary
I live in Brazil and it is very expensive to order anything from the rest of the world!!!!! Brazilian money is well undervalued against other currencies.
But I’ll be happy to follow you through the blog.
I’m looking forward to Monday. Thank you for this project!!
Sunny kisses from Rio de Janeiro, Brazil
I too am wondering about that blue stitch and want to learn it! I’m so looking forward to this project!
I am so excited for this series! I am hopeful that I will be able to use items from my stash for many of the projects. Thank you Mary!
Dear Mary
I can’t wait to learn more about The Stitch Snippet projects and I can’t wait to join in. I’ve had a busy time at the moment but I’m now able to join in, in some of your up and coming projects and I’m really excited about this new pincushion project and would love to join in as the project emerges and make one with . It looks such a lovely project and would be fun to embroider and make. I’m really looking forward to this and can’t wait for the project to start. Thank you for sharing with us this lovely project and for the photos of it above it looks lovely.
Regards Anita Simmance
As I live in South Africa I am unable to pay the fee for joining your PATREON group but I do look forward to your newsletter whenever it appears in my mailbox. Looking forward to making a bee pincushion as have all the supplies and hope the pattern will be available on yr ordinary newsletter.
I am trying to determine the type of fabric to use in this project. It looks like an even weave linen, but do you have any other info for us? I have some fabric in my stash and might be able to make it work. Thanks!
Hi, Judy – Nope, it’s a plain weave. The project is a stitch-along, like all the other tutorial projects I’ve blogged about here on Needle ‘n Thread, so there will be a materials list just like there always is, as soon as that part of the series is ready to publish. I’ll also have more kits available shortly, if you want your own kit. Drop me a line and I’ll let you know when they’re ready.
Please if you do a second run of the kits put me on the waiting list.
Thanks in advance,
Debbie
Hi, Debbie – Thanks! The advanced notice list is an email list, so just drop me an email requesting to be put on the list, and I’ll add you to it. Thanks.
Beautiful Bee Jewlered pin cushion..
The beautiful bee jewled pin cushion.. I know im in Australia so i can not get the kit, I tried, but can you tell me please what fabric should i get to follow along anyway..
and is there a list of other supplies we will need to start.. can not wait its sooo pretty..
Can your elaborate please so im fully prepared…Each kit includes all the materials involved in making the pincushions, except for the filling. So, you’ll find fabric, thread, beads, Fireline for sewing on the beads, a lovely little bee charm, needles, interfacing (stabilizer), and board for the base.
Fireline???? an what size board for the base please…
Thankd you in advance
Hugs Ruth
Love your site.. love it
Hi, Ruth – I’ll be answering all your questions as the project unfolds. 🙂
I have just seen this sweet pincushion on face book, it’s lovely thank you
Gillie xxxx
Thanks, Gillie!