


Let’s do something a wee bit different today, shall we?
Normally, when we explore stitches together, I launch right in and show you the stitch and how I do it. You can see examples of this approach all the way through the Stitch Fun series that you’ll find here – lots of stitches to explore there!
Today, though, let’s take this in a different direction. I’m going to challenge you to work the stitch from a set of old instructions, and then I’ll show you my explorations with it in the next article, with some reflections and ideas and whatnot.
Within the last few months, two people have approached me about the Trilby Stitch. Kelly Fletcher (from Kelly Fletcher Needlework Design) encountered it in an old book and reached out to me with some questions. Diane from Minnesota also encountered it in the same book, about a month before I heard from Kelly.
My curiosity was piqued. I get a lot of questions about embroidery stitches, but rarely do I get two almost identical questions about the same stitch from the same old book within a month or so of each other.
I went to the book – which is Embroidery Stitches by Mary Wilkinson, published in 1912, and available for free download here on Internet Archive.
The book is a hand-drawn stitch dictionary of an impressive number of stitches, many of which are… well. I’m not sure what to call them! They are not necessarily what we’d refer to as specific stitches, as much as they are arrangements that have been given stitch names.
Take, for example, the Circle Stitch, which you’ll find on pages 34-35:
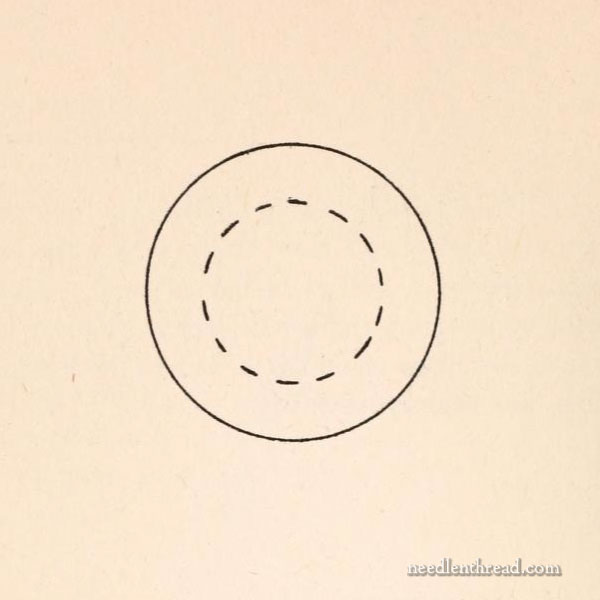
The description of this “stitch” is “a back stitch used for ornamental circles, conventional flower centers, or for attaching ornamental buttons.”
And there you have it. The circle stitch! Or… the backstitch, worked in a circle.
The illustration isn’t quite a back stitch as we know it, if you consider the backstitch as forming a continuous line of touching stitches.
But a “back stitch” doesn’t necessarily have to touch the stitch before it. It just has to be worked back while still moving in a forward direction. For example, I often tack my starting threads with tiny back stitches worked on a line towards my starting point. These aren’t touching stitches. But they’re still “back” stitches, as opposed to the backstitch.
In any case, it looks like a running stitch. She calls it a back stitch. It’s worked in a circle. So she named it “Circle Stitch.”
Keep in mind that, a century and longer ago, embroiderers didn’t necessarily have access to the information overload that we have access to today. Often, they were rather isolated in their pursuits. They may very well have learned their embroidery skills as handed down from their mothers, by word of mouth, through written correspondence, and so forth. And while there were certainly books of embroidery stitches back in the day, there was not the plethora of books that we have access to today.
With the multiplication of books over the years, with the more concentrated efforts in schooling in stitchery, with the “codification” of stitches, and with a growing interest in the preservation of the art of stitching, stitch names have been honed down and “commonized” so that, when English speaking embroiderers refer to, say, “detached chain stitch,” we pretty much all have a good idea of what that means.
But this wasn’t necessarily always the case. In Wilkinson’s book, there is no “detached chain stitch.” It is called “loop stitch.” It’s only referred to as “chain stitch” when it’s worked in a chain of many loops.
There’s an entry in her book for “Chrysanthemum Stitch,” incidentally – which is simply the “loop stitch” worked in longer loops in the configuration of a chrysanthemum. But it’s still the loop stitch – or what we would call detached chain stitch, or, casually, daisy stitch. Or the “lazy daisy,” even.
On pages 110-111, she lists a stitch called “leaf stitch,” which is not at all what we know today as leaf stitch. It is, in fact… loop stitch again! Only this time, she says “similar to loop stitch [it’s the same!]. It may be used for small leaves, as a grounding, or for ornamental motifs, as in the illustration.” But it’s the same as her loop stitch, or detached chain, just as it is illustrated.
The book is rather entertaining in this regard, and you’ll find a lot of interesting configurations of stitches in it, all given their very own stitch names, which can be fun to read!
But onto the stitch challenge…

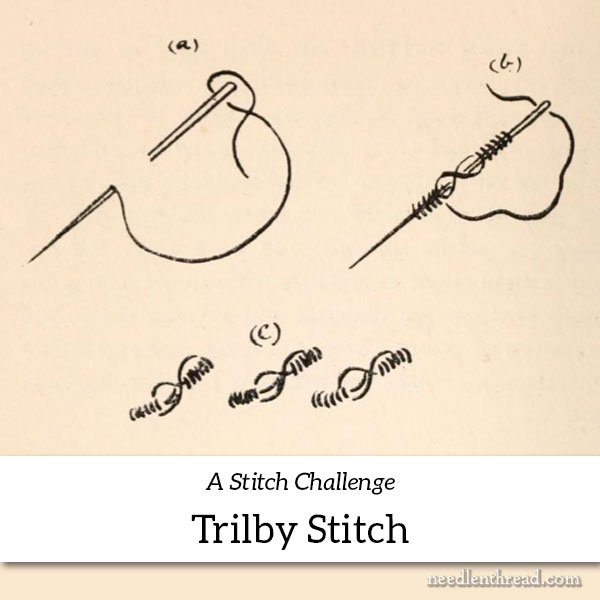
In her book, Wilkinson offers the stitch illustrated above as “Trilby Stitch.”
Her instructions for the stitch, which you will find on pages 186-187 read:
Trilby Stitch – Insert the needle as for French knots. Wind the thread six times round the point of the needle, then six times round the head, then once round the point again. Hold the stitches firmly with the thumb, and draw the needle through. The result is two opposite clusters of knots with a plaited thread between.
Now, before I undertook playing with the stitch, I read that over several times, to make sense of it. I had some trouble reading that over and picturing the whole sequence in my mind, coming out the way it does, so…
… I thought about it.
Maybe the name is supposed to give us some kind of hint about the stitch? A trilby is a hat.
Nope. I can see no connection between the stitch as it is illustrated and a trilby (hat).
I doubled checked to make sure that her illustrations throughout the book are consistent – that she shows what should be the finished configuration of the stitch, worked. She does, in practically every single illustration.
So it stands to reason that, with this stitch, she intends the outcome to look like the final drawn element on the lower right of her illustration, since this would be the normal reading progression through that drawing.
I also went back and looked at her illustration for French knots, since she refers to them, just to make sure that her understanding of French knots and my understanding of French knots are at least similar.

They are not entirely. I wrap before re-inserting. Hers looks like the set up for a very small bullion knot.
And so, with all these little pieces in my mind, and with her illustration in front of me, I should be able to work through the written instructions while following her illustrations and come up with the stitch configuration of that final element in the lower right of her drawing.
I set about trying.
Here’s the Challenge!
And that, my friends, is your stitch challenge!
If you have a chance and a scrap of fabric, give it a try!
When exploring stitches for the first time, it’s easier if you use something like a perle cotton rather than stranded floss, and if you explore BIG at first (while you get the movement down). Then reduce it if you want to, by changing the weight of your thread and the spacing in the stitch.
I explored with perle cotton #5 and a milliner needle (when you have to wrap a thread many times around a needle, a milliner is a good choice). I also tried it with stranded cotton, using all six strands and then just three strands, to scale results.
On Friday, we’ll chat a little bit more about this one, and I’ll show you the results of my explorations.
Have fun with it!
Heh heh.
Mwaaahhhhahahahah.
(“Forgive me a cruel chuckle,” as Prince John would say…)
See you then!
Trilby was a famous old novel and introduced the character of Svengali.
https://en.wikipedia.org/wiki/Trilby_(novel)
Dollars to donuts that the name “trilby” used for this stitch in a 1912 book was inspired by the massively popular 1894 George du Maurier novel (and/or the many play(s) and/or movie(s) based on it) about his “bohemian” heroine Trilby O’Ferrall.
The trilby hat gets its name from the hat style worn by the heroine in an early stage version of Trilby; it is the only currently surviving example (if we don’t count this “trilby stitch”?) of the late Victorian/Edwardian “Trilby” naming craze. Google phrases such as “Trilby corset” and “Trilby nightgown” to see some commercial-advertising examples of how the Trilby character became a fin-de-siecle fashion icon! 🙂
I wonder if there was a lavishly embroidered garment popularly associated with the Trilby character that inspired this stitch in particular?
(And somewhat to my own surprise, I did figure out the intended wrapping of the stitch just from the original diagram, but I haven’t tried it with needle and thread to see how/if it works!)
Did you notice the pearl stitch in this book? Trilby almost seems like the bigger sister. I’m still trying to get Trilby to look more like the picture-I should have taken your “cruel chuckle” more seriously!
I recently made my annual visit to see a brother who lives on a road named Trilby Road. He’s always been intrigued with old things so has thoroughly researched all things Trilby and several years ago determined to acquire an old Trilby hat, which it turns out he had waiting for me when I got there. I was to be the hatband-replacer. The reason I mention it here is that the old one (very old, but relatively well cared for) had a knotted stitch of some sort holding the hatband in place. The thread was far too rotten to pick apart although I did try. I could not actually discern the stitch; it did not look like it would look familiar even if I could find an inch or so intact, which I did not. I put the replacement band on with a smallerish, closely spaced coral stitch and called it good, but now I’m wondering if perhaps that those crumbly bits of knots were part of 2 rows of Trilby stitches…??? Mysteries.
Without reading the answer, I tried it & came up with a little bow/bowtie shape. It’s super cute, but I don’t know for sure if that’s what they wanted – until I finish Mary’s email.
I read this article with interest because a trilby is a hat, and I am very fond of hats! I’m also fond of embroidery so of course, my interest was piqued. You mentioned the “why” of it. When you mentioned holding a ribbon in place, it got me thinking. Perhaps the trilby stitch is a decorative stitch used to hold a feather to the hat. Almost every trilby I have seen from the 30s-40s has a feather.