


Oh, jolly day! Two big events: we’re starting the final Stitch Snippet stitch along for 2022 today, and…
I’m writing my first blog article from my new studio space. Very exciting, on both accounts!
Next week, I’ll show you where we are with the studio space. For now, suffice it to say that we are completely in the new space, but we still have a lot of work to do to get entirely settled.
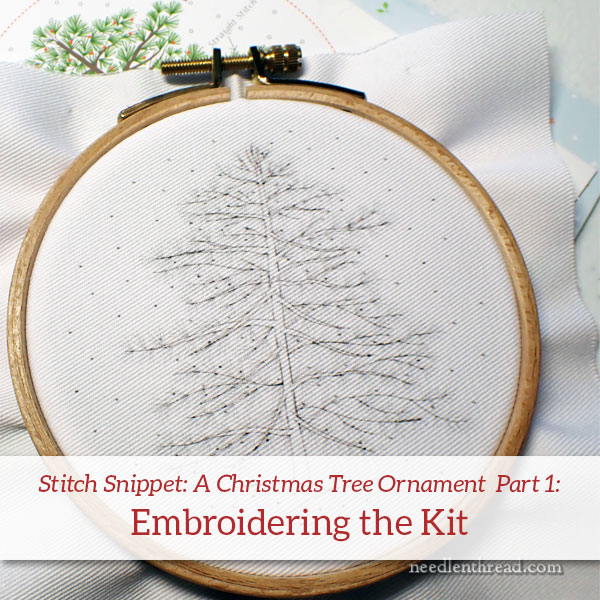
Today, we’re going to launch straight into this year’s final Stitch Snippet – a Christmas Tree Ornament. We’ll talk about embroidering the kit, including things I did differently that you might (or might not) want to do if you’re stitching the same project. Any 4″ embroidery design will work for this particular project, and you can apply all the finishing concepts to any size (or shape) flat ornament.
I’ll also tell you where to find the kit if you’re not in the US. Or, if you already have the kit and you don’t have my extra finishing kit, I’ll share information on extra materials that I used.
Shall we begin? Oh yes, let’s!
The kit that we’re embroidering for this Stitch Snippet is designed and produced by Tamar Nahir-Yanai, an embroidery designer and artist located in Israel. Tamar’s kits are available through her website, and also here on Needle ‘n Thread. If you don’t live in the US, you can order directly from her website.
We are embroidering the 4″ Christmas Tree kit, but any of Tamar’s 4″ seasonal kits will make perfect tree ornaments. Once we make the Christmas Tree ornament, you can branch out (!) to other kits, too, and make a variety of ornaments using the easy methods that I’ll show you as we finish our ornament.
I’ve added a few of my own touches to the embroidery part of the kit. The choice is yours, though – you can stitch the kit exactly as it is written, and it will be absolutely darling. Or you can make some adjustments similar to mine, or you can drum up your own variations.
When you purchase a kit, you are never obliged to follow the kit exactly as written. There’s nothing at all wrong with adding your own touches or your own spin on a purchased embroidery kit. You just have to be aware that the outcome will be different. But that’s ok!
So, to begin, a 4″ hoop fits this project just right. When you mount your fabric in the hoop, keep the screw at the top of the design (it keeps it out of the way of your threads while stitching). Try to center the design exactly in the hoop, and make sure that the fabric is drum-taut.
I’ve noticed that this fabric tends to retain hoop marks, even after damp-stretching, so it is best to make sure from the start that your embroidery is centered as best as possible. When we finish the ornament, the finishing will hide any hoop marks that may remain in the fabric, though, so don’t fret too much if it’s off just a fraction.
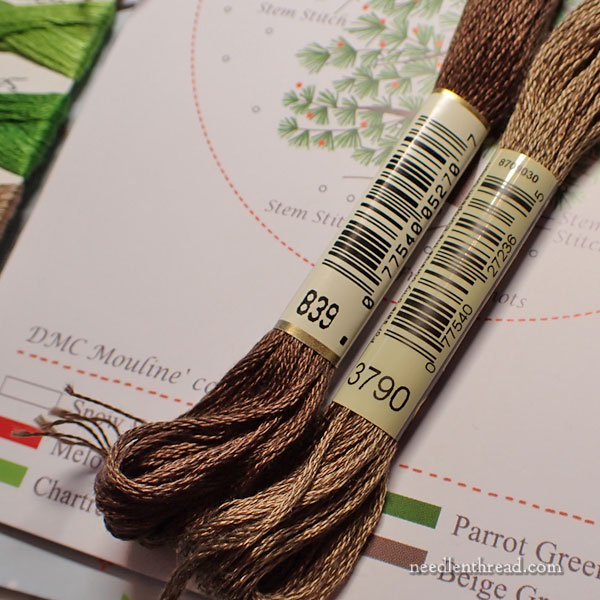
I decided to add a second shade of brown to my tree trunk and branches, using DMC 839. If you purchased the extra finishing kit from me, you will have enough of this color to incorporate it throughout the trunk and branches of the tree, too.
As Tamar instructed, I used stem stitch for the trunk and the branches, but I used one strand of DMC (from the six) to work the embroidery.
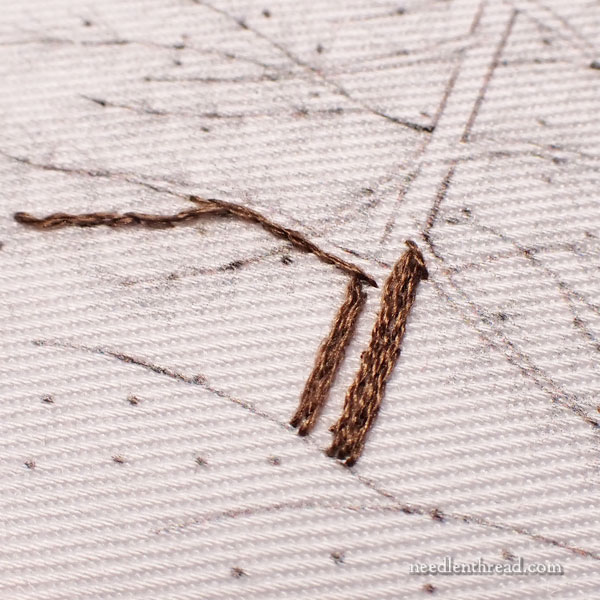
I began working from the bottom of the trunk upwards, stopping at each branch along the way to stitch the branch. Most of the trunk is worked in 839, but I added lines here and there of the lighter brown that came with the kit.
The tops of all the branches have a layer of anywhere from 1 – 3 rows of the lighter brown that came with the kit. Below this, the rest of the branch is filled with the darker 839.
Where the branches come into contact with the trunk, I sometimes worked the branches so that they started relatively deep within the trunk, instead of sticking straight out from the sides of the trunk.
You can see that Tamar does the same on her tree, when you look at the finished photo of the design on the kit cover.
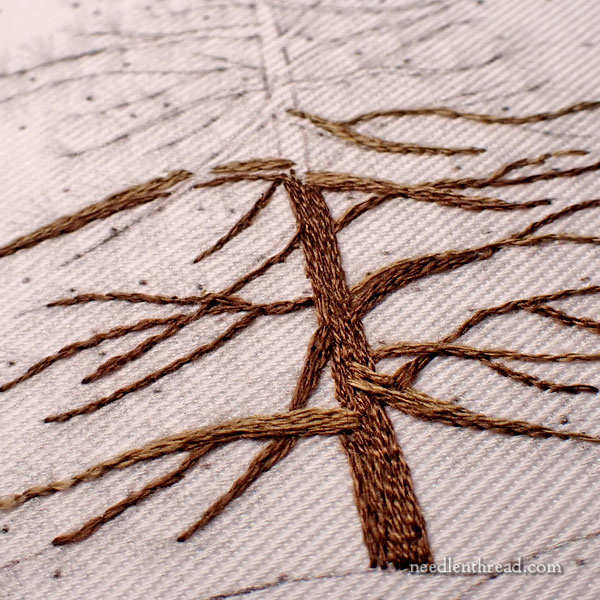
Sometimes, I’d work branches and then go back and finish the trunk around the branches.
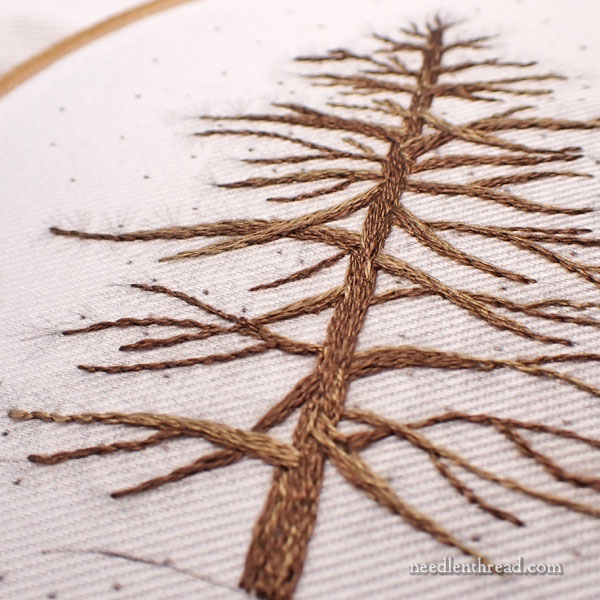
Wherever a branch intersects the trunk from within the trunk area, I added a small vertical lighter brown stitch or two near the intersection to highlight it.
I also added random lighter brown long stitches vertically down the trunk, just to work more the light brown in and to give the trunk a little woody variation.
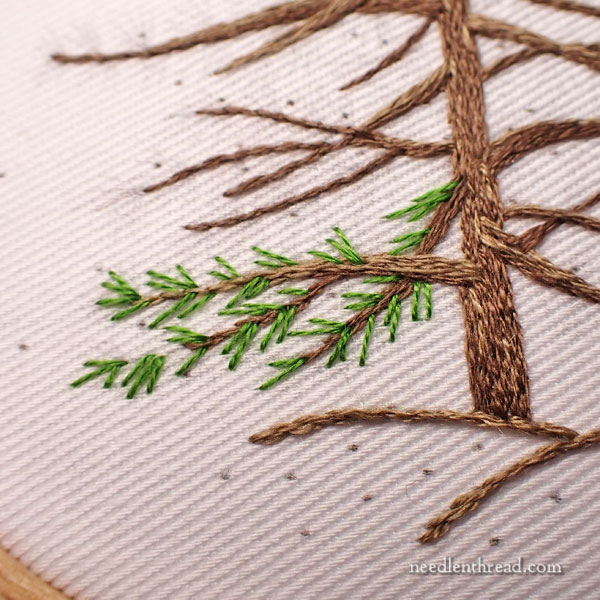
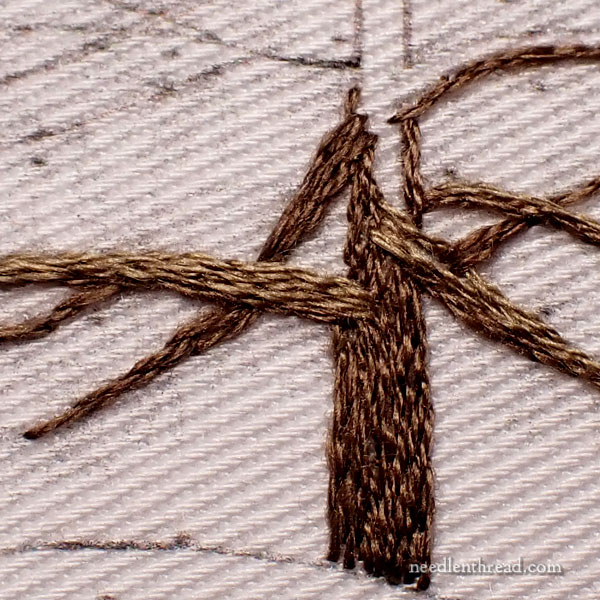
When the trunk and branches were finished, working from the bottom up, I began adding dark green needles using the photo and diagram in the kit to help with placement and orientation.
I worked first with the dark green, making sure there were anywhere from one to three dark green needles where every cluster of green would be.
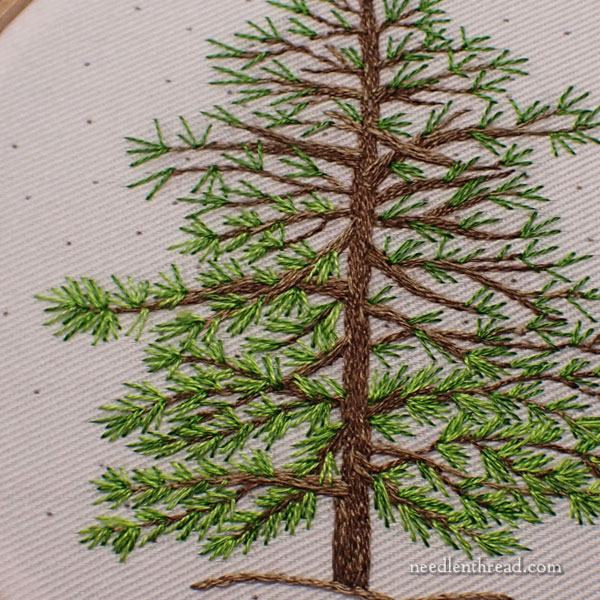
Then, I went back and filled around the dark green needles with the lighter green needles.
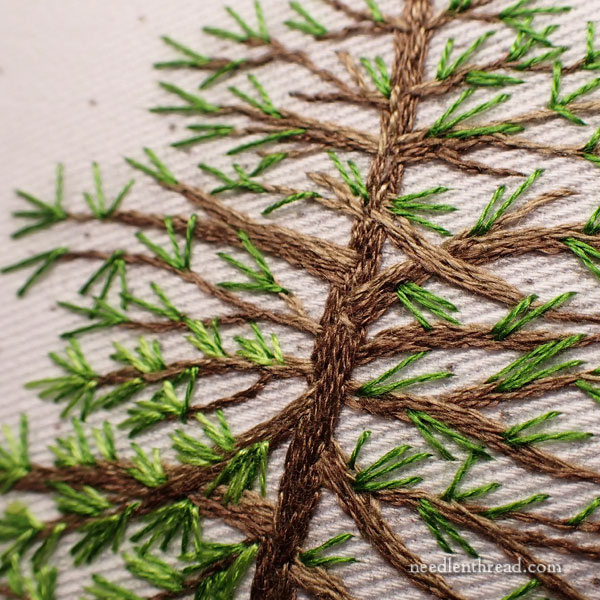
When stitching the clusters of needles, stitch some of the clusters on top of the branches. Try not to stitch all of them as if they are coming straight out the side of each branch. This will give more depth and dimension to your tree.
You might not always see exactly where to put clusters, but if you refer to the drawn design in the kit, you will have a good idea of the layout. You don’t have to go exactly by the kit drawing or the design on the fabric – just make sure that you cover all visible lines on the fabric while you’re stitching.
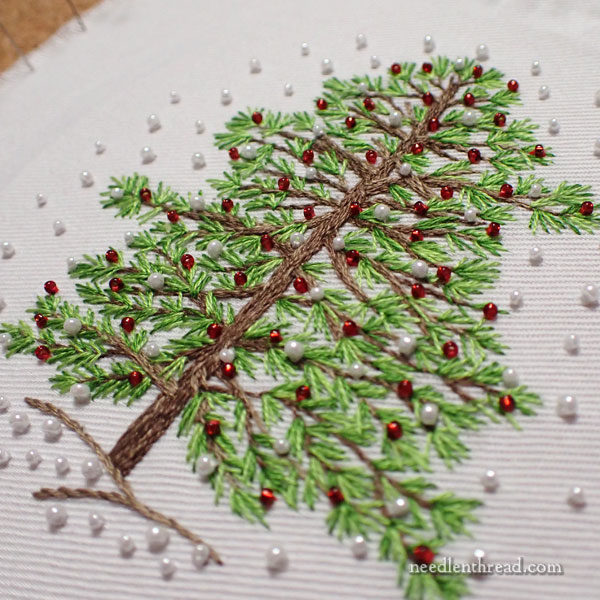
Once the greenery is finished, it’s time to add the snowflakes and the red accents on the tree.
Since I planned to make an ornament from this, I decided to work with beads here rather than French knots. I thought this would be a good way to incorporate a little sparkle. But you can do either! It will look great either way!
For the red beads, I used Miyuki 15/0 round seed beads. The color is 0011, a dark red, silver-lined transparent bead.
For the white beads, I used Miyuki round 11/0 and 15/0 seed beads. The color number is 0420, opaque white luster. The two sizes (they are mixed in the bead bag in the finishing kit) should be stitched on randomly, so that they convey the idea of snowflakes falling.
Sewing on the Beads
To sew on the beads, use the fine beading needle provided in the finishing kit. This is a #10 short beading needle.
Use the floss provided in the embroidery kit: one strand of white for the white beads, one strand of red for the red beads.
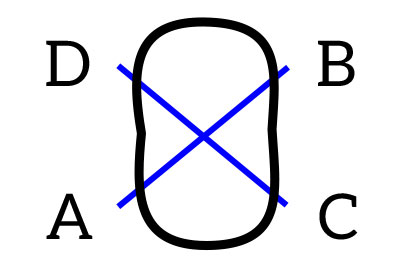
If possible, sew the beads on in the configuration in the diagram above – trying to make a tiny “x” that crosses inside the bead. This will help secure the bead to the fabric better, and it will help it maintain its situation. It is less likely to turn to its side if it’s sewn on with an “x” configuration.
The beads should sit upright, like a tire.
Coming Up: Finishing Next!
Next installment, we’ll start the finishing process.
This whole project will transpire in a short three lessons, so you’ll have your embroidered ornament ready to hang well before Christmas arrives! And you’ll even have time to make more…!
Members on Patreon can look for the PDF for the entire ornament – finishing and all – with the next installment next week. I’m combining all the lessons into one downloadable and printable PDF, so that you can whip up your ornament in no time. I’ll have that out for you next week! Look for it then!
The Kit
More kits are on the way, and we will be preparing more finishing kits to go with them. They’ll arrive some time after Thanksgiving – between Thanksgiving and Christmas – so if you’re in the market for the kits and the finishing kits, keep an eye out for them!
I still have several other 4″ holiday-related kits available in my shop, too, if you want to pick some of those up for gifts or for ornament stitching. I think you’ll find these kits fun to stitch, quite relaxing, and perfect for whiling away the early darkness and chilly evenings this time of year!
So just like moving house, now begins the work of putting it all away and finding what looked like would work on paper doesn’t in real life? I’m looking forward to seeing the new work space. How much needlework items are left in your home now? I recall you had a converted garage space dedicated to needlework.
The tree kit is nice!
Hi, Gail – when I moved out of the converted garage at home into the residential duplex that I’ve been working out of for… five? years, I think! … all the needlework goods except for my books when with me. My books were stored in cabinets. I have some peripheral “stuff” in the garage cabinets, but they aren’t specifically embroidery related. They’re more general craft related.
Everything is working out Better than we planned on paper! Yay!
Congratulations on the move to your new studio. I hope you’ll get everything properly organized soon.
Also, an update on my problem with the linen thread used for mounting Autumn Fire was apparently a couple yards of defective thread at the beginning of the spool, which can happen with linen. Perhaps a spot with a slubby bit of thread which doesn’t get enough twist in it or something. Anyway, I took a bit more off the spool and it’s fine-I absolutely couldn’t pull it apart with my hands.
Oh, that’s very good to hear, thanks Linda!!
Delightful additions to this project, Mary, as well as the advice for shading the branches.
On another note, just a random thank you for introducing us to floche. It has been just the ticket for some tiny leaves on a Christmas gift–in fact, I can’t think of anything else that would have worked. Your wisdom has saved me many times 🙂
Congratulations on your new space! May it bring much joy to you and Anna!
Linda
Oh yay! That’s a great plug for floche, Linda – nice to know it has worked out for you! I’ve got three more floche packs of various colors and hues in the works. If you love the thread, it’ll be a great way to build a collection!
The space is working out well! We are loving it! We’re not quite “there” yet – still lots of organizing to do – but we’re getting there.
Mary, Is it ok for us to to pre-iron this printed fabric in the kit — the fold isn’t flattening out but I don’t know if iron will damage the printing. Can’t wait to get stitchin’ & begin the festive holiday season. Thanks for another fun project!
You can iron it, but I’d iron it on the back side of the fabric on a very low setting. The crease will come out when you tighten the fabric in your hoop, and then at the end, you’ll damp stretch it, anyway. But if you want to iron it, iron it on a very low setting, on the back, keeping in mind that the fabric is not cotton or linen – it’s a polyester – so you definitely don’t want to press it with too hot an iron.
Good morning, Mary!
Have you ever tried out the Sulky Stick n Stitch For transferring a design? I just wondered what your thoughts are on this product, pros and cons. Thanks
Have a great day.
Yes, do you mean the fabri-solvy, that you print on, stick on, stitch through, and then dissolve? I like it ok for some things. I find the stitching can’t be quite as neat or accurate by the time everything is rinsed away, but for some types of casual embroidery, it works well!
Is it possible to order and purchase the Tree kit from the Snippets Series? If need be, put me on a list so I can obtain the 4 inch Tree Kit, Snippet Series, Stitch-Along. Also, since this is a series, what is the next to be embroidered? I’d like to order it. Thank you Mary.
Hi, Elizabeth, thanks for your question! We will have more kits available before Christmas, is all goes as planned. I’ll announce them on the website when they are ready. Concerning the series, this is the last of this year’s stitch-alongs, so the Snippets series for 2022 is officially over with this kit. 🙂
Hi Mary. I purchased 2 of Tamir’s snow-girl kits from you and I’m so impressed and pleased with the quality of them!! The DMC Mouline threads seem to be of extreme quality- very shiny and a bit thicker than what I’ve been using. Is DMC Mouline floss a special kind of DMC? Thank you so much for your passion, generosity and expertise!!
Nope, it’s just the regular DMC stranded cotton. DMC only makes one grade of stranded cotton (despite rumors out there in the needlework world that they produce a “quality” grade for needlework shops and a “sub quality” grade for big box stores – this isn’t true!).
The difference could be that, as a high volume kit producer, she is like kitting off cones, which means that the thread hasn’t gone through the extra process of skeining, but it all works out the same in the end!
Hi, Mary. I love the red and white beads! Tamar is one of my favorite designers whose in my stash, already. When I receive her kits, it’s like Christmas. They are beautifully wrapped and put together, which shows she has put a lot of thought into them. I did this pattern several months ago and had trouble seeing some of the lines for the pine needles (my eyesight is not what it use to be) and made it come alive. The beads are a gorgeous idea. Have you seen her “Snowy Night” pattern? Thank you for sharing with your fans.
Yes, her kits are a lot of fun!
I carry Snowy Night. 🙂
Hiya, I’ve managed to find a place in the UK that sell the kit but I’m having a bit of trouble with the beads. The red is no problem but the white is proving to be more troublesome. I’ve found Miyuki Seed Beads, White Pearl Opaque Luster and Miyuki Seed Beads White Pearl Ceylon. Is there a difference? Beads are a whole new world to me!! 🙂
Ah, here’s your comment. It got lost in all the incoming give-away comments on another post. Please see my previous answer to your later comment. 🙂
Hiya, I posted a comment yesterday but it seems to have disappeared.
I live in the UK and have managed to source the kit and red beads but I’m having some trouble with the white. I have been able to find ones called white pearl opaque luster, opaque white and white ceylon and then Toho seed beads in opaque luster white. I’m lost in a world of beads!! I do hope you can help.
Kindest regards
Ophelia
I think the white pearl opaque luster sounds right. The problem is that distributors assign their own names and sometimes their own numbering systems to beads, so it can be very confusing!
How do I order kits
Hi, Linda – The embroidery kit and the finishing kit (bundled together) are available here: https://shop.needlenthread.com/product/christmas-tree-snippet-kits