


The split stitch used in hand embroidery is one of the basic embroidery stitches. It’s a simple stitch in concept; difficulty with the stitch usually comes from the splitting of the stitch from underneath. Some threads are easier to split from underneath than others. Personally, I think floche and wool are about the easiest threads to use for split stitch. But regular stranded cotton, stranded silk, twisted filament silk, and perle cottons and silks are all fair game for split stitch.
It’s definitely worth learning to split upwards into the stitch when working split stitch. It just takes a little practice to get that upwards split correct. You can read about the difference between splitting the stitch coming up into it from beneath the fabric and splitting the stitching going down into the stitch from the top of the fabric (called split backstitch) in this article on split stitch vs. split backstitch.
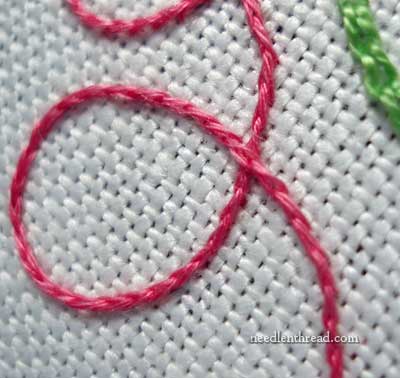
Split stitch can be used to stitch delicate lines and curves, especially when you want detailed, tiny tendrils and or curved lines. You can see the split stitch used for small hand embroidered lettering in this article. This article also shows you how to start a thread when split stitching a line.
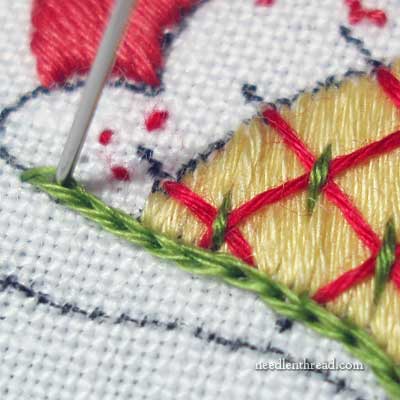
Split stitch is also often used for padding under filling stitches, especially under satin stitch. Stitching over a split stitch line when working satin stitch helps maintain perfectly smooth edges that have a little lift to them.
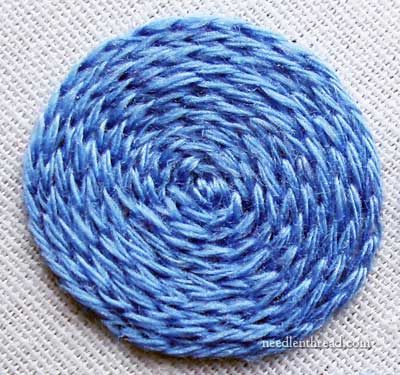
And of course, split stitch can be effectively used as a filling stitch for any shape.
Here’s the split stitch video:
Do you want more inspiration & information on hand embroidery?
There are all kinds of reasons to sign up for the Needle ‘n Thread daily newsletter! Check them out and sign up today!
If you’re looking for other instruction for hand embroidery stitches, do feel free to check out my collection of hand embroidery stitch videos here on Needle ‘n Thread!
If you like what you see on Needle ’n Thread, if you want to be a part of keeping the website thriving (and free of annoying network advertising), why not become a patron on Patreon? Check out my Patreon page here, where I’ll occasionally add special needlework bonuses for patrons.
If you shop on Amazon, you can support Needle ’n Thread without any extra expense to you by visiting my Amazon Recommendations page here, where you’ll find books and sundries for the needleworker available on Amazon.
Hi,
This is very useful and whatever I expected as a beginner,it is there.Thanq so much.
Deepa
Hi,
This stich is very useful.before i dont know about this stich. After this i got an idea, i did this stich in combi of two colour it is good.
Mar, thanks so much for the video. Also for the tip that you were using 6 threads in your demo. It's taken this blockhead time to realize that varying thicknesses of thread render varying finished products. DUH? Thanks again….Judy in Pittsburgh
Hi,
I have a quilt that my grandmother made and it needs the batting. I have decided to try this myself. I wanted to embroider her name on the back to give to my granddaughter. My question is, what is the best stitch to use that will will do the round part of letters? I have never embroidered before. Your video library is very helpful. Thanks so much.
Hi, Sandy – You might want to take a look at my lessons on hand embroidered lettering. This might help you pick out the right stitch for your project. Here’s the link to the lesson index: https://needlenthread.wpengine.com/2009/10/hand-embroidery-lettering-and-text.html . Hope that helps! ~MC
Hi Mary, just watched your video of split stitch. someone told me that they did the stab method going from the front of the stitch and stabbing from the right side to the wrong side. i have tried this but cant seem to work it out. have you ever heard of this method. thanks for your tutorials on embroidery for lettering. hope i can take this over onto the hebrew alphabet. i am just about to embroider the outline a small bird, i tried stem stitch but it looked awful (maybe because i used 3 threads of dmc floss) and i unpicked it. what stitch would you use. thanks for a truly wonderful website, Ilana
Hi! I just found your website and it is great. I have been sewing since I was 8 years old and have tried a lot of different techniques. This Christmas I was introduced to Crewel Work for the first time and I am really enjoying it. Thank you for your lovely patterns.I don’t know if you ever come to Scotland but you would be most welcome!
I just used this stitch to outline some satin stitch leaves that came out a little woobly around the edges (used a flocked cotton that wouldn’t cooperate). But instead of bringing the needle up through the threads on top, I did it by using the outline stitch as you did, but I bring the needle down through the center of the previous top stitch. I find it much easier to be able to center the needle in the threads this way, and the stitches look great to my untrained eye. Has anyone else tried this? The stitches are veeeeery tiny, as they are tiny leaves, and it just made the sweetest little edging ever. I can tell you, I’ll never try satin stitch on medium cotton flocked fabric again! Couldn’t get those stitches even no matter how hard I tried. This stitch was a lifesaver for edging.
Hi Mary,
I thought I’d check out how you do split stitch after seeing today’s post about the fleur-de-lis. Like “Dee from Atlanta”, I also split the stitch from above rather than below. It ends up being worked like back stitch. Do you think I will obtain a better result working split stitch the way you demonstrate? Or is it 6 of one and half a dozen of the other?
Thanks!
Hi, Jen –
Thanks for your question! I always work the split stitch from underneath, splitting as I go up. It does make a difference in the look of the stitch, when it’s worked as a “visible” stitch in a design, but it doesn’t make that much of a difference when it’s worked to outline a part that’s going to be stitched over (like outlining under the fleur de lis). When you’re outlining like that (to stitch over the outline), the point is just to give an even “ridge” to work your stitches over, and so it makes little difference, from what I can see, whether you split from the top or from underneath, as long as your line is smooth. Backstitch, for example, is not the best outlining stitch in such a situation, because backstitch can form little bumps. But split stitch from the top or from underneath works fine. It’s when you work split stitch as a visible stitch that you might have some concern, especially in any case where it is used as a filling. When the stitch comes up from below, it “lifts” the first stitch (the one that’s being stitched) but when the stitch comes from above, it pushes that first stitch down and dents it.
It’s a good subject for a comparison article – maybe I’ll work up a little tutorial on that!
~MC
Hi, I am loving your blog – I´m embroidering some leaves in a bag and the stitches I am learning by watching your videos.
Christina/Brasil
Dear Mary,
When you split the stitch, doesn’t it damage the thread? I am practicing the long and short stitch and when i split the stitch in the previous row, the finished work gives a a sort of fluffy look that I don’t like.. is it because of the quality of the thread?
It could be the thread. It could also be the size of the needle you’re using in relation to the thread. Use the smallest needle possible. When working with stranded DMC, a #10 crewel needle works best.
Thank You so much!:)
Hi. I’m looking at doing some medieval period embroidery. I know split stitch was used for filling in areas. My question is, do all the stitches run the same direction (silk on linen)? Thank you.
No, not always. It depends, I think, on what you’re embroidering. Look up “opus anglicanum embroidery” and you’re bound to find some good tutorials and information, especially from SCA members. ~MC
Thank you. I’m teaching an SCA class soon and just wanted to make sure. As I’m doing my sample piece, visually you can’t tell direction of the stitches as I’m doing the filling. What a wonderful web site you have!
Just wanted you to know I am just learning how to embridery and your video’s have been so helpful and I thank you very much.
Hi Mary, Thank you for sharing all of these beautiful stitches. I’m a beginner, and was wondering if there are any lessons on how you hold your hoop. I’m left handed, but have mastered sewing with my right hand, but I still just don’t feel comfortable sewing. Your lessons have been very easy for me to catch on to the techniques, but I would like to see how you hold your material as you sew. Thanks again.
Hi, Madonna – I use frames held by a stand more frequently than I use a hoop, and often, when using a hoop, I’ll clamp it in my frame holder, because I prefer to have both hands free when stitching. If I have to use a hoop without the clamp and hold it, I only use a small hoop, no more than 6″, but often just 4″. Smaller hoops are more comfortable to hold.
,,,Jadore tous qui est fait à la main
Mary,
1st- Thank you for these amazing tutorials. They’ve assisted me with learning more than just how to chain stitch.
2nd- in this tutorial; what size perle cotton are you using, and what size/type needle? Fabric type too if you recall please?
I’m attempting to learn this beautiful stitch yet, my attempts are somewhat lackluster to put it mildly. I am using #5 Perle Cotton DMC, on some cruddy waste material (practice fabric) and a #22 Tapestry needle.
My results look nothing like yours; despite several hours of practice. I’m trying to discern if it is just a more practice required issue, or if the materials I’m using are less than ideal. You can’t even tell its a split stitch. It looks more like a back stitch with something screwy at each of the split points. I am utilizing the stab method and working from back up.
Would you suggest a certain combo of needle type/size in combo with a certain thread in order to practice. I don’t want to use some of my pricier threads until I’ve come closer to looking like a split stitch as opposed to my granddaughter’s stitching with Grammy projects.
Any tips, or the clarification of your setup in the video, would be greatly appreciated.
Much thanks for the videos and all the articles. You are my go to spot. I’m a novice, but progressing nicely under your tutelage. It’s just this stitch that seems to trip me up. More complicated ones I’ve had more success with from go. This is a 9-1-1 stitching crisis. LOL
TY again,
Tracie
Hi, Tracie – in the video, I’m using a #8 pearl cotton, on linen fabric. You need to be using a crewel (also sometimes marked as “embroidery”) needle, not a tapestry needle. A crewel needle has a sharp tip, which is absolutely essential for splitting the thread. A tapestry needle has a rounded, blunt tip. It’s used primarily for counted cross stitch and techniques where you already have holes in the fabric and aren’t splitting threads, or for stitches where you specifically don’t want to split the thread. But for most hand embroidery stitches, a crewel needle is essential. Try it! I bet your problem will be almost instantly solved! If you’re using a #5 pearl cotton, try a size 1, 2, or 3 crewel (or embroidery) needle. You should be able to find a combo pack at sewing or hobby stores, with sizes 3-9 in them, or something similar. The 3 will work. Hope the helps!
I am wondering how to join a circle of split stitches? I split from underneath, but cannot figure out how to make a circle join up correctly. I’ve searched the site, but I think I missed it somewhere.
i really love it
??
Wanting to do split stitch for satin stitch outline. Satin stitch is cotton floss. Is it possible to do split stitch with single strand of cotton floss?
Hi, Lorraine – yes, it is! That’s how I normally do it….
Can you show or advise how to join a circle of split stitches? I can’t seem to figure it out.
For the most invisible join, you’d come around the circle and end the last stitch by going down into the first.
When using a split stitch to fill in an area that requires three rows next to one another, do I work the first row then start the next row coming up a little diagonally down from the end of the stich in the first row, take the stitch to end even with the first row, and then work the stitches in the opposite direction from the first row? (First row was left to right – is the next one right to left?) This is so hard to describe in words!
Dear Mary,
Thank you so much for your tutorial on the split stitch. I will try it for under some long and short stitches in the crewel piece I won from your site!! It’s beautiful. The Mellerstain Firescreen by Phillipa Turnbull.
thanks a lot for guidance. Keep posting please! Thanks
I feel like I’ve died and gone to heaven finding your website! Thank you for making all these tremendously helpful videos!
Mary,
I’m so glad I discovered you and all the wonderful tutorials, books, videos, tips, etc…! My knowledge of hand embroidery is limited to my 8th grade Hone Ec. class. My interest has mainly centered on quilting but as my quilting skills set has increased my interest in vintage quilting, vintage linens, and ultimately, vintage embroidery has also increased. Your knowledge and tutorials have allowed me go beyond those basic 8th grade skills waaay back in the mid 60’s by improving those simple stitches & adding to my skill set. My quilts have an added dimension if only in a simple hand embroidered label, an embroidered Scripture, or an ornate flower strategically placed throughout a Quilt!
Thank you for sharing your knowledge…. Much of it FREE or low cost. A Priceless Value n my opinion!
You and Jenny of @jennyatelefantz are my Go-To Masters of Embroidery!!
Blessings
Jane Ellen Hillis
Alabama
WOW I really love the Split Stitch! I love the look, it seems simple enough and I love how it can be used as a filler stitch if you will. I used to embroider as a child and it has been MANY years since. Your videos and articles are very, very helpful. Thank You!
It’s very helpful. Your video makes it clear.
I am now anxious to try the split stitch. You are very persuasive.
Greetings!
I’m working on a couple of pillowcases each with Disney characters (Okay, It’s Flora and Merryweather I downloaded the outline of them)
I enlarged the pattern so I could do the delicate stitching for the small hands and facial features. (1 single length of floss in black does the trick or Sulky 12 wt. embroidery thread. That and a lot of patience and eye rests)
For the skirts and capes, I’m experimenting with Sulky 12 wt black for outlining and other places, I’m trying 2 strands of DMC Cotton floss for outlining the body details (bust, arms) and clothing (cape, skirt, sleeve, hat, etc)
My question (finally) is for the large open areas, (skirt open area 2 1/8″ x 2″) & cape it seems impractical to do a satin stitch. I’m thinking a split stitch might be good.
The reason I need to fill the motif is because I’m using flesh-colored fabric for the face and hands. The applique will go onto a pink fabric for Merryweather with “Make it Blue!” and Flora will be on blue fabric with “Make it Pink!”
I decided on the flesh color fabric because I know there’s NO way I can stitch small enough to fill in the face and do a good job on the facial features. I haven’t worked with floss in ages. I’m more comfortable with wool for crewel or needlepoint.
What are your thoughts? if it would help, I can send a picture of what I’m trying to accomplish
Thanks
Hi, Terrie – I’d probably use long and short stitch to fill. It’s like split stitch, in a way – only it’s worked in rows of long and longer stitches, staggered, to create a consistent filling. Although it’s more often seen in shading (with different shades or colors), it can be used as a solid fill as well. Just keep in mind when filling a solid space like this, you want to watch your tension carefully, because dense filling can cause puckers if you’re not careful. But if long and short stitch isn’t your thing, then yes, split stitch would work! You’ll end up with a more noticeable path of stitching, but that’s ok.
Good morning.
I am working through your long and short tutorial (I’m at second colour, first square). Can you offer some tips for coming up to pierce the previous row? Coming up isn’t the issue, it’s finding the thread to pierce particularly when I have to go deep into the first row (#349). Not only do I have to find the correct thread among several that are close together, I then have to hold that thread so it doesn’t move while I blindly push up the needle.
I am using a hoop in a needlework stand.
Thank you,
Barb
Hi, Barb – You don’t have to be too particular about the exact thread. Just make sure you’re coming up into the previous threads, in a position so that when you take your new stitch down into the fabric, the angle you want on the stitch is there. You’re not necessarily going to pierce every single thread in the previous row.