


Yesterday, we talked a little bit about the split stitch, discussing the direction from which the stitch is split: do you split up into the stitch or down into the stitch?
Yesterday’s article was specifically about the difference in the look of the stitch from the front, when stitching up or stitching down into the split stitch. Today, I’d like to elaborate on the subject, and since there was quite a bit of feedback on the topic, I’ll try to clarify some points.
The models I’m going to use for today’s discussion are stitched with cotton floche, which is a non-divisble, softly twisted cotton thread about as thick as two strands of regular stranded embroidery floss. Floche is a softer thread than perle cotton, which is a thicker thread with a tighter twist, so the stitches don’t end up as defined as they would with perle cotton.
Speaking of thread (seems we’re always speaking of thread, doesn’t it?), we all have our own thread preferences, and when it comes to split stitch, I have a definite preference in threads. I prefer split stitch in single strands of thread – whether it’s a single strand of cotton or silk embroidery floss, a single strand of floche or coton a broder, a single strand of perle cotton, a single strand of wool. That’s just me.
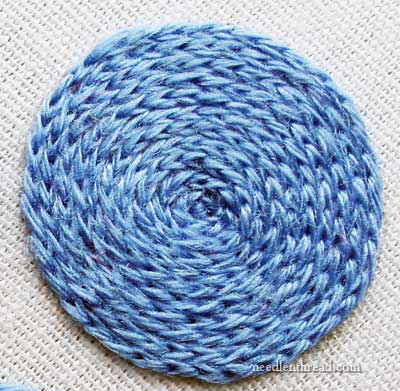
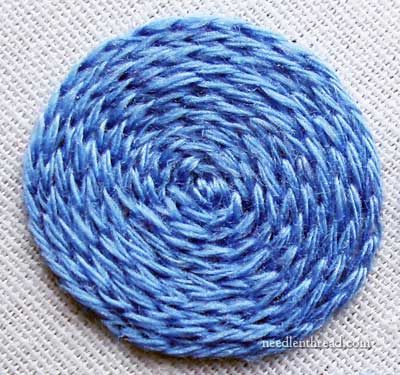
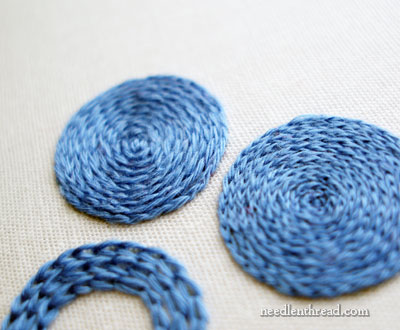
So here we have two split stitched dots on the page so far. The dots are the same size. They are both stitched with the same thread (cotton floche) in the same color (the lighting was a bit different in each photo), with strands of the same length.
I tried to keep the same stitch length as I worked the outside of the circle on both dots. I fell a bit short on that – the first dot has 31 stitches around the outside circle and the second dot has 35. I found that, to take the curves well on the second dot, I had to shorten my stitch length. On the first dot, I didn’t. The stitch I used in the first dot took the curves more easily with longer stitches.
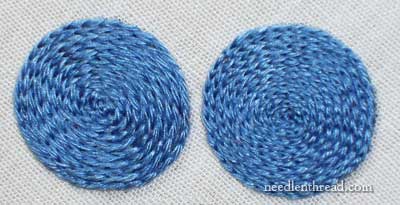
The dot on the left is the same dot in the first photo on the page here, and the dot on the right is the same dot in the second photo.
So which dot is which approach to split stitch? I bet you can guess, though admittedly, it’s a bit more difficult to see the difference with the floche.
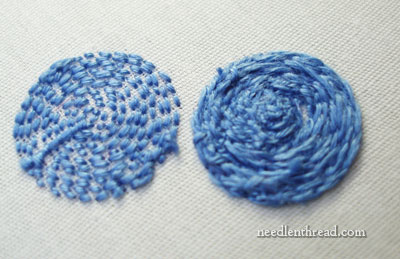
Where you can really see the difference between the two dots is on the back of the stitching.
The dot on the left is split stitch from underneath. The dot on the right is split stitch from the top. And they both form a completely different look on the back of the fabric. The dot on the left (split from below) makes little spaced backstitches on the back of the fabric. The dot on the right makes…. well…. a much thicker carpet on the backside! Something akin to a combination of stem stitch and split stitch.
And that brings us to the difference in the two approaches, and the difference in the stitches themselves.
And that difference is in the way in which the stitches are stitched, the movement of the stitch, and – finally – what the stitches are called.
Like I said yesterday, there are different approaches to split stitch – a lot of stitchers split from the top and a lot of stitcher split from underneath. it depends on the look you want to achieve, how you go about splitting your stitch. But, in fact, the stitches – split from below and split from the top – are actually two different stitches. One is split stitch (it is split from below) and the other, split from above, is called split backstitch. The split backstitch is essentially backstitch extended into the previous stitch, so that it splits it on the way down.
Though the two are similar – they both involve splitting the previous stitch – the second one (split from above) has its very own name, because it is a different stitch. And you can tell it’s a different stitch by looking at the back of the stitch.
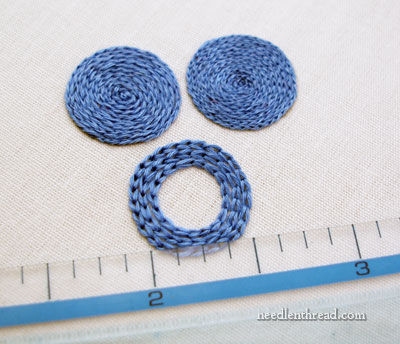
And one final difference between the two stitches: split backstitch uses up significantly more thread than split stitch. The circles stitched above are all the same size – about half an inch in diameter. The split stitch circle (split from below) took two lengths of thread. The split backstitch circle took two and almost a half of the same length thread. So – about 20% – 25% more thread for the split backstitch circle!
I received a few questions after yesterday’s post, regarding chain stitch and whether it is different from split stitch. Yes, chain stitch is a different stitch from either split stitch or split backstitch, a point better clarified by watching this video of the chain stitch. Chain stitch does not involve splitting the thread. Instead, the whole thread is wrapped around the base of the next stitch. So with chain stitch, the resulting “chain” is made from the whole thickness of the thread all the way around. You can see in the photo above that chain stitch makes a much larger stitch.
(I just couldn’t bring myself to fill in the whole chain stitch circle. Now I have someone to talk to out in my workroom. It’s my version of Wilson!)
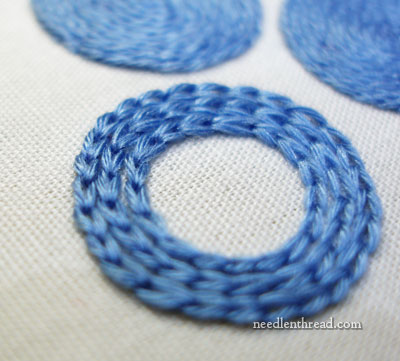
You can see the thickness of the chain stitch better here.
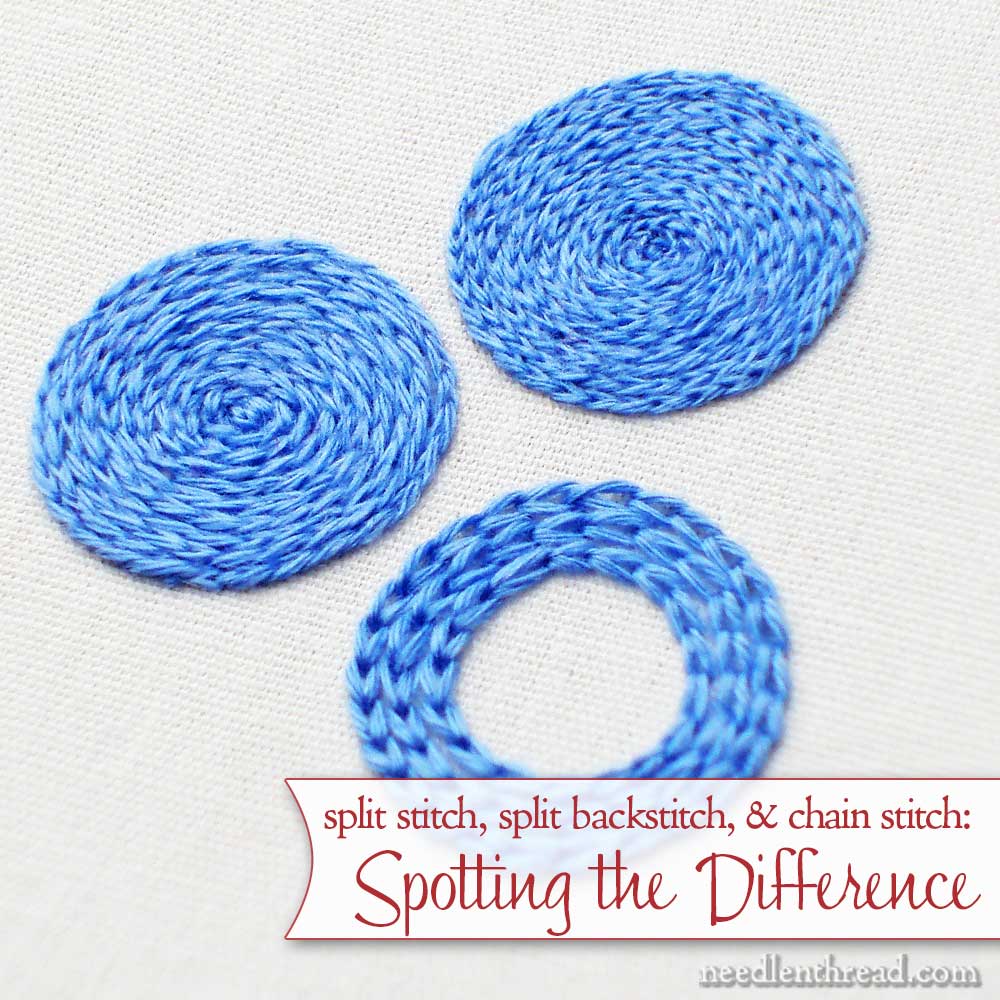
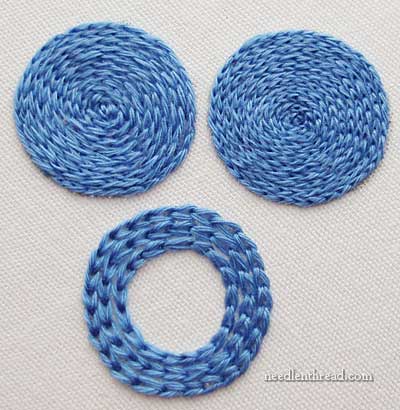
So just to recap: in the three circles above, we have three different stitches: the split stitch, which is split from below the stitch; the split backstitch, which is split from above the stitch; and the chain stitch, which is not split at all.
And finally, to clarify the point I brought up concerning long & short stitch yesterday: long & short stitch involves splitting stitches as well, but it is not technically split stitch, either. Long & short stitch is a filling technique involving rows of staggered stitches, with subsequent rows of staggered stitches coming up underneath the previous rows and splitting them. When split stitch is worked as a filling, it is worked in lines or spirals, like the circle above. Split stitch as a filling is not the same thing as long & short stitch. (I just wanted to make sure I didn’t cause any confusion on that point). The only similarity between split stitch and long & short stitch is the splitting of stitches.
So that’s a little more to chew on, concerning split stitches! Of course, you aren’t obliged to be technically correct in what you call either stitch. But I’ve found that if I’m consistent in calling a stitch by the correct name, I’m able to look them up more easily and to teach them to others with less confusion.
What do you think? Is it worth making the point about the direction of the stitch and the name it is called, or do you think it’s easier all around to just call both approaches “split stitch” and leave it at that? Am I really splitting hairs here, or what?! Have your say below!
Thank you very much for the thorough description with these nice pictures.
Technique is EVERYTHING, as you pointed out recently with the Stem Stitch / Outline Stitch direction. It makes all the difference in the world.
Thanks for your comments so far, all! I am glad to see I didn’t put you to sleep (yet) with the overdone stitch-talk! 🙂 Sometimes, I think split stitch is under-valued. I just thought I should give it its day in the sun! ~MC
Phew… Yes, it was definitely worth it, but I think I need a second cup of coffee. You’re the bomb, Mary!
“My version of Wilson.”
Mary, you crack me up! Great study on this stitch. I’m currently stumped on a project that calls for Outline stitch, but am finding that if I follow the directions, it’s very similar to the split stitch, so I’ll be reviewing any notes I can find on your site today to see where I’m going wrong.
Thanks for this post. It’s very interesting!
Excellent Work, Chuck!
Hi, Sheila! I didn’t know if people would get the Wilson reference! But every time I look at my blue-eyed guy, that’s what he reminds me of! Uhhhh…. just for the sake of clarity…. I don’t talk really talk to him. (Yet.)
thank you Mary. I wish I could ask you a million questions! Linen or cotton? what is the best investment for your money? Good instructional books/good tools (millenium scroll frame) or good materials (fine linen and silk thread) if you only have a couple hundred $ for the year?
That’s a tough question, Heather, in a way. I see frames as an investment. Once they’re purchased, they are reusable for years and years. They’re like buying a good tool that you’ll always have around to rely on. So once you have the funds to invest in a good frame, I think it’s a good idea to get one. For major purchases like that, I usually set aside a little here, a little there (even if it’s just change from the bottom of my purse) until I’ve gathered enough to make the purchase.
When it comes to linen and silk, I’d say you have to think about what you’re making. What is it for? Is it something you want to last for a long time? Something you hope to hand down to others, to give as a nice gift…? As a showpiece in your home? Those types of items are worth investing in. Better materials last longer, and when you start with good materials, your outcome is better. But if you’re practicing or playing around, just to get the feel for embroidery, or to try a new technique, then you might not want to invest big bucks in expensive linen and threads.
All that being said, better quality fabrics and threads do help produce a better outcome. They also lessen frustration. We were just chatting about this in my current class – we were discussing the difference between “craft floss” (off brands of thread) and better cotton threads like DMC and Anchor. The floss that’s sold I big packs at craft stores and that’s relatively cheap tends to pill and tangle when you stitch with it, and often is not colorfast (the bright colors especially are prone to bleeding). I think it’s better to pay a little more for DMC or Anchor, even if you’re only playing around or practicing, because the frustration level will be a lot less when working with a better thread.
Anyway, it’s definitely something you have to weigh and balance, to see what you want to make the investment in. I’m a wholehearted fan of working within a budget and saving until you can afford the supplies you really want for your hobby, so I’d suggest making a list of wants and needs and determining where best to put your money.
Hope that helps a little bit!
Thank you Mary! You’ve clarified the issues. Now I know why I’m not fond of either splitting the stitch up, or back splitting the stitch down. It’s way too fiddly with two strands–usually floss! Maybe I can learn to love them both by using floche or another single strand. Hmmmm….
Hi, Suzette – yes, I think you’re right – I think split stitch is pretty fiddly when working with two or more strands. The only advantage of working with two strands is that they are more easily separated and kept even. You can generally split the stitch right down the middle without a problem, if your strands of floss are kept parallel. But floss tends to twist up on itself, and if you don’t keep the strands parallel (for example, by using a laying tool), I think it’s harder to split them evenly than it is to split one strand. But that’s just me! It’s also a matter of getting used to the stitch – the more you work it, the easier it is. ~MC
I knew about the split stitch, but had no idea there was a split backstitch. I love learning new things through your articles. Thank you, Mary!
I am brand new to your wonderful site and daily email and excited to read such wonderful explanations and directions. Your detail given in easy to understand vocabulary is my daily treat. The library of videos is going to be my box of chocolates! I will savor them. Thank you for providing all this site offers; no payments required, no calories involved!
Hi, Sharon! Welcome aboard! Glad you’re enjoying the site! I’m working on the video library this year, updating the old and replacing them with clearer ones, so hopefully we’ll kick that box of chocolates up to something… well… a bit more decadent!
Ahhhh…. chocolate!… it’s cruel to mention chocolate before noon! 🙂
And once again, you have given a clue as to why my stitches aren’t always what I hoped for – I think I’ve usually used 2 strands. At least I don’t recall splitting the threads unless specifically told to.
I’ve usually done split from the bottom. I did figure out myself that switching top/botton split mid-project (at least in the same area) is not a good thing.
Very informative. Thank you!
Yes, I do think it is worthwhile to go into the details of a stitche. I often do a stitch just the way I was taught without thinking about why – I just do it. Sometimes it is a very good thing to look at why you do something the way you do and to look at other options out there. It is just these little extras that makes a difference!
I think it’s very important to differentiate the two! While I like the look of split stitch for outlining satin stitched elements better, I personally have a more difficult time with it, vs split back stitch, because of poor vision. I also find that split back stitch works well for extra fine lines, with very tight, tiny curves. It may be bulkier on the back, but it’s finer on the front.
Love your articles…VERY informative, insightful, and funny to boot!
Mary, THANK YOU, for the details. i’ve been searching to see if one used one strand or two or more. now i know…lol…i can use what i like depending on the look that i want. so like everybody else, i appreciate the knowledge you impart. i’ve often thought that the simplest thing is often the one thing that nobody ever ‘splains, to Lucy…!
Oh my gosh! I thought I knew a lot but now I’m not so SURE! The info is fabulous and now to put to practice what I’ve just learned. I save certain emails you send to my special reference file I set up to re-read. You have such detailed instructions. I wish I lived back in Kansas but close to where you are, however, one just can’t beat Texas winters, most of the time. lol Thanks again Mary for your knowledge you share with such love and joy!!
When the back of your work matters, I think it’s important to distinguish between the stitches! Great explanation and visuals!
🙂
Dear Mary
Very interesting and informative posts. I think its important to “split the difference” between the stitches and show, by using different techniques you end up with a different outcome.
As a relative beginner I learnt most of my techniques from NeedlenThread so I learnt to split stitch from below.
Regards Anita Simmance
I think when following directions from a pattern, it does matter that the split stitch is defined as from the top or bottom. I usually will try it another way if I’m not getting the results I want, not necessarily what the pattern says. Today, you need to name things for reference mainly but not so much in your own head. It is so easy to “google” any question that you don’t have to memorize so much–that’s not necessarily a good thing. For example, I can look up so many “how to” on Needle & Thread quite easily thank you. Actually, I look to you to find out how I “should do” a stitch and not how I’ve been doing it.
I was working on a project that had a water scene. I wanted to have a unique look so I did split stitch one row and the split backstitch the next. It had a very wonderful outcome. To me it looked like the water had movement.
Wonderful explanation, that will help me. I would do another stich rather than split because I like others had problems getting the thread spilt. I thought you had to use the double thread and had such problems with the outcome. Thank you.
Mary,
You are an invaluable embroidery treasure. I never want to miss you posts and await them with excitment, as I know something wonderful is to be seen and or read about.
I have always used the split stitch from the bottom, I love the neat look it leaves.
Thank you so much wonderful teacher.
Hi Mary,
These last 2 posts on split stitch variations has been very informative. I’m so glad you’re the sort of teacher who appreciates detail!
Thank you for working on these stitches again. Seeing them worked side by side in the circle I do like that first circle the best. What a difference in the back side too! Please tell Wilson he is looking well and his color is good!
Deb
I like that you take the time to really analyze a stitch, Mary. It’s something that not all of us have (or will take) time to do. It makes us look closer at our work. Thanks for taking the time to do this. I recently did a fairy’s legs and arms with split stitch fill. They are itty bitty and I find it easier to fill with split stitch than short and long in a small area like this. I found that I discovered the difference you have described in your 2 posts while doing it. In fact, I ripped out one leg because it was split from the top and it looked bumpy compared to the parts that were split from beneath. It’s such a coincidence that you would be blogging about it at this particular time.
Hi Mary,
Another great post! I think it is of immense value to call a stitch by it’s proper name, after all, words do mean something. It’s how we communicate, so we need to be precise when called for.
Maybe I live in a cloud (as my brother accuses me of) but I still don’t get the Wilson reference.
Hi, Cynthia – I agree, it’s a good idea to call things by their correct name. Why have language if we don’t, right?!
Wilson: he’s the volleyball that Tom Hanks draws a face on, in the movie Castaway. The guy is stranded on an uncharted island by himself for several years, so Wilson becomes his best friend, and he talks to him all the time. When Wilson floats away on the water right before he gets rescued, he starts yelling, “Wilsoooooooooon” – and while pathetic in the setting of the movie, it is rather funny! He calls him Wilson, incidentally, because it’s the brand of volleyball. So, Wilson is really just a goofy face drawn on a volleyball that a guy talks to because he doesn’t have anyone else to talk to!
It falls rather flat in the retelling, doesn’t it?!
MC
Oh.. Wow! Look at the back of the split backstitch dot! I’m so glad I split stitch my bird with the original split stitch ;-).
I think it is better to call each stitch by its correct name instead of giving it nicknames or whateveryoufeellikecallingit name ..lol. At least now I will be making clear distinction between split stitch and split backstitch and will make sure that when my little one is ready to learn these stitches she will learn the technique with the correct name.
Thanks!!!
Thank you once again Mary Highly detailed and very necessary for others and myself to know more about this since I am new to the Art… Bless you
Wonderful explanation of these three stitches – I am about to stitch the outline of my Nesting Birds – have usually used split backstitch – definitely will use split stitch now – thank you Mary.
Jillian Bath.
SOME HAS GOT TO SPLIT HAIRS, it might as well be YOU, Mary!!!
Love it.
Thanks for the education.
Thank you for going into wonderful detail about such important and useful stitches. I learn much from your descriptions and videos. Furthermore, because of your excellent indexing, topics are easy to find, an attribute almost as important as the actual content.
That makes it all a little clearer.
Thank you so much.
Three different stitches three different looks
Thanks I found that very helpful. As for splitting hairs I find that the details make a difference. I want my embroidery to be as good as it can be so the more I know the better. Knowledge is power.
Thank you for the information about splitting stitches. I always wanted to know the differences.
I have another stitch that I have questions about. The rope stitch described in the Embroiderer’s Handbook appears to be a different technique to the instructions in the A-Z #2 and the Stitch Bible.
I learned the stitch from the Embroiderer’s Handbook. Then I was checking my techinque with the other two books and they seem to be different.
Are the stitches the same or or they different as with the split stitch?
Thanks,
Debbie Brian
I think it’s better to call each stitch by its own, particular name. How will people learn that they are made differently, if we use the same name for more than one stitch.
Having always split my stitches from the top, I think the split backstitch makes a neater circle. The split stitch circle looks too loose for my taste.
Thanks for the three examples together. It helps me understand which stitch I would want to use.
When I’ve done long and short stitches, I have never split a thread. I’ve always put the new stitch in the same hole as the previous one.
Though English is our common language – words can fail. Precise terminology is essential for our international needlework world. I had never heard of split backstitch bfore and have always come from the bottom. I liked Ren’s idea of water movement.
And Sheila please look at Mary’s outline stitch as it is not split stitch but anbe usead as an ‘outline stitch’.
Thank you Mary, we need embroiderer’s like you to keep this work relevant and ongoing
Thanks Mary, your website is an invaluable resource. I look forward to the day that you publish a book or ebook!
Great minds think alike. I like to specify and call each stitch by it’s proper name. Thank you for taking precious time to detail all this information. I appreciate it very much.
Hi Mary, thanks again, it make sense and better understanding.
But can you perhaps tell us more about split stitch with one thread of DMC cotton.
Mine looks terrible, I dont know if the stitch is too long or too short. It seems I can not get the needle through the centre of the thread from the bottom. You can not see the stitch I’m trying to make.
I am busy with one of Trish Burr’s pantsy projects, working with DMC cotton on high count quilting cotton. The stems ask for rows of split stitches with one thread, DMC cotton.
Thank you!!!!!
Hi, Alet – I think with one strand of DMC it’s easier to work the split stitch if you have a magnifier. If not, one thing that helps is to keep tension on the stitch that you’re getting ready to split, by pulling slightly on the working thread to hold the stitch down flat on the fabric while you stick your needle in to split it. MC
re. wilson. thought he was the next door neighbor of tim-the-tool-man who is aleays behind the fence
Oh yeah – I forgot about him! LOL!
Mary: I do believe that we learn better if we know the name of what we are talking about. Thank you for ‘splitting hairs’ and teaching like any good teacher would do! Keep up the good, better, and best teaching that you do.
Jane
Georgia Gal
Mary, This post gives just the type of detailed information that helps clarify technical things so that I can make better (i.e., more reflective and analytical) choices when stitching. I loved it! Thanks so much.
-Sharon in France
Hi Mary
I think you are right in calling a stitch by it’s correct name it does prevent confusion. (Maybe it is my obsessive side coming out LOL)
Thank you once again for your time and expertise
Sandy
What, no comments?
If this is hair-splitting then long may it continue. I have a similar problem with plants where the same common name can apply to several different plants, but every single plant has its own proper name, albeit in Latin. And to my mind stitching is the same, give each one its own proper name and end any confusion. Thank you Mary, for the clarification.
Sorry about that, I didn’t know that the order of the comment box and the comments had changed.
Hi Mary,
Well, I guess I am a creature of habit and always come up for the split. I am going to try out the counter one and see the contrast in my hoop. Thank you for opening my eyes to
differnt things/ways over and over again. You are a special woman and treat all of us
embroiderers so wonderfully.
It’s very nice & beautiful
Hi I’m more than a novice in embroidering and haven’t done it since I was a child but I do remember some of the basic stitches. I want to personalized a cubed already stuffed pillow using the simple split and satin stitches, my problem is trying to do the split stitch on the pillow since I can’t go over and under the material as when using a hoop, so I am trying to place the needle between half of the 6 strand thread which takes some more effort as well as being hard on my eyes. Is there a better way to do this stitch on the type of project I am working on? Your help will be greatly appreciated ASAP since I am burning the midnight oil and trying to finish the project for a Christmas gift. Thank you for your prompt response and your web help tips. Merry Christmas!
I loved your analysis of the two split stitches. I use both stitches depending on the situation. If the thread I am working with is thin, I find it easier to split from the top. If the thread is heavier and doesn’t wiggle I split from the bottom.
You are the only person I have found on the web that has made a distinction between these two stitches. Thank you for the clear pictures and the post.
Best, Marianna
Hello!
Since you asked us our opinion about whether or not calling the different sticths by name is better… I had to respond. : ) I found your site a couple of days ago and have been reading it since.
As a beginner I find it much quicker and easier to learn each unique stitch by its own name with clarification on uses and comparisons to similar stitches. Learning each stitch with an individual name helps me to understand the overall concept and strategy of embroidery. It especiallys helps as I am learning to embroider by either tailoring a premade design to my liking or creating an entirely new design. My first project (besides playing stitching outlines on old shirts) was a premade design with a about 4 different stitchs for different purposes (outlining, detached, and knots). As I worked through the piece I begin to understand more about how the stitchs worked and how they are for different uses. However, it did not explain anything about the stitchs except for a diagram. So learning the stitchs I have pegged then under certain names under certain categories and associated specific purposes with it. Moving on to new pieces or researching tips, it was very confusing trying to find the information I needed. Your site by its very specific use of names is exactly how I am learning and understand it. If you had been casually calling the split backstitch the split stitch I would have been absolutely confused moving on to a new piece or when I read your tips about split stitching.
So in other words, it is fantastic! Please keep differentiating unique stitchs and comparing them to each other!! Those are some key concepts to embroidering you are teaching! Embroidery is not simply following a predesctibed pattern with very specific instructions… it is truly art when one crafts designs focusing on the different textures, looks, etc. The look of the stitch is essential after all to the picture…. All of this may seem quite obvious to you, but I can assure you that I had to wade through many sites that paid little attention to it. Also, many books about embroidary simply show a diagram of what order to put the needle through the cloth.
Thank you again for sharing your knowledge!!! As other people have mentioned, you are exactly what we’ve all been looking for and have not found anywhere else. Ty ty ty!
Hi, Mary ~ Thanks for all the info and your daily e-mails. I keep learning something everyday.
Right now I’m looking for a charting diagram for split stitch for canvas embroidery (needlepoint) – and to fill an area. I know how to do split stitch for embroidery – but not sure how many threads I need to go over to fill an area. Should I step up/down as I fill the area with split stitch? I.E. up over 4, down 2, up over 4 splitting at 2, etc. Next row up over 6, down 2, up over 4 splitting @ 2? Any help you can provide will be appreciated.
Calling the stitch by the proper name and giving exact directions for its application are why I turn to your site for help.
I’m fairly new to embroidery so I don’t know a lot of the tools used. I need to know what is a laying tool and how to use it.
Hi, Shirley – here’s a video to show you: https://needlenthread.wpengine.com/2010/11/how-to-use-a-laying-tool-video.html
Yes, it is very confusing! I didn’t know there was a difference between the 2 methods of working the same stitch. But thanks for clarifying. The photos really helped (front & back). It all depends on what u r using the stitch 4 that dictates which method to use. Sorta like tent stitches (basketweave vs. continental vs. half cross). The stitch with good backing is great for needlework, upholstery, etc… . Weight doesn’t matter & it wears well. The other for garments: tailoring (seams, rips, fixes, etc.), & embellishments (threads, beads, do dads). All that stuff adds up. Try wearing a museum piece from the 1800s versus the polyfil blanket from Walmart.
Thank you for the explanations. I am teaching myself to embroider as a retirement hobby. Very confusing, but your explanation and photos have helped clarify the mysteries that I am encountering.
Mary, thanks for the explanation. I could use some advice. The instructions for this year’s New Year’s Day project (a butterfly) calls for coarse and fine split stitch both worked in a strand of tapestry wool. Might these vintage instructions from across the pond be referring to the location of the split as you described? Thanks. Happy New Year.
That, I don’t know. You’ll have to contact the designer to find out what they mean by the two terms. I’ve not heard split stitch and split backstitch referred to this way, but that doesn’t really mean anything! Individual designers might have their own pet terms for such differences!
I think it is very beneficial for us to learn the correct name, as like you say, it makes it much easier to look up information on the stitch should we want to.