


You might call this splitting hairs – going into too much detail over something that seems to matter little – but it’s a question that comes up often, so it’s probably worth addressing briefly.
This is the question: when you work the split stitch in hand embroidery, does it really matter from which direction you split the stitch?
Most split stitch directions will tell you to split up into the stitch from underneath it. But, you might argue, as long as you’re splitting the stitch, does it really matter all that much? Can’t you split from the top, which is much easier to accomplish because you can see right where your needle’s going?
To answer the question, I’m going to take the middle path: it depends…
Split stitch can be used a number of ways in hand embroidery.
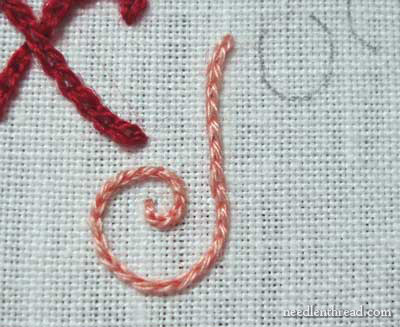
It can be used “as is” – as a line stitch that stands on its own. For example, in the photo above of lettering with split stitch, the split stitch is used with cotton floche to “write” the letter.
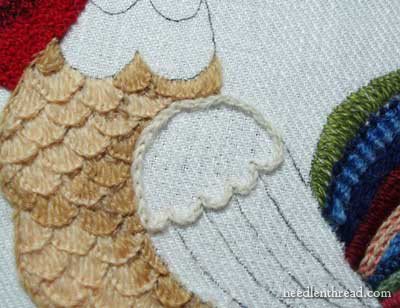
It can be used as an outline stitch underneath long & short stitch or satin stitch, to help define and lift the edges of the filled element. For example, in the photo above, I outlined the top of the wing on my crewel rooster with split stitch before stitching over the outline with long and short stitch, to give good definition to the area and to give some lift to the edge.
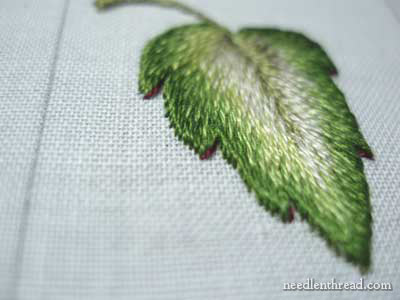
It can be used as a filling itself, by working rows or spirals of split stitch to fill in an area of embroidery. For example, Opus Anglicanum, a medieval embroidery technique, makes use of split stitch this way. The photo above is a small sample of Opus Anglicanum worked by Margaret Cobleigh.
And then, “split stitch” is also involved in another stitching technique: the long & short stitch. Long & short stitch is, after all, rows of stitches that are split by subsequent rows of stitches coming up underneath them. You can see how long & short stitch is done by taking a look at my series of long & short stitch tutorials, if you wish.
When you take one approach or the other to split stitch, there’s a noticeable difference between splitting up and splitting down.
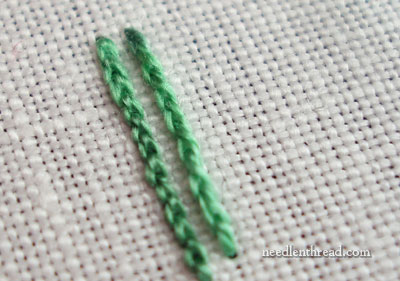
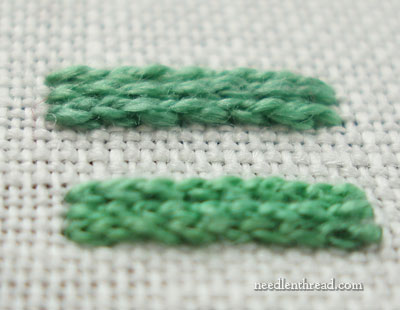
In the last two photos above, you can see two little lines about an inch long each, stitched with #12 perle cotton. One line of stitches is split by going up into the stitch, while the other is split going down into the stitch. Can you guess which is which?
It’s not hard to guess, is it? The line that looks dented from the top is the line that is stitched going down into the stitch. That’s the lower line in the photo directly above. When splitting from above, each stitch is pushed down against the fabric, pushed apart, and separated as the needle and thread pass through it. This causes each stitch to be more compact and the whole line to look a bit tighter.
The individual stitches in the top line look less compact, because when you stitch up into the split stitch, you lift each stitch away from the fabric and separate it. As your thread pulls through, the stitch continues to lift. The stitch, after being split, closes around the thread. The finished result is a stitch that hugs lightly around the base of the next stitch.
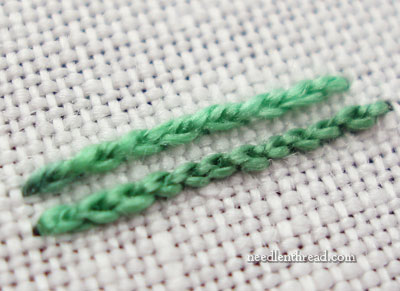
Here, you can see a few rows of split stitch, stitched both ways. The top area is split up, the lower area is split down.
You can see that the individual stitches in the top area are less defined, though they still possess that chain-like look that occurs with split stitch. The individual stitches in the lower area are better defined, and that chain-like appearance is more obvious.
The stitches in the top area blend together better, while the stitches in the lower area are more obviously separate.
The top area of split stitch sits up off the fabric a bit – there’s a little more “lift” to it. The lower area is more compact, and sits closer to the fabric. It has a tighter look to it.
There is a difference, then, in the stitching itself, when you split from below or above when working the split stitch. The approach you decide to take with split stitch will definitely change the outcome of your stitching. If you want a tighter, more compact look, with defined individual stitches that don’t blend together as well, you might decide to purposely split your stitches from above.
If you want your stitches to blend together more smoothly and to lift a bit from the fabric, then you’d work split stitch the regular way, split from below.
When you’re using split stitch as an outline underneath another stitch to lift and define the edge (like satin stitch or long & short stitch, where you outline first and then stitch over the outline), it doesn’t matter so much which direction you go, because the line will be covered. You’ll get a slightly higher lift on the edges if you split from below, but will it really be that noticeable? Probably not.
In long & short stitch, if your point is to blend together your long & short stitching into a smooth, needle painted finish, the stitches should be split from below. If they’re split from above, each subsequent layer of split stitch will form a defined line that sits on top of the previous layer of split stitch, rather than blending with it.
So, if you’ve ever wondered if it makes that much of a difference whether you split from below or above with the split stitch, now you know! It does make a definite difference in the way the stitch looks.
Can you say that one way is “right” and the other is “wrong”? Well, not necessarily – it depends on the look you want and what you’re trying to achieve. The only place I’d say there’s an Absolute on the below / above issue is in long & short stitch, when you want to achieve that smooth, blended, needlepainted look. In that case, the outcome is achieved by splitting the stitches from below.
Me, I’m a splitter-from-below. What about you? Do you split from below, or do you split from above? Leave a comment below and let’s split some hairs together!
Well, I tend to split from above – it’s easier ! But I never really think about it : I surely will now ! Thank you !
Well, first I have to say thank you for addressing this issue!
Now a confession.. I ended up doing split stitch, stitching from the top, as a way to clean up the edges on a satin stitch job I did that was less than stellar… it was very small leaves that went awry. Stitching from the top down, made the cleanest edging around the leaves. I was so pleased! The concise, clean look of stitching from the top was what sold me, in this particular instance.
I’ve never tried split stitching from the bottom up, so I appreciate seeing the difference very much, and plan on trying it as a filler stitch in the future.
Wow Mary – you have blown me away with this post. It’s the first newsletter I have received in my email from you. I am rather contemporary in most of my textile work but have a deep seated interest in traditional embroidery and its history and love to play with stitches. You have gone to so much trouble to give such a detailed description of the why’s and wherefors of a simple stitch. I tell you I was rivetted – you bring a whole new dimension into the world of embroidery. Thanks so much! Can’t wait for the next letter.
Hi, Christine! Welcome aboard! As far as stitches go, I love to look at them closely. Sometimes, too closely! Sometimes, so closely that it can have a wonderfully soporific effect! 🙂 It’s like eating too much lettuce, as Beatrix Potter would say!
I’ve tried both ways from time to time, but always wind up going back to splitting from below. Not as a totally conscious decision, now that you mention it – but just because it would better achieve the look I was going for and preferred. Thanks for bringing it into focus!
Mary Ann
Hi Mary, thanks for addressing this issue!
I had usually split from the top and I always getting tangled up into the bulkiness of the stitch ,when I do L&S stitch.
Now I split from the bottom and it is not so bulky anymore.
I am a bottom splitter!!
I have never considered which direction I stitch from using this stitch. I do know I always feel as though my split stitch is a bit messy. In your examples I would prefer the one that is stitched from the top down if I were doing lettering.
And then there’s the ‘how many strands are you using’ question…it’s going to look different if you are using one strand versus two or more, isn’t it?
Christine–welcome to the ‘we love Mary’ club and pin your hat down or you’ll lose it around here because Mary will blow it off on a regular basis. 🙂 Check the archives!
I think I go mostly from the top down but strange as it seems I can’t exactly remember. I just sort of do it without thinking. I’ll pay attention next time though!
Mary I would now consider going down in lettering and outline and have always gone up from the bottom in crewel and embroidery.
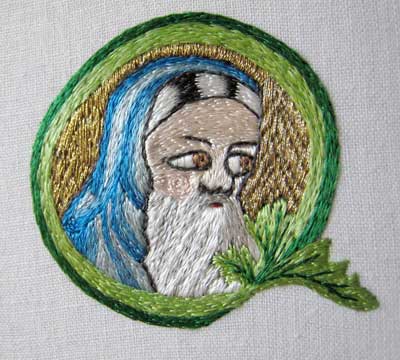
I am so enjoying your tutourial on your medallion.
Linda in Canada
I had to think for a minute. I split from above. But I will try from below to see how it looks. Thanks for sharing.
A while ago I stitched a piece that had a great deal of small writing on it and used a single strand of 6-stranded floss, split from the bottom up and it was a pain to do. It would have been much easier to have done it from the top down but I did it that way because ALL of my embroidery books said ‘bottom up’. I’m going to be doing another piece with small writing and this time will give myself permission to try top down!
I use both ways. If it’s a split stitch that will show I think I tend to come up from the bottom. If it’s going to show I think you should pick one of the versions and use it consistently.
I’ve been using the top down method (I call it ‘back split stitch’) a lot more lately for outlining shapes for thread painting. I find that I have more control with back split stitch especially when doing curvy outlines. I also tend to mix the two methods when the stitches are going to be covered and I haven’t noticed any issues.
One more thing about the difference between the two stitches is that back split stitch uses up more thread than regular split stitch. Sometimes I think that affects my choice. I don’t like to waste thread. 🙂
I prefer the tighter neater look…plus it looks more solid, which I personally like. So stitching down for me seems the way to go. I’ve never done that so when I am doing something like that again, I’ll certainly try stitch down.
I always split from the top, considering it to be more accurate, until a teacher pointed out that much more thread covers the back of the work if you split from the top. This was for outlining before satin stitching, and I totally agree with her point for that purpose, preferring not to have any more bulk than absolutely necessary on the back of the work. As you pointed out, though, for different applications it might be preferable to split from the top.
Thanks for another interesting post, Mary!
Interesting post Mary.I split both ways but mostly from top.I guess I like the tight,neat look.
Anita-MM.
THANK YOU FOR THIS – I USE BOTH METHODS BUT HAVE NOT REALLY THOUGHT ABOUT IT – USED MOSTLY FOR UNDER SOMETHING LIKE LONG AND SHORT – THE LEAF LOOKS SO GORGEOUS, I WOULD NOT HAVE THOUGHT IT WAS SPLIT STITCH. NICE TO BE CONSTANTLY LEARNING. PEGGY
Mary, thank you for your explanation of the two ways to split stitch; it was so interesting to compare the difference in the finished lines. It will allow me to consciously decide on which effect of stitching would make more sense in a project in future.
Most of my embroidery projects are done using wool threads, including a lot of long and short stitch, and I do split stitch from below.
However, the first (crewel) kit I bought indicated to split stitch from above. It also called the stitch “split back stitch”. I noticed that stitching from above as indicated in these instructions resulted in a thicker line on the back of the fabric; it used more thread.
Very informative post! I’m very surprise to see sooo many “from above/top splitters” :-). I myself one of them! It all started few years ago, when learning the split stitch (splitting from below) from a book and not been able of getting it right… so frustration got the best of me and I decided to split from the top. I do like the chain stitch look when splitting from above, specially when you use tiny stitches.
Now, when venturing into long and short stitch I did follow the golden rule of splitting from below (that was when stitching the square of the Long & Short Stitch Lessons you gave in 2009) when doing the long & short stitches filling up the square… however, I must admit that, before filling up the shape, I did outlined it splitting from above ;-).
For some reason I tend to make a separation on the split stitch and long & short stitch. For me it is not hard to split from below when doing long & short stitches filling up an area than it is when only stitching an outline… lol.. crazy I know.. :-D!
I learn most of my embroidery stitches from books; when I first did the split-stitch I kind of made it up–and never cared if I split from the top or bottom; eventually preferred the from-under method as I like the blended look better…
Many years ago (won’t say how long that is) I was working on a pattern with a lot of long and short stitches. I had no one to give me advice at that time and I was not enjoying the result of my work. That’s when I finally figured it out that coming up from below into the stitches looked much nicer. Before when I was digging into the stitches, it looked lumpy and rough, not nicely blended. Trial and error comes in handy but I prefer reading your posts.
I split from below, but only because I was told to. Now I see the reason why. It’s always much better to be given the reason as to why something should be done rayher than be told ‘because that’s the way you should do it’.
My problem is with long and short stitch. The directions as to how it should be done always shows definite colour changes. I think I’d prefer to call it ‘random’ stitch otherwise it seems regimented. I don’t know if I’m making any sense., but I love needle painting and never think I achieve it properly.
Hi, All!
Thanks for your comments so far! Yes, it’s very interesting to see how many people split from above vs. below.
There’s a good distinction made in some of the comments above: that splitting down into the stitch is actually called split backstitch. This is true, and in fact, the two stitches are classified as different stitches. Split stitch proper (if you are doing the split stitch) is actually split from below. Split backstitch is split from above. So they are two different stitches, but most stitchers don’t realize that they’re actually working a different stitch. It’s kind of like the difference between outline stitch and stem stitch. If you change the placement of the thread, you’re actually doing a different stitch altogether.
What I’ve seen happen with my own students is that most people start out with split stitch (either through the instructions of a teacher or by reading a stitch dictionary) and, because they get frustrated when trying to come up into the stitch, they decide to go down from above rather than up from below. So they get used to doing it that way, and they call it split stitch. In fact, it’s split backstitch.
And another good point is raised above about the difference in the quantity of thread on the back of the two stitches. On the back of the split backstitch, you end up with something similar to stem stitch building up on the back of your embroidery. With split stitch proper, you end up with what looks like backstitch, cut a little short.
You all have anticipated my next stitch article….!
And just another little note about stitch names. Long & short stitch isn’t “split stitch” – it’s just made up of stitches that are split from below, so in that case, it is similar to split stitch, but it isn’t the same thing as split stitch proper, because it isn’t worked in lines like split stitch is, it’s worked in rows. So just to avoid some confusion there, in case it sounds as if I’m asserting that long & short stitch is the same thing as split stitch – it’s not, even though splitting from below is involved.
So – more coming up on the topic! See, I really AM splitting hairs!
MC
Hi Mary,
As a professional embroidery artist, I use both simultaneously. If you take a look at this piece I’ve done: http://www.vanterve.ca/photogal/Farms/images/holsteidetail.jpg I have used single strands of embroidery floss to stitch these holstein cows. What is more important when you are split the stitch from above is how the needle enters the thread. If you enter at a slight angle that flows with the previous row of stitches, then your results will be much better. By combining both methods, it allows for a bit more freedom. I also jump around a bit stitching where it seems most logical to go. I this piece of an oriental poppy:http://www.vanterve.ca/photoga/silk/index1.html, I have used three strands of eterna silks, blending colours in the needle. Again, sometimes I enter from below and sometimes from above. I feel both give good results but you have to watch how you enter from above. Great pictures you have offered though.
Margaret Vant Erve
I never thought that much about it, and took the easy way out( top down). Then I read in Trish Burr’s book that L&S should always be done from the bottom. I understood that it would leave a smoother blending that way, but seeing your pictorial really brought the difference home.
Thanks Mary!
Mary I really love these little tutorials – I read your blog every day and I enjoy every aspect – but these little sessions are the icing on the cake!
I almost always split from below. I have really noticed the difference in L&S needlepainting. If you split from above it leaves a little hole that you can easily see. I do vary it when stitching outlines that will be covered, especially when going around tight curves and corners/points.
This is a great post! It may seem trivial to some, but if you want your work to look really good, you do have to pay attention to these things.
I am confused. your pictures look like chain stitch, which technically is a split stitch. I have just never heard it referred to in that manner and certainly not when referencing long and short. Please elaborate.
Thank you
Hi, all – thanks again for all the comments and feedback! I’ve got a bit more on these approaches coming up later this week. In fact, probably tomorrow now, just to get some questions answered.
Hi, Pat – chain stitch is not quite the same as split stitch. In chain stitch, the thread is not split. The stitch is actually taken through the loop of the working thread, so that the thread itself is never actually pierced in the stitch, whereas with split stitch, the thread is actually pierced. Hope that helps explain it a little better!
MC
This topic is so timely for me. I am working on an Opus Anglicanum inspired piece.
I had never considered working a split stitch from the top. I always work from the bottom. It really is amazing how differently the two look.
Thank you!!!
Heather
This is a very interesting article Mary and I can see using both ways…I just got Trish Burr’s Needlepainting Embroidery fresh Ideas for beginners in there she does the split stitch from the top but you are covering it with the needlepointing stitch..But she does suggest using the split stitch for small leaves or stem in one of her books…So it’s very interesting to see all the different ways of using and doing a split stitch…Good Article mary…Thanks Have a Great Day everyone
I wasn’t mindful of whether I split from the top down, or bottom up but in doing a sample just for fun, I’m more of a bottom up because I want to fill the area smoothly. I chain stitch for the top down look. Thank you for the helpful information.
Thanks for taking the time to show us the difference in this one stitch. I really appreciate learning from an experienced stitcher.
I always mess up on that stitch, so just watched your video.
I am working on a project, so might just try it on the leaves.
Debbie
Splitting down stitches is my favorite way of doing this, I find it easier too.Hungarian stitch drives me nuts!
Mary,
I am also an advid reader of your daily newsletter. I appreciate how much professional advise I receive from it.
I am currently working on an image that has some satin stitches to fill a ribbon. Just a small one. I am usuing a single strand of DMC to outline the ribbon. How does one split a single strand. Almost every one of my stitches ends up being a stem stitch because it isn’t split.
Thank you so much Mary for your advice, I can now see why my long and short stitches don’t blend well. I have trying to perfect it but have had no success, now I will try coming up from underneath
I had trouble getting my head around the concept of splitting the thread from below. I have learned to split it from the top, going between two strands of floss, or at least, dividing the width of the floss evenly. I still don’t quite understand how you can split the floss evenly when coming up from below. I guess I need to get out a doodle cloth and try a brand new (to me) stitch.
Thank you, Mary, for the great articles. I look forward to them every day.
Mary,
Thanks for the post! I was trying to figure out how to make the split stitch look more defined on the banner I’m working on. Wonderful post full of help!
Hi Mary, What a fascinating post! I’ve always stitched from below and never given it any thought. I don’t remember ever having trouble coming up into the stitch, but this one of the first stitches I learned and I still have a book cover I made when I was eight or nine, so those memories are probably long gone!
I’m currently working on a piece incorporating a metal sheet and I’ve pierced stitch holes in advance, and coming up into those from below is a complete nightmare! If I could work out how I do it so easily when doing split stitch it could save me a lot of heartache!
Hi Mary,
This is wonderful Mary thank you so much for taking the time out to do such a detailed explanation This is defiantly important and necessary to know
now I know why my attempts at “shading” (aka long & short stitch) failed. I always split stitched from above primarily because I could more easily see my needle hitting exactly where i wanted it, but I never processed that same precision was making the stitch “crisper” than I wanted for blending/shading. Thanks Mary! Maybe I’ll give it another try again…if I can get my precise accountant brain to relax some
I don’t know! I haven’t done split stitch very often and I just don’t remember how I did it. I do remember that split stitch was one of the stitches I hated to do when I learned and it probably was one of the reasons I thought I didn’t like embroidery for so many years. Seeing your explanation here makes me thing this might be part of why I hated it. It never looked right to me and perhaps I was going down when I wanted the going up look.
I posted a question in the forum about it as regards long and short stitch since I had just done some long and short stitch last night and realized I really had no idea if I was doing them right or not.
I forgot to proof before sending. I meant “think this might be part of why…”not “thing!”
Great information, I never thought of it like this!
bravo votre site est magnifique
I do the same as you, i have always come up. This is one of my favorite stitches.
Bottom up stitching also uses less embroidery thread/floss. (Top down uses 1.5x on the back each time, bottom up uses 0.5x).
Not extremely relevant for modern floss use, but it will make an overall lighter/thinner piece, and in a historical context, when the floss could have been extremely expensive, or available only in limited quantities in a matched dye lot, it’s a significant factor.
I’m a beginner, thinking I’d done my homework. I began my project with a split stitch. All is well..until I looked at the back to discover two different types of stitches. It took much brain power to realize I split one row of stitches from below and one row from above w/o realizing I’d “switched “. Thank you sooo much for clearing this up for me-I’m quite particular