


The rooster wing gave me some cause for concern. Should I embroider it in colors, like I did with the tail? Should it match the rest of the body? Should I do something completely different with it – introducing a new set of colors, for example? Oh, so many possibilities, and when I started out on them, I found out that most of them really stunk. Winging it on the wing was probably the worst idea I’ve had on this piece so far.
The last time I showed you this crewel project, you could see the red scalloped line I had embroidered in chain stitch, using Bella Lusso wool, across the scallops on the wing.
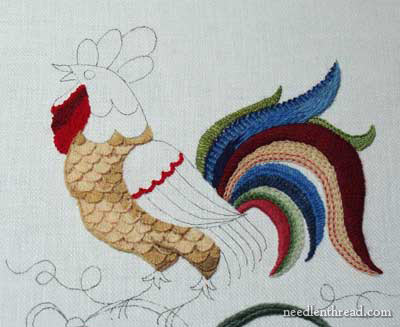
Well, it didn’t take much to convince me that the red scalloped line wasn’t going to work.
So I picked it out. The Bella Lusso merino wool goes in great! It’s a beautiful thread to stitch with – very fine, very soft, very smooth. Coming out, it leaves shreds, but these wipe off easily.
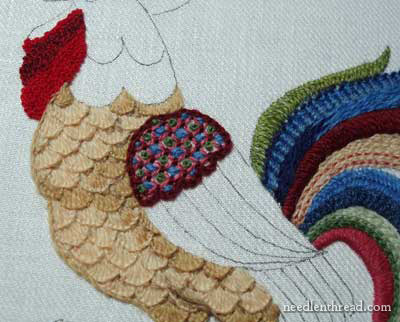
Once I picked out the red, I got it into my head that I would work the wing in colors matching the tail. The top section, I decided to fill with a lattice design, like so:
I wasn’t really liking it much, but I plugged on. I filled the open parts of the lattice area:
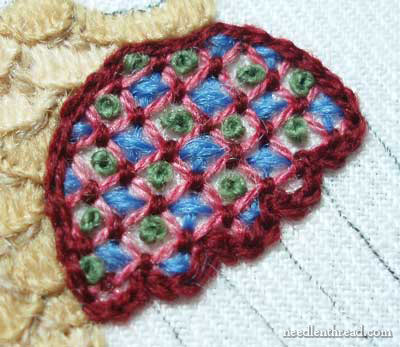
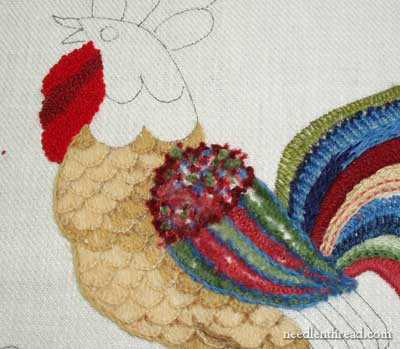
Green French knots alternate with blue cross stitches in the open areas between the lattice lines. The outline is worked again in chain stitch, using D’Aubusson in the brick red – the same stuff used on the large center tail feather.
This colorful lattice design left the base of the wing questionable: more color? which colors? Argh. I continued with the same color scheme, and came up with this:
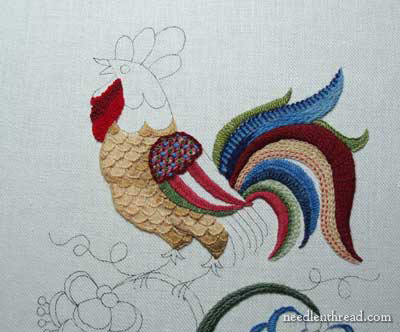
Using the same greens and pinks found in the tail, I embroidered these stripes down the wing, following the design, in buttonhole stitch.
(Don’t worry, it gets worse!)

Between the colored striped, I worked a blue stem stitch. Well, what the heck? If we’re going with a colored wing, it might as well be Really Colored.
I didn’t like it. I didn’t like it At All. For one thing, the wing looks as if it were stitched somewhere else, cut out, and stuck on a piece that it doesn’t really fit on. It just looked too bizarre and busy for me.
On this project, I have discovered that picking out can sometimes be highly pleasurable. For one thing, there’s the building anticipation of trying something different in the same space. For another, there’s the sheer relief in removing something I really don’t like!
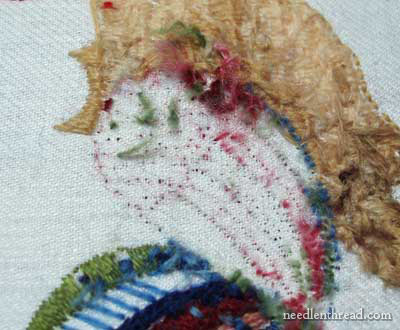
Quite a bit of picking later… from the back.
Another fine testament to the Legacy Linen Twill!! It holds up incredibly well. We’re back at the drawing board.
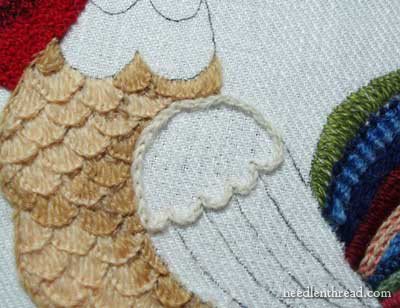
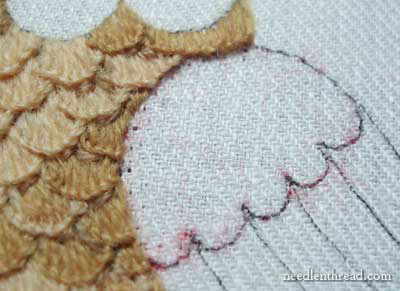
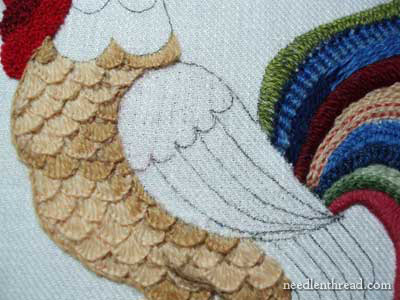
I decided color on the wing just wasn’t going to hack it. So, taking the two primary shades of the rooster’s body, and adding a creamy white, I explored a new idea. Above, you can see the split stitch line that’s going to form the base of some long and short stitch shading.
The wing needed to stand out a bit from the side of the bird, so to that end, I padded the long and short stitching space completely with the same creamy white. Here, I’m working with Appleton wool.
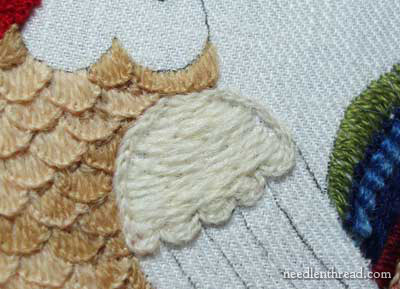
Then I began the first of three layers of long and short stitch, with the lightest shade on the top.
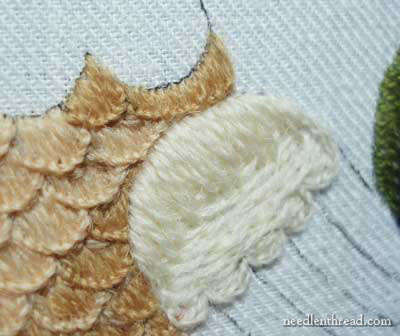
And there’s the top of the wing. My mother says it looks like a pillow stuck on the side of the rooster. Thanks, Mom.
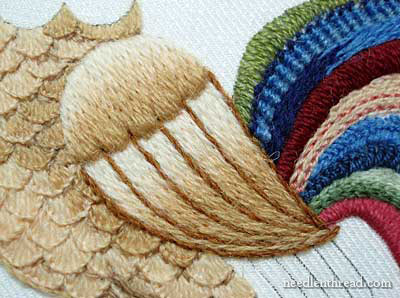
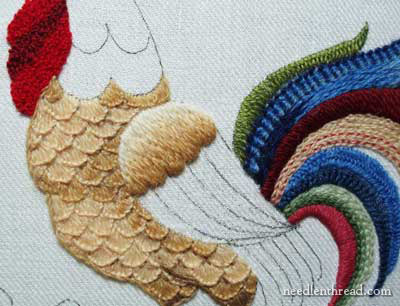
Then I worked long and short stitch shading down the stripes of the wings, in the same colors, from light to dark down the wing. I separated the lines on the wing with a darker gold altogether.
Finally, I went back and added some fly stitches on the stripes. Now, don’t be alarmed. Please don’t be alarmed. It’s not over yet.
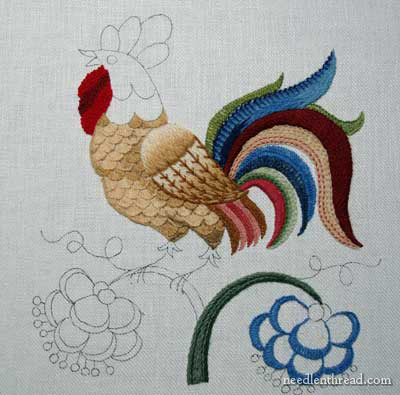
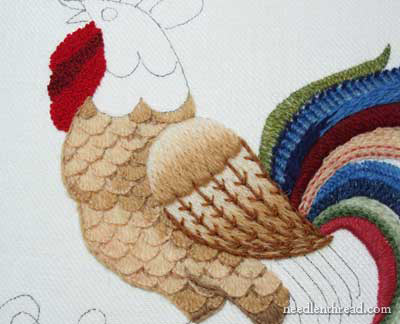
I also finished the long feathers underneath the wing, in the colors you see above. These may yet change.
The wing, however, is going to stay more or less like it is. I have an idea for the top part, which I may or may not implement.
But overall, the wing isn’t changing. It’s not!! But guess what? The body…. the body is changing! Oh, boy.
We shall see where it takes us.
Any comments? Questions? Suggestions? Let me know by leaving a comment below. And please don’t tell me to give it up! I’m not ready to throw the towel in on this guy just yet. He’ll be right —– eventually….
Maybe…..
For further posts on this project, feel free to visit the following links:
Free Hand Embroidery Pattern for The Crewel Rooster
Setting up The Crewel Rooster Project
Choosing Threads for The Crewel Rooster – and the first flower
Crewel Design Books
Stem Stitch Filling on Flower Stems
Scalloped Feathers on the Rooster’s Body
The Beginnings of the Rooster’s Tail
French Knots on the Wattle
Adding the First Blue Feather using a Raised Backstitch
The Rooster Tail, Finished for Now
Mary,
I like how the wing turned out it is lovely.
This is getting interesting. I agree that the first wing just didn't look right. I really like the wing as it is now. What I want to know is what's going to happen to the body? I think it looks marvelous! Interesting and I'll keep watching!
I think it looks lovely. I liked it before, but now seeing it this way, I agree that this is much better.
I'm a new stitcher and I'm loving your web site. Thank you!
It is really fun watching you play! What an adventurous spirit you have, and I can really see how this gets your creative juices flowing. Isn't it freeing when it's about the process and not necessarily the end product? – re: feedback, I like the wing. Lovely stitching!
It looks like your process for this project is really about stitching and picking. I know *this* project is really about testing various threads and it's great to see how the Legacy Linen Twill is holding up.
Just curious, on other projects, do you ever try to map out the colors beforehand with color pencil on a copy of your transfer pattern and then play with the textures later? Or do you find it's still too difficult to really envision what it will look like so must stick with trial and "Err-rrr-errr-or" 😉
Honestly, I cannot for the life of me know how you can unpick so much. I don't think I would have the heart. It is truly a beautiful work of art – just don't know what you are going to do with the body. BTW, I do like the red in the underwing part – just a touch of colour to match the tail.
Oh, the pain, the pain. As I watch you stitch this and then unstitch this I am in pain. Each time you do something different I look at it and think, yes, that looks great and then…I scroll down…only to find that you've unstitched it again! Yipes. You have the patience of a saint!
The first wing was way too busy, took attention away from the rooster's pride and joy – his tail. I like his new wing very much. The fly stitch makes it stand out without being too flashy. I'm worried about changes to the body. I've grown very attached to the scallops which add a tiny touch of realism to this bird. In many male birds all the flash and color is in the tail and head. I'm not very good with change (sigh) but I'll trust your judgment. 🙂
I like the wing…I like the whole thing actually. And I agree whole-heartedly about the previous wing, that wasn't so hot! I think I would like to see the deep red in the wing though, maybe where you put the fly stitch?
Hi, all –
Thanks for your comments! Oh, yes, the picking out is quite a chore, but it is worth it – might as well end up with something likable in the long run!
Sheila – yes, on any large project that I design myself – any project that will be time consuming and that will require the use of expensive supplies – I plan the colors first, usually using colored pencils (prismacolors – I love 'em!) or watercolors. If texture is involved, I try to get an idea of it before hand, sketching it in if possible and determining what stitch will give me the texture I want. And example of the process can be seen on my "Agnus Dei" project – or at least, the results can be seen there. I didn't actually post my sketches, as that was before I realized people enjoy seeing the whole development process of a project, from conception to completion.
As far as the body goes, don't worry! The scallops are staying. I'm just touching in a bit of the darker gold that is on the wing, to tie the wing and the body together a bit more!
Stay tuned!
Your entire creative effort is so interesting. I love the way the wing has been reworked- understated and yet clearly delineated. I am waiting to see the new changes that you have planned
Mary, don't change anything at this point. The body is perfect in the shades you have used. I think making it a darker gold will distract. As Irene said, he really wants to strut his tail. It is a lovely tail.
The first wing, I thought "Oh my gosh what is she thinking" It looks very nice NOW.
I will stay tuned… it is fun watching you stitch & create.
Have a great day ~
I literally gasped when I saw the shading on the wing cap – Perfect!
You really hit it with the wing. What an arduous process. Oh, patience, patience….
WendyBee
Hmmm… I keep a "doodle" piece of material in a hoop and doodle before I actually start stitching on the "real" piece. It seems to cut down on picking out stitches. But after following your posts for a few months now, I am sure the rooster will be magnificent in the end!
Hi, Mary. It has been fun to watch you stitch and then unstitch, and try again. It has taught me that it is worth the time to take out if I am not happy with it.
I love the wing and body. I am glad that you are leaving the scallops. I like the stitches that you have chosen and how they describe the part of the body that you are creating.
Thanks for sharing with us your thought process and unstitching experience. I know that I am learning from it. Sandi
I like the way it turns out ! Go on !
I'm having a lot of fun watching the progress of the crewel rooster, Mary!
You are unbelieved doing and undoing – i believe that sometimes you already know that way will not work but you are a teacher…:)
And today when I read the "body…the body is changing!I laugh, sorry 🙂
Since the beginning I felt you would do something else with the rooster breast!
He is becoming wonderful!
Any hint from here, just watching because I really know that when finished I'll love it.
"As far as the body goes, don't worry! The scallops are staying. I'm just touching in a bit of the darker gold that is on the wing, to tie the wing and the body together a bit more!"
Oh good. That was what I was going to suggest.
He's looking great!
Erk! I am the only dissenting voice regarding the wing. I am no expert so I hope I'll be pardoned.
I wondered if the straight across scalloping might look more natural if it curved upward to match the wing top.
I love your last coloring of the wing and how you, an expert with the needle, show your mishaps, which is so encouraging to me who has plenty.
Even though you are undoing a lot you are finding out how your threads and fabric react for you and others can benefit from this.
The scalloped body is so beautiful.
If you've got the colors, I suggest you change the under-tail feathers to something a bit more orange–different from the wattle and comb. Right now he kinda looks like he has a major problem.
The wing is GLORIOUS!! absolutely GLORIOUS (although I'd have skipped the fly stitches, that's just me). I'm with Sharon, though…'tying it together' just might make the whole thing less defined and distinct.
He's gorgeous! 🙂
I think he is magnificent (all except for the feathers under the wing- I'm not fond of them) they take away from his tail feathers. I also like the breast as it is. You give me the incentive to do more than just the necessities, to go 1 step further and see how it comes out, maybe good and maybe not so good, but I keep trying! Because you do!!!!
Thanks for all the candid feedback on the rooster so far.
I suppose we'll all just have to wait and see how he turns out!
One thing I guess I should reiterate, though I'm pretty sure I'm stating the obvious. He is a "stylized" rooster – not meant to be entirely real looking. After all, when's the last time you saw a rooster perched on the stem of a drooping flower?
Next up, I'm adjusting those tail feathers….
Thanks again, all! I appreciate your input!
I love your final wing. Thanks for sharing your process–so often (every project) I go through something similar and it seems to take so long when other's artwork seems to come together so easily. This helps me to know I am not alone! It is the journey and not the destination, I just sometime wish I could travel faster. Thanks for your lovely blog, Denise
Love the wing! It’s subtle, and gorgeous. You do amazing work!
Hi! New to crewel… Did a Google search and stumbled upon this page. Your work is amazing! Did you ever finish your project?! Curious to see how it turned out!!
Hi, Julie! Welcome to Needle ‘n Thread! Oh, the rooster – I loved this project. I sure did finish him. You can find all the articles about this project, from start to finish, listed in this Index for the Crewel Rooster project: https://needlenthread.wpengine.com/2010/04/crewel-embroidery-project-step-by-step.html You’ll find complete finished photos in the last article.
That wing is gorgeous!