


After coming to a screeching halt on the flower on my Crewel Rooster project, I moved on to the stem. Stems deserve stem stitch. Maybe that’s a bit narrow-minded, but it really is the first stitch I think of when it comes to stems. Because the stems on the Rooster project are thick, they needed to be filled, so I embroidered the first stem with a stem stitch filling, using D’Aubusson wool in a dark and a medium green.
Compared to stitching with the Appleton wool, I liked the D’Aubusson better. First, it’s a finer thread, and second, it seemed to me to be a bit smoother. I like the look of the stem stitch with this thread, too.
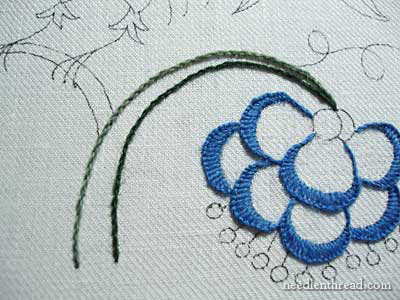
I began by stitching the lower line of the stem with the dark green, and the upper line of the stem with the medium green. Unfortunately, this shade of green doesn’t work so well with the blue, I thought. Maybe something a little brighter and greener? But not a grass or kelly green? In any case, I stuck with it, because this is the thread I have!
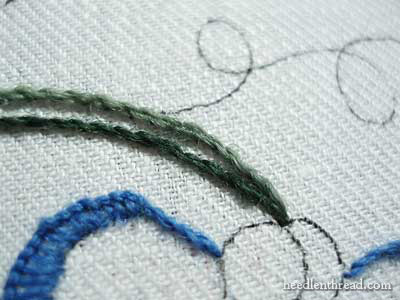
The two lines converge in the same hole at the tip of the stem.
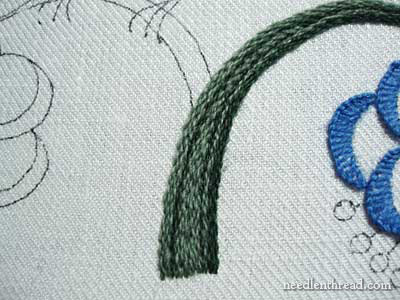
After working the outside lines, I filled the inside by taking turns doing a row on the left, then on the right, then on the left, and I changed out the shade of green now and then – keeping most of the darker green towards the right side of the stem and most of the lighter green towards the left side (which is the top of the stem, where the light would hit, if I were worrying much about realistic lighting…. which I’m not. But at the time, it struck me as the way to do it….)
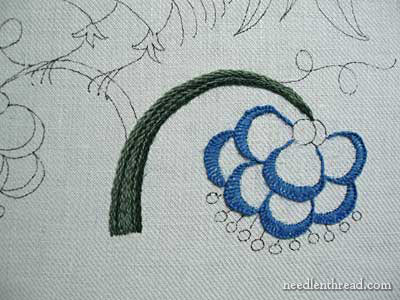
Here’s the first stem, then, and the first flower.
You can see that the green is a bit muted for the blue in the flower. I can’t wait to see what shades of D’Aubusson going to be available! I really like stitching with this thread. As wools go, it’s a nice wool to stitch with!
After finishing the first stem, I jumped again to another part of the design, the body of the bird.
Now, you’ll have to bear with me when discussing the belly of the rooster, because I have started and stopped and picked out, and re-worked this a number of times. (Is this process beginning to sound familiar?) Even at this point, I know I will pick it out AGAIN.
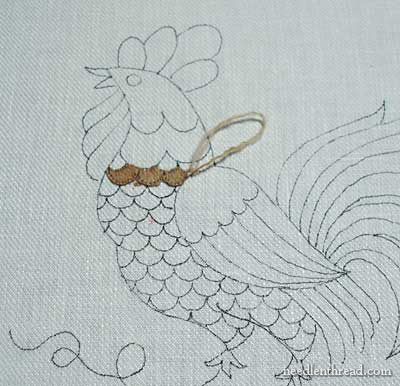
If you’re stitching along with me on this – or planning to eventually – you do not have to work any part of the design (and especially the Rooster Belly!) the same way I decided to. At first, I started with some lines of fly stitch down the contours of the bird, with a stem stitch outline around the body. But oh me, oh my. I didn’t like it. I want a Bold Rooster. Roosters, after all, are generally pretty bold. So I decided he had to be filled. I drew scallops all over him and went at him with the buttonhole stitch, and you can see the beginning of that in the photo above.
However, the thread I was using – which I think is Paternayan crewel yarn – was awfully persnickety.
When working with wool, it is essential to use short strands to stitch with. If you’re used to getting just about every stitch out of an 18″-20″ strand of cotton (or even some silks), you may be in for a surprise when you try wool. I am cutting my wool lengths at about 14″, and I can’t use it all. I find I have to change threads even when I want to squeeze out several more stitches. This is more the case with some threads than others. I’ll try to illustrate this for you in an upcoming post.
But, back to the rooster fellow. I picked out these stitches. I like the idea of the scallops – a lot – but they need to start from the bottom of his legs and move up, so that they can overlap each layer nicely, like feathers. Also, I don’t like this color brown for the whole body. So I picked out a lighter golden wheat and a medium golden wheat color for the bulk of the rooster’s body. And now, I’m scalloping away with buttonhole stitches!
That’s where I am! I’m always open to comments, suggestions, questions, advice! Feel free to let me know what you’re thinking about this so far, especially if you have any ideas for me! I LOVE ideas!
I’m off to make some headway on this guy!
Previous Articles on The Crewel Rooster:
Free Hand Embroidery Pattern for The Crewel Rooster
Setting up The Crewel Rooster Project
Choosing Threads for The Crewel Rooster – and the first flower
Crewel Design Books
Mary, it's gorgeous! May I suggest that for thick stems you can use blanket stitches as outline but change the lengths so that it gives a shadow look, almost like a pencil line-drawing shading.
(It's another option, anyway.)
This has absolutely nothing to do with the wonderful crewel work that you are doing. I had a question and just wasnt sure where to go to so I could ask. I have seen some spools of machine embroidery thread at very dood prices, can they be used to do hand embroidery work? What is the difference in the threads? Hope you can help. Thank you for you wonderful website. I just love it, Liz
Hi, Laura – that's a good idea, especially if stitched over another color running perpendicular… kind of adding texture and shadow at the same time. I don't suppose I'll do that on this project, just because I've got one stem in, but I'll certainly keep in mind for upcoming projects.
Liz – that's a very good question, and the answer pretty much is no. It's not hand embroidery thread. I've used machine embroidery thread, sometimes doubled or tripled or quadrupled in the needle) to embroider on cards and other paper items, but it is not pleasant to hand stitch with at all, and it certainly wouldn't give the same type of coverage that hand embroidery threads offer. Hope that helps!
MC
Hi Mary- I love your design, and I must admit my favorite part of embroidery is the stage you're at now. Picking the colors and stitches to complement the line drawing is so much fun. I think your green stems are fine, they really let the blue pop against them. For the blue flowers, I would suggest something similar to the lattice filling you just did on the pomegranate project, with one set of "lines" following the curve of the blue buttonhole stitches, and the other set of "lines" at radial angles (similar to spokes on a wheel, but originating at regular intervals rather than a central point). The lines could be a yellow, or even the light green from the stem (or lighter), with the intersections couched down using blue.
I can't wait to see your progress on the rooster. You're my first treat of the day before I get the kids ready in the morning- thanks for all the inspiration.
Mary, I see what you mean about the green with the blue — the blue wool for the flower has more yellow in it and the green yarn has more blue to it — but it's not a deal breaker. I love your use of the the random medium and dark stem stitch.
For the rooster, I don't know, that seems like a very large expanse of tan (even in two shades), and of that stitch, for both the body and legs. Is it possible to break up this large area by varying the stitch/and or color for the legs?
Look forward to reading more about your progress.
Hi Mary,
I like the green stem being a cool shade of green, since I assume the rooster will be in warm tones, and it seems like it will be nice for the stem and flower to unify in coolness in contrast with the rooster…does that make any sense? Of course, I am making assumptions about the rooster coloring. Anyway, I love the way you shaded the stem. It is exciting to watch an artist work!
WendyBee
Suggestion for flower – how about some yellows/yellow-gold at the base of the flower and then maybe also for the seeds or stamens. I wonder if you could also pull in some corally red color in the petals. I'm looking through Jane Rainbow's book "Beginner's Guide to Crewel Embroidery" and I've got to admit that I am partial to some of her flowers – colors and stitch combinations.
Oh, Joey – that's funny! I did coral in the middle – at least, I tried, but I didn't like the way it looked. I kind of tried "stippling" it with French knots! I'll have to see if I took "disaster" pictures at every step, so I can post them….
Hi Mary,
It's looking great! It's interesting to get your take on the feel of the different threads in your hands. I'd agree with Janice that the color blend of the green and blue are not a deal breaker. If you go out and look at flowers that have that kind of bright blue (in California, we have Ceanothus or lots of plantings of Cape Plumbago "Plumbago Auriculata") both of which have some species with this spectacular color of blue, the foliage on one has more blue green and the foliage on the other is more gray green. If you like, you can image google for some examples.
Way back when, I learned about a technique called Simultaneous Contrast, that would be fun to play with in your color selection. Now, you may already know about this, in which case, I bow to the master! 😉 It's a trick used by graphic designers to maximize the appearance of the number of colors. This works really well when you're blending paints. Again, you can google this term for a better explanation, but an example of the idea is this: Take a splash of blue-green color and surround it with a large field of yellow-green. The large yellow-green field will visually suck the green out of the blue-green mixture and make it appear to be a brighter blue. Now take that same color combination and reverse it so that a small splash of yellow-green is surrounded by a large field of the blue-green and the blue-green will suck the green out of the yellow-green, making it appear more yellow. It only works when it's surrounded by color though, and the colors have to be secondary or tertiary colors.
That's how to make a two color printed piece appear to be four colors. It's so cool when it works right! I know this works with paint because you take a bit of the one color and mix it into the contrasting color, and vice versa. Now, can you do that with thread? Not sure about that, but it seems like mixing a touch of the blues and the greens together somewhere else might tie it in together.
Either way, it's so cool to watch what you're doing! Neat to see your process. I'm holding off on starting. Will head to Needle in a Haystack late next week or so to get threads, so I'm cheating to see what you like stitching with first. 🙂
I like Bulli's idea. Darker edges with a bit of glimmer? Or is glimmer too un-Jacobean?
For some reason my mind is drifting towards tambour embroidery "bordado mallorquín" when looking at your super cute rooster pattern… no necessarily by using the tools for tambour embroidery but for the look of it, all those filling stitches. In a way it resembles crewel work.
Or am I mixing things up a bit ?
Like for example…Have you seen these:
http://pasaloda.blogspot.com/2009/04/cuadros-bordados-mano.html
http://pasaloda.blogspot.com/2009/05/colchas-con-bordado-mallorquin.html
If you haven't I think you will enjoy it !
Mary, hullo there,
1st up, colour. I like the dull green for itself, and it will be balanced by the other stem (I suppose it will be the same). A touch of it in a/some 'shadowy' part/s of the rooster could probably harmonize it if needed.
Colour is not my strong point and I appreciate all the info from yourself and others in that regard. Having said that, I do like the blue keeping it's own identity which this green seems to allow.
2nd, the stem stitch, It's lovely. I've looked up other sections on stem stitch which have answered questions (thank you, it's beaut to have it at the finger tips) but am also wondering about the filling. I think you would have gone in the same direction with each line (ie from base to tip), but I'd like to know for sure. It's always niggled me. I think I remember from somewhere, something about doing stem stitch one direction and outline stitch comeing back????? That would mean turning the work though eh. I have tried some different ways but seem to always question it.
3rd, the rooster's body. I thought of the plain body space as a resting place for the eye, considering de tail, (sorry!), considering the detail in the rest of the design. BUT I was very wonderous as to filling it. I like the scallops and if are basically all the same colour it still gives the eye a resting place AND solves the filling in.
All the same, thought some of the scallops might eventually do with a little touch of the tail colours. Just a basic line stitch on the outside of the buttonhole stitch, and the same side of each scallop that is done. Only some of the scallops, and ending before the join of the scallops beneath.
4th & last! Concerning design. I noticed this 1st up but was a bit shy to mention it! To me it seems the tip of the wing should go past the line of the tail where the wing tip stops. I drew it on a copy with the tip beyond that line but not as far as 1/2 way in the gap. To me it looks 'better'. Separates it from the tail.
This has become perhaps too long. Takes me a bit to explain things. Sorry.
Bye now, Kath
Hi Mary
I am really liking this tutorial and am especially interested because, as I said before, there is a rooster Japanese Embroidery that I would like to stitch one day. Also the next phase in JE for me is a design called Loving Couple which is a pair of Mandarin Ducks so I am very interested in how you will stitch your feathers. Even though you are using wool and I will be using silk, I think there are a lots of techniques that would work for either.
I never like to presume to tell you how to stitch something but as you have invited ideas I am happy to have an opportunity to share some ideas with you.
On Loving Couple there is an area of scallops like on your Rooster's breast. I am certain that these feathers are stitched in the order that you have suggested so that the curve of each scallop overlaps the stitches on the preceeding scallop. An alternative to buttonhole stitch would be to outline the curve with outline, stem or back stitch, then satin stitch over the line, I think this would give a nice smooth curve and a slight padding to the edge of the feather.
Another thought, would be to fill each scallop as if it were a leaf, say with fishbone stitch, or any other stitch that would give a central vein and a feathery look to the stitching.
Finally, I agree that using three or four shades on his breast will be more stricking than one shade all over.
He is going to look magnificant and I wish I were doing my JE Cockeral as a stitch-along, it would be great to compare techniques.
G'day Mary, again,
Looking again at the rooster I now notice the actual design on the fabric does have the wing tip a little past that tail line.
On my copy I was speaking of, I drew mine coming down a little further and going into the space a little more than your working one. It seemed to separate the wing and tail more.
But… like others, I'm just sharing ideas, not telling you how to do it!! Just thinking on 'paper'. This is the first time I've participated in discussions like this (in actual groups, the others say I'm the 'quiet' one!! I know, you're thinking the rest must be very, very vocal!!)
Am absolutely loving your 'class'.
Bye for now, Kath.
Hi, All!
Thank you so much for the input! I am trying to assimilate it all! I finished the turkey breast…. no, I take that back. I finished the Rooster breast the other night, so it's officially done, after much trial and error. It's not too bad – but I'm still not 100% sold on it. Still, I can't pick it out anymore! I've picked out more than I've put in on the whole piece so far, and now I really have to make some serious headway! I wanted to finish the rooster before the weekend is over, because my vacation is officially over Monday morning. Life gets back to "normal" after that, which will mean a real reduction in stitching and blogging time!
I'm making notes, though, and hopefully will be able to make further suggestions for the completion of the bird, based on your suggestions! Thank you so much!
Bambina – Thank You for those links! Gorgeous, gorgeous embroidery! Unbelievable. My rooster won't even come remotely close!
TTFN –
MC
If you need a thick stem a good technique is to Back Stitch first and then Whip -some times 2 rows of Backstitch before whipping —
depends on effect you want
I`ve been teaching for 50 yrs !
When doing birds it is best to start at the bottom row of Feathers in order to give a layered look and it will give more dimension
The embroidery technique not done before that interests me is the long and short stitch shading. I am amazed at the beauty of the shading and coloring especially for flowers. I have not tried it before as I was not sure I could master this technique.
Joanie B.
Galveston