


How do you transfer designs onto your fabric to hand embroider? Personally, I think I’ve tried everything. Prick-and-pounce, transfer pen / pencil and light box; dressmaker’s carbon, especially on larger designs; basted designs on, but that as a last resort. Come to think of it, I’ve even drawn the design on interfacing, and held my projects over my Ott light so that I can see the lines of the pattern. But until a few weeks ago, I had never even thought of Solvy.
The inspiration to try Solvy came from… Inspirations Magazine, appropriately enough. When I received the last issue, I noticed the embroidered children’s book in it, and I took the time to actually read the article rather than just flip through and drool over photos. This is where I learned that a clear plastic stabilizer that dissolves in water exists, and that, if you trace your design in permanent ink onto the clear plastic, you can mount the plastic over your fabric in your hoop and actually stitch the plastic and the fabric together, following the design lines. Well, apparently the rest of the world has known about this stuff called Solvy, but I had never heard of it!
So I decided to take the plunge and try it, purchasing a sample of regular Solvy. It worked great on plain cotton fabric, for a very quick scrap of a try. But that wasn’t really what I was interested in Solvy for – see, prick and pounce, transfer pen, or a regular light mechanical pencil works fine on regular fabric. What intrigued me was the idea of using Solvy on material with a nap, like velvet.
So this last weekend, I set about to try it. Here’s how you do it:
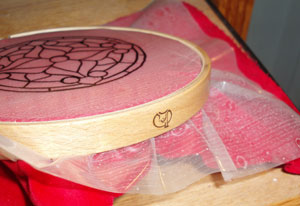
1. Gather the supplies: Solvy (NOT ULTRA-Solvy – you’ll see why); a permanent marker, such as the macro pens at art stores – though for the sample below, I used a Sharpie; your choice of fabric (a washable fabric is a good idea for starters, though I’m told you can use this method with anything, as long as care is taken); your threads and needles; and your design.
2. Unfold or unroll the Solvy, and give it time to relax a little. If you’re going to trace where it’s been creased, it helps to leave it sitting for a while unfolded.
3. Trace your design onto the Solvy. Be careful in the tracing – wobbly lines will give wobbly results! I messed up on my tracing right off the bat.
4. Place your inner hoop on the table, lay your fabric over it, right side up, lay the Solvy over the fabric, pen side up, and place your outer hoop over everything. Tighten the hoop, and tighten the fabric and Solvy, making sure that the fabric is not wrinkling underneath while the Solvy is fine on top. Tighten the hoop again, and pull the fabric again. Be moderately gentle with the Solvy.
5. Begin stitching as you normally would – you can set up a waste knot and just go for it. Especially on fabrics with a nap, you might want to use slightly more tension as you stitch, to compensate for the extra layer over the fabric.
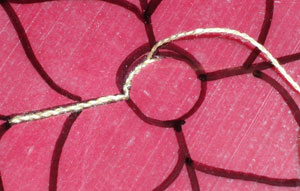
Here’s how it started out:
Here, I’m stitching on red cotton velveteen and using Ultra-Solvy. The Ultra-Solvy for regular surface embroidery is probably a bit much! It’s like embroidering through a clear vinyl shower curtain or something! At first, it felt like I wasn’t using my own hands to stitch, and I really had to get the hang of it. I missed being able to see the work – the color and texture of the threads, etc. – directly on the fabric. But the suspense was kind of fun!
Starting to stem stitch – you can see where I messed up on tracing the design. Nice thing is, I didn’t have to worry about stitching over a line to cover it up, since I was planning to melt the whole thing off, anyway!
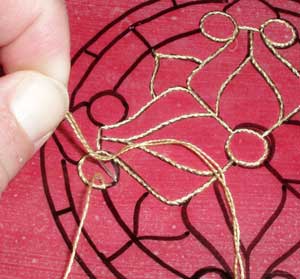
The picture doesn’t really make it 100% clear, but at this point, I was pushing with all my might to get that needle to pierce the plastic! And it wasn’t piercing it! The lesson: make sure you’re using the right needle, and be patient until you get the knack of plastic-piercing.
I’m not left-handed, by the way. That was just for the sake of the photo. One thing you can’t do with the Ultra-Solvy is use a ‘sewing method’ on the stitches (working only from the front of the fabric, never having to go to the back of the hoop with your hand). You have to use a ‘stab method’ to get through the Ultra-Solvy.
So that’s getting started. I’m almost finished with the little medallion – it’s a stained glass motif from a Dover publications book I had on hand (below). I’m working on cotton velveteen with one strand of soie d’alger by Au Ver a Soie. Once I’m finished, I’ll show you the melting process!
If you’ve used Solvy before and have any tips or tricks, feel free to share them with the rest of us!
To see the rest of my Solvy Experiment, go here.
I love Solvy. I stitch Brazilian embroidery (rayon threads), and I found that Sharpie pens (permanent markers) will rub off the Solvy and onto the floss. So I used a Uni-ball or Roller Ball (metal tip) pen, and had no problem. Experiment with the pen – make a mark on the Solvy and then a few seconds later, rub it. If it smears, you have the wrong pen. The Uni or Roller Ball pens (available at grocery stores, even!) won’t rub off onto the floss.
Rosalie Wakefield
Millefiori B.E. Books and Designs
[email protected]
Great idea. Our guild had to transfer a design onto fine hankerchief linen with a LEAD pencil then stitched in white floss using the stem stitch. What a disaster! This is better.
i also use a lightbox and water-soluble pen to trace the pattern directly onto the fabric. i wonder if you think it would be ok to use a light colored micron pen instead. hoping that might be similar to the patterns on kits.
I've used micron pens often for transferring, but only when I am certain that I can cover the line up completely. They do not rinse out, no matter what! So if you are drawing a Very Thin line that you know you will cover with your stitches, go for it!
Hi Mary,
As you know I’m new to the site and and trolling through picking up tips and pointers. So I hope I’m now able to give one back. I’ve been using solvy like this for some time and to reduce, (infact cut out the problem of ink transfer altogether), I use ZIG Millennium memory system pens. They’re usually used for putting faces on dolls. Made in Japan Pigment free, Acid free, waterproof, lightfast, fadeproof, non-bleeding. I use 01. All I do is trace the pattern onto the solvy as you did, then small running stitch onto the fabric with a tread shade or two lighter than the one your going the finsh your work with. 1 Thread only. Remove slolvy under water and you have a running stitch pattern which is hidden under your final stitching. You don’t have to worry about ink transfer. However, I should think that if you let this dry, because it is so fine, and has the properties you could just do your patterns straight over it as you do and the just soak the solvy off.
I’d try either way. The pens come in a variety of colours and if we can get them in Aus surely you can get thenm in the States. They are Manufactured by Kuretake Co., Ltd.
Hope this has helped
Kimandra
I’ve often thought I should mention this to your readers who might be looking through your archives and considering using solvy. This is not a good product to use if you are the type to complete projects over long periods of time (I frequently switch it up to prevent frustration and boredom). Over time the solvy dries out and gets very brittle, making it near to impossible to stich through with out a lot of agita. It will tear and shred. I have had some decent results with lightly steaming the piece to restore suppleness– enough to finish, but it was a complete disaster. This is really only a good method for something quick.
If you like Sulky Solvy, you’re going to LOVE the new Sticky Fabri-Solvy. It can be run through a printer or copy machine. It peels off of a release sheet and sticks to your fabric. It looks and feels like fabric, so it’s not stiff and you can still hoop your project. And it completely rinses away just like Solvy, but no tracing! Yippee! You can buy it on-line at http://www.speedstitch.com. It comes in packs of 12 sheets (as well as in rolls and 1 yd. packages, but for printing the sheets are much better). It is a dream come true for those of us who do handwork.
Hi, Patti – Thanks for the recommendation! I’ve reviewed fabri-solvy (and transfer-eze, which is essentially the same thing) here on Needle ‘n Thread. I find they work well. I find the amount of stiffness produced by attaching the fabri-solvy to the fabric removes the need for a hoop altogether. ~MC
I know this post is *super old* but I wanted to post my perspective as I’m working through this myself for anyone who pops on here later.
I am a sewist, so when I do an occasional embroidery project, I always come to Needle N Thread for a stitch refresher and to help problem solve, so thank you Mary!
I am embroidering a dragon on the back of a dark gray linen vest I am making for Mr H. I have in my stash some REGULAR Solvy, so I whipped that out last night to test this technique. I used an extra fine tip black Pilot pen to trace the design. I hope it doesn’t darken the floss too much, but I am using a dark red floss to begin with so it may be alright. I hooped it up last night and am trowling for stitches today. C: So far I am really happy with how it transferred and how easy it is to see.
Similarly of interest, the “front” and “back” of the Solvy take the pen differently. On one side, it would not rub off no matter how soon I touched it. On the other, it needed a moment to dry. Interesting!
There is also now a Sulky Sticky Fabri-Solvy in 8-1/2″ x 11″ sheets that an be run through a copier or printer. Wonderful for any hand embroidery, and it shows up incredibly well on dark fabrics.
Although the last comment was in October of 2015, I’m still going to comment. I’ve been using Press’n Seal for over a year now. It like Saran Wrap for covering leftover food, but it has a stick side. You’ll find in the grocery store with the aluminum foil and Saran Wrap. Trace your design and stitch. Then gently rip the plastic off. If there’s bits left, use your tweezers to remove.
And guess what else. Sulky now has a Sticky Fabri-Solvy, that has a release sheet, so you can print your pattern right from the computer or copy it on a copy machine. You can’t see through it, like you can the regular Solvy or Super Solvy, but still, it sticks and it washes away, along with the pattern, so if you don’t stay on the lines, no one will no anyway. It has been a real hit for handwork.
Ah…this looks like the answer to my question below! I think I’m going to give it a try. :^)
Mary, do you know if the printable Solvy works as well as the regular kind?