


The bullion knot – sometimes, the name strikes fear in the embroiderer’s heart! But it shouldn’t be so. With a little practice, bullion knots are actually pretty easy. There are a few tricks to making them even easier for you, so I’ll talk about those tricks below, and in the video, I’ll show you how I make bullions. It’s a little different from the way you’ll see them diagrammed in books, but I think it’s a lot easier.
A couple tricks to working the bullion knot:
1. Use a milliner (or straw) needle. The long shaft gives you lots of room for wraps, and the fact that the shaft and the eye are the same diameter make it easier to pull the thread through the wraps.
2. Instead of anchoring your needle in two places on the fabric (as you’ll see diagrammed in books), take your needle down into the fabric where you want the knot to end and pull the thread part of the way through, leaving most of the working thread on the fabric. Then stick your needle halfway up into the fabric, in the same hole where you started the stitch, and use the eye of the needle on the back of the fabric to help you twist the thread around the needle. Then hold onto the wraps, pull through and upwards, ending with a gentle tug, then pull the thread down towards the end of the knot. This method is shown in the video. It makes it a little easier, I think, to make a bullion knot, plus it also gives you a gauge to easily see whether or not you have enough wraps on the needle to cover the length of the bullion.
3. You can use any kind of thread to make bullions. You might want to take a look at this comparison in the direction of the wrap on the bullion knot, to see how the direction of the wrap changes the look of the knot.
If you wrap your needle with more thread than will cover the stitch length that you’ve left on the fabric, the knots will be a bit wiggly, or may even stand up on the fabric.
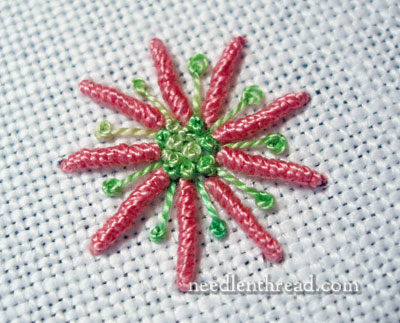
You can make a bullion knot flower petal by keeping the space between where you emerge from the fabric and where you go back down very small, and wrapping the thread many times around the needle. This will cause the long bullion to bend into a loop.
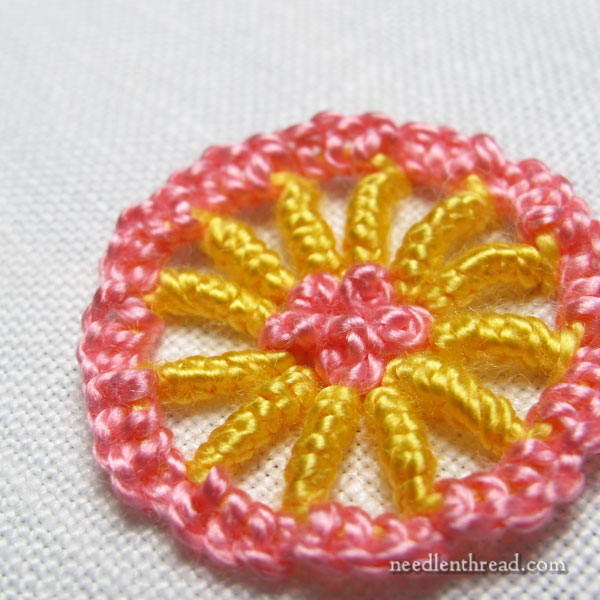
And if you want to explore some stitch combinations with bullion knots, this Buttonholed Bullion Buttonhole Wheel tutorial is rather fun!
Here’s the video for the bullion knot. I hope you enjoy it!
You can find more hand embroidery stitch videos right here on Needle ‘n Thread, if you’re looking!
Looking for inspiration & information on hand embroidery?
There are all kinds of reasons to sign up for the Needle ‘n Thread daily newsletter! Check them out and sign up today!
If you like what you see on Needle ’n Thread, if you want to be a part of keeping the website thriving (and free of annoying network advertising), why not become a patron on Patreon? Check out my Patreon page here, where I’ll occasionally add special needlework bonuses for patrons.
If you shop on Amazon, you can support Needle ’n Thread without any extra expense to you by visiting my Amazon Recommendations page here, where you’ll find books and sundries for the needleworker available on Amazon.
This site is awesome! I feel like
I’m in school except this time I’m interested! I love it! thanks
Thank you for an excellent tutorial on bullion stitch.
Nerys Purchon
http://gypsysoul-au.blogspot.com/
This is GREAT! I am one of those “visual” people and I LOVE THIS. THANK YOU so much. Jeanette, San Antonio
I can learn stitches in a class and think I know what I am doing – but really don’t. I can play this video over and over and then I do know what I am doing. What a great tool for student stitchers.
Thankyou so much for doing this for all of us. It is really helpful to have a visual reference.
I shall be looking in often.
Sue
http://www.susie1205.blogspot.com
Wow! Very good video instructions accompanied by excellent written hints. Thank you for this site. I’m impressed with the quality as well as the quantity and variety of stitches explained.
I have been embroidering for over 40 years and never been able to master the bullion stitch–always substituted a heavily padded satin and it never gave as good an effect.
This morning I successfully completed the stitches for the first time because of your video tutorial.
Your site is the most useful I have ever seen BAR NONE. Wow, wow, wow!!!
Your tutorials are superb.
Fantastic.
cherryinga@live.com
I am SO GLAD to hear you found the video so helpful!
Thank you for the kind compliment!
I’ve beeb doing needlework for a very long time. The Bullion Stitch was more like a “stitch in my side”. That is until I viewed you video. Now I’m making beautiful Bullion Roses, Bullion Daisies, Bullion Rosebuds and even Bullion Smiley Faces..You Are My HERO…
Ginger
THANK YOU! This stitch has given me problems for years. Your demonstration showed me exactly what I needed to do.
I can’t tell you what an invaluable reference is for me and anyone else who accesses it! I echo the comments of the quality of the video and written instructions. I also went to Amazon to order the A~Z of Bullions. The video shows what no illustration on bullions could ever do. Thank you so much for publishing this site. Now, if I could just find the same format for the silk ribbon embroidery I would be in absolute heaven. Lol
Carol K.
Thank you so much for your easy to understand video. I was in pretty desperate shape. My grandmother taught me how to embroider when I was 13 – a long time ago – and I’ve been stitching ever since -but never had to do a bullion knot. (Never even heard of it!)Started a new project recently where I needed to do a TON of them. The written instructions I found didn’t help much. Your video did the trick. THANK YOU!!!
hi i can barely hear the audio on this video, anyway you can fix that? my speakers are up all the way, and i can hear the other vids just fine, thanks for all your hard work!!
great information. thank you so much for sharing.
Wonderful video! Thank you for clear instruction and good pics. I use this bullion stitch in hardanger, and you just cleared up a misconception. Now I can REALLY do a good bullion stitch.
Judy A, Vancouver, BC
I just pictured myself embroidering pretty little ringlets on a girl…
and I’ve never embroidered before. This is an inspiration! 🙂
Thank you so so much for this video. I can now finish the lovely kit I bought 10 years ago but abandoned because all the flowers were made of this stitch and I just couldn’t get them to stay on my needle – NOW I KNOW WHY! So much better to see it done that follow inadequate diagrams.
Thank you so much – a friend loaned me a book with this stitch, and I did pretty well – but your video answered a few small questions I had. Very helpful!
I couldn’t figure out how to make a boullion stich. Thanks to your embroidery course, I will be able to finish a smocked dress with bullion flowers.
Thanks again Gloria
mtlstitch
this is wonderful. i’ve bookmarked this site. i want to use the bullion stitch as hair for 3 different angels on a bell pull. i will be using variegated thread to make it look more like hair. this is an awesome site and thank you so much for your time. i know i will be back!!! to watch this video several more time!
Oh thank you lady!
ive tried making this about 20 times and i still dont get it ;(
Thank you for every video you made, as well as written instruction you gave in order to help beginners in handembroidery stitches.
I looked at 2 of them (corral stitch and bullion knot) and I was very happy to get these explanations and to see how to proceed.
hi mary. thanks so much for the tutorial. the bullions knots am making are coming out better and better. but i think the straw needle am usin is a bit too large for the 2 strands of dmc embroidery floss.kud u plz suggest the needle size i should use.plz plz ans..
sooo helpful. I've been trying to figure this out since I've never done it before!
Thank you SO, SO, SO much for the bullion knot video! I couldn't for the life of me figure out how to do them until I saw your video!!
THANK YOU!!!!!!!!!!!!!
Sue
Thank you, Thank you. I have been having so much trouble with my bullion stitch. I read so many things and still it just would not stick in my mind. Your very good illustrative video, just made it click inside my brain. I have been wrapping the wrong direction this whole time, this would probably explain all the inconsistent odd looking bullion's I made. Thank you for taking the time to make the tutorial. It is so helpful!!!!
Ann Flowers
flowerscrazyq@gmail.com
I am a Home Economics teacher in Mountmellick Ireland where some of these embroidery stitches originated . I think that your site is a wonderful resource for my students and I recommend it all the time to them. Thank you for your help. Feel free to contact me
its an excellent tutorial .. i used to get fascinated by my grand ma embroidery skills but now actually i can learn them from this site….. 🙂
This is awesome!! I was able to do the bullion stitch on the first try! Thank you so much for this site. I teach embroidery to young girls, and this has made it soooo easy to remember all the stitches I learned as a child, and learn many more.
Hi I have just found your video and instructions on bullion stitch I have never done this before and was looking to find instructions now after viewing the video I am looking forward to giving it a try You have made it much easier for me to follow Thank you
christine
Australia
No tenìa idea de como era el bordado brasileño y estoy felìz con todo lo que he visto en esta pàgina, le pondrè todo mi empeño para aprender, me encantan las manualidades y las cosas novedosas.
Felicitaciones, no se si se pueda copiar la teorìa para tener como una base para repasar cuando estè bordando.
Mil gracias por compartir estos trabajos tan lindos.
cordial saludo
Olga Gòmez Camargo
hi mary, all ur pieces are totally elegant. i keep viewing them often..
I’ve just viewed a couple of the videos which are great, including the bullion rose. Thank you so much for posting them.
Since you suggest in the bullion rose video to look at the bullion knot video, I am trying to do that. The tape is running just fine but I cannot hear it. I have the sound on my computer turned up as loud as possible, but cannot hear the commentary beyond a sort of low murmer. This was not a problem on the two others I watched this a.m.–don’t know if it is correctible or not from your end but I am hoping to hear all the tips you are offering as you stitch if it can be fixed.
Sorry to post this on the web but I see your request at the contact link to leave messages here.
Hi, Thanks a lot..Wow i’m expert with Bullion Knots!!!! Great!!!!
I loved your video on the bullion and palestrina stitch it was soo very clear Thank you Do you also have any with brazilian embroidery? Thans again
Thank you so much you are a great teacher, please keep doing this great job. I just a beginner.
I cannot thank you enough for these videos which I use all the time sitting in front of the computer untill I have the stitch correct. I have told so many sewing groups and recommend the videos all the time. Thank you again.
Thanks, Gill! I’m glad you like them and that they are helpful for you!! ~MC
Hi Mary,
I love your website. I love that I can actually see how to make the stitches. However, now that I am ready to do bullion stitches, I can’t get the video to play again. What have I done wrong?
Hi, Marie – You’ll need to check to make sure your computer software is up to date. The video requires flash to play. It’s working on this end – admittedly, it’s one of the videos I need to replace (soon!) because it’s quite blurry and old, but it does work. If you google the “google video help page” you’ll be able to troubleshoot why it isn’t working on your end. Hope that helps! ~MC
Hi, I just discovered your wonderful website and have subscribed to your newsletter which I know I will love. I was trying to find the pattern for “Desprez a Fleur” by Lynda Maker which is described and shown on your website, but can’t locate it. Can you tell me where I can find the instructions for these dimensional roses please? Thanks very much.
Jan
You are an outstanding teacher!
Thank you so much!
Desde Mexico, un gran saludo, como siempre excelente trabajo , excelente maestra, gracias por compartir , en este momento pondre manos a la obra para usar esta bonita puntada en flores.
gracias
Hi Mary,
I tried this stitch after much trepidation yesterday. And it looked pretty as a multi-hued pink rose. My husband oohed over it for a few seconds before he slyly saying that it looked like a bunch of pink worms making happy time!
Sigh..I’ll never look at a bullion stitich as ‘just’ a bullion stitch anymore. 😉
fondest love from India.
Mary, once again, I knew I could count on you to show me how to do a stitch I was struggling learning. Your the best!
Mary, thanks, I’m at a retreat now and couldn’t remember how to make these. I knew I would find it here. Thank you so very much for having done all the work as a reference site!!!
Mary, I am very interested in learning the bullion stitch but the video is not live? Is there another way of accessing it? Many thanks.
Thanks, Mary!!
This is one stitch, along with the colonial knot which you so wonderfully demonstrate –
that I couldn’t get without seeing. The 2D
drawings just don’t get it across for me.
You are great – I really appreciate all of your work for us embroiderers out here.
Jane
Thanks Mary for your great tutorials. I learned at last how to do the bullion stitch.You made it so clear and easy, and it is very much appreciated.
I must be living too far into my cave and do not recall ever seeing such a lovely stitch. Thanks for sharing thie and the first white pieces.
Helen
Mary,
The thing that makes your videos work so well for me is that you repeat the stitch many times, explaining it in your calm, soothing voice. I sit with my embroidery hoop at the computer and stitch along with you and my fears melt away as I hear you repeat the directions enough times for me to get it. It’s as if you are saying, “Of course you can do it!” And I do! Thanks for a terrific website.
mam how to make more beautiful roses out of it? kindly explain
I had been dreading the bullion stitch after all the comments I had heard and was inclined to skip it on week 20 of the TAST. However I found that I could do it with the help of your video with no problems.
I had had problems with French knots before the French knot video and think I was wrapping them in the wrong direction. I think the video on bullion stitch prevented my making the same kind of mistake.
thanks for the video’s. do you have a cd? you should, great work.
Oh, thank you dear lady!!! I just watched the bullion stitch video and can’t help being amazed at how clear it is now, just with the simple step of pulling the eye of the needle to the back before doing the wrapping! I’ll never have to curse the bullion again!!!
Great Video on Bullion Knot! Thank you!
what a lovely stitch Mary Corbet !
Hi there, just discovered your sight, I’ve retired and finally have all the time in the world to learn to relax and enjoy embroidery,
Just found your site, love it, love it, love it, thank you so much for providing such a wonderful tool area where I can get to and actual see how it’s done…Curious, do you have a one time fee whereby it would allow me to actual watch projects being done and where I can come by and review where-ever? I haven’t decided what I want to do yet, but do look forward to it all.
thanks again
Hi, Elsie – under Tips and Techniques in the main top menu of the site, you’ll find a section of projects that I blogged about step by step. You can visit the main page for each of those projects and read through the previous articles on them. Each project shares tips and techniques along the way. Hope that helps! -MC
Thanks so much for taking the time to create these wonderful and HELPFUL videos! I was trying to learn this stitch from a book and it just wasn’t making sense. Now I’ve got it! THANK YOU
I am new at embroidery and am trying to learn how to do the bullion stitch which is well shown on your video. However would you be able to show me how to make a long line of bullion stitches. I understand the process until stitch is finished but where do go for the next bullion stitch?
Kind regards
Judy
Dear Mary
I have been interested in embroidery for some while,but your site has spurd me on to do something about it. Your tutorials are inspiring. Hers looking foreward to a lot more. Thanks Carole
Wonderful video. A question: Do you hoop or frame your fabric when you are working bullion stitches?
Hi, Elaine – with bullion stitches, either works, or you can work them in hand without a hoop or frame. – MC
Hi Mary,
A million thank you’s for this tutorial on the bullion knot! For the first time, I have actually made a knot that looks good! For years I have struggled with this one…finally, I get it!
Thank you
Linda from Canada
Congratulations, Linda! The best thing about bullions is that, once you get it, you get it! And with a bit of repeat practice, they become second nature and easy to do! ~MC
Love your tutorials! I’m wanting to design a large tapestry too picture my blended family. I’ve chosen to start with a large oak tree. Our children will be the branches, grand children the leaves, great grands nuts, ect. Do you know anywhere to help me make my tapastery dream a reality?
Thank you so much for all your tutorial videos. I’ve been stitching for 25 years and never found anything as helpful as watching your hands make these bullion knots over and over. I’ve been trying to put bullion roses on my daughter’s dresses and struggling to get them right. I tend to not get that little bit of thread pulled under nicely at the end…I hope that makes sense. But I think I can do it now. Thanks again for such helpful and extensive resources!
Lovely!Thank you so much for that wonderful tutorial. It was so very helpful.
Thank you so much. The video clip on bullion stitch is the best method for embroidery novices like me. Your explanation is very clear but the tip about holding the eye of the needle is brilliant.
You make all these stitches look so easy! And the videos are just the right length…
THANK YOU THANK YOU THANK YOU
LOVE IT ALL
I have never done a bullion stitch…until today. You made it look so easy. And I was finally successful. Thank you so much for such for showing how to do this.
I’ve saved it as one of my favorite sites! Love it!
Querida Mari,muchas gracias ,me siento feliz de haber encontrado tu pagina ,gracias por compartir tus conocimientos
.
Thank you very much for videotaping this so I can understand it!
What great site and video’s! I was having a hard time learning bullion stitch. Now it is easy. Thank you!
I am having a hard time with the bullion stitch as I tend to make a big hole in the fabric with the needle while wrapping the thread around it. What am I doing wrong ?
Hi, Trudy – your needle might be too big? And if you’re wiggling the needle a lot in the fabric, then it would definitely enlarge the hole a bit. So, true to keep the needle movement down a bit, and perhaps try a milliner needle that doesn’t have a really thick shaft. If you’re using two or three strands of regular floss, you wouldn’t need anything larger than a size 5 milliner. Hope that helps!
Thank you so much for the great explanation and vide of the bullion stitch.
I am unable to subscribe to your newsletter; your site does not recognize my email address.
Hi, Karin – thanks for your note and for letting me know! I’ve added your email address manually from this end. You will receive a confirmation email with a link to click, to confirm your subscription. If it doesn’t show up in your inbox, please check your spam filter. You can also drop me a line at mary@needlenthread.com if you have any further difficulties. Thanks!
Dear Mary, Thank you so much for your kindness and generosity in sharing your expertise. I sooo enjoy learning from your tutorials! Please help me identify the stitch that is used in the very first photo on this page, where the green thread seems to come out of the center of the French knot and go back into the center of the flower. How is it made? I can’t figure it out. Thank you very much!
Hi, Nata – that’s an elongated French knot, also called pistil stitch. Here’s a tutorial for it, and for a “cheater method” that will give you the same look: https://needlenthread.wpengine.com/2014/05/pistil-stitch-elongated-stitch-knots-tutorial.html
Does anyone know which size milliner needle to use? I’m on Amazon trying to purchase some but I can’t figure out which size is best.
Thank you.
Hi, Nicole – It depends on what size thread you are using. They usually have combo packs – I’d look for one of those, so you can try different sizes with different threads.
I love your website! My grandmother taught me to embroider years ago and I am now interested in doing it again. But the names of many stitches are new to me. What to do? Then I came across your shop, and not only are there descriptions of the stitches, but wonderful free videos!
Thank you so much for sharing your knowledge and making any embroidery stitch doable. This site is so special, I wanted to thank you.
Thie bulion video was very helpful, Mary. Thank you for all you do to help all your followers to learn and improve their skills.
Thanks, Susan! I’m so glad it was helpful!
je decouvre ce point merci
Tried to sign up three times rejected my email. Hope you can sign me up. Thanks Judy
Hi, Judy – I just added you to the list, and you should receive a confirmation email with a link to click to confirm. Not sure what the problem is, but I’m trying to resolve it! If you didn’t receive the confirmation email in your inbox, please check your spam filter! Thanks a bunch!
Thank you, thank you. I am taking a class at EGA and it calls for a bullion knot it has whipped my back side.. you have made it so easy. I think it is such a pretty stitch. Will get do thread painting.and will be back to your site.
Amazing i learnt it in a second love u so much i have been trying to learn this from so many websites but cudnt get it rite ever
Awesome. Your the best online teaching I have seen. Thanks for your great and easier demo on this stitch
I love your method for bullion stitches. It is so much easier! Thank you for showing it.
Awesome…absolutely an awesome video. Thank you.
This is very helpful info. Also… I saw your video tutorial for the Bullion Knot Stitch and for some reason unknown to me, your method just seemed to be the simplest way to remember how do it. I have very basic embroidery and hand sewing skills. I was embroidering some flowers on a canvas bag on which I also wanted to add a ladybug and my search results for help led me here. I also clicked some of the links in this tutorial. They were also very helpful, too, so thank you for sharing your expert embroidery knowledge and skills! ♥️
Have a great day!
Thanks, Tammy!