


It’s been a while since I’ve written a Stitch Fun tutorial! I’ve been aching to write one, though, for quite a while!
This particular combination of stitches results in a rather frivolous and fun spoked wheel. It would be perfect for adding to dimensional embroidery projects, Brazilian embroidery, highly textured embroidery, free style embroidery, and so forth.
Before we begin, if you’re not familiar with buttonhole wheels and bullion knots, you might take some time to watch the buttonhole wheel video tutorial and the bullion knot video tutorial.
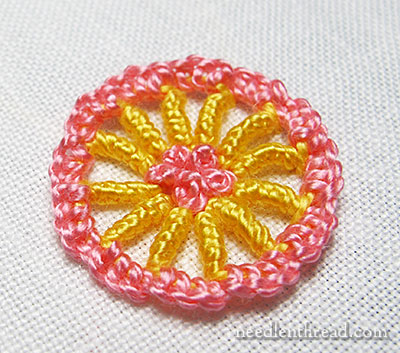
Kind of cute, isn’t it? And it’s fun to work, too! So let’s see how it’s done.
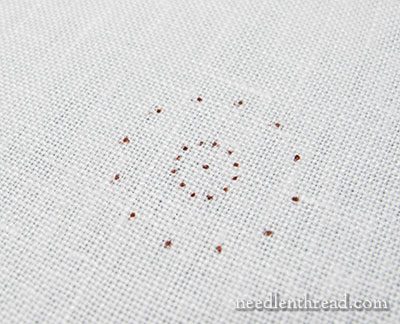
I started by marking out dots for a spoked wheel. The way I do this for a circular element that requires even spacing is explained in this article on petals & spokes & how to space them.
It’s really very simple. I use printable polar graph paper (which you can find online for free), and make little templates with tiny holes at the intersection of each circle and spoke. Then I just touch a tiny pen tip into those holes while holding the paper in place on the fabric. It works great!
This particular wheel has 12 spokes. The inside smaller circle of dots is somewhat necessary when working bullions in radiating spokes like this, because the bullion knots are fat and they need space in the center of the element. It would be very difficult to get 12 bullion knots to fit down in the same center hole without crowding and overlapping! So, we have two concentric circles here, with 12 dots for the beginning and end of each spoke.
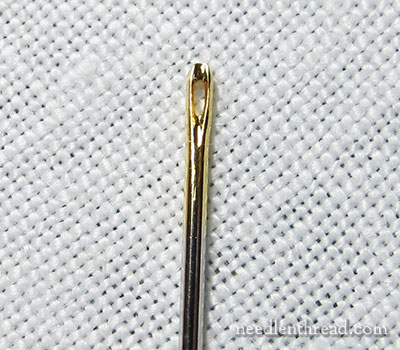
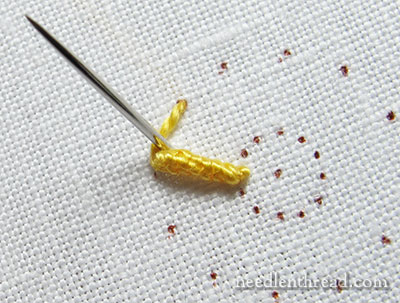
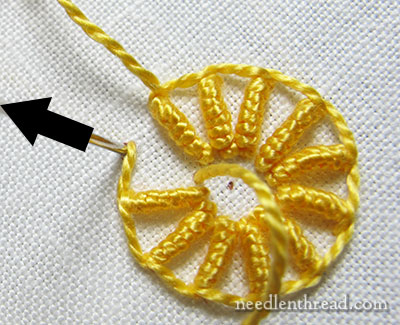
Bullion knots + a milliner needle = a happy stitcher.
A milliner needle (like the one pictured above) is a needle with an eye that is the same thickness as the shaft. It has a smaller, roundish eye (compared to a crewel needle or tapestry needle).
Because the shaft and the eye are the same thickness, it is much easier to pull a milliner needle through all the wraps of the bullion knot.
Milliner needles are longer than regular embroidery needles, too. More wraps fit more easily on a milliner needle.
Milliners are also known as “straw” needles – if you can’t find a milliner needle locally, ask for straw needles.
So, if you want to make perfect bullions – or even just better bullions – and you want to do it more easily, invest in milliner needles. You may be able to find them locally at fabric and sewing stores. If not, you can find them online. Anita’s Little Stitches carries a whole slew of different sizes of milliner needles by Bohin. They’re really nice needles!
In this particular demonstration, I’m using a #3 milliner needle with #5 perle cotton.
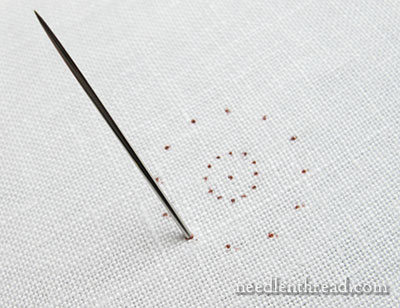
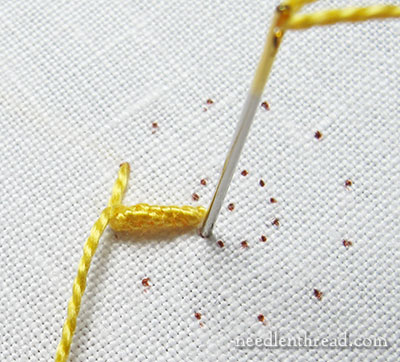
Bring your needle and thread to the front on a dot on the outside circle.
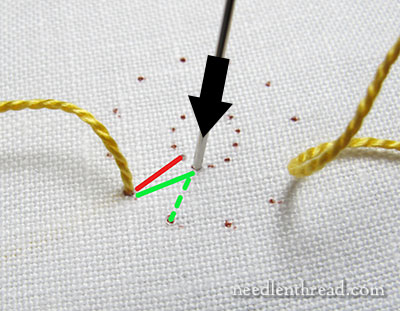
Working counterclockwise around the circle, take your needle down into the fabric in the next dot over on the inside circle.
If you look at the photo above, the red line indicates the dot directly across from where the needle and thread came to the front. That’s not the dot you want. Instead, you want the next dot over, indicated by the green line, and corresponding to the outside dot indicated by the green dashes.
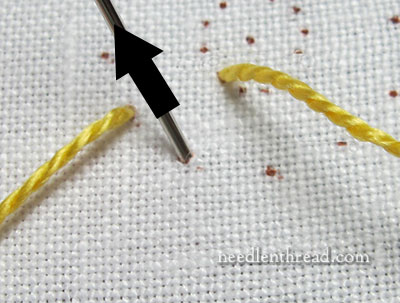
Without pulling the needle all the way through, bring half of the needle up on the dot directly across from the inside dot you went down in, and next to the dot where you started the stitch.
If you pulled through right now, you’d have a regular buttonhole stitch.
However, we’re not going to pull the needle through at this point! No, no! This is where it gets fun!
Instead we’re going to wrap the needle for a bullion knot, using the working thread coming out of the dot on the outside circle.
So, at this point, wrap the needle like you would for a bullion knot.
Make sure that enough wraps cover the needle to cover the space between the outside circle of dots and the inside circle of dots. For this particular stitch, I think I have 7 or 8 wraps on the needle.
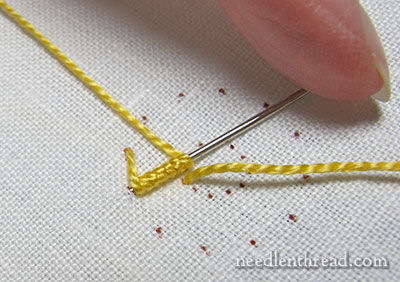
Holding the wraps onto the needle with your finger and thumb, pull through and upwards towards the inside of the circle. Situate the wraps onto the thread and tighten the thread, and then take the needle down into the fabric right at the end of the bullion, on the inside circle of dots.
That’s the first bullion “buttonhole”. It’s not really (technically) a buttonhole, but it has the shape, anyway.
Note: This is also the same point where you’d change out your thread as you work the element. If you run out of thread, end the thread after this movement of the stitch and start a new thread with the next movement of the stitch.
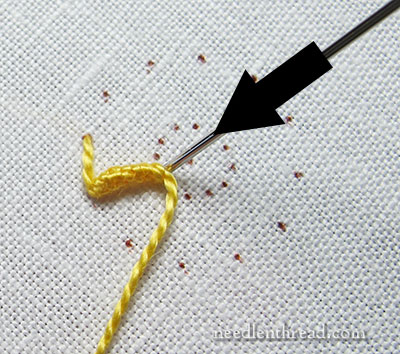
Now, bring the needle and thread to the front of the fabric, coming up inside the little “elbow” formed by the stitch.
Continuing counterclockwise around the circle, take the needle down in the next dot on the inner circle, and repeat the steps.
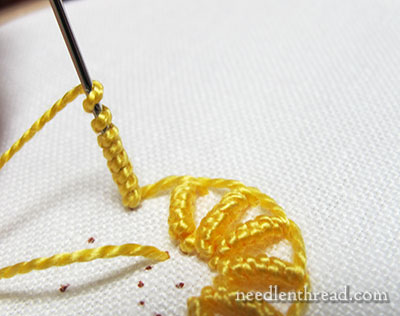
Continue to work around the circle counterclockwise, making sure that each bullion has enough wraps on it to cover the distance between the inner and outer circles.
Feel free to experiment with different numbers of wraps on the needle, to see what results you like best. With more wraps than covers the distance, you can end up with highly arched bullions, or even wiggly bullions that “s” a bit, resulting in a pinwheel-like look to the wheel. It’s fun to experiment!
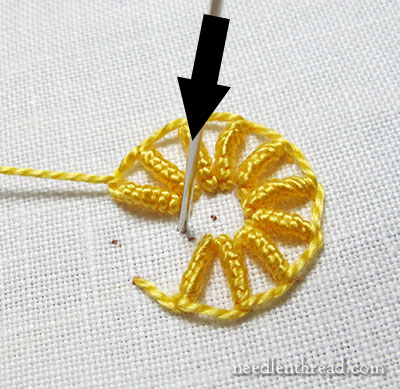
Here, we’re getting to the end of the wheel – two more bullions to go.
The last bullion will overlap that arm left from the first stitch we took.
With the very last bullion, come up on the dot just to the outside of the beginning of the very first stitch.
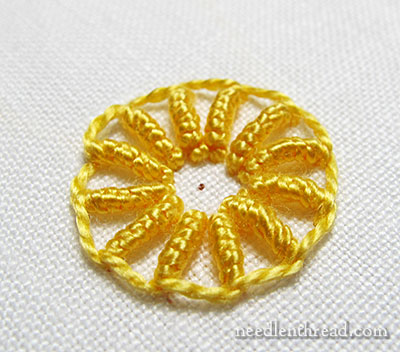
And there’s the bullion buttonhole wheel.
We could leave it like this, but why pass up an opportunity to embellish?
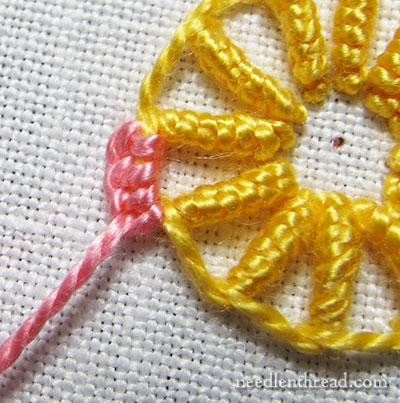
Switching to a different color of thread and to a tapestry needle, I’m buttonholing over the long stitches forming the outside of the wheel, between each bullion spoke.
Bring the new thread to the front of the fabric, just in front, and slightly under, one of the spokes, and then proceed to buttonhole over the long stitches between the spokes. Four buttonhole stitches fit perfectly between each spoke on this wheel, but the number of buttonhole stitches between the spokes will depend on the size of your own wheel.
This idea of buttonholing over the stitch is covered in detail in this tutorial on scalloped buttonholed chain stitch.
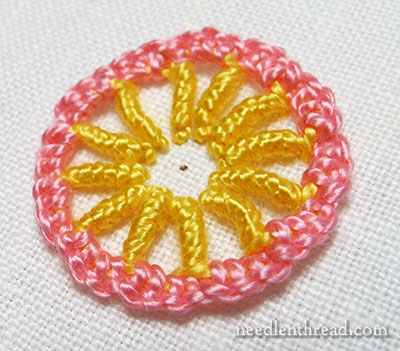
So there’s the buttonhole all around.
But you know we can’t leave that gaping center hole in the middle, right?
So let’s fill that with a bunch of nice, plump French knots.
And there it is! A Buttonholed Bullion Buttonhole Wheel!
Fun! But then, that’s what Stitch Fun is all about! Did you know that there are 60 Stitch Fun articles in the article index? Stitch Fun tutorials focus on fun or challenging stitches or combinations of stitches.
If you’re looking for a way to bring more fun into to your embroidery, why not browse through the Stitch Fun articles? You’re bound to find something in there that tickles your fancy and delights your needle and thread!
How very, very clever. Your colors even make it look fun, so sunshiny and bright. I can see myself putting several of these on a yoke of a dress that I would make for my granddaughter. No pattern needed! I always love your Stitch Funs. It is fun just to sit down and play around putting stitches together and seeing what you come up with. Thank you, Mary
Ah, Mary, once again, you have informed and instructed. I found a little case of “straw” needles at my local thrift store, purchased them, wondering WHAT on earth a straw needle was but they looked good for embroidery so…
Well, now I KNOW. Thank you. To top it off, a book I recently purchased listed a “milliners”
needle in list of supplies so I was looking for one yesterday at the horrid “big” stores (I hate Michael’s completely, and not real fond of JoAnn fabrics either). Nothing. Well, here I had them all along. LOL.
🙂 That’s great, Carol!! Yep, they’re the same thing…
Wow that is clever. Thanks for posting.
Mrs. Corbet,
Adorable! I’ll try it today if I have time. I SO want to use this on my fair project for this year! I’ll have to study all the stitches involved. Thanks so much!
Sarah 🙂
Uh, yeah, so I DID try it, but I couldn’t quite get it to work. I suppose it’ll just take practice, but I think I’m changing my plans for a fair project, anyway, though. (Not because it didn’t work!)
– Sarah
Dear Mary
I do love the Stitch Fun articles and I really like this bullion buttonhole stitch it such well Fun, ha, ha! and your colours are so springy and light just right for a fun project. I must try this. I do like the bullion stitch especially you how to on the rose bud which I used many times. Thanks for sharing this fun stitch with us and giving us such detailed instructions it looks so tantalising.
Regards Anita Simmance
Good evening, Mrs. Corbet. I have to say that thus far, I am not a huge fan of bumpy, and/or open stitches. I’m not sure if they just seem too hard to me, or if it’s just not my particular aesthetic taste, (I do tend to be ridiculously formal, and these seem ultra casual)but I appreciate the hard work and effort you put into these tutorials.
That said, you would happen to have a cat who thinks embroidery thread is a good meal? Mine gulps it down like it’s a piece of salmon. She’s going to the vet ASAP!
Hi Mary, I figure the weather must be improving since you are using such spring-like colours. It’s getting cooler here which is good.
I want to ask a serious question: I have read that when making a French knot, you should only wrap the needle once; I have also read that you can wrap it twice but absolutely no more than twice. What is your opinion, and how many wraps do you do/have done etc?
I can’t see any problem in using a few wraps – 3 or even 4, depending on the thread etc, and as I do what I call ‘freestyle’ work I figure it doesn’t matter but still I am curious as to the ‘correct’ way to do a French knot.
Merci Marie.
lol a
Mary thankyou for the very clear instructions for the Bullion buttonhole wheel. i have just done it and posted my attempt on stichn finger.
Doreen.
so creative ..so nice .I like it :)pleaaaaaaaaaaase continue to do this work ,it’s so funny work 🙂
Hermoso me encanta este tipo de bordados! Gracias!!!
merci pour ce modèle de broderie
Such fun! I’m thinking of trying it on my crazy patch – after I practice it a few times! Thanks so much for your Stitch Fun & all your hard work for us!
I like this much…and your way of teaching is so easy that i could understand it ,,,very clever idea
Thank you
regina
Me encanto!
Amei esse trabalho, já fiz igual e ficou tão lindo quanto esse. Obrigada por compartilhar sua habilidade. Beijos.
its so beautyfull..i love these embroidery stich works..
hola que a mi me tinco hacerlo para un regalo