


I love chain stitch! It is So Very Versatile. From using it as a line stitch or as a filling stitch, to whipping the chain stitch and lacing it, to working buttonhole stitch across rows of it… there’s just a lot you can do with chain stitch.
When stitches work together in happy combinations, they make me happy! And this stitch combination – chain stitch + buttonhole stitch – works particularly well together, to make a sweet little scalloped edge.
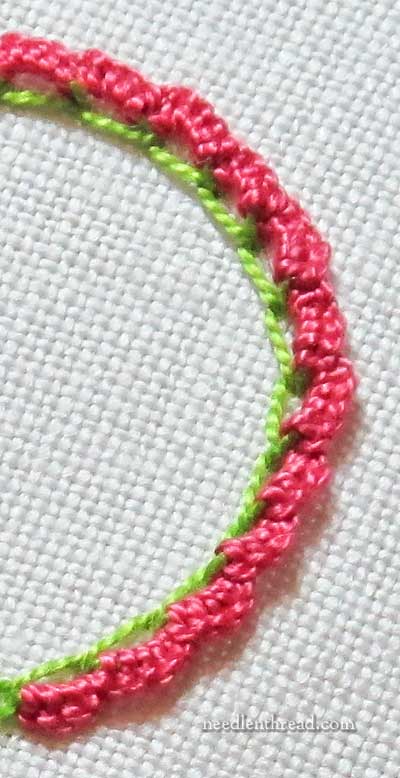
The scalloped buttoholed chain stitch is easy to work, it works up quickly, it takes gentle outward curves well, and it’s a great way to add a little dimension to borders, edges, and so forth.
Let’s see how it’s done!
The Chain Stitch Foundation
First thing’s first: embroider a line of chain stitch for the foundation of the scallops. A chain stitch circle works well for this, too, if you don’t want to practice on a straight line.
In this tutorial, I’m using DMC perle cotton #5, but you can use regular floss, too – two or three strands of regular DMC floss works brilliantly with this! You can also use silk or wool to good effect, and you can use other cottons like floche or coton a broder, too. The finer the thread you use, the smaller and finer your scallops can be.
With the perle cotton, because the thread is fairly thick, my chain stitch foundation is made of stitches that are approximately 1/4″ long. That’s a long chain stitch in surface embroidery. If you’re using a finer thread – like 2 strands of floss, or a strand of floche or coton a broder, your chain stitches can be anywhere from 1/8″ – 3/16″ in length. You can go as long as 1/4″, but with finer threads, the resulting scallop gets a little floppy.
The Buttonhole Scallops
Once your foundation line of chain stitch is embroidered, thread a tapestry needle with a new thread. This new thread can be the same color, a different shade of the same color, or a contrasting color, depending on the look you want. To make sure the demonstration here is visible, I used a bright green for the chain stitch and a bright pink for the buttonhole scallops.

It’s important to use a tapestry needle because the blunt tip won’t catch on or pierce through your foundation stitches.
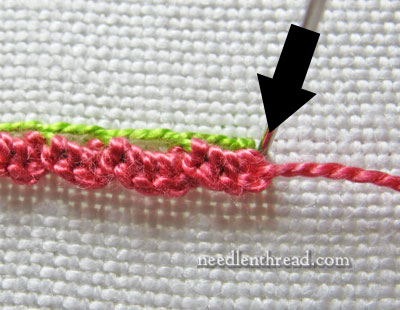
Bring the needle up at the beginning of the line of chain stitches, right where the first chain stitch began.
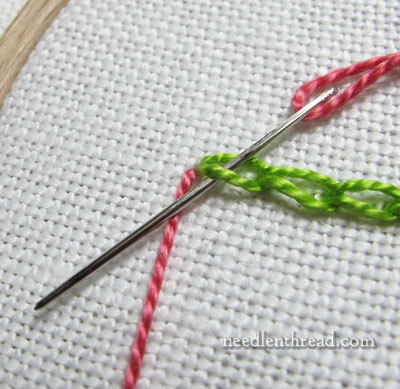
Take your needle into the middle of the first chain stitch from above, passing out underneath the lower half of the chain stitch, as shown in the photo above.
Make sure that your needle comes out over the working thread, so that you’re stitching a buttonhole stitch over the thread that makes up the lower half of the chain stitch.
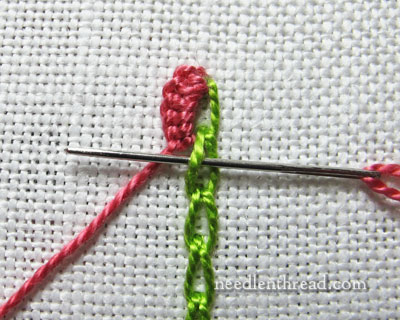
Pull your needle through and tighten up the buttonhole stitch. Continue to work buttonhole stitches until you’ve covered the whole thread that makes up the lower half of the first chain stitch.
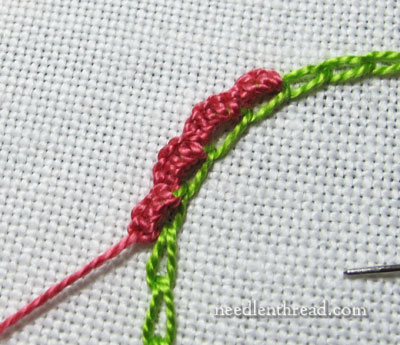
I think it’s faster to work down the chain stitch line, so I turned my work in this direction to work down the line.
Once you’ve filled the first chain stitch, just keep going with the buttonholes, moving into the next chain stitch. On the first buttonhole on the second chain stitch, pull the buttonhole stitch snugly, so that you get a clear “dip” forming the scallops.
If you’ve stitched equal length chain stitches (and ideally, you have), then you should be able to fit the same number of buttonhole stitches on each chain stitch half. So, in this sample, I’m filling each chain stitch half with five or six buttonhole stitches.
You want the buttonhole stitches close, but not packed in so tightly that they ripple.
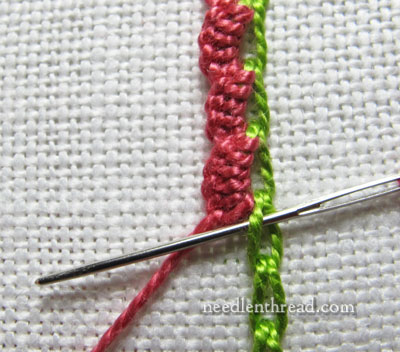
Keep working down the line, filling each half a chain stitch!
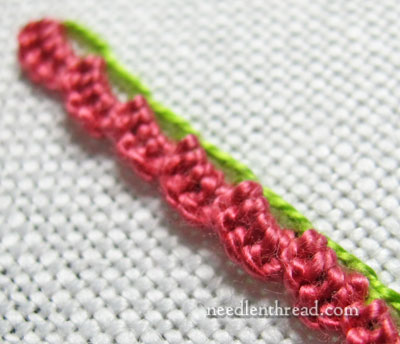
When you get to the end of your line, after the last buttonhole stitch, take your needle to the back of the fabric in the same place that your chain stitch line ends.
You can work the scalloped buttonholed chain stitch on gentle curves – and even fairly tight curves – as long as you’re working on the outside of the curve. If the curve is gentle enough, you can also work the inside of the curve, but on tighter curves, the inside curve gets a bit too crowded and the scallops may buckle and ripple.
Imagine all the fun things you can do with this stitch combination! If you’re a crazy quilter, it would make a nice seam treatment. If you like embroidering Sunbonnet Sues and parasol ladies and similar designs, this would make a great little “ruffle” on the hem of a dress. You can add this to Brazilian embroidery, working up ruffly stems and branches. You can edge finished objects like fobs, ornaments, needlebooks, scissor keeps and the like with it. Lots and lots of possibilities!
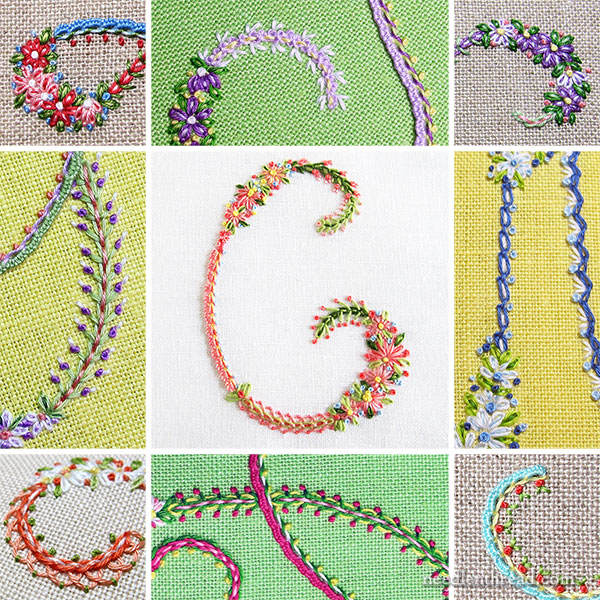
The scalloped buttonholed chain stitch is one of the prominent stitches in my Stitch Sampler Alphabet instructional e-book.
The e-book contains over 65 fun embroidery embroidery stitches, composites, and combinations with step by step directions for all the stitches. They’re used in a lovely alphabet, but you can also use them in all kinds of other stitching applications, like line samplers, crazy quilting, regular surface embroidery, crewel work, and so forth.
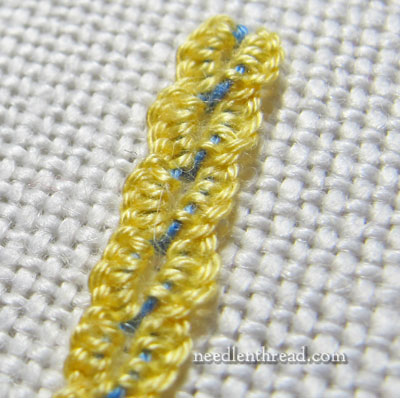
Here, I’ve worked the technique rather loosely, using a blue and yellow floche. If you buttonhole both sides of the chain stitch, you’ll end up with a mirrored scallop effect!
Then, of course, there’s the option of a bead in the middle of each chain stitch – or a big, fat French knot. There are lots of ways you could further embellish the line – it’s just a matter of playing with the stitch to see where it leads you.
Wherever you happen to go with it, have fun!
Stitch Fun is a series of stitch tutorials here on Needle ‘n Thread. If you’d like to catch up on the rest of the tutorials in the series, feel free to visit the Stitch Fun Index, where you’ll find then all listed for your convenience.
I CAN’T WAIT to try this!!
G’day Mary,
Easy peasy and the darlingest, but I’d never have thought of it!
Thank you. Cheers, Kath.
Ooh, have I got a place to use this! I’m planning a picture smocking design of Little Bo Peep and had been musing about what I would do on the edge of her apron. I wanted a little texture and this is perfect. Thanks, Mary.
Mary…
How wonderful! I have been working on crazy quilting blocks for years (and someday may combine them into a quilt!) and I am using a Christmas theme for the blocks. I know exactly which block is screaming for this scalloped buttonhole chain stitch! Thanks for these directions and some exciting inspiration!
Wonderful Mary! I love it!!!
This is so pretty! What a genius idea 🙂 I’ve always wanted to try a Crinoline Lady, and you are so right, this ruffle would make a lovely hem!
Wow Mary this is a great idea! Looks like a fine crochet scallop lace! Will use! Thanks again.
Dear Mary, I found your blog today very interesting. I loved the button-holed chain stitch. I have been buttonholing feather stitch in my crazy patch embroidery work. Now I will add the button-holed chain stitch.GB
Oh I love this one – never seen this stitch before
This is so pretty.
You said,
“You can edge finished objects like fobs, ornaments, needlebooks, scissor keeps and the like with it.” Would that be similar to what you did recently with the Palestrina stitch where you stitched two edges together? I’m not sure how to visualize chain stitch on edges. Any further specifics would be helpful.
Ev R.
Hi, Evelyn – no, I probably wouldn’t use it as a join, but rather right along the edge, on the side front of the edge, and then scalloped on the top, so the scallop just sits right up around the edge. -MC
Mary;
I’ve searched the Stitch Fun Index and I haven’t found stitches or explanations for the orange ladder looking shape on the jumble. Could you please explain what stitch/method you used for this as well as the similar looking portion that wraps around the curly Q thingy done in long straight and short straight stitches? I would really be grateful – I like the way these look. I’d like to copy most of your stitch choices in working this sampler.
Hi, Jacqueline – the ladder looking stitch is just buttonhole stitch, and the spikes around the curl are just straight, long stitches. Hope that helps! -MC
Thanks Mary – that does help but was is bordering the ladder looking stitches – the orange border,,… Is it whipped chain stitch? And one more question concerns the spiral around the long and short green straight stitches. Is that stitch the knotted pearl stitch? It looks like orange spikes on either side of a blue braid thing.
Hi, Jacqueline – sorry about that! I misunderstood the question! That’s the interlaced chain stitch, and it’s listed in the Stitch Fun index, but here’s a direct link to it: https://needlenthread.wpengine.com/2012/10/stitch-play-interlaced-chain-stitch.html
For the swirl around the green straight stitches – the middle of it is a regular chain stitch that’s been whipped on each side of the chain stitch, and the spikey stuff is just buttonhole stitch, with the edge of the buttonhole on the outside lines and the points in next to the chain stitch. You can see a close up photo of it on this post: https://needlenthread.wpengine.com/2013/02/stitch-fun-playing-with-braids-and-chains.html
Hope that helps a little better! -MC
It helps a bunch and I really appreciate it. Now I can get started – so excited….
It looks like an edging used in crochet. It is the sweetest.
Thank you Mary, I am thinking ‘flowers’ when I read this instead of using cast on stitch. A lovely stitch that I will try this afternoon.
Such a sweet border. Thank you for sharing it with us. I can see many uses for this and so much nicer than nylon lace edging.
Dear Mary –
You are a creative genius! I can think of several uses for this stitch, now that you have shown it to us. You are the best, thank you!
Blessings,
Tomi
I found this stitch to make a pretty leaf a long time ago. This is the link.
http://letslearnembroidery.blogspot.com/search/label/Buttonhole%20knot%20flower-pointed%20tip
It is interesting how a chain stitch can be used to create different designs.
Hi Mary …
Long time no talk. 🙂 I still love keeping up with all you’re doing. Busy lady!
Thank you for this gorgeous scalloped buttonhole chain stitch. I’d love to do it around the neck of my granddaughters singlets …. What thread would you suggest I use for this please? I thought I might even do it around the collar of her onesies. (we call them Baby-gro’s here)
Cheers & Thanks again for all your wonderful inspiration …. Wendy
Muito lindinho esse bordado, obrigada por ensinar, abraços – Luzia Raposo
Só esqueci de dizer que moro em Brasília, Capital do Brasil, abçs
Finally tried this stitch tonight for a crazy quilt seam. I am in love! I will definitely be playing with it much more!
Thank you for all your awesome tutorials!
Maybe my grasp of the buttonhole stitch isn’t great enough… but I must be missing a step here? Your instructions say “Make sure that your needle comes out over the working thread, so that you’re stitching a buttonhole stitch over the thread that makes up the lower half of the chain stitch. Pull your needle through and tighten up the buttonhole stitch.”
Is there a step between making sure the needle is over the working thread and tightening the stitch? It seems the needle must go back through the fabric at some point…
Thanks in advance for any insight you can provide 🙂
Hi, Molly – no, when working the buttonhole part of the stitch, you never enter the fabric – you simply buttonhole down one side of the chain stitch line, using the chain stitches as the foundation for the buttonhole stitch. Don’t enter the fabric again until you get to the end of the line of chain stitch. Hope that helps! -MC
Thank you for the sensible critique. Me and my neighbor
were just preparing to do a little research
about this. We got a grab a book from our local library but I
think I learned more clear from this post. I’m very glad
to see such wonderful information being shared freely out there.
That’s a great idea! Thank you very much
me gusta yo estoy haciendo un cuerso de bordado y estos puntos son bellos si me pueden enseñar mas puntadas se lo agradesco
Been looking for a stitch like this to give a crochet look. Thanks so much for posting it!
Amei!!
Espectacular, interesante material. Mil gracias por permitirme disponer de el.
Thanks so much for sharing this!! Always on the lookout for ways to enhance embroidery & this is lovely!
I love to learn new stiches
Mary, I have a question about the stitch size and my perception. I love executing this stitch. It’s currently my favorite. But if you’re using floche you can scarcely see the detail unless you look extremely closeup. Do we just deal with that disappointment (I had to show it to my husband thru my magnifier), and be happy with the overall texture from a reasonable distance? Or what am I missing?
Hi, Kay – I like the smooth finish the floche gives on this stitch. If you don’t like it – or you’d rather see more texture – try a #12 perle cotton. It’ll give you about the same size thread and a lot more texture. Hope that helps!
Very interesting, look forward to trying out on a new piece of felt work
Love your site!
Momma tried to teach me embroidery as a child. The pillow she made for me when I was < 10 is still a treasure, especially since she isn't with us any more.
I bought your monogram sampler and was able to stitch a decent-looking, pretty gift for my niece.
That’s great to hear, Angela!
Hi Mary. I love your newsletter, website and all your instructional videos. Your instructions are so clear and easy to follow! I’m working on a project that calls for the edges of a flower to be picked up in detached buttonhole stitch, but I don’t know how to do it and can’t find any instructions anywhere. I found your video on filling in the small square in the detached buttonhole stitch but it doesn’t help me with the edges of the flower. Can you direct me to a video or book that can help? Thank you so much! Cassie
Hi, Cassie – I don’t know of a video or book that could help you right off the bat, but really, all you’d be doing is working the buttonhole stitch “in the air” – you’d be anchoring the end of the straight stitch part of the buttonhole in your fabric, but the part where you pass over the working thread (to make that stem stitch-like line) is just in the air – you don’t pass through the fabric. Maybe I’ll have a chance to work up a photo tutorial for the technique. I’ll add it to my list!
Mary — thank you for your quick response. I understand what you are saying about passing through and not stitching into the fabric. I practiced yesterday, but my stitches just didn’t look right. I’m really looking forward to you doing a video as your instructions are so easy to follow. In the mean time, I’ll continue to practice! Thank you again. Cassie
Your sampler is very pretty. I like the colors and the intricate stitches. I love samplers. I hope not to miss the ones you choose to show.
Que belleza todo lindo. Felicitaciones.