


Let’s start the week with a bit of Stitch Play!
If you’re doodling about with hand embroidery stitches, and you’re looking for a way to create a wide line with a bit of added interest to it, you might like this simple combination of chain stitch and buttonhole stitch.
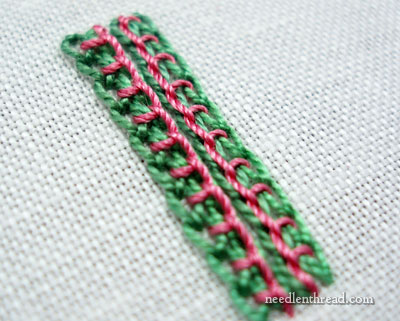
Combining chain stitch and buttonhole stitch in layers is not a new idea. There’s a certain type of needlework called Parma embroidery (which Jeanine demonstrates on her blog Italian Needlework) that combines three rows of chain stitch topped by two facing rows of buttonhole stitch worked close together. Parma embroidery is a whitework technique that produces a very textured line due to the closely worked buttonhole stitches.
My Stitch Play idea here evolved from Parma embroidery – I was looking for a wider line, though, so I extended the base to four rows of chain stitch, and, to create interest with color, I reduced the number of buttonhole stitches, placing one buttonhole stitch per chain stitch.
You can play with this whole idea of stacked stitch combinations, by fiddling with the number of buttonhole stitches in each chain stitch, by stitching your buttonhole stitches from different directions (creating a different twist on the lines where they meet in the middle), by testing the stitch in different color combinations, or working the layers in the same colors, or working the layers in light or dark shades of the same color… lots of room for play here!
When I was playing about with this sample, this is what I did:
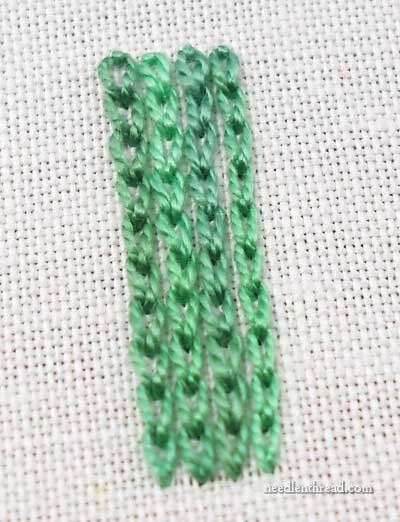
I started with four rows of chain stitch, worked side-by-side, in a #12 perle overdyed cotton. I kept the chain stitches synchronized all the way up each line. If you were working this on a very large design, this would be the tricky and time consuming part! This combination looks best when the chain stitches line up next to each other.
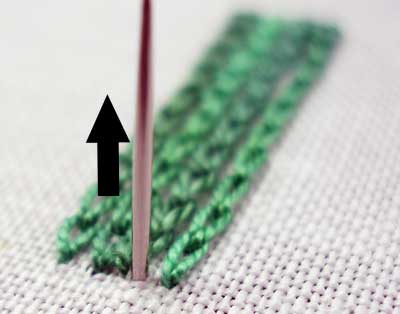
Starting near the beginning of the line of chain stitches second from the right, I brought my needle to the front of the fabric.
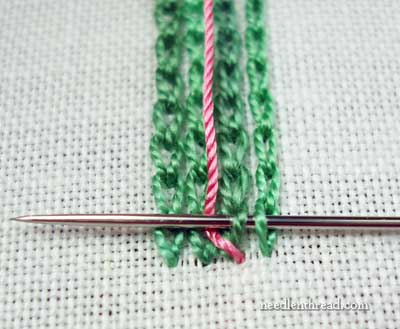
Working over the two right-most lines of chain stitch, and picking up the facing halves of the chains on each of those lines, I worked the buttonhole stitch so that the line created by the buttonhole stitch is running up the middle of the four lines of chain stitch.
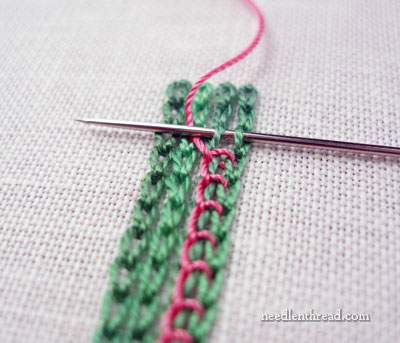
To achieve the look in this sample, it’s just a matter of passing through the middle of each chain stitch, and over the working thread, all the way up the line.
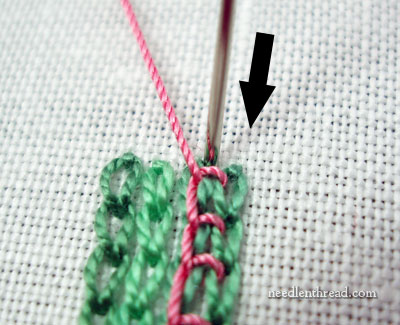
At the end of the chain stitches, the buttonhole is anchored by taking the needle and working thread down into the fabric near the top of the chain stitch line.
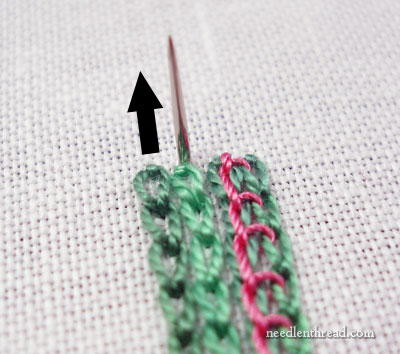
At this point, I cheated. For right-handed people, it would be easier to go back to the same end of the chain stitches that we started on above, turn the fabric 180 degrees, and stitch down the line. Instead, to avoid changing the thread, I jumped over to the other side of the chain stitches here, to work down the two lines of chain stitch on the left, using my left hand to stitch. You can do it whichever way is more comfortable for you – understand, though, that you’ll get a different twist on your chain stitch, depending on the direction you work from.

So, here, you can see I’m working down the left side of the chain stitch rows, in the same manner I worked the right side, going into the middle of the chain stitches and over the working thread.
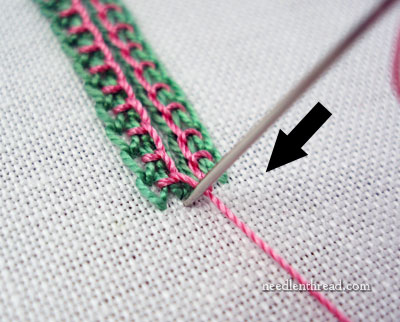
At the end of the left side, I sunk the needle and anchored the buttonhole.
This is just one of an infinite variety of ways you can layer your stitches and combine two stitches to create a different look. This isn’t a rigid “how-to-do-this-technique” tutorial, as you can see. The purpose of Stitch Play isn’t rigid instruction. Rather, it’s to show you how you can dabble about with stitches, and to encourage you to play around with various embroidery stitches. Dabbling with stitches can be a lot of fun – it’s a good way to get comfortable with surface embroidery!
So – go dabble!
If you have any ideas you’d like to see worked out for this Stitch Play series, leave a comment below and let me know!
Hope your week is off to a good start!
This stitch is very cool. I’m think on creating a sampler of the different ones for a notebook.
Thank you very much.
Mary,
This is very informative. I had no idea you could do something like this with chain stitch (one of my favorites).
I am looking forward for more stitch play updates. 🙂
This is beautiful. I am continually gaining interest and intrigue in all the possibilities with these stitches, especially the buttonhole. Thank you!
G’day Mary,
I’m taking a great interest in these Stitch Plays and the Stitch Glitches.
Thank you. Cheers, Kath
You make this look and feel like fun! The books of stitches are so much harder for me to understand and a bit…. scary. This way, is well, fun! I might try the letters in the ….Lazy Brown Dog…. that looks like fun too.
This is beautiful and awesome!
I have got to do this.
I just wonder while your using the pink would it not be better
to use a tapestry needle, so that sharp point doesn’t catch the
green? And i really love purl cotton.
Love it.
Really like the texture! Lots of possibilities here – could be done in “scrolly lines” as a border, in circles, etc. Makes me want to do so me dabbling…
-Sharon in France
This series of stitches are great. I will find a use for them…they are beautiful and Thank You for sharing.
Really Marry what to say its superb. No doubt you every time make me surprise that how could u innovate such work.
I really, really love it when you show us the different ways to do things….I am thinking of doing a sampler of different stitches…thought that would be fun…and a chance to learn new one….
I love this stitch combination. I am gonna use it on this month’s cqjp block.
What a great idea. I’m going to try out this combination straight away!
Chris P, great idea about the tapestry needle.
Since the nature of Buttonhole Stitch has a bit of an offset to it, I want to play around doing this with an even number vs an odd number of base chain sttitches, and doing the second row RH vs LH. This would make a great striped fill for doodle stitching or abstract work, wouldn’t it? And if you added more rows of chain, you could interlace the legs of the 3rd row of BH… hmm! 🙂
Oh my, Mary! Yesterday, I was looking for some ‘gridding lines’ to divide up a line stitch sampler…..something relatively simple because I want to spend the time on the sample stitches themselves, but still interesting and attractive…and this is *perfect*. I’d ‘lace’ (buttonhole stitch) with gold, since my sampler will be of gold stitches. And a black silk thread background (chain stitches). Being able to vary the width so easily is great!
Thankyou so much!!!
I love this new feature on your blog. I love combining stitches in different ways on crazy patch projects, and look forward to incorporating some of your ideas!
Wonderful work Mary, How do you come up with such delightful ideas. You really inspire me.
Aloha Mary,
Love the stitch play. Speaking of which, have you seen the little stitch contest on “Needleprint” ? Perfect for stitch play (as if you don’t have enough on your frame).
Regards,
Ji
Ooh! ooh!…You must be psychic, or there’s something in the air! I’ve been looking all week for a ‘solution’ to a very boring single row of chain stitch border. I’d been considering adding another row of chain stitch…but that idea just seemed – blah. This stitch play lesson was exactly the thing to get me started again…my engine is revved and threaded – I’m ready to PLAY!!! Thank you!
Oops…just wanted to add a another thought – ‘Stitch-Play’…hmmm? Do I sense a book here?
Once again Mary, you do the “obvious” with the “simple” and it turns out…….”UNIQUE” ! ! One of the reasons why I am addicted to your blog….Judy in Pittsburgh
hi Mary,
What else can I tell….It is awesome…what a combination of stitches…I think I have to explore more…your blog rocks…
thank you for sharing.
Thanks for the mention, Mary my number of visits went through the roof! Yvette Stanton is really good at explaining the Parma Stitch in her stitch manuals. Curves are very tricky. Do I dare ask if you had tried your combo on a curve?
really cute
I am trying to imagine a stitch combination that would simulate rippled water surface. Can you help?
I’m not sure how much “water” you are trying to create–but–for the illusion of ripples or light playing on the water, use a single strand of a silvery variegated thread like Madeira Astro & stitch a very open, irregular Cretan stitch. Use the “side to side” version of this stitch. Hand painted silk really comes alive as “water” with this technique. Hope this helps. Good luck!
hello.the web is very good .iam enjoy.thank you
wow this is a unique and wonderful stitch. thanks for taking so much pains to this detailed tutorial step by step
I as well as others have been very bored I used to do embroidery as well as crewel Its been a few years but as well as all america I need something positive to keep my brain focused to help staying in I ordered several cross stitch as well as crewel and embroidery So I think i am all set to have fun I am so happy to find your app!!!!! I just needed a refresher on my needlework Thank You My life will much more stressful
I just wanted you to know what a difference you have made to one person’s life. I have been pretty much housebound for the last 18 months while recovering from GBS. A couple of months ago I decided to save my sanity by learning a new skill, I chose embroidery as I already had the things I needed. Like any new skill this has been an enormous learning curve for me, especially under these challenging circumstances. Your tutorials have been a real lifeline during this process, guiding me as I navigated this new skill. I just to say what a wonderful resource your blog and videos have been and to say a huge thank you and give you a virtual hug. X
I hope that you’re on the road to recovery now, Sandie! I’m glad Needle ‘n Thread was able to help you out while you were suffering with GBS. Not fun!
I would love love love more combinations like these…I see them a lot in your sampler type works but my eyes are old and I’d like to see them worked up close. Thank you!