


After working out the colors and procedures for the stem stitch filling on the outer edge of the Medallion (it’s not all finished yet!), my next step was to concentrate on the goldwork dots and makes some decisions about them. Around the outside of the Medallion, you see, there are 50 round dots, each about 5/16th’s of an inch in diameter. So they aren’t large dots, but they are dots nonetheless, and each has to be individually worked.
What was I thinking?!
Once I finished one section of the blue outer edge of the circle, I took a break to think about those dots.
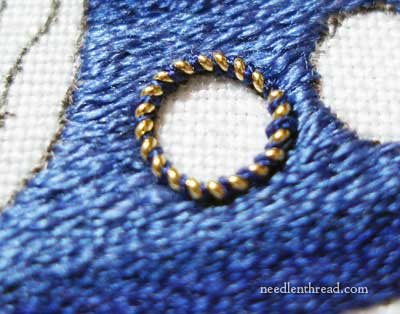
My original plan was to outline each of these little dots with pearl purl wrapped with silk (much like the Lizardine technique around the monogram), and then fill with chipping in check purl, just the like the center of the Tudor-style rose on the design. The photo above documents my trial of this technique.
A couple things perturbed me:
1. To bend the pearl purl smoothly around this small of a circle and make a decent enough join in the two ends is somewhat difficult, but the difficulty is exacerbated by the stretched purl and the in-between layer of silk. It’s just too tight, and it’s too fiddly and time consuming.
2. While I like the gold / blue twisted effect (and I especially liked it around the monogram), here, it doesn’t make a clean enough line around the dot. Too much blue, not enough gold.
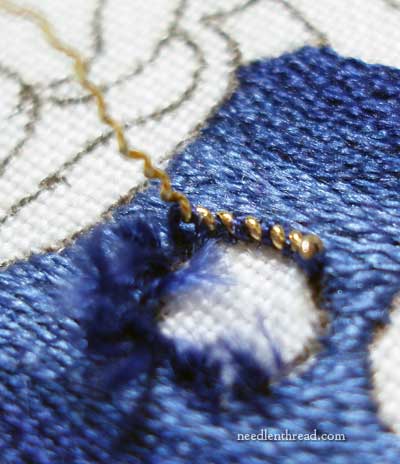
So it came off. Now, picking off real metal threads from an already-stitched background is something that should be done carefully. Tweezers are essential tools at this point – but not sharp-tipped tweezers that can snag the silk. I use blunt tipped tweezers in places like this. They grip, but they don’t stab!
But … rats … I still snagged the silk! See the problem? I caught a bit of the background silk and pulled it up. To fix that, I threaded up a strand of the same color of blue, and took one stitch over that area on the front, pulling the silk back into place, and then secured everything on the back.
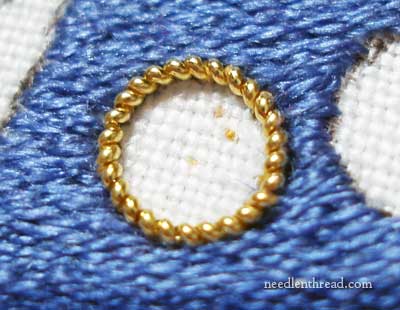
Ah. Just a gold ring. Much better! The outline is cleaner, and it’s a lot easier to work with just the gold without the silk twisted in it.
When you work with pearl purl, you have to give it the slightest, tiniest bit of stretch before stitching it down. If you’re working in lines and loose swirls, this bit of stretch is just barely there, enough to barely separate the little “beads” of purl, but not enough to notice the separation. This helps remove some of the bwoinginess from the wire (it seems to stiffen up a tad and it becomes easier to manage), and it also separates the coils just enough that the couching stitches slip easily between them without being seen.
When working around a very small circle like this, I found that the stretch on the wire is just slightly more than it would be if working a longer or looser line. Otherwise, the beads of the purl try to shoulder each other out of the circle.
Stitching the dots was an adventure – we’ll revisit them later on and I’ll show you the filling and a little extra touch around the outside.
If you’d like to follow this project from beginning to end, in step-by-step fashion, feel free to check out the Medallion Project Index. If you have any questions, comments, suggestions, feel free to leave a comment below!
If you’d like access to all the tips and techniques discussed in the Medallion Project, including complete step-by-step coverage of the Tudor-Style Rose, conveniently collected in one document, interlinked, referenced, and indexed, why not add the Marian Medallion Project e-book to your library? It’s packed full of all kinds of embroidery tips for undertaking a project like this, all in a convenient electronic format for easy searching.
Not only have I loved following this project, but I love the word “bwoinginess” and we all know exactly what you mean!
Thanks, Ouida – It was the only non-word I could come up with. I figure if Shakespeare could invent words, why can’t I?!
Don’t you just love it – ‘bwoinginess’! My spell checker had no suggestions what so ever, a luscious, original word. What fun! I added it to the dictionary, I wasn’t going to let that one get away.
Oh, G’day Mary…umm nice post…and I do love the gold dots. They’re going to be so beautiful. It’s like a wedding circlet as it is now and speaks to me of unity. 50 of them around the outside, uniting the whole.
Cheers, Kath.
PS: I could do with less stretch and more bwoinginess just now, and THAT word is such a happy one, so, thank you!
I agree whole heartedly!!!
Well, if you can use a new word ten times in an original sentence in one day, you’ll never forget it!
Actually, I think this word might be forgettable! :-/
Thanks for the smile, Kath!
Please do a tutorial on these goldwork dots with lots of pictures…I could not see the beginning and ending of yours…when I try this I see everything…
Hi, Sue – I will try my best to do just that. The “join” on the pearl purl is sometimes pretty difficult to do, and on small circles, it is that much more difficult! I tried to photograph this one while I was doing it, but what a mess! Not one good picture.
On the bright side, I have about 40 more to do, so somewhere in there, I will try to get a series of good photos and show you how!
MC
The switch to the gold thread around the tiny circles is perfect. The affect on the whole will be stunning.
One question I have is about the stem stitch filling in the area between each circle. When the space gets so narrow, are you doing just one stem stitch or so to fill the space, or does it end up switching to a satin stitch for a stitch or two?
Also, are you using one or two strands of silk thread on this part? I’m assuming it is two as you were using when the monogram was stem stitched before the restart?
Wishing you “fast” stitching and tangle free thread to meet the deadline!
Hi, Carrie – Good questions! Thank you!
Yes, with the stem stitch filling, between the circles it ends up just being satin stitch. It’s too small a space for two stitches.
No, the background is worked in one strand of silk. I didn’t want it to be too thick – it actually looks pretty thick in the close-up photos, but it’s not as thick as it looks. I love this thread!!
MC
When I saw the first picture, I thought that the purl and silk was the right thing to do, but when I saw just the gold ring, I realized that you are absolutely right. This is a beautiful piece and I am enjoying its progress.
Thanks, Heather. The primarily problem with the blue / gold combo was that it was not very visible from even a little distance. The gold is working out quite well!
MC
OOooooooo!!! Love your finished circle!
its absolutely gorgeous
Can I just say, I started following your blog when I was using your videos to learn very basic needlework for an heirloom sewing project, and I have to say: I am sooo amazed by your talent! Wow! That gold circle looks amazing! Everything you do looks amazing! It’s so inspiring!
Mary, I love the ‘bwoinginess’; it describes perfectly the spring in pearl purl. Thank you for sharing your not-so-good decisions and their remedies, and the tip for curing snags.
Joyce.
I liked it with and without the silk – but I can see that doing 50 silk-twisted dots would be a bit of a nightmare, especially up against a deadline! ‘bwoinginess’? What a great word! 🙂
Nice! Great idea! Will you do that around the fleur de lis?
Hi, Laura –
Thanks for the question!
No, I won’t do it around the fleurs de lys – they would become too much of a focal point, if surrounded in the bright gold. The pearl purl is also a bit too “thick” compared to the other stuff around the monogram, so I don’t think it would blend well. I’m leaving the fleurs de lys as they are. Well… for now, anyway!
MC
Mary,
The gold ring is just perfect, much better without the blue. Now what I would like to know is how to you figure out what length of gold pearl purl to cut. Do you measure the diameter, calculate the circumference, then cut a teensy bit smaller piece so you can stretch it slightly? Or do you do something easier?
Hi, Cynthia –
Well, for the first go at the ring, I “estimated” (generously – better to have too much than too little) the length of the pearl purl, measured my estimation so I would know how long the estimation was, and then I sewed it down, and clipped the left over length. I measured the left over length, and subtracted that from the original length, and that gives me a starting point for cutting the pearl purl. I always cut a couple “beads” beyond the length, because I have a super dread of the piece coming out too short. I’d rather waste a tiny bit of thread cut from the end, than the whole thread, because it was too short after all and I had to pick it out.
MC
Mary, the effect looks to be worth the effort to take out the pearl purl and redo it. I have some pearl purl, but haven’t tried using it yet. This is such good information, as is typical from your posts…Not just how to use something, but what to do when things don’t go as planned. Invaluable stuff. Thanks and by the way, it looks so beautiful! What a work of art!
Thanks a bunch, Lin! Glad you’re enjoying it!
I live vicariously through your work and am bedazzled! I get so many things in my inbox that just weigh me down and your posts are just a highlight in the day.
Why, thank you, Betsey! That is very nice of you, and I’m glad you’re enjoying the posts! ~MC
Beautiful and informative, as always, but my stomach did a little turn when I scrolled to the second photo. Whew!
Yes… mine did, too, Georgia… I don’t really like picking things out! Actually, the worst part was when I snagged the background silk. I might even have let out a wee bit of an expletive at that point… though I’m not admitting to it! 🙂
I’m so impressed with your work. The colors you choose, the way you stitch. But to be able to make all those tiny circles in gold, tack them down and not show the cut ends is magnificent. And yes, I did look.
As for removing the first circle and snagging one of the other threads, I know that feeling. Good to know that you just matched the thread and stitched over it all to hold it down. I do that and wondered if I was cheating. Guess not. Whew.
Hi, Irene! I don’t think it’s cheating at all! I can’t tell you how many times I touch in a spot with a new little stitch or something, to finish it or correct it or what-have-you. If it’s cheating, then I suppose I’m the Biggest Cheater of All!
I thought the blue/gold effect in the original was lovely, but yes, too much blue. The plain gold really stands out.
Regards,
Marian
Hello Mary,
Thank you so much for your lovely work and the opportunity of watching a master like you take it step by step, I truly look forward to my updates to see what step you have taken next, it is truly inspiring and something that scares me to even attempt. Thank you once again for sharing with all of us.
Glad you’re enjoying watching the development, Marianne!
I am sorry but I do have to disagree with one of the comments – you simply can not have too much blue, it’s impossible. Oh, that’s just my opinion, you say. Oops, sorry, hope no toes were hurt.
Given that blue is my favourite colour, and especially that cobalt colour, I must plump for the former blue and gold ring, but I take your point, Mary, that it would have taken ages and with 50 of them it may have been just a tiny tad overbearing.
I do love this project and part of me can’t wait for it to be finished so I can see it in toto, but the other part wants it to last forever.
Oh, no, it’s a Blue Lover!! LOL!
Hi, Chris – actually, it would be too much blue, only because the outline would not be visible, even at a little distance. It would end up looking “jaggy” and messy instead of sharp and defined. Nothing against the blue! Just the technique! Now – to make you Really Happy – never fear! Because I actually did add even more blue to the dot area than there would have been had I kept the blue / gold twist. I’ll show that to you later!
I am enjoying your trials as you continue to work through this medallion. I really liked the blue over the gold, but either way it will be lovely.
No, no, no, I’ll never get tired of following your progress on the medallion!! Please, don’t stop telling us about it. I learn a lot, but most of all, it helps me when I’m tempted to skip a step on my embroidery because it is too slow or too difficult. You are really an inspiration to try to excel.
alicia.