


This is the 7th and final part to this series of tutorials on the Goldwork & Silk Tudor-style Rose project. If you’re just joining in on this series, you’ll find the index of all the previous stages of this embroidery project listed under Tips & Techniques, in the first section titled Hand Embroidery Lessons & Step-by-Step Projects.
Let’s look at the last step of the project, which involves outlining the inner circle of the flower with pearl purl and filling inside of the circle with Gilt Wire Check #10, which is a check purl in a fairly small size. I’ve already covered today’s particular goldwork techniques elsewhere on Needle ‘n Thread, so we’ll look at them briefly here, with links to other articles if you wish to read further.
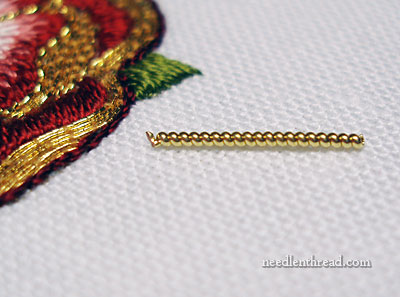
Begin with a small length of pearl purl, in size “super”. You won’t need to cut more than half an inch if you’re working the smallest rose, but for handling purposes, you might cut it a little longer, as the small pieces can be difficult to handle. At this point, you’ll want a pair of tweezers on hand, to help you manipulate the metal thread.
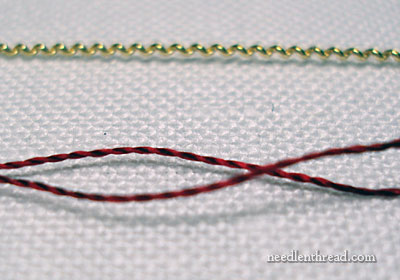
Stretch the pearl purl out to twice its length by gripping the very ends of your cut length and pulling gently. Then you’ll want to prepare two or three strands of Soie de Paris (#4624) and thread those up in a needle (probably a #9 crewel / embroidery needle will do). I ended up using three strands of the Soie de Paris to couch the pearl purl, but in fact, you can get away with two, especially if you want a little less red and more gold.
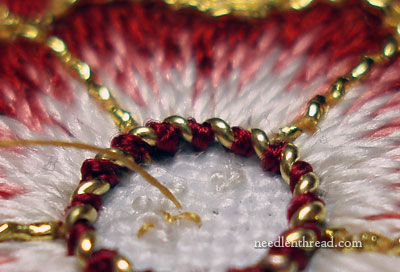
You’ll outline the circle area by couching the stretched pearl purl in every “valley” of the thread. Use the tweezers to manipulate the pearl purl around the circle (it’s pretty tight and fiddly, but just take your time and be gentle with the thread!), and when you arrive at the starting point, snip the pearl purl to size, use the tweezers to “fit” the two ends of pearl purl together, and take your last couching stitch to the back and anchor your thread.
You can see here that the three strands of Soie de Paris look a wee bit bulky, but I wanted the red to really show up. You’ll get a much lighter look if you use only two strands.
In case you’re wondering about wrapping the pearl purl with the red silk first, and then couching the pearl purl into the circle, the very small circle here makes that technique extremely difficult to execute in this case. It’s much easier just to couch the pearl purl!

Now it’s time to cut your chips of Gilt Wire Check #10. You’ll want some kind of cutting surface to work on – the normal being a velvet board or a small lid lined with velveteen or something of that sort (I used my goldwork thread tray that I made out of a tin). Cut your chips about 1/8″ or smaller.
Use the YLI #100 thread (pull it through your beeswax a few times, and then run it through your fingers to smooth out the wax) and a very small needle for this – I used a #12 crewel needle, but if you can’t get your fingers on a crewel needle that small, you might try to find a fine beading needle. A #10 crewel doesn’t fit inside these chips very well.
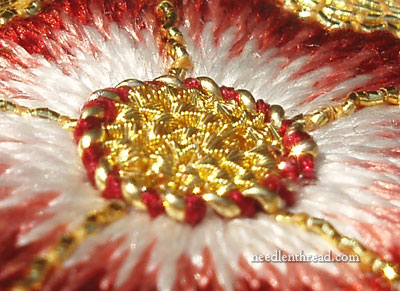
This type of gold chip work is pretty simple – it’s just like sewing on a bead. Because we’re not working on padding here, it’s important to really fill up the center. You’ll want to work the chips in close together, but not so close that they end up buckling over each other or pushing up off the fabric. Keep them close and snug, but not overlapping or buckling.
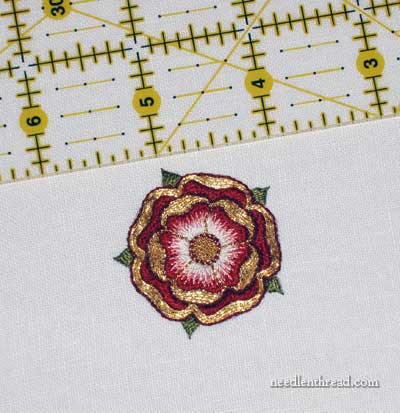
When you see the whole rose in context, with a ruler for size perspective, you can see how tiny this center section of the rose actually is!
And that, my friends, is the end of this little project! You’ll probably see this rose popping up now and again in the future, so when you do, you’ll know where it came from.
I really hope you enjoyed this series of tutorials on embroidering a goldwork and silk Tudor-style rose!
Very pretty! What happens to it now? How will you use this rose?
Hi, Laura – This one was a sample. I’ll be stitching five of these on a larger project. But for this sample, I’m thinking about either mounting it on a tiny box or framing haven’t. Haven’t quite decided which yet! ~MC
thank you, Mary. It was a very valuable tutorial AND it was inspiring. I must think how to decorate my life w/ tiny Tudor roses!
Mary,
Thank you for such a wonderful tutorial. As someone who reads a pattern guide from start to finish and has to be able to see myself doing each step of the process before I begin, your wonderful pictures are a great aid. Even though I have not tackled this one, I enjoy living the process vicariously through your posts!
Thanks a breath-taking sample! Lucky the person who receives such a gift!
Don’t know if you’ve ever considered it, but I think give-aways of your work, even the samples, which you don’t always think of as perfect, would be treasured by us out here in the blogosphere!
Mary: Your Tudor rose is really beautiful and I’m definitely going to stitch it as a learning piece. I have 3 questions:
(1) I just saw a piece of embroidery stitched 6 or 7 years ago that included silver pearl purl purchased from the Japanese Embroidery Center; the pearl purl was tarnished to the point of being a very dark brown-gray color. The rest of the silver metallics had not tarnished. It actually didn’t look bad because there was a similar brown-gray color elsewhere in the piece, but still… That piece did not have glass over it. Would the glass have slowed the tarnishing? Is there anything you can do to restore the pearl purl to its original color when this happens? I’d hate to put that much effort and money into a beautiful piece and then have it tarnish this badly. We live in SC where we have humid summers, but I’d guess this piece has been in an air conditioned house for the duration.
(2) Can you couch metal threads with a silver or gold metallic thread (ex: Accentuate by Access Commodities) instead of silk?
(3) When using silk thread to couch metallics, can you use Thread Heaven to condition the silk instead of bees’ wax?
Again, thank you for providing such a beautiful teaching project for us. Janet.
Hi, All! Thanks for your responses and questions and so forth!
Karen – Thanks – I’m glad you enjoyed watching the process. I normally end up giving away just about everything I stitch as gifts, except for the things that I use as teaching samples. I never actually thought about doing a give-away of one of my samples, but that’s a great idea, and I’ll definitely keep it in mind! Hmmmm…. my mental wheels are churning!
Janet – The one thing that has the greatest affect on speed of tarnishing is sunlight. That’s why it’s important, if displaying goldwork pieces, that they aren’t hung where they get sun. Some types of glass will slow the rate of tarnishing. Most framers today offer the option of “museum” glass, which is supposed to protect the framed object more so than regular glass. I use this kind of glass on all my framing, and yes, I do frame all my embroidery under glass, with spacers if necessary. It keeps the dirt off, and it cuts down on the damage from light.
To my knowledge, you can restore metal threads to their original appearance. I think even the restoration and repair work that goes on in professional studios involves salvaging and replacing threads much of the time, if the customer wants to restore the brilliance of the metal threads. Now, I could be totally wrong about this, but from what I’ve read, this seems to be the case. I don’t think silver polish or anything like that is used to restore textiles!
You can couch metal threads with other metal threads, for an interesting effect. You can, in fact, couch with anything – just depends on how create you want to get, I guess! I prefer silk because of its strength, beauty, and longevity.
Yes, you can use thread heaven – I know some stitchers who use it faithfully. I prefer beeswax because it’s time-tested, because it’s natural, it smells great, it feels nice, and there’s just something about it that’s so real and earthy and warm and …. ok…… I have thing for beeswax. I have cakes of it throughout my house, because I am just sure I’ll use it some day. I don’t “get” thread heaven. What is it? Silicone? Plastic? It’s strange stuff. But I do know people who use it, and I’ve used it myself, and it’s a good product. But golly. I just love beeswax! And you can really work the beeswax into your threads, too, which you can’t seem to do with the thread heaven. But… (sorry!) … to cut to the quick, you can use thread heaven! 🙂
Another point – I don’t use beeswax when the couching threads are meant to be seen in their full color, when the color of the threads is part of the overall picture. It darkens the threads significantly. I use it for gold-colored silk that I use for sewing down gold metal threads, or for white or grey silk used for sewing silver metal threads.
~MC
Thankyou Mary for a wonderful project!!
Just to make absolutely sure – beeswax is fine to use to ‘tame silk threads’ instead of Thread Heaven? I thought beeswax was used just to strengthen silk threads when used in goldwork, to stop the metal cutting/damaging the silk thread.
I’d also much rather use beeswax.
Hi, Megan – I think she was asking about using thread heaven vs. beeswax when working with metal threads…? MC
Mary, I learned SO much by following this process. Thank you hardly covers it … but THANK YOU for sharing this journey with so many of us. I will use many of the tips and techniques (and materials) that you introduced and used on this LOVELY project. ~Cindy in PA
Hello Mary !
I am actually working on this project. I wanted to let you know that this 7th step is not listed on the index.
This project is really very instructive, thanks a lot for your explanations.
Hi Mary,
I was wondering if you have other images that could be substituted for the tudor rose (such as the Mystic Rose) that would be suited for a Cathollic vestment? The Mystic Rose has 4 petals and is a symbol for Mary.
Sincerely,
Irene
Oh my…so pretty and intricate.
Mary, that is just beautiful.