


Flat silk is filament silk that has no (or very little) twist to it. It has an incredible sheen and, when it’s a good flat silk, it’s one of the most luxurious of hand embroidery threads. Flat silk is used in different types of hand embroidery – for example, I used flat silk as a background for my Medallion Project.
If you’re not sure what flat silk is, and if you’d like to read a little more about flat silk and what it is, you’re welcome to read these two articles comparing flat silks, which I wrote a long time ago:
Comparing Flat Silks for Hand Embroidery, part I
Comparing Flat Silks for Hand Embroidery, part II
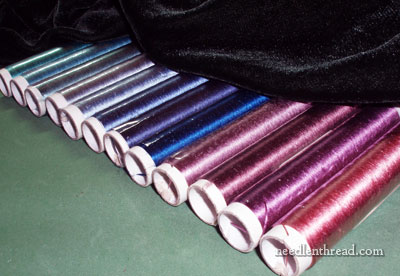
Flat silk is probably probably best known for its use in Japanese embroidery. Flat silk used in Japanese embroidery is fairly recognizable – it comes on cardboard tubes in a beautiful range of colors!
One of the most interesting things to me about flat silk is that it can be used as twisted silk as well. In Japanese embroidery, it is common to twist the flat silk and stitch with it, but it takes a certain knack to be able to do this, and a lot of practice!
Over the last several years, I’ve kept up a pretty steady communication with Anne Gomes. She’s a reader in North Carolina who has trained in Japanese embroidery, and she also does quite a bit of ecclesiastical embroidery.
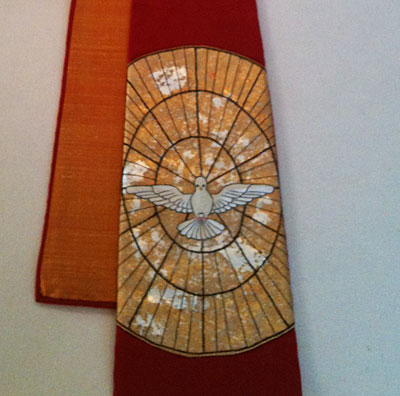
For example, she embroidered this Pentecost stole.
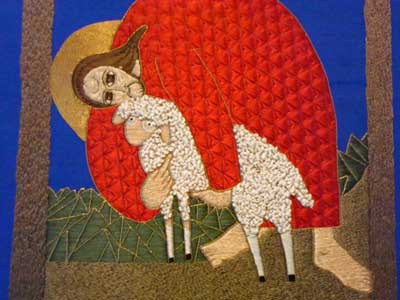
And she also embroidered this modern icon of the Good Shepherd, incorporating some Japanese embroidery techniques.
Well, over the years, Anne has suggested off and on that I really need to try twisting my own flat silk, to use in my embroidery projects. I agree with her! This is something I would like to do… but I’ve never quite gotten the technique down. I’ve often twisted my own cording out of floss, to use for finishing, and I’ve even braided my own cording, Kumihimo-style. But I haven’t yet twisted my own flat silk and actually stitched with it!
So, to help me overcome my inhibitions about twisting flat silk, Anne and her friend Esther collaborated to make a video on twisting Japanese silk, so I could see the method. Needless to say, I was thrilled to the core! Anne also said I was welcome to share the video with you all, and so here it is:
While you can’t see the thread up close in the video, Anne not only shows the whole technique of twisting flat silk, but she also gives a lot of how-and-why information, which is very helpful. If you’ve ever wondered how they twist flat silk in Japanese embroidery, the video will show you how it’s done, and put you on the road to trying it for yourself! Thank you, Anne!
I’m going to play with this over the weekend a little bit, to see what results I can come up with, and then I’ll share them with you. If for no other reason, I have to try this technique because I’ve never been told to lick my hand before working with thread. It is an opportunity to good to pass up.
Speaking of Japanese embroidery and videos, Anne also did some digging and came up with another Japanese embroidery video which I found really interesting. You don’t often see the techniques of Japanese embroidery, framing up, and so forth, presented in video form, so if you’re interested, take a look at it! I especially like watching the ease with which the frame is set up.
It’s always a pleasure to watch a master at work, isn’t it?
Other News – an Interview
On a slightly different note, Trish Burr very graciously interviewed me last week, and the results are now on her blog. Grab a cup of tea, and join me for a chat with Trish, if you like! Thanks for that, Trish! Very kind of you!
Will you get in any good stitching time this weekend? You know what I’ll be doing, stitch-wise: focusing on the Medallion! But I’ll also be working up a few little bits and snatches for the website for next week – some Stitch Play coming up, as well as a bit of Thread Talk (for those of you who happen to like embroidery thread!).
Hope your weekend is just swell!
Thanks for sharing this video. I pretty much do it the same way. The video is good, there are other fine points that go with twisting, but including them would have only made it more confusing. Nice job! Now, I should go do some twisting and stitching, myself.
Christine
Northern Virginia
Wow! This post is fascinating. I watched both videos and was amazed at how the Japanese man created the frame.
Oh, fabulous, fabulous, fabulous! Both videos are so instructive, and I’m so excited to try and develop the technique. Thank you to Anne Gomes for sharing them with us to to you for posting them, Mary.
W.O.W. both videos are amazing! THANK YOU so much for sharing them with us. Wouldn’t it be wonderful to be able to do this type of work. Another goal to be added on the list of things I want to learn.
Wow, what a fun way to create our own silk threads from flat silk. I could see using two shades of green, cose together in value to create a slightly variegated thread of blended colors. On a funny note, Ann’s method of twisting the thread is just how I used to fix my daughter’s hair when she was little. We called it a “Barbie braid” and I didn’t lick my hand, but it was the same principle and it was fun to see the two twists wind around each other. I think I’ll try the flat silk idea this weekend and see what I can create! Thanks for always sharing and inspiring us to try new ideas.
I’ll have to try the hair thing, sans licks, with my granddaughter.
As for combining colors, you can do it, but, it’s better to split the threads so the colors at mixed to avoid a candy cane effect unless that’s what you want.
As a spinner, this is very interesting! 🙂
I would probably choose to use a spindle and make longer lengths rather than doing multiple short lengths; it’s simpler and more likely to be uniform throughout the length….but then, I’ve never done filament silk, so I could be way off!
*sigh* Add another project to the list… 🙂
Thanks for the nice comments.
There are lots of little things I could not include briefly in the video. Mostly, keep tension, don’t ever put the thread down while twisting, make sure both pieces are equally twisted. You can twist as small as 0.5 thread divided into to 2 for couching thread to 5 into 1 (2 1/2 in each strand).
I just twisted 6 strands of DMC cotton floss for a thread to be couched. Don’t think anything bigger would be stitchable.
Christine, chime in if you have any other tips. I’ve learned from a lot of different teachers. Thanks, Mary
I know you didn’t go over the different ‘loop’ sizes, but since this was a beginning tutorial, maybe that would have been too much detail. You stressed to make the loops the same size, and so that’s enough to get them started. I saw that you ‘smoothed’ the silk with your hands several times, I was taught not to do this, as I think the worry is that the more we touch that silk, the rougher it gets (at least in my hands). I made a not-so-good video about Needle on Koma personal technique, maybe I’ll point Mary to that and see if she wants to post it. It’s not too good, though, so I’m kinda afraid 🙂 I love to twist threads, and do it with floss and all sorts of fibers. It’s great fun!
wow cool! Thank you!!!
Thank you for these videos. I’ve just starting using flat silk, and have also been nervous about twisting it, but now I’ll give it a go on my next project since I’ve bought a lot of flat silk (discontinued colors from Kreinik).
And thanks for that video on Japanese embroidery. I watched all 4 parts and found it fascinating just how quickly those masters can work. I also realized that I misinterpreted the directions in my book on working with the koma for the gold as the masters didn’t tug the koma with each stitch, just allowing it to sit at the proper angle to the work and provide the needed tension.
What fun it was to read the interview and get to know you a little better!
Hi Mary. I loved the interview with Trish Burr. I am so very grateful that we didn’t lose your blog. The two videos were captivating – especially licking the hand! I am very grateful also for the internet. I feel as if I’m in the room with you. I feel as if Trish Burr is just around the corner from me. Thanks so much
I loved the interview! No more boys, huh? Has Leonard (the grotesque I gave you) found a new home?
What on earth happened with the finishing of the gold metal thread there in the Japanese Master vid? Interesting way to finish the couching thread….but that small tool waved quickly over the top, and then somehow he pulled the gold thread through the ground. Do you know what he did?
I feel like a positive stitching tortoise, the way he whipped along! Literally, almost whipping his stitches, although they would have all been perfectly flat, in flat silk. Wow!
Thank you so much for sharing this video! I took a couple of pre-phase 1 Japanese embroidery classes at Callaway Gardens a few years ago. I needed a lot more practice in twisting the silk, so I put away my projects, which remain UFO’s. I do remember the teacher’s telling us to lick our hands before rolling the silk. But I had difficulty discerning exactly what a strand is. The filaments are all so fine. Anyhow, I will return to this video for practice and will now know to whom I can turn with questions!
Thanks so much for this one Dear Marymentor <3, Like you, I truly love to watch a reeaaaallll Master at work…….and ergo……also love watching YOU at your closeup work. It's really so kind and generous of you to take all the time to "walk us through" close up work with step by step photos. That is SO appreciated. Like you, I"m going to take my time with these today..Sunday…..hugs…Judy in Pittsburgh
I saw a tv show about Yunjin Brocade in which they were weaving with peacock feather herles. I can see lots of potential in using the thread they were using for embroidery but have yet to find any clues on how to make it. I have peacocks and lots of feathers. The herles are the part that comes out from the stem and are very silk like but about 4 inches long. Do you know of any info on this?
Thank you for your interview to Trish! I love your work. Keep going and never give up your dreams.
Thank you for the information shown in the videos