


Silk and gold combined – aaaaah! I love it. Two great tastes that taste great together. When Reese’s came out with their 80’s ad campaign about chocolate and peanut butter, they had nuthin’ on silk and gold!
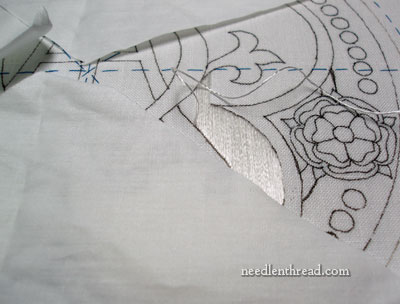
Time for an update on the Medallion Project. What you’ll see here may not seem representative of much work, but it was a satisfactory start, and it assured me that I was on the right path.
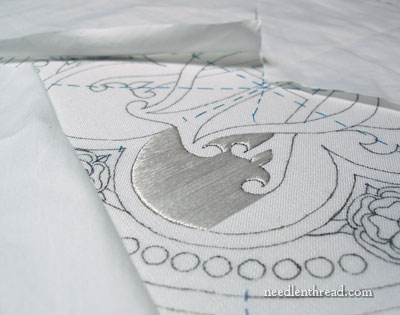
We’ll start with the flat silk. You probably remember that when I first started the Medallion Project, I began with the monogram in the middle of the design, stitching it with a stem stitch filling. On this second start, I decided to start with the background. It’s normal, in Western embroidery, to begin with the background and work forward in the design. There are a couple reasons I didn’t want to do this initially: 1. I don’t like the idea of having a thick concentration of metal threads around an area that still requires a lot of silk embroidery. Much better to do the metal threads last, because silk floss can catch pretty easily on metal threads. 2. Stitching from the center outwards seemed like a much better approach, because it would eliminate having to work over other stitched areas.
But I’ve put aside those inhibitions, because I really wanted to get the background in, to see how heavy it looks. This will help me make sure that the monogram sits above the background, rather than seeming to sink into it. I’m pretty certain I will have to take some measures to lift the monogram a bit, something that I hadn’t done when I started the project the first time. Once the background is in, I’ll have a clearer idea of what I can do to add some height to the monogram.
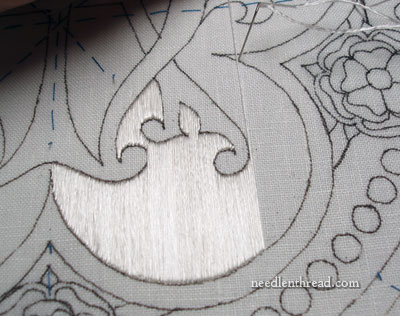
So, background first this time around! The background of this design is going to be filled with flat silk, couched over with a tiny gold metal thread, in a technique called (in some old books) “Italian Stitch.” This is a technique that I’ve used successfully before with this Agnus Dei project. In that project, I couched straight vertical lines with a tiny gold thread. In the Medallion Project, I’m going to go with a random scroll pattern in the gold thread, in a style of goldwork called “vermicelli.” It’s called vermicelli because it looks a lot like vermicelli – the gold thread winds and twists and covers the silk like a heap of noodles.
But before we get to the pasta, we have to prepare the plate. You have to have something suitable to put the vermicelli on, after all. It could be worked directly on the ground fabric, but I plan to cover the ground fabric (linen) completely with silk and gold, so you won’t see the ground.
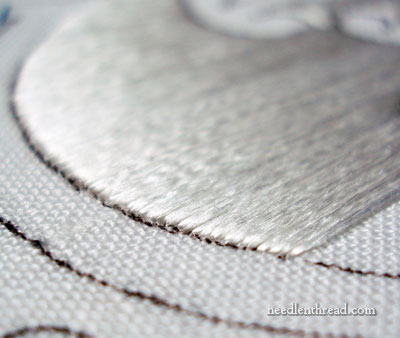
So, the first order of business is laying the flat silk. This silk is Soie Ovale by Au Ver a Soie – a sumptuous flat filament silk that’s very beautiful, has a high sheen, and takes some getting used to work with. I’m using the color “creme.” It’s not stark white, but it’s not got any yellowy hints of ivory, either. I’d call it a subtle egg-shell white … or I might just call it “creme.”
Surface Satin Stitch
The threads of silk are laid, rather than stitched satin-stitch style. This is called “surface satin stitch” and you can read more about using it as a filling for this project here. That is, the needle comes to the front of the fabric at the beginning of the stitch, goes down into the fabric a stitch length away, and then comes up immediately to the side of where the previous stitch ended, then down right next to where the previous stitch began. This type of covering does not leave a long thread across the back of the fabric. There are two good reasons to work the silk this way: 1. it conserves the thread; 2. it avoids long stitches across the back that can snag on things or loosen up over time.
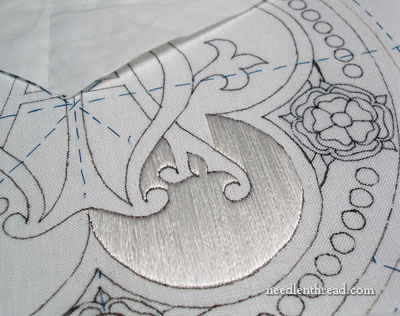
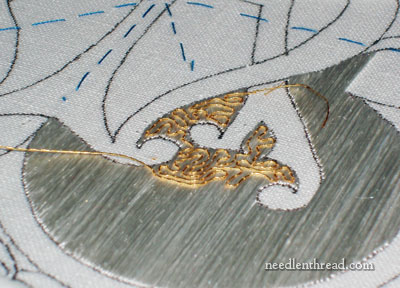
I’m filling the background of the design vertically. It’s important to keep the silk threads parallel to each other and straight. To do this, when I come to an area where I have to travel quite a distance with the thread and I don’t have another stitch right next door to judge the placement of my current stitch, I stretch the silk beyond the place where the stitch will end (you can see the silk stretching into the top of the photo up there), and then I stick my needle into the fabric where the silk intersects the design line.
Nice sheen, eh? What a thread!
Remember the built in cover that I basted over the project? This part of the stitching is exactly why I did that. More than any other part of this project, this flat silk needs to be protected. It is so easy to snag it accidentally. I wanted something I could immediately fold down to cover the flat silk as it filled.
Even when working with a floor stand and frame – so that you have both hands free – don’t rest your hands on the surface of your project! I keep my hands above my work. If I’m stitching for long bouts at a time and I need to rest my arm, I don’t rest it on the surface of my work. I rest it on the edge of the table, on the edge of the frame, or in my lap when the hand isn’t in use. Allowing hands or arms to rub over the surface fabric can be detrimental to good results. Besides displacement or pilling of threads or transfer of skin oil to the project, it can also ruin the tension in your frame without your really noticing it. Always better not to touch the surface of your work with your arms or hands.
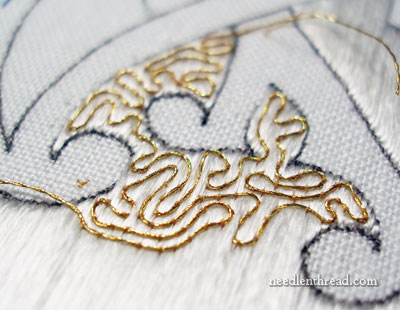
You could never fill a large area with this kind of silk and just leave it there, exposed, with nothing holding it down. And this is where the gold comes in! The gold vermicelli work serves two purposes: 1. It’s pretty! It’s decorative and rich – it adds an incredible subtle gleam to the background (I probably don’t have to sell you on this point!); 2. It secures the flat silk.
I’m using a very tiny, beautiful gold thread called Elizabethan Twist. It’s a 2%, 2-ply gold thread, and it’s tiny and delicate and beautiful. The twist adds a glimmer or sparkle to the thread, because the two threads twisted together catch the light differently than a plain single gold thread would.
Depending on the angle from which you view the gold, it really gleams. It makes the whole background subtly gold.
Since I’ve overstayed my welcome today, I save the details on vermicelli goldwork until next time. I’ll also show you a lot more filling, so that you can get a real sense of what the gold thread will look like in relation to the whole project.
Any questions, comments, ideas, musings? Feel free to leave a comment below!
If you’d like access to all the tips and techniques discussed in the Medallion Project, including complete step-by-step coverage of the Tudor-Style Rose, conveniently collected in one document, interlinked, referenced, and indexed, why not add the Marian Medallion Project e-book to your library? It’s packed full of all kinds of embroidery tips for undertaking a project like this, all in a convenient electronic format for easy searching.
Flat silk and gold! I’m 100% with you on this Mary. Flat silk on its own is stunning and the second picture in this post gives me shivers. That pic could be my ‘Miss January’ on a ‘pin up’ calendar of flat silk and gold 😀
But you are quite right, laid stitches of that length have to be held and what better than gold? I used the Elizabethan Twist on the Floral Glove project and just loved it.
You cannot over stay your welcome when talking about flat silk and gold but if you are saving some for tomorrow post, that’s fine. I’ll be back for another portion of yumminess.
Beautiful!!!!!! It is already looking gorgeous.
Your silk & gold thread work is really going to be beautiful. May I ask how long did it take you to complete just the silk background? Love reading how you decide how to proceed with each step of your work in progress. Whether its conventional or not, it helps me when I start a new project. Thanks
This looks wonderful !!
That is very nice. The flat silver looks like brushed satin stainless. The couched gold looks like bugle beads strung together! Very pretty. The white “creme” tone can be called milk-white, which is warmer (yellow) than snow white. Eggshell is more grey, just like putty-white! This project is really interesting with the metallic combo. I want to see the method of raising the embroidery, too. Will you use silk floss – and how much of a lift will it get?
Wow! I’m astounded at (a) how parallel your lines of silk thread are all the way across the design and at(b)how smooth your stitched outline curves are when using the laying technique. Just beautiful! Are you using silk or another thin metallic to couch the vermicelli? Janet
Overstayed your welcome! You surely are kidding! I could read your column for hours! I love the gold couching over the silver, it is so lovely and reminds me of stipple quilting. I’ve looked at the Agnus Dei project and was waiting for you to show this technique – just gorgeous.
Mary, this is simply wonderful!
Wow! Always feel like I’m in a master class when I get your daily news. The photos make the work so much easier to study the process. Thank you so much for sharing your time and expertise with us.
Dear Mary….Happy Thanksgiving Day….
I just wanted to know where u can these threads…gold and silver and all the silk threads you use in your embroidery. I would like to buy them please.
Thanx
So beautiful……. Mary you do such exquisite work.
PS Every time I use the needle case, I smile at it.
The flat silk stitching is so beautiful, it’s almost a shame to cover it. I just wanted to stroke it! lol The gold couching on top is wonderful. I so enjoy following your progress. Maybe someday I will be as good. I do almost exclusively counted cross stitch, but after following your blog, I have at least kitted some surface embroidery projects. Now to get the courage to start them!
That is stunning! We don’t see this kind of embroidery much and it’s such a treat!
Just curious-can’t remember if you’ve ever mentioned it but have you ever taken Japanese Embroidery classes or wanted too?
Stunningly Beautiful!!!
Seeing your work makes me practice my embroidery stitches and dream. Stay as long as you want! I can’t get enough.
that is just.lovely! 🙂
Out stay your welcome ??? Your knowledge and humour is one of the main highlights of my day. Stunning work Mary. Winter has arrived hear in the UK, the fire is on and it is time for embroidery. Yippee
Astonishing! We are following you very closely… keep on going…! -Thank you so much for the classes and for sharing with us your works…
Well that looks amazing. I enjoy your blog so much and have learned a lot from it. There’s really nothing quite like detailed, painstaking stitching done by someone who loves their work!
Happy Belated Thanksgiving.
And wow!
That looks lovely.
Your work keeps getting more and more amazing, interesting, beautiful. I know there must be more words, but I ran out. Thank you for sharing.
Mary – what exquisite work!
I can’t believe how the edge line under such magnification is so neat.
Please don’t think you could ever over stay your welcome; I love to read your writings; it is like having a fellow embroiderer in the house everyday.
Thank you so much for your time and effort keeping this alive for us all. We can’t thank you enough.
Regards Sandra
Mary, the background filling looks just stunning, and thanks so much for sharing all this information, I’ve learned so much since subscribing 🙂
Absolutely stunning…wow! The silver just shimmers and looks fantastic underneath the gold…beautiful combination…the colors/textures really compliment each other.
Ooooohhh…lovely! how I’ve been waiting for this project to kick off, just to see your wonderful interpretation of the design.
Makes perfect sense doing the background first so you can decide the colour & stitch for the monogram. I think you would have to use a thicker thread for the monogram now else it won’t stand out against this rich background.
I feel like starting something similar!
Wow….you just take my breathaway with that skill. Oh what a touch and an ability to handle such needle and threads….And this is just the beginning…
Overstayed your welcome?!?! NOT. 🙂
I have the habit of resting my hands on the project, I guess I’ll have to watch that. I’ve seen painters use a bar or long brush to rest their hands on. Is it possible to add a bar to the needlework frame for a similar purpose? I’m thinking of when working on the center and there’s no area close enough to make for comfortable stitching….
Parabéns pelos trabalhos,são excelentes e de boa quelidade!!!
Eu bordo dês dos meus 8 anos de idade,e hoje tenho 26, e não paro com essa mania louca de criação.
Agora estou aqui, no seu blog para tirar novas idéias para eu criar mais arte,e espero q este incentivo continue passando de geração para geração,pois vale a pena e satisfação das coisas q criamos.
ABRAÇOS…..Paula Marques
Oh my goodness! Words fail…
Amazingly beautiful work
I am always amazed by the smoothness and regularity of your work. And gold on silk … how wonderful !!
Hi-Mary, A suggestion: Why not lay across the frame a strip of conservation matboard? You can buy acid-free matboard, cut to your preferred size, from any frame shop that does custom framework for art pieces. Just make sure that you ask them to make a straight cut, not a standard bevel cut because the board gains a razor sharp edge when beveled. Keep the board clean and stored safely for years of use. For further life, place acid free vellum on the board to rest your hands on, since you can more easily dispose of and replace the paper as it gets used.
Thanks, Laura – That’s a good suggestion! I try to keep the habit of not resting my arms or hands on the fabric area, but I suppose if there were something hard there, to keep any weight from pushing on the fabric, that might be a different question! ~MC
Lovely. That style of laid stitches (when teaching, sometimes I call it “back and forth satin”) is exactly what I use for Bayeux-style embroidery, and I also use the method of holding the thread straight beyond where it goes to make sure it lines up correctly.
I’m curious, what thread are you using to couch the gold down? The same Ovale?
Is the vermicelli work really named for the pasta, or are they both straight from “little worms”? The pattern is pretty much the same as an icing pattern called cornelli lace, but I guess nobody wants worms on their cake! 😉
I look forward to your daily postings, I feel like I am entering this class of magnificemt instructions that otherwise I would never be able to get anywhere. A neighbor who likes to shop at the thrift shops is always giving me the things she buys because she feels they are of use to me, i.e notions, ribbons,etc., and other stuff for my embroidery, sewing, doll making, etc. I received a small tin box full of
silver and gold threads, some of the gold spools are wire. Since I did not know what to do with because I had never seen such threadsm it has remained in my stash. Perhaps one day I will venture and try to use them. Thank you for sharing your wonderful talent.
I love the silk! It’s georgeous!