


Last time we visited the Secret Garden project, I was reveling in Yellow. I still haven’t gotten over the excitement of the yellow – I want to outline every element on the project in yellow now!
But I’ll refrain…
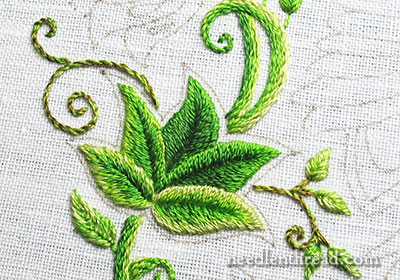
Today, let’s look at some leaf clusters. There are quite a few clusters of leaves on the Secret Garden project. Some could certainly be translated into flowers. The three-leaf clusters, for example, could be worked as some kind of stylized flower, in colors other than green.
But, as I explained earlier, my color vision for this particular project is predominantly lush and vibrant green – lots of green. Very leafy and springy green. And so my clusters are all going to be leaves.
Before I tackled the leaf clusters, I looked at them long and hard and thought about how to arrange the leaves in the clusters. On the original design, these particular leaves already have lines on them, but when I transferred my pattern, I didn’t include the lines. I wanted to make a clear distinction between the leaves in each cluster, and I figured I could do that better, working directly on the fabric.
So, just before tackling any particular leaf, I mark out, directly on the fabric, where I want my lines separating the leaves in the cluster.
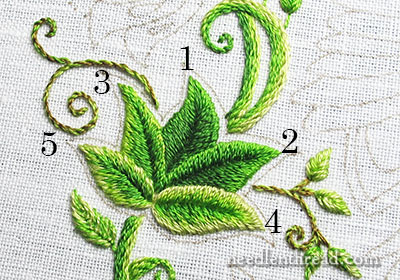
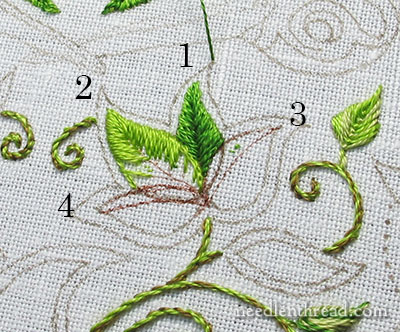
My five-leaf clusters ended up like the one in the photo above – one leaf farthest back, overlapped by two leaves, which are overlapped by two more leaves.
The leaves are embroidered in long & short stitch, as explained in this article.
The order of stitching is marked above. The darkest leaf that’s farthest back is stitched first. Leaf #2 overlaps #1, so it is stitched next, and leaf #3 overlaps #1, so it is stitched next. And then #4 and #5 are independent of each other, so those two can be stitched in any order, last.
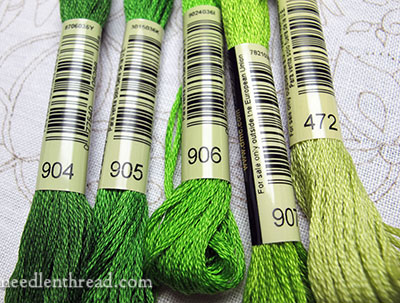
These are the DMC greens I’m using. Starting from lightest green to the darkest, let’s letter them from A to E.
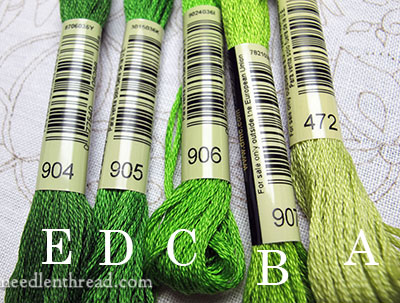
Ok, the lettering’s running a little backwards in the photo, but with the greens lettered from A-E, it’s easier to explain the color layout on the leaves.
Leaf 1 (farthest back) is worked in C, D & E. C is worked first (the lighter of the three colors), just on the tip of the leaf and a little bit down the sides. I switched to D for the majority of the sides, and E (the darker of the three) is worked on the inside of the leaf and right at the base, near where the other leaves overlap. This gave me the darkest of the five leaves.
Leaf 2 is C, D, and E. The outside of the leaf, all around – up both sides and the tip – is worked in C. The next layer towards the middle of the leaf is D, and the inside of the leaf and the lower base (towards leaf #4) is worked in E.
Leaf 3 is worked in B, C, and D, and the arrangement is the same as leaf 2 – the lightest on the outside, the darkest towards the inside, though some of the darker green is worked at the lower left base, where leaf 5 overlaps.
Leaves 4 and 5 are worked in A, B, and C, with the lightest green (A) on the outside, and the darker greens towards the middle. You might not be able to fit three shades of green in the top half of Leaves 4 and 5, if they ended up shaped like mine. And you might be able to fit four shades of green in the lower half – it just depends on the layout of your leaf.
Order of Stitching, in a Nutshell
The leaves farther back in the cluster are darker, gradually getting lighter towards the front.
Always start with the lighter of the greens on the outside of the leaf.
Where there is an overlapping leaf, work some darker green next to the overlap. Make sure that the overlapping green leaf is always much lighter than the one behind it, so that the distinction between the two leaves is clear.
Four Leaf Clusters
Some of the clusters on the Secret Garden Hummingbirds have four leaves in them.
These four leaf clusters are located just above the hummingbirds, but I’m working with my frame upside-down, for two reasons: 1. it’s easier to reach, and 2. because the leaves are hanging upside-down. With the frame upside-down, the leaves are now right-side-up. This makes them a little easier to stitch.
With these four leaf clusters, you can decide for yourself how you want them to overlap.
I decided to overlap them as shown in the photo above. Leaf 1 is overlapped by 2 and 3, and leaf 2 is overlapped by leaf 4.
They’re stitched in the same manner as the five-leaf clusters: darkest in the back, overlapped by gradually lighter leaves.
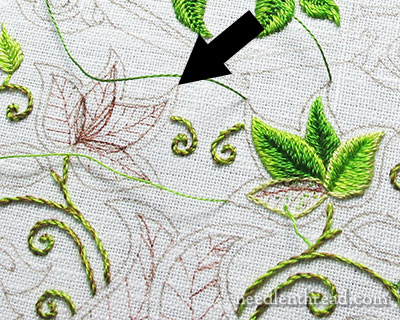
The arrow above points to the second four-leaf cluster, which more or less mirrors the one on the right.
You can see that I’ve marked this one up quite a bit. Don’t hesitate to draw stitch direction lines inside your leaves. You can mark up the leaves however you need to (within reason), because the stitching is pretty dense with the long & short stitch and the markings will be covered.

If I follow the stitching order of the previous four-leaf cluster, this would be the stitching order on the second four-leaf cluster (see the numbers in the photo above).
But I think on the mirrored version, to keep it from being too mirrored, I’m going to overlap the leaves a little differently.
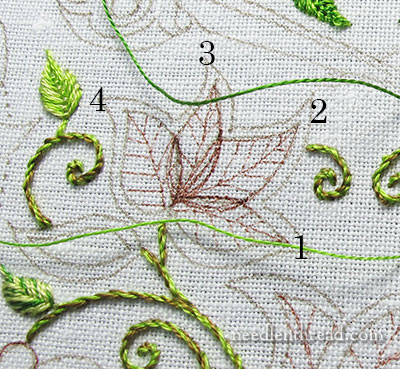
If I change the stitch order to follow the numbers in the photo above, the leaf cluster will look like it’s fanning out a bit. Although the markings on the leaf obscure it a little, what you’d have is 2 overlapping 1, 3 overlapping 2, and 4 overlapping 3.
I’ll try it this way, and then we can compare the two clusters.
Why not try it, right? What’s the worst that could happen?
(…she said, right before she started picking the mess out…)
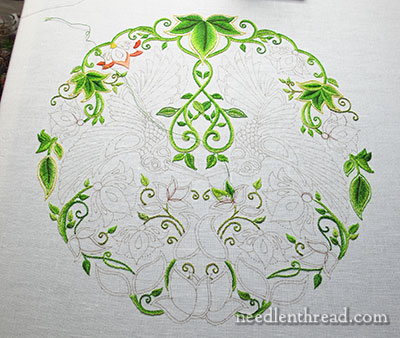
Here’s the last whole-project photo I took. It’s upside down. I’ve gotten a little farther along since I took this. But it gives you an idea of the greens filling in.
I still have some outlines to fix that were worked earlier in the darker greens.
So, that’s where I am on this version of the Secret Garden Project. More soon!
Any questions, comments, suggestions? Have your say below!
If you’d like to follow along with the Secret Garden Hummingbirds project, which features a design from “Secret Garden: an Inky Treasure Hunt & Coloring Book” by Johanna Basford, you can find all the articles relating to this project arranged in chronological order in the Secret Garden Project Index. Among the articles, you’ll find plenty of tips and techniques that will help you with your own embroidery projects.
Oh, Mrs. Corbet! It’s BEAUTIFUL! It’s snowing right now where I am, and I needed all this wonderful vibrant COLOR to cheer me up! I can’t wait until we get to the peachy-coral goodness of that flower! I’m in a tizzy trying to guess what the hummingbirds will come out as. I still can’t quite look at this as a “beginner’s” project, but I’m ravenously devouring the beauty!
I haven’t quite decided on the hummingbirds, myself… :-/ Glad you’re enjoying it!
Well, if you have Netflix they have a documentary called “The Life of Birds” and it’s full of inspiration. I know the birds are stylized but just seeing all the color combinations can spark an idea. Whatever you do, it will be GORGEOUS!
I just love what you are doing. Love the yellow. so glad I bought the book and while getting a very late start, will be following along. What you are doing is beautiful!
I love the green shading, Mary. And that yellow is just perfect!
Look lovely. Is this really for beginners? I’m just starting embroidery. I had Joanne’s book and gave it away as a present, might have to order another one.
Yes, definitely for beginners, though you can always change out the stitches for easier ones, if you’re not comfortable with long & short stitch, which can be intimidating (it takes a little practice, but it’s a very forgiving stitch!) You could fill leaves, for example, with chain stitch in shades of green, or stem stitch. Or you could just outline everything and still end up with a very vibrant and colorful piece. -MC
One of my greatest aspirations is that one day, my long and short stitch might look like yours and will no longer make me nervous! I am doing the RSN certificate (just started) – I have some L&S on my jacobean birdy project, in nice appletons wool. My silk shading module is up next and at that point I will either sink or swim!The thing I really struggle with is L&S where The shape isn’t a leaf. I have lots of books that demo leaves beautifully, and I can emulate nice, fat leaves. But for reasons unclear to me, I always seem to end up needing to do L&S in weird or awkward shapes. Sometimes it works, sometimes it takes 3 attempts and I’m still not happy! Jacobean birdy requires his back doing and I am already obsessing over it.
Could you please let me know what count linen you use. I have wanted to ask this question many times as you just mention the name of the linen but not the count. If you could email me with the answer I would really appreciate it. I have sent you work done by a friend but you have never acknowledged it. It was counted thread.
Hi, Jean – it’s not a counted linen (it’s not perfectly an even weave, like you’d use with counted cross stitch). There are approximately 50 threads to the inch. -MC
I guess, if I liked the original drawing, and if I liked the greens you have chosen, I might like the entire project. As it is, I can’t wait until you get to some other project. I’m sorry. I know it is just me. But.
I don’t think I’ve learned as much in many years as I do following your outstanding photographed details. Though I’m not stitching this project, seeing the introduction of color on the green stems, the yellow expanded outline on leaves and today’s overlapping sequence motivation are all well worth review for whatever I attempt in future. I also was glad for the reminder of that Hungarian Braided Chain Stitch as a dramatic alternative for a thick line. With much appreciation, your fan.
This is looking good, Mary. The greens are very vibrant and you start to get an impression of how the other colours will look from the little bit of pink that you have stitched.
I am constantly in awe of your work, and I am enjoying watching this project progress. I have no where near the talent you do, but this project has inspired me to take on a larger piece. Every single day, I look forward to another update. I am curious how other’s projects are going… Was there ever a page or link for reader’s projects? I would love to see them all.
Hi, Lisa – there’s not, yet. I’m working on an upgrade to Stitchin’ Fingers right now, and once that’s done, I’ll set up a section for the Secret Garden projects over there. -MC
Ms. Mary I just wanted to thank you for responding to my comment, and also to thank you for working on that reader’s page. I appreciate all the work you put into your site already, especially all the photos and the main pages for each project. It’s very organized and helpful!!
I am learning so much from this project! I have waited to work on my project to see what you are doing here. My project is nice but a little flat and it is begging for a change in the way it is stitched on the pattern photo. I have to go out for more thread. Oh darn!
Dear Marie,
One thing is certain, I would project the secret garden after both mine I realized with fine Aubusson wool and wool dying Renaissance. And I would or I would try to do exactly the same thing with the same colors and the same points. Your work is perfect and we can see all the love for embroidery, I’m in ecstasy every day and in awe … A big thank you
I love what you are doing, it’s beautiful. May I ask what it’s going to be when finished?
Love your work. Ordered the Secret Garden book, but it is on back order. Would like to try my hand at this type of embroidery. Right now I am doing some crazy quilt blocks.
Look forward to your posts.
Louise
Dear Mary
As I write this on my friends iPad (as I am babysitting) I am so inspired by your tips and advice on how to embroider and use colour on a project. Although I am not following you on this project I can use your advice on thread colour for future projects and I can also use the tips for different colour thread families, so thank you for this very detailed advice on project and colour design needlework.
Regards Anita Simmance
Hi Mary, I am really enjoying this project and the work done so far. The yellow outline is great. I am lookng forward to getting some colour on it but so far it’s great.
This is so beautiful! I knew it would be but what fun to see it. I live in the beautiful desert SW and just yesterday I saw my first hummingbird as they winter just south of here in Mexico and west in Arizona. This is the earliest I think I have seen them return. So I can hardly wait to see how you embroider them in this piece. Thanks for your wonderful blog!
It looks lovely Mary and I think you are right to keep the foliage predominantly green.
G’day Mary,
I’ve been watching this project since it began and I’m loving it =) I’m in the process of ordering the book and can’t wait to create my very own. Thank you for all your projects and and more importantly thank you for sharing the – how tos (that spelling so doesn’t look right)lols, have a great day.
I am trying to choose colors and the more I work on it, the harder it gets! I have the DMC chart and quite a few threads on hand — but no way just now to get to a shop to see the colors “in person.” I think I want cooler greens. I’ve been drooling at http://www.worldofhummingbirds.com and the array of colors is amazing. My lack of an art background and childlike love of bright colors is showing. Maybe I’ll have cool leaves and let the birds sing Babalu? And, too, the flowers all seem to be the same type. Maybe this is a flower that changes color as it matures, i.e., red moving toward magenta and purple as it grows — and wirh burnt orange accents! Well, as my mom’s Swedish friend, Marta, used to say, “Yoost get storted!” Thanks, Mary, for your beautiful high-reaching instruction and example!
Well Mary ,but I continue , I’m going to have to do something besides long and short stitch ., I just am not ready for so much of that stitch. It seems even harder on very small leaves like dome of these . So I’ll try substituting other stitches instead . I still have a problem with loose tension . I’ve wrapped my bottom hoop, but it’s still loose . My ground fabric is too thin I think . I was surprised that your linen ground doesn’t have a count number. I didn’t like. 32 at all .
I’m learning a lot from your daily blog . Thanks
Hi, Jackie – The Alabaster Angel fabric I’m using has approximately 50 threads per inch. It’s not an even weave fabric (like fabric you’d buy for cross stitch). Some cross stitch linens that are 32 – 36 count can be used for surface work, only if they have a very close weave (that is, the individual threads in the fabric are thick and fill the weave more or less). With a stitch like long & short stitch, if your ground fabric does not have a close, firm weave, it’s very difficult to achieve a smooth edge on the long & short stitch. You can always back the ground fabric (the linen) with a piece of white cotton muslin, to give the stitches something to grip into, that will help ensure a smooth edge. And if your fabric’s too loose in the hoop, backing with a piece of muslin might help correct that, too.
If you decide to forego L&S stitch, there are other options for filling. Chain stitch, stem stitch filling, different types of couched fillings like Bokhara couching or Romanian couching, etc.
Hi Mary, I love the way this embroidery is developing and took particular delight in the yellow outline in your previous post (would never have thought that was the answer but it ticked all the boxes!). Here in Aus we are approaching our Autumn (Fall)after a long, hot summer and I am looking forward to the beautiful orange/yellow/gold hues that this new season offers (not to mention a cooler change) … Check with me at the end of September (after a long, cold Winter) and I’m sure I’ll be yearning for the beautiful greens that are featured in this project.
This is just so gorgeous. This woman’s art is precious.
YES,I am ok with you, she is very very precious.
im so in love with this project! Beautiful!
I was trained in Japanese embroidery, so I am often baffled by the order of stitching by Western trained embroiderers. If I were to do these clusters of five leaves, I would do foreground first. Then I would do the next set of leaves back leaving a perfect gap of empty ground fabric between the leaves. I mean a perfect, uniform, needle’s width of empty space between the shapes.
It seems Western embroidery does the order of stitching from background to the foreground, and Oriental embroidery does it the reverse. I asked about this, when I was taking Japanese embroidery lessons. The answer I got was If you do the background first and then come up through your stitched leaf to do the second leaf, you can’t see where the line drawing is anymore because you have covered it with stitches. The Oriental embroidery always leave a little gap and does not stitch on top of anything else. It probably does not matter much if you do the front to back or back to front, just an interesting observation.
Hi, Ginger – yes, you’re right. In Western embroidery techniques like needle painting and long & short stitch shading, the back is worked first, so that the foreground elements sit “on top” of the background elements.
Mary, you have a way with leaves and vines, and your choice of greens is perfect. You are so careful in your work,thanks for sharing the process.