


The larger the leaf, the longer it takes to embroider it. I know that’s just common sense, and I know I should know that.
But when I started the long & short stitch shading on the large leaves at the base of the Secret Garden design, it seemed to take So Much Longer than I had anticipated. And that’s because long & short stitch on a large leaf is not the same as fishbone stitch on a small leaf.
I’m just loaded with all kinds of common sense today, am I not?
In reality, though, the large leaves didn’t take all that long – it’s just a matter of plugging away at them.
So, today, let’s go through the large leaves together, and allay all our fears of long & short stitch shading on these leaves, or anything similar on your own projects.
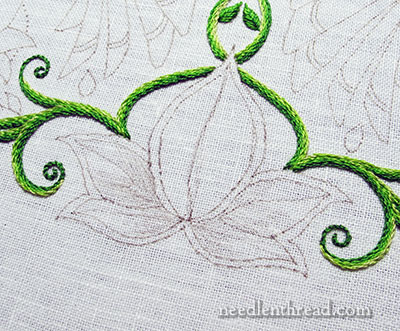
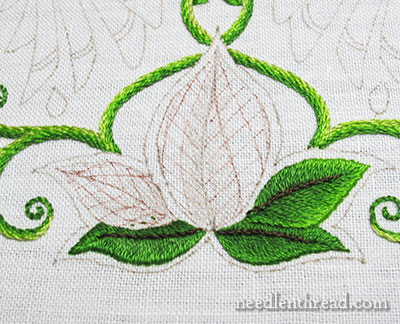
Here are the large leaves at the base of the design. Notice that I’ve sketched in some shading on them. I used a very light pen to do that – the same micron pen I traced the design with. It’s kind of a grayish taupe color, so it’s light. If you decide to make marks all over the insides of the leaves, that’s absolutely fine – they will be covered. Just don’t make them too dark or they can end up being quite distracting while you’re stitching, or confusing if you need to change them.
In any case, work out the shading first on the paper design, then feel free to mark in your shaded areas either with lines that delineate where the shades will approximately change, or with some little sketchy strokes.
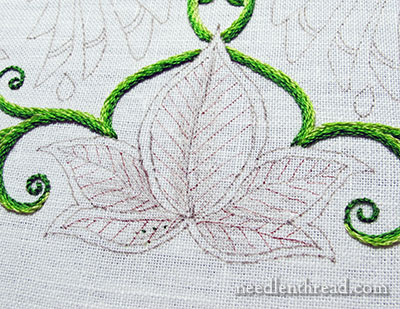
Next: directional lines. You don’t always have to do this, but it does help, especially if you’re new to long & short stitch shading. Mark in some directional lines that will help you keep your stitch direction consistent.
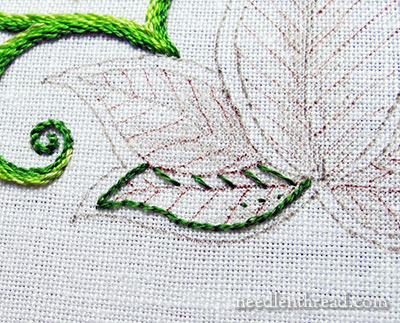
Then, begin with the lower leaves that are farthest back in the design. On my design, these are the darkest leaves, and they are overlapped by slightly lighter leaves.
Using one strand of floss in the darkest green (904), I outlined the lower leaf with split stitch, except where it is overlapped by the next leaf up.
All the long & short stitch is worked with one strand (from the six) of floss, except in the one case noted below, where I use two strands.
I worked in some spaced directional stitches before starting to fill up the area. On the top half of this leaf, the color is solid 904, and pretty much just satin stitch, since the space is so narrow.
I’m only using two shades of green on these lowest leaves – 904 and 905.
On the lower half of the leaf, the outside shade is light – 905 – and so I worked directional lines in 905, and then filling in between them with long & short stitch.
It’s kind of a “divide and conquer” method of long & short stitch, but it works.
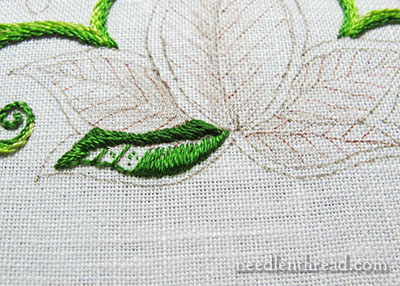
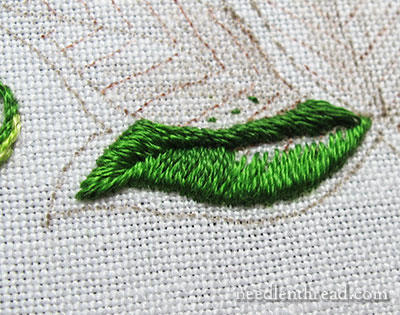
So, above you can see the lighter (905) on the lower half of the leaf, worked in a dense long and short stitch over the split stitch outline.
When working this outer layer of long & short stitch over the split stitch outline, I prefer to bring my needle up inside the leaf and take it down over the split stitch line.
The reason I do it this way is because it’s easier to see exactly where I’m taking my needle over the split stitch outline, and it seems to keep the edge neater.
All the layers of long & short stitch after the first layer on the outside of the object, the needle will come up in the previous long & short stitch layer and go down into the not-yet-filled design area.
Now, the darker green is going into the middle of the lower leaf. Remember, the needle comes up into the previous long & short stitch, and down (in this case) on the spine of the leaf. There’s only room here for two layers of stitching.
The key to this type of shading, if you want it to blend really well without looking too toothy: make the stitches a lot longer than you think, coming up very deeply into the previous layer. Alternate long and short, but not “rigidly.” Make sure you’re spacing the long, deep stitches going into the previous layer, so that they don’t form a ridge of color change.
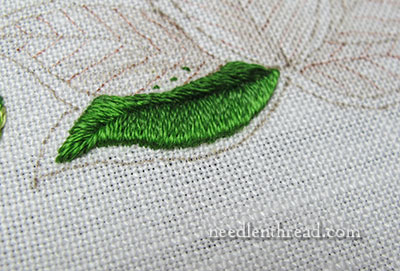
So there’s the first leaf. There’s a little wonky blurble towards the tip, on the spine, but that will be covered up with the stem stitch spine in the end, so it’s ok.
When you’re working the long & short stitch, by the way, don’t hesitate to go back and sneak in some stitches to even things out or smooth things up. It’s a very forgiving stitch! It hides a lot!
After finishing one lower leaf, I jumped over and embroidered the opposite lower leaf in the same manner.
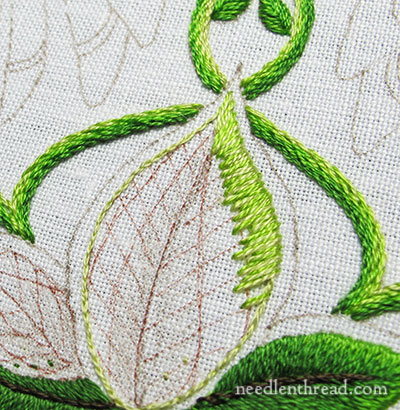
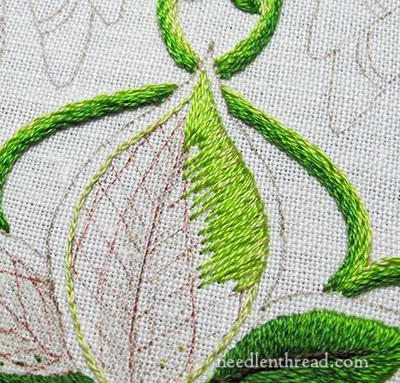
With the next leaf up that overlaps the lower leaves, I worked the split stitch outline in 906, which is the next brighter shade of green, and then began filling in the leaf in the same manner as the previous leaf.
This leaf will be worked with three shades of green, from 906 (the lightest, on the outside) to 904 (the darkest, on the inside).
On the top half of the leaf, though, I only worked the long & short stitch shading with two shades – 906 and 905. There wasn’t enough room to work the darker 904, and it didn’t need it, anyway.
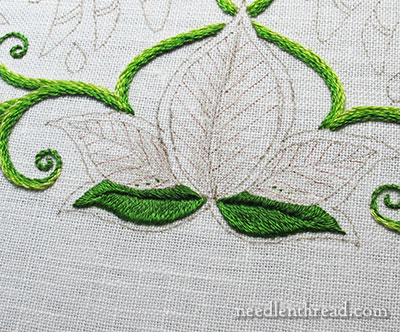
So here you can see three leaves, finished. I’ll talk about the spines below.
At this point, I moved on to the right half of the large leaf, even though the middle leaf on the left was not worked. It doesn’t matter, because technically (so I thought) these two leaves are separate – the large leaf doesn’t overlap the middle leaf, as there is a border between them.
Once I finished this half of the large leaf, though, I made some adjustments.
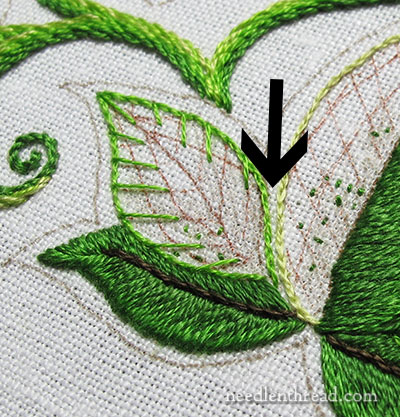
In any case, the split stitch outline on the large leaf is worked with 472, the lightest green.
Then, for large leaf, because it is so large, and because I really wanted to have a solid, thick first layer of long and short stitch, and because I wanted a mix of greens here, I used two strands of floss for the first layer (only) of long & short stitch on this leaf. I used 472 and 907 in the needle.
The stitching here tends to look a little rough and thick, but it will all “pull out” when the next layers of long & short stitch are worked into this layer.
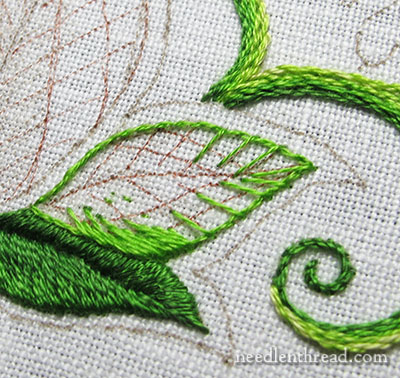
All subsequent layers of long & short stitch on this large leaf are worked with one strand of floss. So here’s the second layer going into the first, in 907.
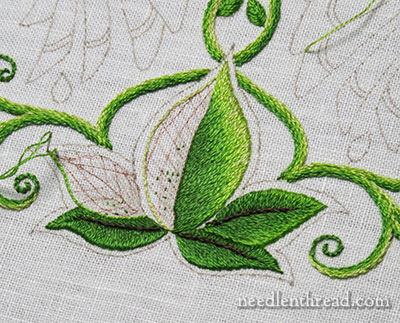
And then it’s just a matter of continuing the filling with the different shades of green, up the spine of the leaf.
The shade change looks pretty severe in this photo above, but there is an in-between shade of green there. It’s just not picking it up in the lighting.
At this point, I moved to the other side of the leaf cluster, to work the second leaf on that side. I extended the outline of the middle leaf, so that the outlines of this leaf and the large top leaf butted up next to each other.
The purpose of this was to eliminate that white space between the two leaves, and to allow the large leaf to slightly “overlap” the lower leaf on the left side.
After finishing the smaller middle leaf on the left, I finished the left half of the large leaf.
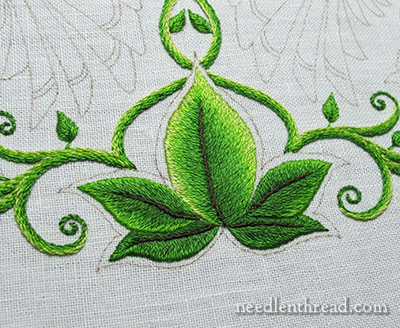
Once the leaves were finished, I worked a stem stitch spine in the center of each, using one strand of dark brown (DMC 3031).
I’ll show you this cluster in context with the rest of the piece next time we visit the project.
If you haven’t tried long & short stitch shading before, take a look at these long & short stitch shading lessons, and this series of videos on long & short stitch. They’ll help!
And a final tip: long & short stitch can be a rather dense filling, and these leaves are grouped together pretty densely, compared to the other elements on the project. Be careful with your thread tension as you work this stitch and the split stitch outlines. This would be a prime place for puckers to form, so make sure your fabric is drum taut in your hoop or frame, and go easy with your stitch tension. (Not too easy, but don’t get tense and make the stitches too tight!)
As always, feel free to ask any questions. leave comments or suggestions and whatnot below.
Enjoy your weekend!
If you’d like to follow along with the Secret Garden Hummingbirds project, which features a design from “Secret Garden: an Inky Treasure Hunt & Coloring Book” by Johanna Basford, you can find all the articles relating to this project arranged in chronological order in the Secret Garden Project Index. Among the articles, you’ll find plenty of tips and techniques that will help you with your own embroidery projects.
Thanks for sharing this Mary! As always, you do beautiful work. I’m working on a long and short stitch project right now so this was helpful. It told me I was on the right track. 🙂
Mrs. Corbet,
Ahhhhhhh. . . This really makes me want to try some long-and-short stitch shading! It really doesn’t sound as complicated as I thought it did. Thanks!
Enjoy your weekend as well.
Sarah 🙂
I am now convinced YOUR week has 9 days instead of my 7! Your work and pics are exquisite!
Good morning, Mrs. Corbet. I’m not going to ask any questions because I know that I’m not ready to try shading yet. I still have to get up the courage to draw on an old pillowcase to attempt the actual stitch! I will only say that this might be one of the most beautiful embroidery pieces I’ve ever seen. I’m literally trembling to see what’s next!
I know you said this is the “Beginners” version, but I’m someone who still buys the stamped cross stitch and embroidery pillowcases, and table runners at the craft store. This is on a whole other plane of existence for me!
But I am learning so much, and I am starting to actually think I might be ready to move on soon. So you have all my gratitude and thanks for your wonderful website!
Hi, Kristina! I’m glad you’re enjoying the project, and I hope you try long & short stitch soon! It’s one of those techniques that, at first, seems complicated and difficult, but with even just a little bit of practice, you’ll find that it’s much easier than you think, and oh-so-forgiving (as in, you can make mistakes, and then easily cover them up!). I like stitches that allow you to do that! 🙂 ~MC
Well, right now I’m in the middle of two projects so, I’m just trying to keep my head above water. If I never see another sunflower it’ll be too soon! But I am absolutely going to try it when I’m all caught up.
Nothing can be worse than Detached Chain Stitch, NOTHING! Even with your amazing videos, mine still fail.
I absolutly love this project, I think its amazing and beautiful! I LOVE all teh bright vibrant color and the curves and the flowers!
These are just exquisite!
Marie,
A “big” Many Thanks . It is wonderful.I am your student carefully all days.Thank you for your time for us, it is a remarkable work and lesson.
They are gorgeous! I am definitely going to give this a try. My stitchery project is turning out to be ‘a junp off the deep end’. It is all backstitch on the pattern but it can get a little boring. I am so excited to give this shading a try. I am sure it will go better than the crocheting I am attempting. bhwaahahahahah
Kiitos! (I’m trying to learn some Finnish) I read what you write every day. I am always inspired and continually learn from your examples and instruction.
This part, the long and short stitch, is the part I knew was coming, and the part that scares me most. I practiced some after looking up your series of lessons. I’d like to go back and do the whole thing. I’m going to try my very best to do it.
Although I’m not caught up with you on this piece, I try to work on what you’re doing at the same time. I can go back and finish the vines and small leaves later.
So long and shirt scares me, but I’m going to do it.
What I’ve done so far isn’t great, but I’m trying.
Thanks Mary
G’day Mary, I have to admit I skimmed over the text tonight and just read the pictures. Have marked it to return to. Your long and short stitching is just so, so lovely. The blending on that large leaf is especially noteworthy. It probably stands out more because it has a greater variation in tones to be blended. This is a valuable project for me to follow along.
Thank you, Cheers, Kath
Such beautiful stitching. I find your emails valuable and the knowledge that the tutorials are
available is a comfort. Thanks for the time you take to prepare such in-depth materials.
Dear Mary
Well these are just beautiful, I love the way you have used contrasting green threads and they all intertwine with each other wonderful. I find long and short stitch easier the more I embroider with it. When I first started stitching the long and short stitch I followed your samplers and that gave me the bases on how it’s done and it’s so true about directional lines I always use these when I embroider this way. Thanks so much for this tutorial it is so helpful not just for this project but in all other needlework which requires the long and short stitch. I hope you have a great weekend.
Regards Anita Simmance
Beautiful! I just finished my long and short practice piece, and wow. Mine isnt as forgiving as yours lol. Every time I stitched I kept repeating your advice: the stitches lay on top of the frabic next to each other. Really helped me to keep the tension looser and to not fill too tightly! Overall all though, I decided I really enjoy the long and short stitch on a certain type of leaf because it makes directionals so much easier. The larger petals and their shapes are harder, but so pretty!!! Im glad you decided to go with long and short shading here on these large leaves. Theyre a central focal point and deserve to be pretty!
Cheers!
Ahhh! Too! Your descriptions with pictures really are helpful for my shading project. Thanks so much..I do so enjoy your site and the way you share. Thank you, Mary.
Thanks for sharing your beautiful work. I’m beginning to experience long & short stitch and dream do similar work.
I want to mimic the stitch on your Secret Garden Design, (not the leaf stitches), and nothing was mentioned about the stitch used for the actual Secret Garden Design with instructions. Referring to instructions on the long-short-stitch-shading-on-the-leaves.html. Thanks, Constance
Hi, Constance – it’s the long & short stitch. You can find a link to the tutorial above – it’s also under the how-to videos. Hope that helps! -MC
gostei dos trabahlo gotaria de receber mais
I love! I would love to work ! I want to embroider this phrase on a tablecloth.
TU VOLUNTAD DE LA MANO DE MARIA
Which stitch can I use and which type of thread do you recommend?
regards
Eloisa
Hi, Eloisa – For embroidered writing on a table cloth, I would probably use cotton floss – maybe two strands – and stem stitch.