


As promised, here’s the rest of the embroidery project I started last Saturday.
This is an embroidered prayerbook cover I made for my niece for her First Communion, which she made on Sunday. I also posted the pattern for the embroidery, if you are interested in adding it to your pattern collection.
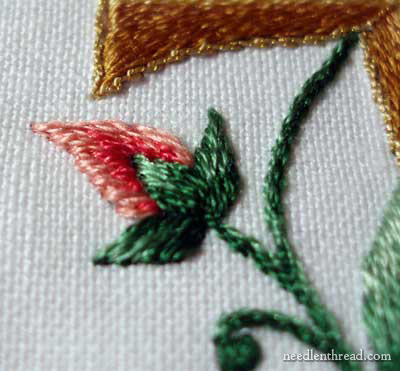
The bud is worked in a light and medium coral-pink. I used silk (Soie d’Alger by Au Ver a Soie) for all the embroidery, with the exception of a little bit of Gilt Sylke Twist around the cross and on the crown.
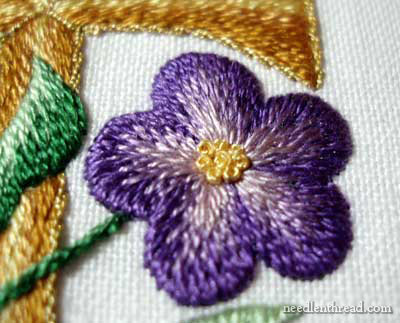
The flower is worked in three shades of purple, in long and short stitch, with French knots for the centers. (Emma picked out the general colors, by the way. “I think the flower should definitely be…. PURPLE!”)
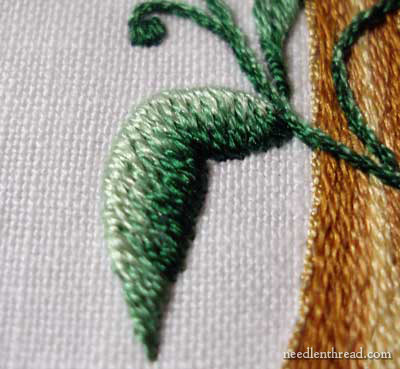
Three shades of green were used on the leaves, also worked in long and short stitch.
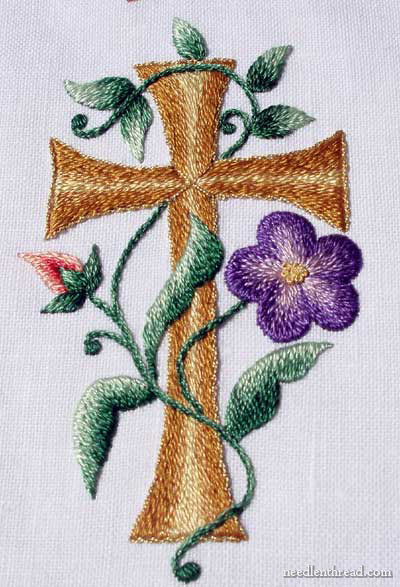
This is the complete cross with the flowers. I worked the vine in stem stitch – two rows, one dark and one medium. The little dots at the ends of the curls are worked in satin stitch.
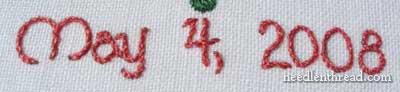
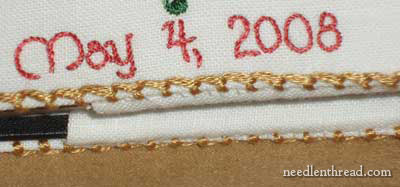
The date is worked in tiny stem stitch – it’s smaller than it looks here. The largest letters are about half an inch high. In order to keep your stem stitches looking neat on text this small, you need to make very small stitches, and it really helps to use a laying tool to hold the thread up and ease it in place, especially when working tricky spots like tight corners.
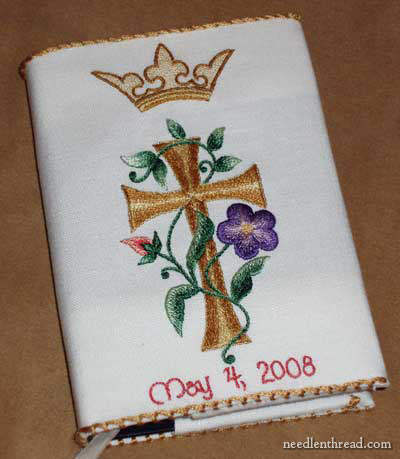
Here’s the finished, assembled cover. It’s assembled just exactly like your typical text-book covering technique: folding the long sides in, then the short sides, and slipping the cover into the sleeve that’s formed. Then I used white thread to stitch the edges together, so that it fit snug on the book.
I was going to make a hand-made twisted cord out of matching floss, but I didn’t have enough floss, and it was too soft, anyway. I was afraid a loop of the cord might get snagged, with would pull the whole thing out of whack. So instead, I used buttonhole stitch all the way across the top, creating a kind of stem-stitch looking line right on the outside edge.
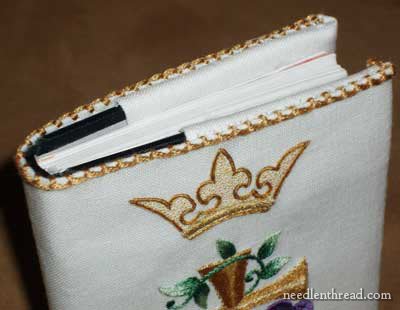
At first, I thought buttonhole would look a bit casual, but I like the look of it. You can see the sewing on the flap. Not … so … neat!
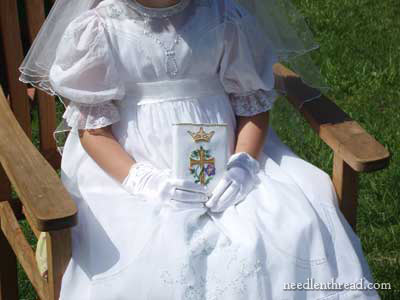
And the little kiddo herself (minus her head – gosh, I wonder what I was focusing on?), in her hand-embroidered First Communion dress. Speaking of floche (well, we were a few days ago, weren’t we?) the embroidery on this dress is worked in floche, with little pearls as accents. The dress has been used now by 5 girls in the family over 16 years – it’s just as beautiful as ever, and the embroidery is flawless! Here are some close-ups of the dress and the embroidery on it.
So, there it is. Success. Now, onto other projects…. as soon as I catch up on incidentals! It’s amazing how much can slip when we get engrossed in an embroidery project, isn’t it?!
Mary it is just absolutely obscene how exquisitely perfect your stitching is. I am so envious. And this, a project ‘whipped’ up in a few days.
Your a genius with a needle
XX
Mary, I’m still at awe…have no words to express how beautiful this book looks. Once again, you have done an awesome job by using such a simple pattern. Thank you so much for the detailed pictures and explanation. Keep up the good work!
Yes please show more picture of my wife’s dress she labored over!!!
😉
Joe
Just Beautiful.
Mary,
I have been following your blog for a while and was particularly inspired by an earlier post of yours on embroidered book bindings.
I recently finished my first book cover using the Ecclesiastical Embroidery Pattern: Crown & Wheat from your site. It is a book cover for my niece’s first bible: a gift for her First Communion this Saturday! My stitching is nowhere as exquisite as yours, but I am glad to be able to give her something that I made myself to help commemorate this special day.
Thanks again!
Chris
This is absolutely gorgeous, and like Jo said – I cant believe it is just a couple of days work. The dress is beautiful too, as is the headless communicant, Im sure! ps I dont think any colour but purple would have worked for that flower 🙂 – she chose well.
What a treasure you’ve created, Mary. It’s just beautiful!
The dress is very beautiful too! I’ll bet your niece was a lovely vision to see! Thanks for sharing!
– Jeannine
The finished cover is just beautiful. Love the colors especially the purple flower.
Your long and short stitches are done so well.
Thank you for showing this to us.
Hugs
FredaB
Simply gorgeous, Mary! Thanks for sharing.
This is so beautiful, I am sure it is a treasure for your niece.
Simple design yes but the end result is gorgeous. Your work is very inspirational
Linda
Mary, this is stunning. I have been looking for a project to use Cotten Floche, would this be a project for those threads?
HI, Janean – Sure! You could definitely work this project in floche. It might end up looking a little “thicker”, but I still think it could be done! ~MC
Thanks, I was looking for an excuse to buy and use the cotton floche. I wasn’t sure how many strands of the silk you used to compare it to the floche. I may have to give that a go for my Mom.
just gorgeous Mary, you are a champion
Joy
Bondi Beach
Sydney
Australia
Hi Mary,
this is gorgeous. I actually found the pattern the other day on the ecclesiastical patterns page and decided to put it on the front of a prayer book cover before I saw this page, so I’m happy to see it will work out.
I really want to use DMC 5 silver metallic pearl on the cross. Did you use a stem stitch on the cross here? Do you think I can use a satin stitch and perhaps couch if I need to?
I would really appreciate any advice you could give me, this looks so pretty. Thanks so much for your patterns!!
Hi, Lexi – yes, I think satin stitch would work. The finish will look different, not just because do the stitch but also because the thread is much heavier. I used one single strand of silk (which is about the size of a single strand of DMC floss). You might consider testing the look of the stitch you want to use first, using a doodle cloth (scrap fabric) – it would save you from having to pick out on the “real” fabric if it doesn’t work out. Just a thought! MC
Thank you so much for your reply, Mary! I found a reader’s project using a different type of metal thread and satin stitch this morning, so I will try the doodle cloth idea and see if mine works out kind of the same.
Thanks again!