


As I prepared for my first kids’ embroidery class for this summer, I realized that organization really IS everything. Whenever you teach a class – or prepare a new embroidery project – or cook a recipe – or anything that requires multiple parts to come together smoothly and conveniently, preparing in advance is essential. Any good school teacher knows this. Even if you’re running a casual summer embroidery class, the rule holds true. I found that out this morning!
My preparation for my summer embroidery classes began weeks ago, as you know. I’ve talked a lot about it (I hope I’m not boring you to death!), and I’ve done a lot of thinking, stitching, writing notes, ordering materials and all the stuff that goes with getting ready to get ready. And that’s just it – that was just the background work. Then the real work comes!
As the first class date approached, it was time to actually put everything together for a smooth beginning. So this is what I was looking at this past weekend:

I spent a couple days cutting fabric, separating threads, and putting together each “kit” project for the first class of the first week (I have three kids’ classes I’m doing this summer – this is only one of them!) for the first group (ages 7 – 9 years old).
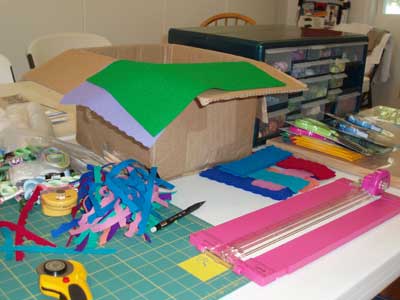
Yeah. The front view wasn’t so bad – it’s the side view across the room that becomes a bit discouraging!
But no worries!! All the background work is absolutely worth it. After the felt, threads, needles, and everything were sorted, pieces cut, designs drawn, everything was cleaned up and put away, the floor swept, and each child’s place set up.
When the children came in this morning, they were met with this:
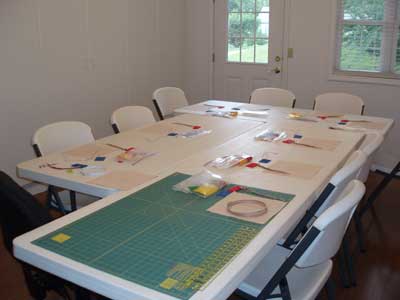
Nine chairs for nine children – each place with a sampler cloth and a bookmark kit.
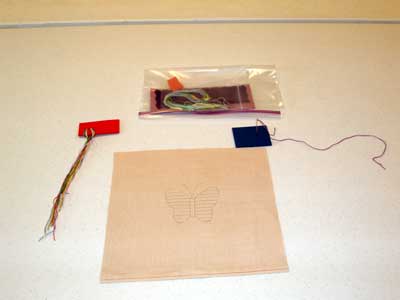
Here you have the “place setting.”
To the top right, the blue square is a piece of 3 mm. craft foam, cut in a small rectangle. This has one threaded needle stuck in it, ready to go.
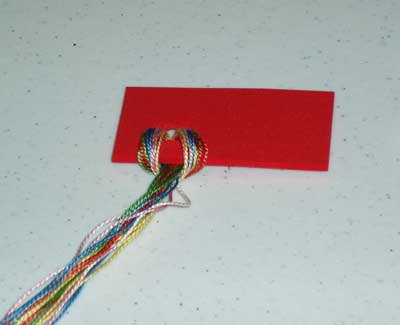
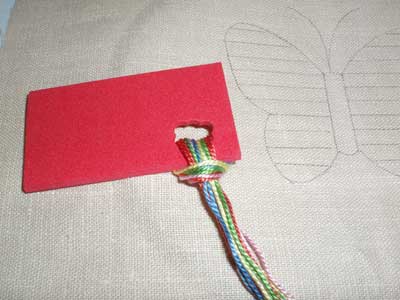
The red square to the top left of each place setting is also 3 mm thick craft foam. I used a single hole punch, and punched out about a 6-hole hole. In that hole, I looped their sampler threads. You may be familiar with thread rings, thread keeps, and so forth. Well, this is thread foam. I made it up, but it does work! I wanted some way to keep their threads more organized than just stuffing them in a plastic bag, so, modeling the foam on the idea of thread cards and thread keeps, I tried it, and I liked it! More on this concept, up close down below.
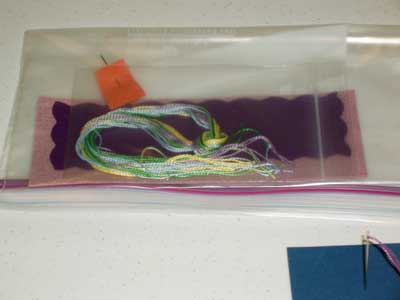
Above the place setting is the bookmark kit, ready to go. It contains the felt front, with the design drawn on, the felt backing already cut with the scalloped edge, a needle, and coordinating threads.
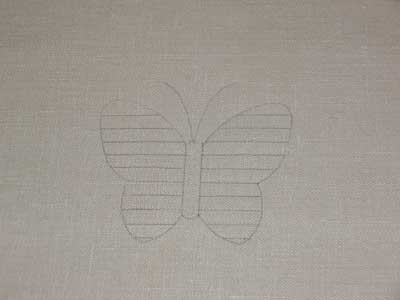
The sampler is a piece of medium weight (clothes quality) linen (I picked up 5 yards on sale for practically nothing!), with a butterfly outlined on it, and the butterfly has lines across the wings. I’ll give you specifics on these little practice pieces when I have some finished ones to photograph! As they are here, they’re rather plain.
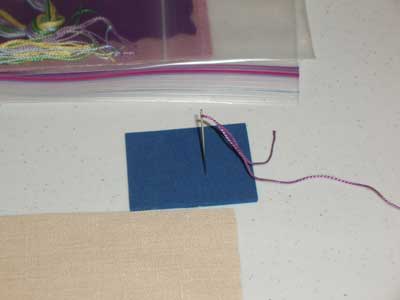
And finally, just to go back to my thread foam a bit… this is a great way to keep thread ready for class use. After punching the holes in the foam, I folded the collection of threads in half and stuck the half fold in the hole, forming a loop. Then I put the ends of the thread “rope” through the loop and hitched it to the foam.
You might think that every time you want a thread off such an apparatus, you have to undo the loop, but not so!
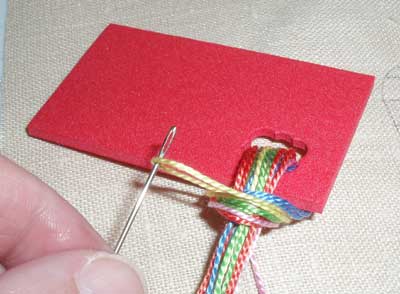
You simply select the thread you want from the front of the looped threads, and pull it straight out. You don’t have to undo your loop – you just pull it out, and there it is!
I know it’s a simple concept, but I’ll tell you why it thrills me. I’ve lost more money on threads over the years, because kids tend to stuff them in bags or just put them in their sewing box, where they automatically mix up, generally into a knotted mess. This way, I have quantity control over the threads, and the kids are more careful with them, too.
Using the craft foam to make these thread keeps was a last minute idea. Craft foam can be puchased at any craft store for about 79 cents a sheet. The sheet can be cut into multiple small rectangles – and it’s much sturdier than regular poster board or card stock for holding threads this way. I had a bunch of the foam on hand, because I’m using it as paper-piercing mats (for embroidered cards) with the older class. While I was setting up the place settings, I mused over how to solve my thread dilemma – and the idea of the foam popped into my head. I had so much fun setting these little things up, and I really think the kids like them, too!
So there’s a cheap way to organize threads for a project. I haven’t tested the colorfast qualities of craft foam, nor do I know the long term effect it might have on threads, but for this short term use, it seems like a great idea.
So that’s the set up for classes. The first day, the kids learn three stitches: running stitch, whipped running stitch, and backstitch. They practice all three on their butterflies, and then they apply what they learn to their bookmarks.
The two hour session today went really well, and I think that goes back to organization. The kids made good progress. Alas, I took no photos! Next week, next week…. Now, if I could only get the next classes that ready, I’ll be really happy!
If you’ve got any nifty organizational ideas or anything that you think would be useful to know in classroom situations, please share! I’m all ears!
See you tomorrow!
This is BRILLIANT! Thank you so much for sharing. I love seeing how you’ve organized things – you’re clearly going off loads of experience and thoughtfulness. I’m teaching an adult embroidery class next week, and this gives me some ideas on prep work.
One thing we’ve done in the past is use a block magnet for holding threaded needles. We teach separating the floss right at the beginning of class, and the students prep a needle for each color and stick them on the magnet. It’s a similar idea to the foam, except they lay down instead of standing up. 🙂
Thank you!
Thanks, Average Jane! (I doubt you’re “average”!) The magnets are a really good idea! And they would certainly have more weight to them than the craft foam!
The kids take home the red craft foam (the thread foam), but they leave the little blue square for the next class. In their bookmark “kit,” I included a small square of felt to stick their needles in for carrying.
It’s a good thing to teach stripping the floss right at the beginning. The little ones aren’t ready for that yet – we’re using perle cotton for the first 2/3 of the course, then we’ll venture into a leeeetle bit of regular stranded cotton for the last project.
Thanks again for your input, and for the great magnet idea!
Where do you get your magnets, by the way??
Thanks, Mary! 🙂
Yes, the floss separation is only because it’s an adult class. When I’ve done embroidery with my daughter and her friends, we never mess with that. (speaking of, do you have tips on helping the kiddos keep the floss on the needle? Some get the thumb/finger pinch right from the start, and other pull the needle right off on every other stitch! 😉
If you Google “ceramic block magnets” you can click on the shopping results and see what they are. I usually get them at the home improvement store, and they are useful for all kinds of stuff. They are super heavy duty!
Mary,
You are absolutely to be congratulated, and held on a small pedastal for your organization, and for holding these classes!
It all looked just wonderful. I bet the kids had a great time!
Thanks, Jane, for the magnet tip. I’ll look those up!
The floss on the needle problem is funny. I was just noticing it today – you forget that it’s just not second nature to hold the thread: kids tend to hold only the middle of the needle! Anyway, I try to show how to pinch the thread at the back of the needle – and you’re right, some get it right away, and others don’t. I tend to think that those who get it right away are “naturals” with a needle, and it does seem as if they are. Their stitching is less awkward!
What a great space you’ve created there, Mary! Each place set looks like an inviting and exciting spot to sit and learn!
Thanks for the tip on how to draw one thread out of a looped bunch. Honestly, that never would have occurred to me!
Best of luck with the class, I’ll bet it’s going to be great! – Jeannine
Mary, thanks for the idea of using craft foam sheets for thread holders. May I borrow it for an upcoming Winter workshop at NSW Embroiderers’ Guild? We have bundled threads before but not through a punched hole, that looks brilliant. I wish I could get my threads sorted at my regular monthly meeting, the tin is affectionately known as the “birds nest” as it contains skeins of stranded threads which the kids prefer to use over pearls. We taught thread seperation early on, and everyone manages quite well. As for holding the needle to prevent threads pulling out, most get it after 2 or 3 lessons. I think it has a lot to do with the background fabrics too, we stitch on cotton patchworking fabrics, canvas and wool felt. I try to use size 7 or 8 crewel needles or smaller, to avoid frequent calls for re-threading.
Thanks for a very informative post,
Hooroo,
Christine in wintry Sydney
http://missmuffettwo.blogspot.com/
Hi, Christine! Yes, do use the idea! It’s been working great so far! And I think it works better than card stock or poster board type paper!
Once again, Mary, another page full of fabulous ideas! I am teaching a little embroidery class this summer, just four one-hour sessions, to 10-12 year old girls at our local library. I am looking forward to putting some of your ideas to work. Thanks for sharing them!
My two daughters, (4 1/2 and 2 1/2 year olds) keep asking me to teach them embroidery, as they usually watch me embroidering something or the other… I started out with running stitch, that being the easiest.. and was wondering what to go on to next…. Thanks for the inspiration! I’ll probably be putting together a ‘project pack’ for them to work on using the 3 stitches you mentioned above..
Hi again…. I wanted to know, when dealing with young children, do you knot the end of the thread? or secure it by ‘burying’ it under stitches?
Hi, Aaliyah –
When I first started teaching children, I tried to teach them not to use a knot. But I quickly learned that with young children, it’s better to let them knot the thread. The idea is to get them stitching and enjoying it as quickly as possible, and teaching how to make waste knots to 6 and 7 year olds tends to slow things down for them. I would just use a knot. When they get older, or when they really get the hang of stitching, then show them how to work without knots.
Hope that helps!
MC
Thanks a lot! Hopefully my 4yr old will complete her ‘masterpiece’ soon!
Hi Mary!
This article is SOOO helpful!! Thank you so much! I am preparing for running my first embroidery workshop for beginners at my workplace to around 6 – 9 adults. It’s only for an hour, so I want to get really organised. I’m just going to be teaching running stitch, back stitch and chain stitch hopefully. I really love your foam thread keeps, that’s so clever! And that you don’t need to undo the knot every time, that is really genius!
If I think of anything good to share, I will post here!
Kind regards
Joey
Hi Mary,
I just joined your newsletter as I am fairly new to embroidery…have only done a few basic stitches. The videos are EXCEPTIONAL ..thank YOU! I’m drawing plans to convert a small room next Fall into “my” room (for my clothes and my hobbies) and it’s only about 10’x10 and that is without the closets in yet! The only plus is a huge window overlooking the garden. Have decided on sliding doors on closets to save room and really like your split shelves idea! I will make the sliders wide as possible and use heavy doors, mirrored as it has to be a multifunctional room…small house too! Love all your organizing pictures!
Hi, Elaine – glad you like the videos! I still have 14 old ones to upgrade, and a whole list to add. So you can look forward to some new ones this year! I have a very small house, too, but the workroom is a good space, separate from the rest of the house, and the storage cabinets are wonderful! I still have some plans for the backs of the insides of the doors, since there’s a good 10″ of space there that’s not used. Hanging threads or something? We’ll see! ~MC
Hello, I just stumbled across your site and am looking forward to looking around more. I am nterested in teaching my kids some embroidery this summer. My question on this post is how did you get the butterfly on the linen that you used?
Thanks
Jen
For kids, I used simple shapes like butterfly cookie cutters, and traced the outline with a blue transfer marker, and then touched up the details after tracing the outline. Hope that helps! -MC