


One of the projects we’re doing in my summer embroidery classes is an embroidered dish towel. We’re using flour sack towels and embroidering a little (actually, relatively big) design on them. I thought it would be a good project for the older kids (ages 11-14), and I’m also doing it with the adult beginners. So, here’s my class sample and a little information about the set up and stitching…
First of all, keep in mind that flour sack towels can be a delight to embroider on, or they can be a pain. Good flour sack towels take hand embroidery very well!
I get my flour sack towels from American Chair Store (ACS Home & Work). Their deluxe flour sack towels are are super smooth and super sturdy – not the flimsy, filmy, wrinkly kind sported by Walmart and Target.
The only reason I bring this up is because I did buy some from Walmart and Target – and they were thin and flimsy – gauzy, really. And gauzy fabric doesn’t support a lot of stitching well.
The towels are huge – 30″ x 30″ – which makes them great for using as a tea cloth as well. They make a nice little decorative spread for the middle of the table.
I’ve read on some blogs that embroiderers will often cut the flour sack towels in half and hem up the fourth side (where the cut is) to make two towels. I suppose that’s a good idea, if you want a smaller towel.
My original intention, as I noted before when I was introducing you to my monogrammed guest towel sample, was to use iron-on transfers for most of our projects this summer, so that we could save some time on setting up projects. But that changed as I prepared my sample for stitching!
I purchased a few sets of Aunt Martha transfers – Wine Country and Java Break – but the transfers were bigger than I liked. I wanted them just slightly smaller! So I reduced them on the copier and traced them.
Yeah. That’s right. I traced 20 towel designs – and that was just the flour sack towels! I’ve also ended up tracing designs on 20 other towels for the younger kids. They aren’t flour sack towels, though. They’re gingham towels and smaller kitchen towels. That was a lot of tracing! I used a light box, and a micron art pen on the gingham towels and smaller kitchen towels. On the flour sack towels, I used a #2 pencil.
For stitching, the kids are using two strands of DMC and a variety of stitches. I thought of the towel project as a sampler, in a sense. That is, it would give the kids practice on their line stitches (I’m emphasizing even stitches and smooth lines), but at the same time, it would give them a finished, colorful project that they could keep or give to Mom or Grandma, or whatever. (Kids like finished projects!)
Here’s my class sample, which is from the Java Break collection:
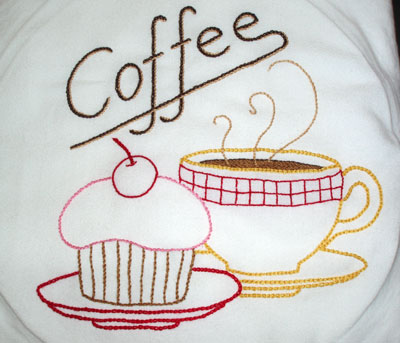
Of course, I had to pick the pattern with the cupcake. There’s nothing like a bit of pink frosting…
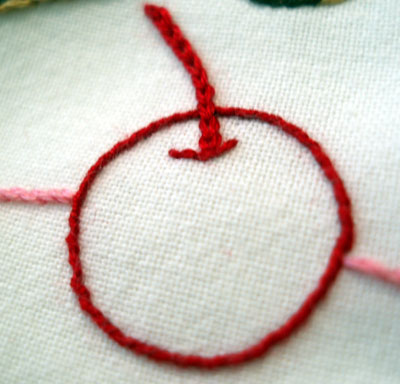
Here’s the cherry, worked in whipped backstitch for the fruit and chain stitch for the stem.
There are three reasons I like to use whipped backstitch with the kids: 1. it creates a relatively smooth line, compared to plain backstitch; 2. It’s easy; and 3. It’s like learning two stitches in one, since they have to learn the backstitch, anyway!

I worked the letters in chain stitch in dark brown, and, in light brown, I worked a line of stem stitch right next to the chain stitch, to give the letters a milky look to the coffee – just to set the letters off a bit.
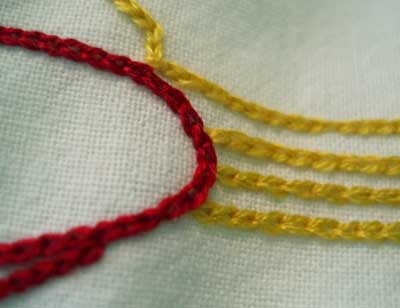
The cup and saucer and the dessert plate are worked in chain stitch, in a bright yellow and red. No complicated color choices here!
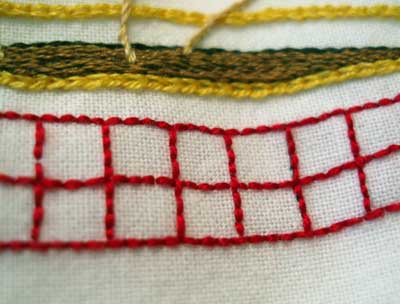
And the decoration on the cup – the red grid – is worked in backstitch. The coffee inside the cup is worked in rows of stem stitch (used as a filling), and the steam rising from the coffee is also worked in stem stitch.
So, overall, the towel gives the students the opportunity to practice some common line stitches – especially chain stitch, stem stitch, and backstitch – and (hopefully!) to perfect their spacing and sizing of their stitches.
You know what? I had fun stitching this towel! I’m thinking about doing the other three corners, so the thing can be used as a little “coffee cloth” (as opposed to tea cloth). Really, the towel is big enough to spread as a tea cloth on your table. It’s not super fine linen, that’s true, but it would be fun to spread out for a coffee break when your pals stop by for a cup!
Other ideas: great wedding gifts for coffee drinkers, fixed in a basket with other coffee supplies (some special cups or whathaveyou)…. or, do a bread / wheat motif in all the corners, and use it as a liner for a large basket of bread when company’s coming, or when you’re having a cookout and you want to put the hamburger buns in a basket and cover them. So many ideas… so little time!
Your classes always sound so fun! These towels look fabulous =)
Cupcakes and coffee, doesn’t get better than that. I have been sharing you with my quilting peeps; hope you don’t mind, but you are an amazing stitcher(is that the title I’m looking for?)
Susan
They are pretty fun, Monkeycat – thanks!
Susan, I don’t mind at all!! Thank you! Cupcakes – coffee – I agree. What could be better? A goooood cup of coffee sounds just about right, right now!
I have as a project (among so many…) to embroider some dish-cloths for my daughter inspired on the ones my mother embroidered looong ago. Only one with a cup resisted through the years – It has more than 70 years old!
I’ve just posted its picture some days ago – redwork – telling about my intention. I only didn’t know what kind of fabric may I use.
You just gave me the answer! Once more Thanks, Mary!
(you welcome to correct my comment, :))
I can’t believe how hard you work Mary – and with a full time job too!
So cute! I’m in love with the shaded two-tone lettering. I am definitely going to try that! – Jeannine
I LOVE those embroidered dish towels! I’m just getting back into embroidery again after a long absence and working on some dish towels myself. That’s wonderful that you’re teaching classes in embroidery! Your class looks like so much fun! I want to be in your class!! LOL. Great blog! Thanks for sharing your stitching! I also love the look of the two-tone lettering and plan on giving that a try myself. Do you use 2 strands of floss for all the stitching on the dish towels or is some of it done with 3 strands? ~Linda W.
Hi, Linda – Glad you like the dishtowels! They are fun!
I used two strands for the whole thing. You could use three, if you want a bolder line, but I found 2 to be sufficient.
Hope that helps!
Hi Mary! This is my first time posting a comment (actually, I have a question too) and I want to tell you how very much I enjoy your entire website. I'm so inspired. I'm going to begin embroidering after not having done it for many years. I'll begin with some dish towels like you've shown here–they're so comforting to look at. My question is this: I remember gifted towels being so beautiful when I received them, but after washing them they were so badly puckered around the embroidery, you almost couldn't tell what the motif was anymore. How can I avoid this happening to my work? Thanks for your time and again thank you for all that you do for the embroidery world! Kate, Astoria, Oregon
Hi, Kate – the key to avoid puckering is first to wash the dishtowels, then iron them. Transfer your design, then use a hoop to embroider. You want the fabric drum tight, but not so tight that it distorts the fabric. When you stitch, keep your tension even – pull the stitches through, but don't pull them so tightly that they pull on the fabric. When finished, iron the piece embroidery side down, on a stack of soft cloth. I use a couple layers of flannel and an old sheet on my ironing board, which keeps the embroidery from getting flattened by the iron.
The secret to no puckering is using a hoop with good tension on the fabric, then being careful about your tension in your stitches as you embroidery.
Hope that helps!
MC
Here I am again, slowly working my way through your blog posts! As someone who is beginning to learn some embroidery stitches, through books and your videos, it was great to see how effective the combination of simple stitches can be. Thank you for the inspiration!
Can someone embroider a tea towel with the above on it? By the 2 September?
I want to embroider love notes to my grown children, to frame in 8/10 frame
What do you suggest as far a how to put the lettering on the towel before I stitch them
So creative, so cute! Love your ideas for these and appreciate the sources for the flower sacks!
what do you put on the back of the hand embroidered tea towels to keep the knots from fraying in the wash? I have several older towels that my mother had done before she passed away… she could not see well so some of the knots are very loosely tied. Is there a spray that will be pliable when dry that I can use to stop or prevent the fraying?
Hi, Wanda – your best bet would be to somehow secure the knots with thread, by whipping around the thread on the back, in the stitches that are there. That’s what I would do.