


Continuing with the series of long and short stitch shading lessons, here’s Lesson 2: Inside the Box. In this lesson, we’ll be stitching element one on the sampler, the two boxes in the top left corner.
If you’re just joining us for the long and short stitch shading lessons, be sure to check out the previous posts in this series: Supplies and Lesson One: Setting up.
At the end of this post, you’ll see a series of three videos on the basic long and short stitch. (I couldn’t quite cram it all into one 10-minute video!)
Materials:
1. Project in hoop or frame, with Element One: Boxes centered in hoop (top left corner of the whole sampler)
2. #9 or #10 crewel (embroidery) needles (I use a #10)
3. Small, sharp embroidery scissors
4. DMC stranded cotton in the following colors: 814, 347, 349, 351, 353, 3855, 745, Ecru
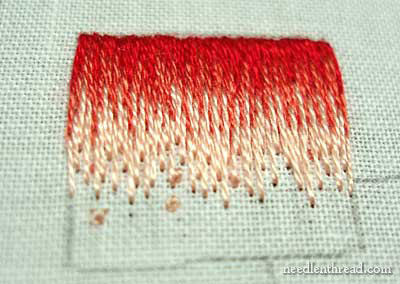
NOTE: There is a difference between the step-by-step photos and the video tutorial for this lesson. In the step-by-step photos, I began the top of the box with bright red (349). In the video tutorial, I began the top row in dark red, (347) and worked six rows of color. The directions, however, are written with the bright red (349) as the first color, with five rows working to the lightest yellow (745). You can work the box either way, with five or six rows. If you work five rows, start with bright red (349). If you work six, start with dark red (347).
All stitching is worked with one strand of floss.
To Begin
1. Begin with the smallest box.
2. Anchor your thread according to your favorite method, or use the method demonstrated in the video tutorial, part 1.
3. Work a split stitch line across the top of the small box in bright red (349).
Draw vertical lines, from the center to each side of the box, to mark your stitch direction. Use a regular pencil for this. The vertical lines will help keep your stitches straight up and down. (This is demonstrated in the video, part 1).
First Row
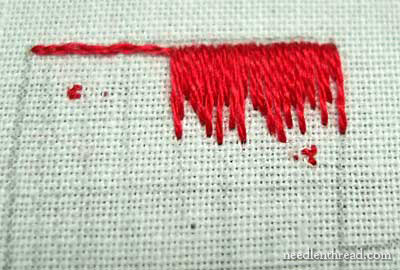
1. Bring your needle up through the fabric, about 3/8″ below the split stitch line, in the top center of the box. Take your first stitch over the split stitch line and back into the fabric. Now, working down the row to the right, space about six directional stitches more or less the same length all the way to the right edge of the box. This is illustrated in the video, part 1. after placing your directional lines (which are “long” stitches), go back to the center and work to the right, filling in “short” stitches of varying lengths, moving down the row.
2. You want your stitches to lie right next to each other, as they would in satin stitch, so make sure that you space them correctly – not too close that they bunch up, but not too far apart that you can see any fabric between them.
3. Continue working across the fabric to the right side of the box, alternating the size of your stitches between long and short. Vary their lengths. For a natural-looking long and short stitch (less formal and rigid-looking), stagger the length of your stitches between several lengths – some long, some a little shorter, then a bit longer, then shorter again, then shorter yet, then a little longer, then long, then short, then slightly longer, etc……! You want the bottom edge of your stitched row to be jagged, but you want ot keep an overall consistent length across the longest points of the stitches.
4. When you reach the right edge of the box, end with a long stitch on the pencil line. This is approximately what your progress should look like so far:
5. Now, move back to the middle of the box and work from the center to the left side of the box, doing the same thing.
6. If you’re like me, one side will look better than the other. I don’t know why this is! For me, the second half that I stitch always looks better than the first, even if I switch directions and stitch from the center to the left first.
Refer to the Long and Short Stitch Video, part 1, below, to see this technique worked out.
Subsequent Rows – up to, but not including, the last row
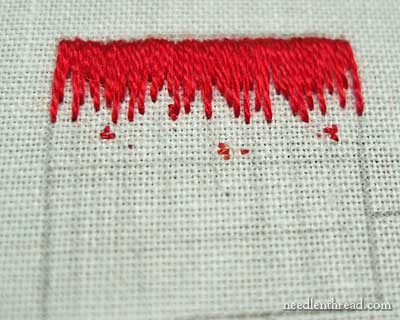
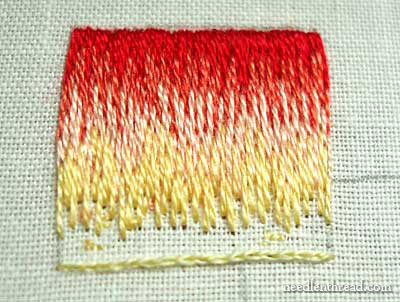
1. After the first row, each row is worked in the following sequence of colors:
—- Row 2: 351
—- Row 3: 353
—- Row 4: 3855
2. For subsequent rows, after the first row, bring your needle up from the back of your fabric into the first row of stitches, in the center:

3. Stitch some longer directional stitches from the center towards the right edge, dividing up the stitching area as you did with the first row (demonstrated in the video, part 2).
4. Stagger the entry point at the top of the stitches, so that some begin higher and some lower than the others. Work into the long stitches of the first row, about one-third the length up into the long stitches.
5. Work the short stitches of the second row high up into the first row of stitches, bringing the needle back down into the fabric to make a “short” stitch in the second row. Again, stagger your stitches, varying their length by varying where the stitches emerge in the previous row and where they go down into the fabric.
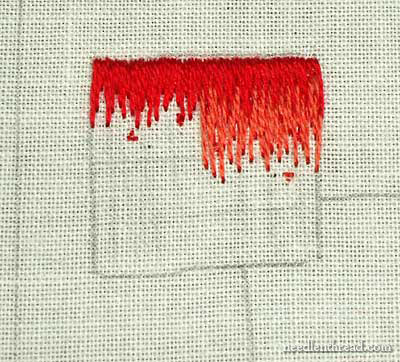
6. Continue from the center to the right edge, and then work from the center to the left edge of the box. You can find this technique demonstrated in the Long & Short Stitch Video, part 2, below.
You’ll work each row in this manner, filling in the square, until you get to the last row.
Make sure that you’re taking your stitches deep into the previous row, so that the colors blend well. Again, the video will help with this!
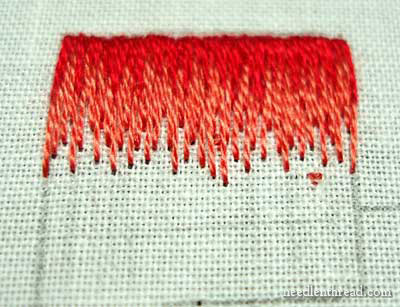
The Last Row
1. Split stitch the base line of the square in light yellow, 745.
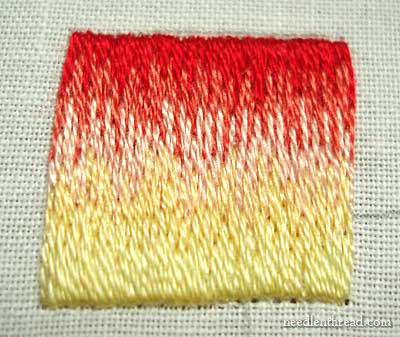
2. Finish the last row in the same manner of the previous rows, but working the base of the stitches over the split stitch line, as you did with the beginning of the first row.
To help reduce “information overload” in one post, tomorrow I’ll post the rest of Lesson Two, which is the second box, worked on the diagonal!
You may p
rint, if you wish, a PDF of the entire lesson (including the second box):
Long and Short Stitch Shading, Lesson Two: Inside the Box (PDF)
Long & Short Stitch Shading Video Tutorial – Part 1
Long & Short Stitch Shading Video Tutorial – Part 2
Long & Short Stitch Shading Video Tutorial – Part 3
If you have any questions or comments, need clarification on anything, or have any suggestions that I’m able to implement concerning the lessons, don’t hesitate to leave a comment below. Additionally, you can subscribe to the e-mail newsletter (right hand column) or my RSS feed to ensure you don’t miss the next lesson! Advantages of the newsletter include that it’s in a better format for printing (compared to the webpage) and you can reply directly to it to send me an e-mail (and attach pictures, if you wish).
Long and Short Stitch Shading Lessons – Related Posts
Supplies for Long and Short Stitch Shading Project
Long and Short Stitch Shading Lesson INDEX
Looking for inspiration & information on hand embroidery?
There are all kinds of reasons to sign up for the Needle ‘n Thread daily newsletter! Check them out and sign up today!
If you like what you see on Needle ’n Thread, if you want to be a part of keeping the website thriving (and free of annoying network advertising), why not become a patron on Patreon? Check out my Patreon page here, where I’ll occasionally add special needlework bonuses for patrons.
If you shop on Amazon, you can support Needle ’n Thread without any extra expense to you by visiting my Amazon Recommendations page here, where you’ll find books and sundries for the needleworker available on Amazon.
I already have my threads and fabric today, so I'm going to start.
Thank so much for everything dear Mary!
All is perfect!
Big Hugs!!
Maria del Valle
I can't open the videos!
It appears this message:
"This is a private video. If you have been sent this video, please make sure you accept the sender's friend request"
What may I do???
Thanks in advance!
Hi Mary…What does one need to do to be able to see your Youtube videos? When I click to view it shows a message that says the video is private and that if you've been sent the video to make sure that you accept the sender's friend request. I don't see anything in the N&T; email that links to a "friend request" or to the videos. I guess I'm missing something here. – Jeannine
Although I'm not working on this project, it's terribly interesting to read about! I am anxious to see what happens next =)
Whooooops! Thanks for letting me know. I had the wrong settings saved on You Tube! It should be fixed now!
It's working!
Thank you, thank you!!
Thanks for the tutorial, Mary. Excellent, as always! This is going to be a great resource for all of us.
Nothing beats actually seeing something done in process. Added with ones own hands on, these are starting off as some great video tutorials.
It is so wonderful for you to take the time to do this.
Is this split stitch or alternating rows of essentially satin stitch? In other words, do I bring my needle up in the middle of the stitch below it or at the top/sharing the same hole?
First I want to say THANK YOU for this awesome tutorial Mary. I have been wanting to learn this stitch for some time now. I finally got all my threads organized and ready to start. I will posting progress on my blog. I do have a question.
On the split stitch are you only using one thread for that or two??
Thanks for the great videos; love seeing it done live.
From years of cross stitch, it feels easier, to me, to bring the needle up in the blank space. Would it make a difference to come up in the blank area and down into the previous row? Is it verboten in this kind of needlework? 😉
Hi, Thelma –
You're welcome! 😉
I used one thread on the split stitch. You can use two – this will cause the edge to sit up a bit more on the fabric. But I only use one, usually….
MC
Lewmew –
You are not coming up in the same hole that the threads in the previous row ended in! That would give you a different stitch, called encroaching satin stitch.
With this, you're actually splitting the threads of the row above – so, in that sense, yes, it is like split stitch, only you aren't stitching in a line, you're stitching across a row, and alternating where you go up into the previous row…
Hope that helps!
MC
Laura G –
Yes, it does make a difference. You want to come UP into the stitches that are already there, splitting them from underneath. This creates a smooth surface on top of the stitches. It "lifts" the stitches above a bit, and your thread becomes part of them, rather than pushing them down. If you go DOWN into the previous row of stitches, then your present row will sit on top of the previous row and push down into it, which will change the look of the stitching. It's subtle, but it does make a difference!
Once you work the stitch a bit, you'll get used to the feel of coming up into the stitches rather than up into the blank fabric and down into the stitches!
Mary, 2 questions:
When you start with the knot on the top of the fabric, and you then cut it, doesn't that leave a loose end on the under side, do you cut that also or weave it in as you stitch?
Is there a reason why you do the right side in one shade then do the other side? Just wondered on the reasoning on that.
Hi, Barbara –
1. if you make your three little anchor stitches fairly close to your knot, and then you pull up on the tail of the knot and cut right next to the fabric, only a tiny bit of a tail is going to be left on the back. You don't need to weave it in – you'll be covering it up with your stitches.
2. Well, I think I explained this somewhere – it doesn't matter, really, if you move from the center to the right or from the center to the left, really. In fact, in one photo, you can see that I moved from the center to the left (it's in the larger box – the photo's in the PDF, and will be included in tomorrow's post). But there is a reason for not starting on either end of the row and just working across the row. It helps keep your stitches in the right direction and it helps with spacing your stitches. Starting in the middle "sets in" your stitch direction. It's the same technique used for satin stitching, if you want to achieve a nice, smooth, even, and consistent satin stitch – don't start on the end of the area you're stitching, but rather start in the middle and move to the edge.
Hope that helps! Thanks for the questions!
I am just starting on the stitching. When you say you use "one strand" of DMC floss is this the entire group of six fine strands?
Thank you,
Debbie S.
I just want to thank you for taking thee time to produce this tutorial. The videos are such a great help to me. I have books that show this stitch, but I learn better by watching and hearing someone actually doing the stitch.
For someone like me, who doesn't have anyone in their life who does this work, this type of teaching is invaluable.
Thanks!
Hi, Debbie –
No, not the group – just one strand!
Thanks for asking!
MC
Thank you so much Mary, I've been wanting to try this for so long now and your tutorial really helps. I stitched the first block yesterday from the photos but now wished I'd watched the videos first as I was coming up between the stitches and not splitting them and the effect definitely isn't so good. On to the diagonal……….
Mary, thanks for the answer, I would guess that is the reason I have never been happy with my satin stitches, see you can teach an old dog new tricks, grin.
Hi, Mary! I loved the videos, they really help me understand how the stitches work. One question here: after I actually saw you working with the thread, I'm not sure I will be able to get the same kind… I thought of using Anchor mouliné, which is the kind I use for cross stitch and is pretty easy to find around here in Brazil, but DMC is not sold here anymore (sad thing, by the way, I could find their products here a few years ago). What other threads could I use instead? Thanks a lot! 🙂
Hi, Samanta –
I think Anchor mouline is the same thing as DMC 6-stranded cotton, but it is manufactured by Anchor (a British company) rather than DMC (a French company). The color numbers are different, but you can find color conversion charts online. You can find one here that you can also print. It's Anchor to DMC, so the DMC number is on the right.
MC
Hi, Samanta – I posted this comment yesterday, but for some reason it hasn't shown up, so I'm going to try it again:
Hi, Samanta –
I think Anchor mouline is the same thing as DMC 6-stranded cotton, but it is manufactured by Anchor (a British company) rather than DMC (a French company). The color numbers are different, but you can find color conversion charts online. You can find one here that you can also print. It's Anchor to DMC, so the DMC number is on the right.
MC
Hi Mary,
I finished my little block…I'm glad you're not grading this!! No, actually I did ok and will do better with the next one! When do I use the ecru? It was on the list but maybe I just ran out of room?
This is so,ooo much fun!!
Kathy
Hi, Kathy! Congratulations on finishing! I'm really glad to hear you're having fun with it!
The ecru, for me, worked into the last row of the second (larger) box, at the very tip of the box (working on the diagonal). If you ran out of room, that's quite ok – you don't have to use every color!
Good to hear it came out well!
Can't wait to hear how you like the triangles!
Best,
Mary
Oh well, bother. I was looking to see whether to use one strand or the thread, and ended up using a thread.
Chunkiness rules! It looks ok.
One thing I personally find useful is to rule across vertically (vertically in the case of this box) as well. This gives you an idea of when to start your next colour – so you don't end up with narrower and narrower bands as you try to fit in all your colours in. (so the box will start off looking like a chequerboard. On a more complicated shape, you end up with directional lines (which I agree – they are essential) and colour change indication lines – a real architecture of a line drawing before you start!
How far along the back would you say you could travel backwards, on the back, to the midpoint before tension becomes an issue? An inch?
I found your comments on going really deeply into the former rows very valuable. I don't think I've been going deeply enough (after a total of 1 year of L&S; stitching practially non-stop)
Mary, many thanks from a newcomer to your blog. This tutorial was extremely helpful. I've been working long and short stitch for a long time, but your new perspectives and personal tips are welcome. Thank you!
Hi Mary,
Thanks a lot for these lessons. I am so happy to improve in that field. I started the first box today. Not perfect at all, but I am sure that your videos and tutos will make me progress
Cheers
Dear Mary, I am finally finding the time to take the lessons. one ? How do you divide the sq. up. do you do 1/4 in each color. I am starting the third row and I haven't gotten to half of the square yet. are my stitches too short? should I be planning out the vertical lenghth of each row?I will post a photo. seems like I will have room left at the bottom at the depth I am stitching..I think I will tear it out and begin again. feedback please , thanks so much I am really enjoying this. joanne
Hi, joanne –
Actually, if you divide the small box, it ends up being in 5 sections of color. Your stitches are probably a bit short, but instead of tearing out, since it is a practice piece, why not just start the sequence of colors over again? Then, on the next element, you can practice with longer stitches! It would save you the frustration and time of picking out your stitches. Just a suggestion! I'll check in on flickr tomorrow (Friday) afternoon to see what's new.
Best,
Mary
Hi Mary,
I know you've mentioned it before, but I still don't get how you're using only one strand for the outline split stitch. How do you split it if you are only using one strand of thread? Also, how many strands of thread are you using for filling?
Thank you so much for the videos, they are so helpful.
Actually, I find split stitch easier (and think it looks better!) with one thread. If you check out the split stitch video in the video library, you'll see how I do it with one thread. Basically, I just come up in the middle of the one thread and split it.
I've gotten a bit o' flack on the question of how many threads to use for the filling – some folks have e-mailed and said that it should be two as a rule, because the threads are being split, and others have e-mailed asking why I didn't include the important information of numbers of strands of floss in the instructions.
To answer the first point, it is a misconception to say that split stitch always has to be worked in two or more threads, so that you can "split" between them. Split stitch is often worked with a single thread, splitting right into the middle of the thread.
To answer the latter point, when I first published this lesson and the PDF, the lesson and the PDF were not merely "cut and paste" jobs – so they aren't exactly the same text. In the PDF, I didn't include the # of threads, but in the post above, I did (one thread for all stitching). But apparently most people are downloading the PDF and not reading the post – so I suppose I should go back and add this to the PDF…! I should've done that several weeks ago – I just haven't gotten around to it yet!
So, yes, split the thread right up its middle, and all stitching is done in one thread (except in the rare instances – eg. the first leaf – where noted otherwise).
Hope that helps!
MC
Merci beaucoup pour ces explications et pour les vidéos.
Fiquei muito feliz em encontrar seu blog e esses ricos tutoriais que me reportaram ao tempo de criança quando aprendi a bordar.
parabéns e já estou inscrita para news letters.
abraços, Dolly
hi Mary,
i learned alot about hand embroidery from ur website thanks alot!
i want to learn different techniques of mirror embroidery can u plz do that?
i m waiting for ur reply… thanks n take care
Asma
Hi Mary,
I’m just starting embroidery, and your videos are helping so much! When you’ve learned from a book, just being able to see someone making the stitches is immensely beneficial, especially these long & short stitches, which I’m having trouble with.
Any chance of a video showing long & short filling in an irregular shape?
Thanks!
Terrie
Just finished your Long & Short stitch video…I cannot thank you enough for doing this demonstration…I’m visual & no amount of reading will do for me what watching your video has done…thank you thank you….
Hi Mary, sorry for my bad English, but I do not understand: when you stitch into the previous row, do you split the thread as in the split stitch or do you just separe the stitches? Thank you
Hi, Manuela – There are different opinions on this. I split the thread as I come up into the previous row. It seems to blend the stitches better. I hope this helps!
~MC
Hi Mary, I sent you an e-mail with a photo of my sampler. I think something does not work as I explained. Have you got it? Thank you so much. Manuela
Hi, Manuela – No, I didn’t receive it! Did you send it to mary (at) needlenthread (dot) com? Please do send it again! Thanks! ~MC
Done, please let me know!
I am so excited that I found your site. I have always loved needle work but I got carpal tunnel very bad and had to let go of my needle work. I have finally had corrective surgery and it has been successful. I can hardly wait to get started and your site has calmed my fears. It has fanned the flames and I am ready to get started. Thank so for having the desire and the know how to work on this site. I love the whole thing.
Hi Mary, one mor question: if the shadow is across the row, how does it work: do you change the thread mid of the row (for instance light, dark, light) or do you stitch vertical. How do the shadow blends in this case? Thank you so much
Hi, Manuela –
You can change your shades in any direction (lighter / darker) that they need to go to achieve the effect you want. Normally, long and short stitch is worked in rows, more or less, but sometimes, the piece might require you to stitch a vertical area, and then go back and fill in the next vertical area. OR – sometimes, you end up with several threads going at one… so say you’re stitching an area where, as you progress across the row, the color changes and then changes back (I think this is what you mean?). Well, you can work in the change of color as you progress across the row, by starting another thread, and then picking up the previous color when you finish the second one, and continuing across the row…
But, yes, you can work vertically – often, when working on flowers (folded or bent petals) or clothing (robes with folds) you work vertically….
Hopefully that makes sense! :-/
MC
Dear Mary, thanks a lot for the precious help! Your answers are always quick, precise and simple to understand, ciao Manuela
WOW! just WOW! You are incredible. I have recently decided to learn some embroidery techniques after my trip to India where I was very inspired by the incredible handwork in the textiles. Thank goodness I found your site. Not only are your directions clear and easy to follow, but your camera work, lighting, editing and narration are the best! i can’t even imagine trying to film something like sewing, much less a tutorial! I’m only on my first tutorial of yours and the information I’ve already learned is so invaluable. Thank you thank you thank you!
Hello, Your website is just lovely…I am just starting with long and short…so far i have just one querry should we use one thread or two threads togather. Thanks
Hi, Saadia – Use one thread! All the stitching with the Long & Short stitch lessons is done with one strand of floss. Hope that helps! ~MC
Your website is great. I’m a beginner at embroidery. I find your video tutorials very helpful. Thanks a million.
Hi Mary!
Will this technique work with shading faces too? Because I am planning on embriodering a Victorian scene for my sister’s birthday.
Thanks a bunch
Thank you for the great video. Lots of great information for anyone to start. The long and short stitch was exactly what I was looking for.
Best of Luck
Sehjta
Dear Mary,
I feel such joy and gratitude to you in looking at these instructions and videos. Is there anything more gratifying than to be able to create that which is beautiful?
Thank you, thank you, thank you!
In long/short stitch, on curve as it narrows, do you just do Satin Stitch.?
What relation in length should the short be to the long stitch, 1/2 …1/3rd?
On susequent rows, do each stitch or skip and do every other one…such as all the longs,..or all the shorts?
thank you very much. I got lot of knowledge regarding this stich. it was a big problem to me. this video helped me a lot to solve it. thanx again
Dear Mary – thanks so much for all the info you provide. An invaluable help. Long and short stitch – I see on the demos you say the long stitch should be 3/8ths of an inch. If the piece were larger what would be the optimum length you would use please.
Thanks Jan
Hi Mary,
I am trying to shade a curved leaf in one strand of silk. I don’t find the box too difficult, but when I am trying to show the direction of the veins on the leaf my shading looks awful. I don’t seem to be able to do long enough stitches to create a neat effect. Is there a technique to shading where curves and non straight edges are involved.
Any help you can give me would be wonderful. Thanks
Margaret
Hi, Margaret – have you looked at the other long and short stitch lessons in this series? There are a couple of leaves in the series, and seeing how those are worked out might be helpful. One of them has a jagged edge, I’ve that helps a bit! -MC
Hello Mary.
I was wondering, is this worked with one strand of regular 6 stranded floss? Or is it one strand of the six strands??? haha thanks
It’s one strand out of the six….
Thanks 🙂
Dear Mary,
I LOVE needlework, and have always wanted to learn it right. I never felt confident enough to start on big projects without perfecting individual stitches… Which is why I really value your website. Thank you so much!
<3
Mrs. Corbet, thanks so much for these videos! I’m watching them on my TV! I have an XBOX with a Youtube APP so I can see it better than with my PC’s cruddy video card. HD is so much better!
I have a few questions and I apologize in advance if they’re ridiculous or obvious.
1. Must one always work from the center? Being a lefty, everything is easier for me to do left-to-right.
2. Must one do long stiches first then go back and fill in short stitches? Is it possible to just alternate stitches?
3. How do you stop one strand of DMC floss from breaking in the middle of a stitch? It happened to me twice today just working a simple split stitch for an outline. I bought my needle up and it tore right in half. I shudder to think what might happen during this project.
4. Can I just knot my thread instead of the little anchor stitches you used? I’m not sure I can do that yet. I’m so used to just knotting that I’m certain I’ll screw it up if I tried it another way for now.
Hi, Kristina –
1. Working from the center, whether a lefty or righty, is pretty much the same concept. The reason it is done that way is to establish your stitching direction correctly from the beginning and to make sure that your stitches spread evenly to the sides. For both satin stitch and long & short, I think it’s practically essential for a good finish.
2. Yes, you can just alternate stitches, but you’ll get a more rigid look.
3. If your thread is breaking, I think your tension is too high, or you’re getting knots and pulling too hard on them, or your thread is too long and it’s wearing considerably before you change it, or your needle eye is too small for your thread, and it’s wearing a place where the eye is. Make sure you’re using a crewel needle (a #9 works well with one strand, or a #10, but some people find the #10 to small). Make sure the pieces of thread you are using are no more than 18″ long. And always change your thread as soon as there is any sign of its weakening.
4. Knots are not the best way to start a piece. For one thing, if you have to go back down in that area where you have the knot, your needle can be inhibited by the knot and you can end up pulling stitches out of whack if you try to force your way through it. A knot can lead to a mess on the back of the fabric, and knot can show through on the front of the fabric. It can also work its way out to the front of the fabric if it is small. And if it’s big enough to not work its way out, it’s even more likely that it can create a little bump on the front of the fabric during the framing process. The anchor stitches take no time, are perfectly secure, are perfectly invisible once stitched over, and they aren’t difficult to do. They’re just tiny straight stitches. I always encourage people to get the hang of this manner of starting a thread – even the children I’ve taught start their threads this way. But if you can’t do it, I suppose you just can’t do it, and for practice, then start with a knot. But eventually, I think you should figure out how to start with tiny anchor stitches – in the long run, you’ll be much better pleased with your finish.
Thank you so much for your answers, Mrs. Corbet.
I’ll bow to your superior knowledge about working from the center. I suppose I shouldn’t have complained much, I can only do a half decent padded Satin Stitch because of your video in the first place and I *eventually* became a little more comfortable working from the center. Well, not really, but I’ll get there!
I think I’ll alternate stitches at first just until I’m comfortable with the movement. I have Cerebral Palsy, so I need to build muscle if you can believe it. It’s difficult to explain, just don’t ask me how I make “French Knots” you will be completely horrified!
Ok my threads are definitely too long, my grammy taught me with extra long threads and three strands no less. I think it was because I could thread the needle better like that 20 years ago, but I never asked.
Anchoring stitches still scare me, (I might be slightly pathetic) I think I’ll just need to slowly readjust my brain to the idea. Now that I’ve finally gotten serious about this, I find I have to continually re-evaluate what I know, and how to learn to improve. This one will take longer than I think either of use would like. That said, in my defense I’ve never done a framed piece. I’ve never had bumps on pillow cases or table runners before.
Thanks again, and I hope you enjoy being a TV star in my home!
Hi, Kristina – no problem! With practice, it all comes easier. Yes, I think the shorter lengths are a better idea! 🙂 it’ll save you no end of grief!
I’m now attempting my first row of long and short stitch and something is just odd, how long are the long stitches supposed to be? I’m trying to stagger, and lay the stitches next to each other, but it still looks odd. Maybe I’m just panicking…
The first row always looks odd. But don’t hesitate to make your stitches a little longer than you think they need to be. When you go back in with the second row, it will hold down the longer stitches of the first row. You’ll have more difficulties if you make the stitches too short.
Okay, I’ll stop panicking then. I just want so badly to do well. You go through all this time and energy to teach people through this site and we don’t pay you! I just want to be a very good student.
Your best bet is to go through the long & short stitch sampler lessons – you don’t have to work the lessons, just read through them all and watch the videos. That’ll help.
Yes, I have the square, a circle, and a triangle all drawn on a pillow case, and I’ve got the videos saved on my xbox. I’m approaching this like a tortoise “Slow and steady, wins the race.” Thank you, thank you, thank you.
Hello Mary,
I found the first row of this process to be easy, but struggled when I started to work the second row. I’m pretty sure I should have stitched the first row longer, so I’m starting over. However, I feel like it’s really difficult to come up in the right place to split the stitches in the previous row while also keeping my new stitches as even as that row (no gaps). I’m sure I just need to practice, but if you have any tips they would be appreciated.
Thank you so much for all of the time you put into this site. It’s been an invaluable resource for teaching myself how to embroider, which is turning into an addiction of sorts. I love it!
Is there a way to do raised needle painting to match a raised satin stitch?
Yes, you can either pad it with stitches the same way you do satin stitch (the padding layer would run parallel to the long and short stitch layer), or you can even pad the area with felt first, that’s appliquéd to the ground fabric and then you’d stitch the long and short stitch through the felt and the ground fabric.
Hi, I have a Denim Dan pattern I want to fill in the jeans and the shirt on the little boy. What is the best embroidery stitch to use to fill in a large area using one color?
You can work long & short stitch in one color – it would work great!
Hi Again Mary,
First: Happy autumn! (My favorite season – you can’t beat the colors of natures natural fireworks. I’ve found it’s inspiring my attempted needlework – hence this lesson. I want to be able to capture the gorgeous Multi-color of the leaves of the Japenese Maple Tree in my yard.)
Now yet another of my continual questions:
As I set up to practice this piece, I decided to utilize a different color scheme, I didn’t think that would be an issue. But, I did encounter an issue – thankfully prior to starting – which hopefully you can provide a suitable suggestion to resolve.
(I have 2-3 dozen or more scrap pieces of linen and and linen mixes I purchased at my local shop for the purposes of practicing on in various shades, brands and counts/sizes from their scrap sale bin.)
I had a 25 Lugana evenweave looped for this project. I think this may be too big considering the single strand of cotton suggested.
What would you suggest as an alternative? 32 is the smallest I have. I have plenty of 28 and 30 as well, or is 25 Ok? This is the last step before I begin practice for the first time on this lesson and I would like to have the best chance for success.
You’re expertise is greatly appreciated, and as always, thank you for your amazing site.
V/r,
Tracie
Yes, for surface work, Lugana isn’t the best choice. It’s more for counted work, and the holes are large. You should probably use the highest count linen you have. If the warp and weft threads on the linen don’t fill the weave, you’re going to need to back your linen with muslin or something similar, so the stitches hold in a precise place.
Mary,
Follow-up to my previous question/comments. I also have one piece of 40 count, New Castle Antique White, which looks light and similar to the fabric you’re using. I tried the #10 needle and it went in smoothly without leaving holes in the fabric and it’s much thinner and lighter than the others I have. Based on the pics and descriptions, it looks like this might be my best bet with what I have readily available. What do you think?
Thank you,
Tracie
Hi, Tracie – sounds good! I often use #10 needles with long & short stitch.
Mary,
Ty for the prompt reply!!! So excited. I had the ironing board out and ready. The hubby asked if I wouldn’t mind doing some shirts since I had it out. I said, do you not see that I’m on an embroidery mission? He backed out slowly and said he guessed its a pizza night. I told him he was a wise man.
Tracie
A friend gave me a crewel kit that has barely been started. I cross stitch and embroider so she thought I might be interested. In trying to do the straight stitch, various lengths, to fill in an irregular area I just can’t get the hang of it. It doesn’t look right and I can’t find any videos on line that show someone doing it. There is no shading and I tried using a satin stich as that does fill the area nicely but it doesn’t suit the application and looses finished quality. I’m sure if I could just see someone doing it I would be able to master it but at present I fear my biggest obstacle is in being too regimented – I can’t find that natural varied stitch pattern that truly is required in this application.
Your time and assistance are greatly appreciated. Thank you.
Hi, Cyndi – you might consider using long and short stitch without shading. Just solid long and short stitch in the one color. It creates a nice filling, and it’s quite a forgiving stitch.
I am just beginning to go through your lessons one by one. Oh what fun! But I want to make sure i understand what you are using. When you say DMC stranded cotton, are you referring to the readily available skiens that have divisiable threads? And when you say you are stitching with one thread you mean one undivided piece or one of the divided peices? Maybe it’s just the closeup of the photos but it almost looks like a pearl cotton? Thanks. Laurie
Hi, Laurie – yes, it’s the regular DMC floss, that’s divisible into 6 strands (it’s also called “stranded cotton”). The lessons are worked with one strand from the six, and the reason it looks big is because the photos are close up. The finer the thread, the better the results with long & short stitch. Hope that helps!
Dear Mary,
This is by far the best website that I have visited for tutorials. Thank you for your generosity in sharing all this with us.
I certainly appreciate it very much.
Best wishes,
Christina.
Hi Mary–Thank you so much for your wonderful tutorials. After many years away from embroidery, I am back at working on a tablecloth, the stitching of which I would never have been able to
complete without your help..both the tutorials and the photo instructions. I go to your website every time I have to start a new stitch. Will order one of your products when I finish this. Thanks again!
hola saludos desde mexico me gusta mucho su pagina
Mary,
I’m a little confused about the thread to use. I work with #5 pearl cotton most of the time. According to what I read, you use regular 6 stranded DMC floss and only one strand of that? The #5 is only one strand. Please clarify which one I use. Thank you so much.
Hi, Cheryl –
It’s one strand from the six of regular floss, so it’s a tiny, tiny strand compared to #5 pearl cotton. Pearl cotton doesn’t really work that well for long & short stitch – it’s too heavy and it’s too tightly twisted to get a smooth, blended result.
Hope that helps!
Hi Mary,
(I am going to try and be brief this time, I think I can)
For the long and short stitch, I understand that you’re working a split stitch on the top and bottom lines, then you do a series of long and short stitches on row one. Now, when you get to row two are you coming up and doing a split stitch into the stitches in row one, or are you just going in between the stitches?
Sometimes in the video I think I hear you say that you split the stitches, which I take as doing an actual “split stitch” and sometimes it sounds like you’re “coming between the stitches” of the previous row.
Is it an actual “split stitch” that is being made? (Hence the reason so many are ambivalent about trying this method)
If it’s just coming between the stitches, perhaps I am not understanding the difficulty of this particular method/stitch. I am naturally making long and short stitches as I am still trying to master consistency on ALL my line stitches! ha ha ha…
Thank you!
You’re Determined Beginner! ;0-)
Hi, Christi – you’ll get smoother results on the surface of the long & short stitch if you actually split the stitches when you come up into them. Hope that helps!
Yes, that does help! Thank you! I will practice the actual “split stitch” when I buy my magnifier. It’s useless to try now as I could not see the 2 plies if my life depended on it.
Just wondering, I read a later blog post that for the first row you cut the thread longer and double it? I think in your post you said you were going to try it, but I haven’t seen a follow up post to know if you have been doing that and it works.
Happy Stitching…;0-)
Trish burr teaches the first row can/should be made with two strands of thread. Why do you feel it should only be one thread?
Thank you
Lois
You can do it either way. I prefer the finer edge achieved with one strand, rather than the slightly heavier edge achieved with two. Plus, to get the edge to look really nice with two strands, you really need to use a laying tool – otherwise, the two strands can twist over each other. So I figure I might as well just use one stand and keep things smooth that way.
Thanks a million from a Brit beginner living in Switzerland (where cross stitch prevails and it’s hard to find lessons on flat embroidery. Trying to do shading on petals has proved arduous and your video has been so useful. Firstly I was using 6 threads on smallish petals and it looked awful. The idea that I can choose to work with fewer threads is liberating. In the pattern (Italian) there was no indication as to how many threads should be used. I have also only now realised how you start off…better late than never. Thanks also for your pleasant speaking voice – a relaxing and encouraging listen. Linda
Thank you. I always know you will show me the correct way to stitch. I may have done it all before but just need a refresher.
Hello and thank you for your dedication to passing along your embroidery knowledge. On my page of Long & Short Shading, Lesson 2, Inside the Box, there are no links to visual tutorials. I can read the headline for Lesson 3, etc., but underneath is only white space. Is this just my tablet or did the video links not get onto your site? It looks the same for other L&S tutorials.
Thank you for providing videos that help me to honor the memory of my grandmothers and my husband’s grandmothers who never had the chance to pass on their skills to me, and to learn skills that my mom cannot show me as a result of the 1000+ miles between us. I have been able to complete projects they started with stitches that I could not master until I watched your video JUST ONCE. (French Knots— I used to wrap the thread in the wrong direction.)
NOW, I will be making bird pictures with the “thread painting” or “long and short stitches” technique and value your videos and pictures as learning tools.
Thank you again.
Hi, Diane! Glad to hear you’re enjoying the lessons. Incidentally…well, when it comes to French knots, you can actually wrap in either direction. Some people find one direction easier than the other, but both will work!
Hi Mary – I’m getting ready to start your Long and Short Stitch class but I have a question. Do you really split stitch with just one thread? How does that work (or do you just need better eye sight than I have in order to split a single thread?)
Thank you!
Hi, Katherine – yes, that’s right. It’s one strand from the six. Sometimes, it’s not a question of needing magnification as much as it is of needing good light. If you have really goo light, you may be able to see it better!
I did it!!!!!
Thank you so much Mary! You were so (obviously) right. Get into the right light and one strand really is actually two once you can see it. I just finished my first row of single strand split stitches and you made my day!
I can’t wait to get into the rest of this project. Your color selections alone look so pretty together. Thank you so much for putting together something for the beginner. Thank you for pointing me in the right direction.
Thank You
Hello Mary, my name is David and I suffer from schizoaffective disorder, and I am now working with Vocational Rehabilitation to start my own business. I was a professional graphics designer in the past and am now starting it up again using the Adobe suite. I am going to design my own embroidery patterns preprinted on fabric ( I am working with a friend who has a BA in art who is teaching me to do the silkscreening.) May I please have your permission to send my clients links to your website to learn the necessary stitches to complete my designs? Thank you for your consideration,
David Greenfield
Hi, David! Absolutely! I appreciate the referral, and I hope my tutorials are helpful!
Thanks for your instructions. What length do you suggest for the long stitches in the first row?
Hi, Bevley – It really depends on the area you’re filling. The stitches should be longer than you might think they should be, though, because when you come up to split them in the next row, you want to go fairly deep into the previous row. You can make them as long as 1/2″, if you’re filling a large space. But 1/4″ is probably about right, when filling a smaller space and using one strand of floss. With a heavier thread, you’d definitely want to go with longer stitches – otherwise, it tends to thicken up and get chunky looking.
Hi there have you any reason why my work is pukering? On the square pattern
Hi, Leeann – It’s usually a matter of stitch tension. If your fabric is drum-taut in a hoop, then just pay attention to how tightly you’re pulling your stitches. They should “sit” on the fabric, and not pull from the entry and exit points of the stitch. Hope that helps!
Wonderful web site! So rich of interesting and helpful resources. I am a beginner in embroidering but I think this site will become my unique and favourite one! Thank you!
How would this work if using all the same color of floss/yarn? I am wanting to do an Orca Whale…. mostly black. Would I use the same procedure, just with all black?
Please explain the necessity of the knot & 3 tiny stitches you do before beginning the long & short stitching. Thank you!
Hi, Sheila – that’s how I anchor the thread. Then I cut the knot away and start stitching, covering up those threads. Voila – no knot on the back of your embroidery, and a very securely anchored thread!
Mary,
Thank you so much for the videos on long and short stitch. I struggle with this stitch, for some reason. I blame it on the fact I can’t see very well, but I think it’s probably because this stitch intimidates me. I love having your videos to reference. I will practice with a box, as you suggested.
Your website is a wonderful place for me to learn. Thank you for providing it.
Best regards,
Dottie
Hiya could this be done using wool rather than cotton?
Hi, Ophelia – It’s done exactly the same way, only you’d use a larger needle to accommodate the heavier wool.
Brilliant!! I thought then I realised DMC don’t do crewel wool so it would be tricky to convert the colours you recommend to use.
I do it every time, over-complicate and then end up doing nothing 🙂
Great video to watch for the long and short stitch can not wait to watch more of your videos
I just started back embroidering I did it as a little girl with my grandmother. I’ve watched some of the other videos but most I’ve watched seemed quick and easy using long too long satin stitches for filling in I just found the work to be less than what I was taught. I am glad I found this site the stitching is more uniform, neat, and the way I remember it. I’m not saying the other were not nice but they were not the same quality I was originally taught. Thanks for keeping embroidery the beautiful art it was meant to be.
Great videos. I’ve watched so many but yours really explain this well. Long and Short is a stitch that always eludes me, but you’ve helped me understand a lot more about how to get it to look good. Thank you.