


Earlier this week, we began deconstructing various elements on a piece of old ecclesiastical embroidery, to see how the elements were originally made and to learn something about the materials and techniques used.
You can find the photos of the whole piece of goldwork embroidery in the first article in the series, and you can find the rest of the backstory, along with my reasons for deconstructing this piece, in the second article of the series, where we began deconstructing the goldwork grapes.
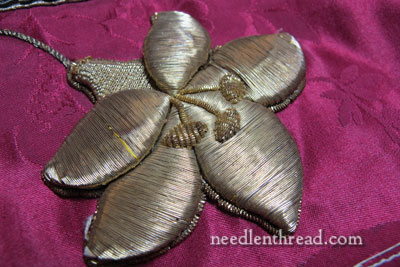
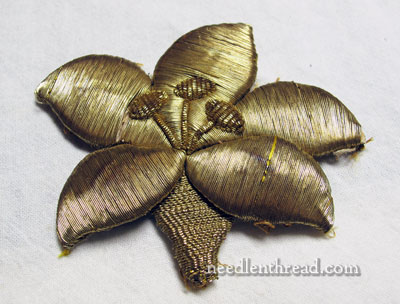
Today, we’re going concentrate on this piece of high relief goldwork:
When I first look at a piece like this, I start asking questions that occur to me as I take an “overview” of the piece.
So first, let’s just look at the piece in general.
We see that there are three different goldwork threads involved in creating the lily: a smooth passing thread that covers the lily petals, rococo (a crimped passing thread) that covers the base of the lily (in the top left corner of the photo), and bright check purl, used for the stamens.
If we turn the piece over, we can see that it was applied to the vestment ground fabric in an appliqué technique. That is, the lily was created on a different ground fabric, cut out, and then sewn onto the vestment fabric, in the same manner that the grapes were made and then applied to the vestment.
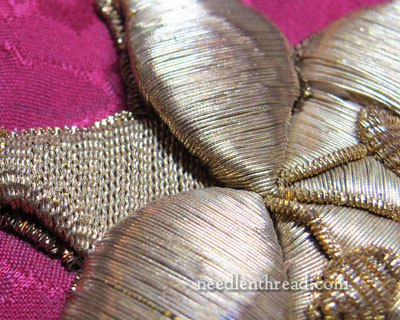
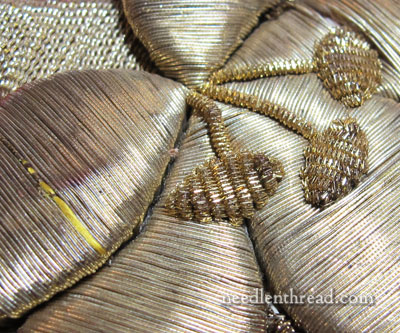
Turning it back over, we can look up close at the way the petals of the lily seem to overlap each other and the base of the lily (made with the crimped gold thread).
We know that the whole lily was sewn to the vestment in one piece (by looking at the back), but when we look at the front, it might seem that the lily itself was constructed in pieces. Given the way the petals overlap here, it almost looks like each piece was embroidered separately, and then all the separate pieces were brought together to make the lily.
Well, it’s a possibility. A little further study will help us determine if this is true or not.
Let’s remove the lily from the ground fabric, and see what else it can tell us. Here’s the lily, off the ground fabric in one piece.
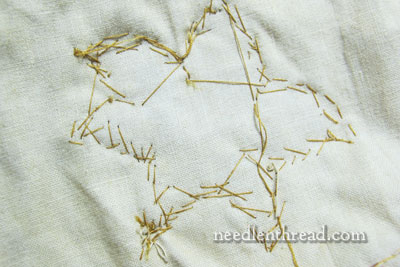
If each piece of the lily were embroidered separately and then brought together to make the whole lily, then when we turn this over, we should be able to tell by the stitching on the back.
The back of the fabric of the “slip” (the embroidered appliqué) would look a lot like the back of the vestment in the photo further above – it would look like more appliqué on a piece of ground fabric, right?
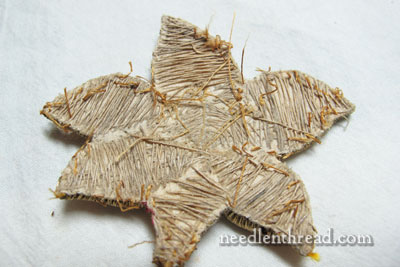
Ahhhhh…. but it doesn’t! The ground fabric on the slip is the shape of the lily, and all over the back of it, we can see the threads involved in the actual embroidery of the whole lily. So the lily was embroidered as one piece, not assembled with many embroidered pieces.
The threads on the back of the embroidery are quite stiff, and rather dirty looking! This is a rougher, heavier thread – more like string. And this makes sense, because this thread is not visible on the front at all. Why use good silk embroidery thread for couching, when the couching thread is not at all visible?
Also, considering the couching technique used, it is important that this thread be very sturdy indeed.
The heavier threads on the back look and feel as if they are coated with beeswax, which is necessary to protect the thread from the wear and tear it will receive from the metal threads.
So that’s an overview of the lily. Whenever I look at a piece like this up close, even though some questions may be answered by a cursory study like this, many more questions are generated.
For example, how were all those fine gold threads sewn on? What is the padding made of? What was the order of work in embroidering the lily? What are the threads made of, and do we have the same threads, or something equivalent, available today? How were the stamens stitched down through all that padding? Will there be anything underneath all the gold that might show a relationship between the lily and the grapes we already took apart? The list could go on and on…
Next up, we’ll take the lily apart and answer some of those questions – and hopefully any others that you might have, too! What questions would you want answered as we tackle the lily and take it apart? Do you have anything in particular that you want to know? You’re welcome to ask questions by leaving a comment below. You can also do like I did, and jot down a list of questions that occur to you, and then see if the answers become clear during the deconstruction process.
If you’d like to read the previous articles about this topic, you’ll find an index of all the articles in this series on Deconstructing Goldwork here.
Have I missed a description of the ground fabric preparation? Just one of these gold elements looks bulky and heavy; the whole design must be that much more so. How is the ground fabric prepared so that it doesn’t sag, stretch, or worse, with all this weight on it? I see there is linen or something lining the silk but is that all?
Ack! You left us hanging. Looks like I’m becoming a bit violent with this one. All I can think of is, “Bring out those scissors. Rip that thing apart so we can see what’s inside.” LOL I’ll see you tomorrow morning, bright and early.
Heh heh. I’m just that mean, Irene! >:-) Actually, I originally had the whole lily all taken apart in this article, but the article was over 2,000 words long and had over 20 photos in it, so I decided to inhibit my big mouth a bit, as it was just too much in one go. Tomorrow’s blog post isn’t the continuation, I’m afraid (just in case you really do get up early for it – wouldn’t want to disappoint!). Probably Monday. Tomorrow is Something Else. You know – variety, spice, life, all that ….
Dear Mary
Interesting that so much gold work and different types of gold were used and all made in one piece. Imagine the amount of time and effort that took to embroider this piece under all that padding. I’m curious to know what’s underneath and look forward to your explorations.
Regards Anita Simmance
This is such a fascinating process. Thanks for sharing it with us, Mary. I’ll be anticipating the next step on Monday. Variety, indeed, is the spice of life.
After your recent lessons on deconstruction of the liturgical goldwork, I was interested to see the pictures of the pope in the news this week with a deep red velvet robe encrusted with elaborate goldwork. . . really beautiful. Any idea if this would be old or something done recently just for him?
Hi, Meg – It depends. Some are old, some are new, and no way to know, without an “inside” scoop! ~MC
Hi Mary, I don’t quite get it. Is the “wire” used on top of the petals couched down? How did they do that considering how close the elements are to one another? Also, how did they get the wires to fold back for the return without any space visible? How I would love to see this up close. FYI I don’t know what they have in stock anymore but Tinsel Trading in New York used to have a huge assortment of old gold metal thread and wire.
Regards, ji
Hi, Jacquelin – More info on it coming up! Most of your questions will be answered in the next article, and you’ll be able to see it up close. I LOVE Tinsel Trading!!!! ~MC
Hello Mary,
now this is a interesting topic! I am very curious if you can really figure out how they did this.
Around here they used to make goldwork like this. They cut the forms out of cardboard and wrapped the gold thread around it, and then they sewed it on the ground fabric (black wool cloth).
The next days I will send you a sample of the gold thread they used. I don’t know what kind of threads you get in the states, but here we still use the same kind they did ages ago.
We are lucky to have a supplier that still makes this type of thread.
Kind regards from Austria
Marianne Bischof
Thanks, Marianne! This is done a little differently – the thread is taken from side to side over the form, and couched on each side of the form, so it is attached directly to the fabric during the embroidery, and it doesn’t pass behind the form. We’ll look at that on Monday! I would be very interested in seeing what type of gold thread you use for the Austrian technique! -MC
Is it too soon to tell if the gold work is the handiwork of one person or a group of “church ladies”? I love imagining a group together, just like a quilting bee or something. 🙂
Hi Mary,
This weekend I was looking through ebay at vestments. I saw a piece that had exactly the same elements (the little ‘helmets’) as the grape element you deconstructed. They actually looked like grapes, so perhaps whomever made the piece you own wasn’t an accurate artist?
Cynthia
Found in church boxed on a roll netting that appears to be gold embroidery . netting very old
do you have a book on how to care and repair,
it would probably need backing support in order to use as altar cloth.
thank you for these articles very interesting
I think you’d probably need to consult with a conservation specialist, Catherine. That would be the best route. A conservator at a museum, something like that…