


Hand embroidering an egg isn’t exactly a new idea, but it is, in some respects, a zany idea.
Last year, when I stumbled upon these magnificently embroidered eggs right before Easter, I knew, deep down, that I’d have to try it.
Egg art has always fascinated me – I love carved eggs, painted eggs, Ukrainian eggs (Pysanky) and the like. And not just at Easter, either, though that’s when eggs really come into fashion. I think eggs make beautiful Christmas ornaments and even year round displays.
I like natural, naked eggs, too – a bowl of blown eggs in natural soft blues, greens, whites, browns, and speckles is so simply pretty in its own right.
But anyway, when I saw the embroidered eggs, I was bitten by a bug…
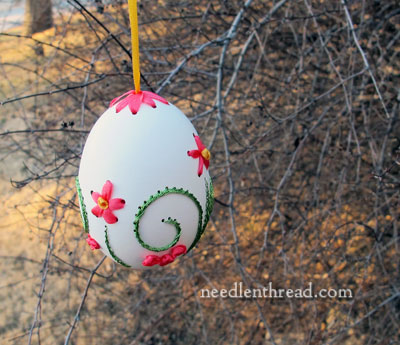
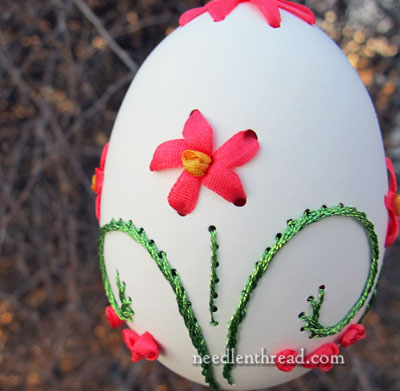
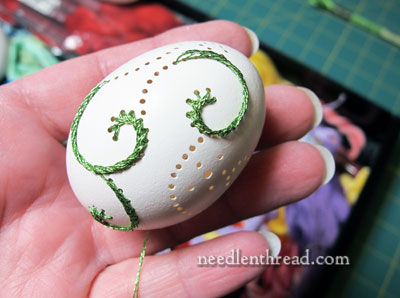
… and the result of that bite? Here’s my first attempt – a simple embroidered egg that felt nothing at all like “simple” during the process!
Once I was bitten by the Embroidered Egg Bug, I started gathering. Tools, supplies, threads, ribbons, eggs (can’t forget those) – all the stuff I would need to launch into embroidering eggs.
After rummaging around online for clear information, tutorials, and the like, I began developing a mental list of criteria, or guiding principles, for my own attempts at embroidered eggs.
I love the beautiful eggs made by Annie Garcin. (That’s a link to a YouTube video showing her at work.)
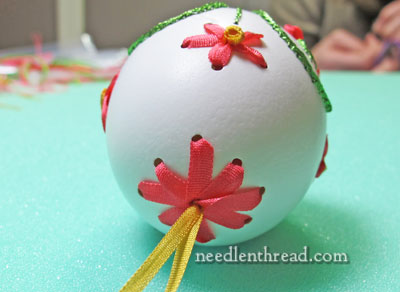
Annie’s embroidered eggs are embroidered on both sides, through the egg, without the back cut off. This, to me, is what is so “magical” about embroidered eggs – they are eggs, whole and entire. They are not just an egg surface on the front, but the whole ovoidal surface, unbroken, and the mind boggles (or at least, mine certainly did!) upon seeing embroidery encrusting a real egg shell with no large access to the back of the embroidery. It’s magic!
So that’s my first guiding principle – the eggs must be whole. I figure if the backs are cut off, or if the egg is somehow cut open and then put back together, half the magic is gone.
The next point has to do with coating the surface of the egg to harden it before working on it.
I love natural egg shells. I think they’re beautiful. I like their matt surface. I like the feel of the shell. When they’re glossed over with a hardener, the egg shell looses much of its egg-shellness.
So I decided that I wouldn’t coat the egg with a hardener – or that I would at least try to avoid doing so, and see how far I could get. My resolve on this point may change over time. There’s also the idea that a hardener would preserve the egg from breakage, after it’s finished and on display. So… I’m still fiddling with this idea.
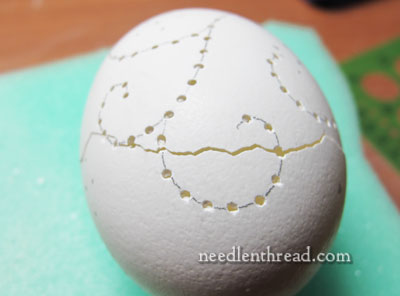
The third principle: Start with basics. Starting simply was a necessary approach. I don’t always do that when I launch into something new. Normally, it’s something complex that draws me to a new interest (kind of like Annie Garcin’s embroidered eggs!). And most of the time, I dive into the complex approach.
But with eggs, it’s a bit different. It’s really important to get the “feel” for the whole process, and I knew it would be less frustrating to do so by working from basic to more complex.
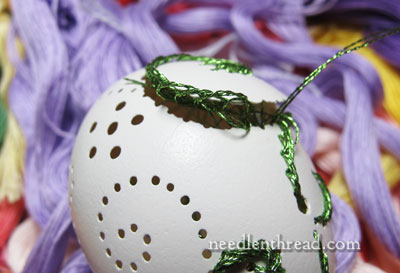
And so my journey into the embroidered egg began. And now I’m trucking along and loving it – but wow.
It takes a lot of time – it can’t be hurried! And it makes a mess – much more so than mounting a piece of linen on an embroidery frame.
And it takes about fourteen million tons of patience. I would say that patience is the key element to the embroidered egg. No other type of embroidery has tested my patience like this has!
…and for obvious reasons.
It broke before I even had a chance to put thread through it. This was my first attempt at drilling an egg. In fact, it was the first time I’d ever used a dremel drill. So the whole journey has been One Big Learning Curve.
And this? This was my first embroidery attempt on a bantam chicken egg, which is about 1/3 the size of a regular chicken egg. If at first you don’t succeed…
I’ve learned a lot about eggs and drills and bits and threads and needles and the relationships between these things when you try to take needle and thread to an egg shell.
And in the weeks to come, I’ll share some of my discoveries with you (and some more eggs), so that you, too, can embark upon the magical journey of creating beautiful – or just plain fun – embroidered eggs!
You can find all the articles in this series on embroidered eggs, including tips and techniques, here:
Embroidery on Eggs – Index of Articles
So, what think you? Are you keen to try hand embroidery on eggs? Is this something that enchants you, or do you think it’s nuts? I’d love to hear your perspective! Feel free to leave a comment below!
Oh my! Mayt that is just amazing! Cant wait to see the future posts.
J’aime aussi beraucoup voir les oeufs brodés mais c’est vrai que je me pose toujours la question : mais comment font-ils pour broder les oeufs sans les casser,
You mention the time factor….my first thought is it worthy of the time and trouble….and then what if it shatters as the last stitch falls into place. Humpty Dumpty also comes to mind…maybe he could have been stitched together again.
It is interesting and beautiful!
Deb
What an amazing technique! Yes, please post more.
I can’t wait to find out how you get the needle back out of the egg and how you secure your thread on the inside.
In high school we had to do egg projects. Mine was to blow out an egg, fill it with confetti and then magically explode it in front of the class. That was fun.
But this is pretty crazy….
I am so “eggcited” about these eggs. We own a small lake and have ducks and geese. My husband blew out a number of the eggs we found lying on the ground last year. I am anxious to try this!!
Debi
Mary, what gorgeous work. Please, please do share your links for this technique, and your source or recommendations for design. These are absolutely stunning. I love the matte, natural look as well, but would be scared of the shell not hardening with time, and all of that work going away.
Yes! Yes! Yes!
WOW! Who would have thought this possible. Can’t wait to see how you manage to do this. Truly beautiful, I still have trouble blowing eggs.. LOL
Wow!!!!!! That’s just crazy!!! They’d be locking me up in the funny farm if I try’d this type of embroidery.
Oh what fun – and yes, enchanting is the word. There’s a part of me that would love to try one, but the problem is I’d love to try ONE, not half-a-dozen before I got a success or semi-success. I don’t think I have that magical requirement – patience!
Your first ‘attempt’ is so pretty. I’ve always been drawn to embroidered eggs too. My embroiderer’s Guild did a class on smocked Easter Eggs last year, it was a lot of fun. I may have to try embroidering on eggs, I have my own chickens, and several different kinds. When I was young my mother and I used to blow out the egg and decorate the shells for our Easter tree. It was fun. Good luck on your new endeavor, as always I can’t wait to see your results.
It fascinates me to watch videos of people embroidering eggs, but I don’t think I want to try it myself.
See if you can get hold of some goose eggs to work on. The bigger surface might give you a better practice surface.
Hi, Kathy – thanks. Yep, I have a whole slew of different types of eggs, from ducks to geese to turkeys, to chicken eggs of various sorts. It’s been fun collecting them and seeing how they’re all different.
WOW! How beautiful Mary. That looks way more complicated than I will attempt right now, but that is an amazing art form. I want to know how you get a needle with thread into it! 🙂 I have never seen this, so thank you so much for sharing. Have a fabulous Valentine’s Day.
It’s nuts, but it excites me! I want to learn more. I want to do this!
I would love to embark on this new adventure of egg embroidery with you. I think.
Beautiful! but the eggs are cooked or raw?
Ana Maria
Salvador/Bahia/Brasil
They’re just the shell. The contents are emptied. -MC
Try using eggs from bigger birds like geese or peacocks. The shells are thicker so they are less fragile. I haven’t tried it. But keep hoping to take the time to.
Thanks, Debbie – I’ve actually done a goose egg, a turkey egg, jumbo chicken eggs, and the bantam eggs. I love the bantam eggs because they are small and delicate and very pretty. But I’m working with all kinds right now. I’m even planning on tackling a rhea egg…
WOW! this is fantastic. But how do you prepare the egg without breaking it. Getting the contents out has to be tricky. This looks like it could be fun and at the same time need a lot of patience. I am willing to give it a try. Well after I finish my other project.
There are different ways to empty the contents of an egg rather easily. I like the Blas-Fix little egg pump thingy that I bought when doing Pysanky. They work great. But you can pretty much achieve the same thing with a children’s medicine syringe or even a …hmmmm…. Well, in our family, we call it a snot sucker, but that doesn’t sound too nice. The bulbous thing you use on babies when they have excess sinus fluid. I prefer using some kind of “tool” rather than my mouth for blowing out the contents…
Dear Mary
Years ago I decoupaged eggs. Needless to say they broke everytime I tried to prick a hole in it at either end to drain the egg overnight. Then a friend who was very good at this suggested I go to the local kitchen shop and get a egg piercer. It worked without breaking the egg, making a perfect hole in the shell.
Maggie
Everyone should own a Dremel.
Lovely effect.
If you do more than drill a couple of eggs, you might want to read up on safety concerns here:
http://www.emuszine.com/eggs/egging_safety_by_gary_lemaster.htm
Diane
Thanks for that link, Diane.
I don’t think I am ready to try this .. I am just getting started with the basic’s of handwork and all the stitches. But will enjoy watching your journey.
Wow, I would never have the patience for this! Phenomenal designs!
I just had an inspiration. Use ceramic eggs, drill the holes before they are fired, then stitch away. Limited breakage….or not.
Ah, yes! But then… They wouldn’t be real eggs, would they? 🙂
This is gorgeous but my first thought was ‘how do you get the needle back out?’
Can’t wait to see how this is done.
I love this! I think I would love to do this. Thank you for the beautiful pictures and article.
Nothing like a good challange.
Oh no you don’t Mary….LOL! i will not be sucked into another hobby that will drive me craaaaazzzzzyyyy! i saw some embroidered eggs a couple of years ago on a web site (i lingered quite a while) and thought they were marvelous. i too would be tempted to jump into an elaborate design to please my senses but i will not take the plunge (lol) but i will, with great interest, follow your progress and maybe, just maybe in a demented fugue try one some day, maybe….lol….but not any time soon….but feel free to take me along on your journey.
Ouh …. It’s very beautiful !!Yes please an other post of this technique..
Good day Mary
To use an overused word—Awesome! I wanna, I wanna! I’ve got everything needed and I’m gonna try–today!
Keep on truckin’. I wanna SEE!
This is a gorgeous technique. I have never seen embroidery on eggs.
I can’t wait for the coming weeks to see your work. Thank you so
much for all your interesting and beautiful projects that you share. Also for all the information that I have gathered from your website.
I look forward to seeing many more of your beautiful projects. Thanks! Theresa
I’m looking forward to your embroidered eggs. As far as coating to harden them, what is used? Maybe they make a matte finish? What about pouring the hardener inside before drilling the pattern? Although I don’t know how the inner membrane that’s left behind would affect it.
I would love to try this. Living in a motorhome, I have limited space for crafts, but always have my embroidery, hubby has a dremel, and we always have eggs. Viola! Am looking forward to more instructions
Do I remember correctly, last time you had an embroidered eggs post, something about small curved surgical needles being used?
Hi, Gail – I think the curved needle discussion was when I was working on the Medallion project, actually. I have used a curved needle on the eggs, but only occasionally, in certain situations. For the most part, they don’t work in every situation on the egg, because of the “leverage angle” you have to achieve when pushing it through – if the egg isn’t hardened with some additional coating, it’s very easy to crack it when trying to get the right angle on the curved needle.
Wow! Can’t wait to try this. Might be easier to work on larger egg? Curved upholstery needle? Coatings like Modge Podge do come in a matt finish.
The Embroidery Club’s Facebook page has a link to an artist who embroiders on wood. You should check it out. Here is the artist’s link: http://www.artnau.com/2011/10/lidewij-edelkoort/. Cannot wait to take this “journey” with you.
The Embroidered Egg! wow, I had never heard of such a thing! They are beautiful, but I’m not even going to think of attempting it!
Crazy…I would not try this but keep the ideas coming
I love the idea of embroidered eggs…I would need to be able to put a hardener on it as I know how easily eggs crack……I am definatley interested in how it is to be done…
Fascinating eggs! I think there is probably a hole opposite the embroidery area for passing the needle. The utility hole is the same size as the holes being embroidered.
I did eggery years ago but never thought to embroider an egg. Barbara W
That egg is beautiful! Oh, I want to try this too!
My thought when you talked about something to harden the shell was – could the hardening liquid be squirted into inside of the egg, through the first drilled hole, with an eye dropper or something & then after it dries, the rest of the holes could be drilled? That way maybe the shell would be a little tougher, but the egg would still look & feel natural.
AMAZING!!!!
Now that is an idea! Never saw an embroidered egg.
I have decorated eggs before, started out with just painting, then embellishing with clay. Then I found a book, showing how to make them into Faberge style eggs. Easy, you cut a door in the egg, decorate it, pop something nice inside, attach the door with a hinge. Easy, the lady said. Not really. 3 out of 4 broke.
Goose eggs are sturdier!
And if you can get your hands on an ostrich egg, those are strong!
I have made some lovely eggs like this, love making them into keepsake boxes with a silk lining.
Try using a curved needle!
I think it is nuts and I want to try it. Lovely and challenging! Looking forward to your posts.
Wow! You are amazing!
How absolutely incredibley beautiful, I would love to learn how to do embroidered eggs, but I think I would need a class. What an incredible gift Annie Garcin has.
Dear Mary
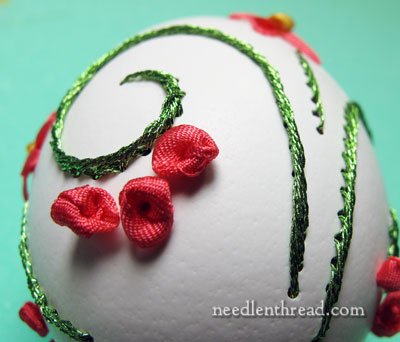
What can I say Beautiful, amazing. It’s better than my attempt yesterday mine cracked as well although I used glue across the cracks and that helped, I’m going to try not cutting the egg at the back today to see how I go. I used ribbon yesterday and it not as difficult as I thought. Is that an outline stitch that you used for the stem. I boiled an egg today after drilling the design so I shall see if that hardens the egg. Thanks again for this beautiful.
Regards Anita Simmance
Although I’ve never embroidered on an egg, I have made hundreds of Pysanky – Ukrainian Easter eggs dyed with the ‘wax resist’ method. I’ve worked with every kind of egg you can imagine and I found that duck eggs are the best – smooth surface, slightly larger than chicken eggs and stronger shell. If you can’t find them you can order small goose eggs, already blown, from the Ukrainian Gift Shop. http://www.ukrainiangiftshop.com
I have never seen anything like this! Love it and as a new stitcher, I hope it is not too difficult that I would just give up on the project. I have friends who do the Ukrainian eggs and I have received them as gifts. I would love to give some away too but with something that says “I” made this. Kind of like my signature piece. All my friends know I love embroidery and that I am learning the art. It would please me greatly to try these and even better to master the art and share it with my friends.
GORGEOUS!!! I want to try this…someday. I can’t wait to hear more about it! Happy Valentine’s Day, Mary.
This is so intriguing! I would never have even thought to do this. I am going to give it a try. Please post more on this. I really enjoy your blog and learn from you all the time. Thank you.
Thankyou for doing the hard part for us, who are better at following than leading. I too have collected eggs of many materials over the years ,so this would be a great addition to my collection. I cross stiched on ribband and then attached it to satin eggs to hang on my “Easter tree” but stitched on the eggs would be absolutely amazing. Are you giving us a tutorial on how to do this?
Louise
I have never seen anything so interesting. I would like to try and hope I have the patience.
A friend introduced me to your creativity …. this is just one more reason to thank her! I can’t wait to see more of this adventure and want to travel right along with you. I would like to give this a try. Beautiful!
Thank you for the wonderful embroideries posted!
Oh – good golly, Miss Molly! I must have missed your post last year because this is the first time I have ever SEEN anything like this! Oh, I must try this. They are so gorgeous. More details, Mary!
Mary, this is incredible! Looking at your embroidered eggs puts me in that “read a mystery book to figure out who did it” mode…and I just can’t figure out how you get the stitches on the egg without the back of the egg being gone! You really have a mystery here and I can’t wait to find out the solution!
OMG that is so AWESOME!!! I cannot wait to try it, although right now I can’t imagine how on earth you do it…
I look forward to your blog everyday, thanks so much!
Abbi
I would love to have a go at this for Easter and give them to my family. I’ll await further updates with great interest and anticipation.
I will try this someday. I think embroidered eggs hanging from my seasonal tree would be perfect on Easter! What a concept! Thanx for sharing.
Can the same be done with ostrich eggs? I have a few I was going to paint, embroidery is much more fun!
Hi, Elsie – No reason why it couldn’t be done. You’d need Really Long needles. The egg will be much sturdier when handling than a chicken, goose, or duck egg, but its size might make it a bit awkward. I’ve got a coupe rhea eggs set aside that I want to embroider, but I’m saving them for a little farther down the road. ~MC
I think the Hand Embroidered Eggs are works of art! Very beautiful. It appears that you have the Midas touch on whatever you attempt, Mary. Well done!
They are very pretty. I would hang them on my Christmas tree. I have many other embroidery projects on hand and am not tempted to add egg embroidery to the list.
I have always dreamed of embroidery on eggs, but had never seen it done until your column last year. I decided I would settle for painting on egg shells.
Yep, I am so ready to try this…..I am always looking for unique gift ideas for sisters. They will love these. And I have time to do them for B-days and Christmas…Thank you for sharing your creativity. Daniece Clark
Dear Marymentor:
WOW ! This I will watch closely……
Mary, Your talents never cease to amaze me! Lovely.
Mary,
I thought I liked doing all kinds of needlework and they do look pretty but I’m definitely taking a pass on this one. We did some decorated blown eggs when I was young and they are very fragile. And then there’s the question of what to do with the stuff you blow out. Too many beautiful and more durable things to do on fabric.
I was facinated by the embroidered eggs. That looks like a real challenge. One I must try,
Thank you for Sharing.
Have you ever done “ONION SKIN EGGS”? This technique is done and makes the eggs look like they are made of wood. The Technique is to wrap the raw egg, before hard boiling..in Yellow Onion Skins.. the outside dry skin of the onion…secure with cheese cloth or clean pantie hose,,tie a knot in the cover to secure it.. and boil egg as usual. When unwrapped it
will have the brown pattern adhered to the shell. If you like, you can rub a light coat of vegetable oil on the shell, making it appear to be polished wood. Very striking when on display. Hope you can try it sometime.
Sincerely, Pat Clark, California
Hi, Pat – thanks for the tip! I’ve tried purple onion skins (they work well, too!), but never yellow. I’ll try that this year! ~MC
Oh my goodness! What a creative and wonderful idea for Easter! I really want to try this and will be looking forward to your posting about it. What a marvelous idea! I am also glad that you are posting about the bad as well as the good as this helps so much.
What a wonderful project idea!! Wow, wow, wow! Please do show us how, I know for certain that we will be trying this. My daughter raises chickens and their shells are very hard, harder than store bought. I cannot wait to get started! 🙂
G’day Mary,
As lovely as the embroidered eggs are, I prefer just the holes. Hung along a window where the light would shine through them would make each one a little enchanted world in itself. Besides patterns like you have there, which look special just as they are, I’m thinking actual things like grass and flowers, moon and stars, cottage windows and doors. Bunnies and chickens for actual Easter decorations. I suppose too dainty a design would be difficult to keep intact, having to put the holes too close together.
I haven’t seen embroidery or the holes done on eggs before. I’ve an elderly friend who carves emu eggs. They are very large, thick and hard and have a few layers of gradating tones, the outside being the lovely dark green/black. Its goes into dove greys under the outside layer. Very lovely. You’re probably familiar with them. I think the ostrich eggs would be much the same but are a creamy colour? Not so familiar with them.
Interested to see what develops further with what you are doing here.
Cheers, Kath
I don’t remember seeing the eggs on your site before. Later I’ll return and look them up. If not ‘before my time’ I’ve probably commented. Interesting to read my thoughts on them at that time.
Hi, Kath – there’s a link at the beginning of the article above, or you can search “embroidery on eggs” in the sidebar on the left. It should pop up!
Hi, Kath – you’d probably love the look of these eggs from The Nest at Windy Corner: http://www.etsy.com/shop/theNestatWindyCorner. They are Gorgeous!
‘Crumbs, Maisie’, I mean Mary. Ever read The Perishers comics? ‘Crumbs Maise’ is an exclaimation we’ve hung onto from them. It’s and older comic. Like Peanuts, there are no visible adults but one is very much aware of them. The Perishers are a group of kids. The drawings are much more amusing and more detailed than Peanuts and no one person is on the wrong end of human nature all the time (poor Charlie Brown), although Maisie IS the wrong end of human nature! I love them. Managed a couple of cheaper ones off Ebay a while back.
These eggs! They made me gasp. They’re eggceptionally eggcellent and eggciting!
Mary, you’ve instigated a new board being added to my Pinterest page. Thank you. Kath.
Toooo cool!! Such a thing never occurred to me. I’ll be watching with interest.
I have done quite a bit of egg art: Pysanky, natural ingredient dying, crystal application on eggs, etc. but never embroidery. This is such an eye opener. I absolutely love it. Please share the web sites you found for instruction. I want more of this art!
Too Cool!
My head is spinning with ideas.
Hi, Mary – there are a few videos on YouTube (not in English) that highlight some embroiderers who do this, but they dont give away too much in the way of instruction. The other tutorials I’ve found online (one is at Design Sponge) show the back of the egg cut off. So I haven’t really found any online tutorials for this without cutting the back of the egg off, except for those videos. I’ll be blogging about the process I go through off and on from now until Easter, for those who want to follow along and try it. -MC
Mary, you are one Crazy Lady!!! I Love it!!
I enjoyed your egg links and applaud your own efforts. I won’t be trying this at home –lol– but I thought about egg shaped gourds as an alternative. In fact, I’ve long contemplated trying to embroider and embellish gourds. I’m wondering if the thin shelled gourds would be less fragile to drill than an eggshell. Idle thoughts; I doubt I’ll ever get around to this challenge.
=O That’s incredible! I can’t imagine how hard that must be!
We have ducks and geese. The eggs are larger than chicken eggs. I have some blown out and will be blowing out more, probably goose eggs as they are the largest of the three. I was planning to paint and apply jewels, but now, trying embroidery is an option. Maybe beading too…have to work on this idea.
I love learning from you, Mary.
These eggs are SIMPLY MARVELOUS!!! It’s necessary to have angel hands!!!
Hello, Mary, from my experience in blown and decorated eggs (not embroidered) the eggs must be coated with a sealer. For 2 reasons, 1st it stiffens the shell and makes them less prone to breakage and 2nd, over time oxygen and humidity in the atmosphere will degrade the calcium in the eggshell. In just a couple years (or less) the shell will become so fragile it will simply crumble and turn super brittle and literally fall apart under it’s own weight.
I strengthened my egg shells inside and out with mod podge 50% with water, put some inside and shake it around, then let sit to dry. do this before drilling. You may experiment with aerosol that may have a more matte finish. Hope that helps.
Hi, Kyra – Thanks for this! I’ve been experimenting with some hardeners… Have you ever used sodium silicate? That’s what most egg artisans have been recommending to me. I never thought of modge podge….
I love this website, but I don’t love the idea of embroidering a natural egg. For me, it wouldn’t be worth the trouble; I’d rather be embroidering something else. I am not an embroiderer, but I want to learn and make exquisitely beautiful embroidered items–that is why I subscribe to your wonderful website. Since you are enthusiastic about embroidering eggs, I appreciate your sharing that art with us. Since you asked our opinion, this email is my response. Thank you for all the wonderful information you share with us on your website.
Hi Mary,
I too have wondered about these wonderful eggy works of art. I eagerly away more installments. Can you tell me what hardener did you use.
Arlene
You are nuts! My oldest thinks I should join you in your insanity. I think I will just watch from cyberspace.
OMG! it would try the patience of a saint….I give you a lot of credit for trying. not sure if I am up to that torcher.
they are lovely!
The first time I ever saw a picture of an embroidered egg shell, I couldn’t believe how gorgeous they were, and I thought there was no way I could ever, ever do something like that.
Buuut if I had a lovely detailed tutorial to walk me through it, sign me up! These would make amazing gifts if I managed to get competent, and if nothing else, my compost pit could always use a few more eggshells!
Dear Mary
I think you’ve found an excellent dieting tip – you get to eat more fat-free eggs and end up with a delightful, completed project at the end. what a lot of eggs you’ve already embroidered – and just in time for Easter too!
Yes, yes, yes! I love eggs, I love embroidery, I love fiddly projects that require lots of problem solving. This has got my name ALL OVER IT! Lead on, Mary!
Eu numca tinha visto, bordado em ovo,achei lindo soh que eu acho que numca conseguirei fazer……fiquei encantada……Parabens….
This is truly beautiful and indeed, magical. I am looking forward to more posts.
Are you using a curved needle to bring the threads through?
Hi, Dorna – In some areas, it’s possible to use a curved needle, but for the most part, no. I find it difficult to get a good angle with the curved needle all the time, so mostly, I use a straight needle. – MC
Ooh! I am so excited! These are so pretty! I can’t wait!
beautiful – can’t wait for tips, hints, instructions
Wow – I love the concept and would love to see you demonstrate. Not sure if I will ever actually try it, but I’m certainly not counting it out if I decided it’s something doable for me :*)
I think it is beautiful and delicate. If I am not wr on the needle has
to be like an u. I would like to try.
take a bow. i’m very impressed. need more info on drilling those tricky holes.
Oh my. Please, please share your insights on how to do this technique! I’d love to try it and your tutorials are so easy to follow. Reading and watching the ones on various stitch techniques has has truly made a difference in my embroidery.
Yes,I would love to try an embroidered egg.
I’ve done Pysanky eggs, onion dyed eggs, wax resistant dying, and regular food coloring dyed eggs.
Looks like fun!
Goodness, I’m amazed! And look forward to learning more about embroidered eggs.
I think these look stunning, but, I am certain that I would not have the patience. Look forward to seeing your results over the next few weeks. I m hoping to start playing with the lattice stitches so that I can try the lattice sampler now that my linen has arrived.
Stunning work as ever and great tools from JR Crafter they feel nice to handle and I will be using them this weekend.
Thanks Again for sharing your work with us all
Kathryn
I’ve seen this kind of thing before, and my opinion is that it makes very little sense. I love eggs too, and pysanky, and embroidering a ‘prepared’/manufactured wooden or plastic egg would be interesting, but this … *is* nuts.
Why? Because it *is* basically a waste of time (precious time!) It also includes waste of resources (water, electricity, even thread perhaps, and probably the egg itself) … And why? When there’s *no* guarantee of succeeding?! It is so fragile and thus so impractical. I still can’t imagine how you can embroider a *whole* egg (maybe I didn’t read attentively or maybe it’s something you want to tell us later :o) ); but there’s stuff inside of it that can’t be easily washed off through little holes and might with time start smelling or stain the thread… (just thinking logically here) Anyway it remains a fragile type of project, not easy to store… And it brings too much preoccupation with how to keep it safe once it is made…
If it feels like challenge, like doing something like it at least once, then that’s ok, but it is a frustrating “art” and eventually one might say:
” Gee, I could have stitched so much in all this time, something I knew *could* and should be done, and makes so much more sense…”
There are probably innovators who embroider on glass bottles or windows.. or something as crazy… maybe just to impress others :o} But I’m not going there with them. I feel like doing something that is likely to survive decades or even centuries, just keeping my feet on the ground (which is fabric)
“There wouldn’t be a sky full of stars
if we were all meant to wish on the same one.”
– Frances Clark
I am *so* looking forward to this!! I love finding new ways to decorate eggs and your final product looks *so* lovely! I’ll be interested in seeing which types of eggs worked best. I’ve got family that keeps egg-laying chickens and know that their shells (depending on the breed) are far more resilient than the eggs one buys on the grocery shelves. And duck eggs are thick and tough like concrete! Can’t wait to see! 🙂
Sounds like a challenge and I love a challenge. I’m looking forward to reading about the process and trying it.
this is fascinating. HOW do you embroider on an egg?? HOW? Please explain Mary!
Ooooh, I will, Wendy. I will! 🙂
what an interesting embroidery. I want to learn how to do it. It is absolutely intriguing.I will be looking forward to the next development.
I love these eggs – I am looking forward to your instruction on how to do them. Thank you so much for the idea.
These are beautiful eggs! I’m dying to know how you stitched it w/o cutting a hole in the back.
Re: hardener; could you use it on the inside of the egg? Maybe after removing the contents and rinsing it, drip a little in the inside and swish it round, then pour out the excess? Just a thought….
I can’t figure out how you can bring the needle back out of the egg, even using a very flexible needle or a curved one. I once stitched bead fringes through the holes of a tea ball where I could remove the lid to work, and it was still quite difficult.
I look forward to learning more.
Oh,yes, please do show us more! They are beautiful! I have a couple of dozen blown out eggs that I have saved hoping to find something to do with them. I was going to paint them, but I would like to try this this first. Thanks!
This looks like something I would like to try. I seem to enjoy detailed work, but I have to be careful of my patience…..I want it done so I can see how it looks. Where can I go to find out what I need for this craft and a tutorial or illustrated instructions. Yes, I need a map drawn for me and then I can go from there. Looking forward to your answer.
Goodness! That is something I want to try so badly, but my bumble fingers will surely kill the egg like Humptey Dumptey. And no putting this back together. I can’t wait for more though.
I wonder what bored soul thought to first embroider an egg? LOL NOW I need to know more–show us more!
Half of my embroidery is on eggshells. I sell them.
Patience and practice are probably the two biggest things needed for eggshell embroidery…
Oh, I forgot to mention. I do take the (only slightly) easier route and cut my eggs most of the time. I use the “panel” I put on to cover the stitching as a place to personalize the eggs. Also, I have yet to figure out how to create some of my patterns without doing so. The method Ms. Garcia uses is great for some stitches, but impossible for others (Iike securely sewing on shisha mirrors in the traditional way).
So far as hardeners, I harden the shell before I drill it. Two coats of watered-down Mod Podge or something similar (half glue, half water) put into the egg with an eyedropper, swirled around and allowed to dry for about 12 hours between coats, and then drill. Since I use store bought eggs (I use the shells from my family’s meals because we eat so many) they vary in hardness. Hardening before drilling and from the inside reduced how many shells break while I’m drilling the designs. I do use a spray-on coat on the outside to protect the designs when I’m done.
Cool video, amazing eggs! I admire your intrepid spirit for adventure, Mary! I may just watch, although I have been known to have fun dying polka dotted Easter eggs…
This is really intreging. I am very anxious to learn how to do tthis.
I’m not sure how hardeners work, but the first thing I thought of was that, if it’s a liquid, you could pour it inside. This would preserve the natural surface outside and still give you a stronger surface to work on..
This post finally encouraged me to replace the Emu eggs I lost in my housefire. Now, what to embroider on them…hummm…
Mary
I love this!! Can’t wait for you to show us how you do it. Or would buy your book if you published one. this is just fasinating.
Thank You as always for your emails. Your amazing and I look forward to them everyday.
Robin Marks
I only use my Dremel for filing the dog’s claws. It will be good to be able to put it to some other use. Look forward to making some of these for next Easter. I have a thing about spirals – can just imagine one going right the way round.
Wow! These are really beautiful. I can’t wait to hear more about embroidering on eggs.
I love it! can’t wait to tryit.
I now that you don’t want to destroy the outside of the eggs appearance by putting a hardner on it, but are you putting one on the inside?? like you do if you are doing eggshell artistry?
Hello mary,
its simply eggcellent. Thanks for the you tube link.
I love challenges and will look forward to more on eggs even though I think it may be more that I am up to Looks great
I have to take a moment to tell you how much I enjoy your blog. A friend on a quilting site got me hooked on following your blog. I had done all kinds of needle work (and let me stop to say that you CAN do crochet but it would be a new addiction)but it has been quite some time since I have done any real embroidery. Your post leave me in awe and I am learning so much. I love that you share your mistakes and your reasoning behind why you do things the way you do. A great learning experience and I just wanted to say thank you. ritzy
Hi, Ritzy! Thank you so much for your kind comment! I’m glad you enjoy Needle ‘n Thread so much…. now, if I can just keep you hooked, right? 🙂 Ahhhh. Crochet – I can cope with single and double crochets, but that’s about the extent of it! 🙂
I would LOVE to have a few tips on how to do this. Those are magical. I admit I wouldn’t have any inhibitions about sealing the egg from both sides. I’d want the gorgeous thing to last as long as possible. Can’t wait to see.
Hola… que bellos y felicidades por tener tan hermoso talento y tanta paciencia… la cual es una gran virtud…
I love the embroidery eggs . I first saw them on YouTube and hoped there would be some information on them, and this is when I found you. I hope you will do more. Thank you Mary. A friend in stitching . Roxanne
I see your point about not wanting to coat the outside of the egg. Have you tried hardening the inside?
Wow – that’s amazing. I would love to try that, but how heartbreaking would that be if it broke when you were almost finished?
Well, Gill, all I can say… I’ve done it, and it’s not really heartbreaking as much as maddening. It just makes me more determined to try, try again! :-/
mmmm,, muy lindo trabajo,, pero el huevo de avestru no seria mas facil bordar,, es mas duro,,igual se ven hermosos estos pequeños huevos..
Hi, I love it and cant wait to trying it, I will see how I go to not break the eggs lol
will you do a dvd in the futer ? if yes I would love to buy one.
Thank you for showing us this new craft love it.
joelle
I’m totally awed!! Smitten!! On board!! And any other verbs you would like to add. I’m always looking for new things to try and for the first time in a loooong time, my heart is fluttering and my fingers itching to get started!!
i’ll definitely try it. i Know won’t be easy. Keep us updated with your project.
If you want to see, embroidered egg only on the frontside, you can visit my homepage. Because you have a lot of links (au feminin) for my embroidered eggs on your site.
http://www.kunst-am-ei.info
Elisabeth
This looks like fun! I will give it a try. I used to paint watercolor, freehand, eggs for family and friends at Christmas. I had to quit because tremors in my left hand made for a lot of frustration. I can still embroider but don’t know if tremors will prevent the egg embroidery.
Wow how stunning. Sadly I’m probably out on this Craft as patience isn’t one of my virtues
What a beautiful and delicate Craft..well done. It seems your patience is definatley paying off. Thank u for the insight
Cheers
Como tira a gema e clara dentro do ovo?
Pode me encinar por favor