


Especially in historical works of embroidery, figures of people and animals were worked in needlepainting techniques, using either long and short stitch, split stitch, or a combination of stitching methods. To me, one of the most amazing aspects of figure embroidery is the eyes. Here, I’ve included some close-ups on eyes in works of embroidery. By studying them closely, you can get a good idea of how to achieve realistic eyes in your embroidery work – whether on embroidered people or animals.
The realism achieved by needle artists in figure embroidery is absolutely amazing! Skin tones, facial features and expressions, draped fabrics, backgrounds, greenery, etc., all unfold before the viewer in the same way that a great piece of painted art would. When we look closely at the stitching, we can appreciate the time, effort, and artistry in works of figure embroidery.
I always notice people’s eyes, and it’s no different when I look at an embroidered work. The artist uses the eyes primarily to get across facial expression – the eye itself, the glint, pupils, and shadows, and then the eye brow. In addition to the eyes in figure embroidery, the mouth also conveys the facial expression, but for now, we’ll look at eyes.
I’ve got quite a collection of eyes to share with you, mostly of people, but some of animals. These are all taken from historical vestments which I have had the pleasure of being able to see, study, touch (in some cases), and photograph. So I’ll be sharing them with you for your appreciation, and also as a learning tool. Sometimes, if we could just see up close “how they did that” we can learn to achieve similar results. If nothing else, we can at least be inspired and gain a greater appreciation for the art of embroidery.
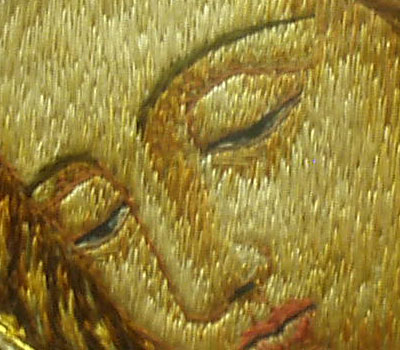
Note the direction of the stitches: for the majority of the face, split long and short stitch is used, going vertically straight down the face. Around the eyes, though, we can notice some different stitches in different directions. Directly above the eye lid, for example, split stitch is worked surrounding the top and sides of the lid, in a slightly darker flesh tone, and above this line of split stitch, you can make out a series of straight stitches in the same color as the outline worked over the flesh tones, horizontal and pointing into the outline. The lid itself is shaded, light in the middle (above the pupil) and dark in the corners. At the edge of the lid, above the pupil, is a very fine, dark line of stem stitch. At the base of the eye, on the edge of the lower lid, a line of stem stitch is worked in a lighter brown, to imitate the ledge of the lower lid. The “bags” under the eye (for lack of a nicer term!) are split stitch in flesh tones, but notice their direction – while they are all vertical (like the rest of the face), in the corner of the right eye, a few straight stitches are worked out from the corner by the nose towards the top of the cheek. On the left eye, the same thing happens, but from the outside corner of the eye, in towards the top of the cheek. The eyes themselves, half closed, are satin stitched in white, grey, blue, and black. The pupils are black, the iris is blue, shot with a tiny stitch or two of white in the left eye (for a glint – to give it that realistic, shiny look), and the whites are worked in a couple stitches of white, shadowed by grey in the corners. The eyebrows are worked in longer stem stitch, in a darker brown. This entire serene face, in context, is no more than 3 inches high.
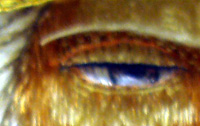
This is a little odd-looking, due to the camera picking up the gleam on the split stitches. Each of those spots of light is the point where one stitch splits the other. This eye is looking up – happy and brilliant. Note the direction of the stitches in the face – vertical – and the overstitching in stem stitch, to set in the details of the eye. Notice the white glint.
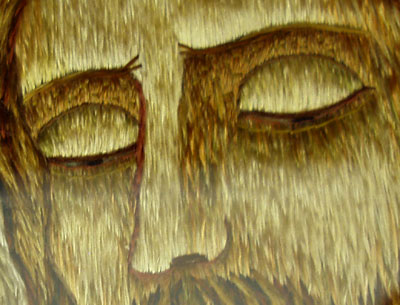
The anguish in this face – that of Christ crucified – is imparted by the shape of the brows. The death-like coloring (very dark around the eyes, pale elsewhere) is achieved through shading in split long and short stitch. Again, note the vertical direction in the stitching on the face, then the overstitching that establishes the shape of the eyes. The pupils are barely visible – dark straight stitches amidst lighter, in a horizontal direction under the lids of the eyes. Notice the bottom eyelids. They are achieved by a very delicate lighter line horizontally stitched under the eye.
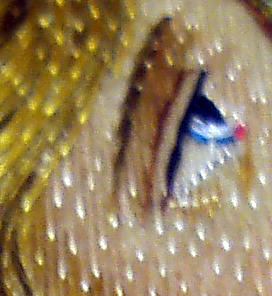
This is a solemn, serious, and majestic eye. The directions of stitches in the face are vertical. The details of the eye are set in horizonally. The eyebrow is stitched, horizontally, in white in stem stitch. The most amazing feature of this eye is the shading. The eye is looking down, and the lid, half closed, shades the eye. The shading is achieved with colors of grey in the whites of the eye, and dark blue in the iris.

This face is approximately 2 – 2.5 inches high. Unlike the previous faces, this one is stitched in two layers: a layer of long stitches in flesh tones which provide most of the shading, stitched over with vertical lines made out of very long split stitches, which also provide shading of the flesh tones. The vertical lines are less than an eighth of an inch, spaced evenly across the face and neck. The irises are stitched in light blue and white, the pupils in black, and the edge of the lid in black stem stitch. The bottom of the eye is also edged in stem stitch, in a lighter flesh tone. The eyebrows match the hair and are stitched in stem stitch. Note that the sides and bottom of the face are set off by a line of stem stitch, in a ruddy color.
Amazing, aren’t they?
Hi Mary,
These are absolutely beautiful. This is what inspires me more to do embroidery being able to Biblical embroidery is just a Blessing from God it truly is. thank you for sharing
hi mary,
i am jolly .i am living in kerala ,india.i had studied embroidery about 15 years ago.i am a teacher now. i am very much interested in continuing embroidery .i want to do this on a five meter cloth which we use as a sari(most indians wear this cloth) .so i wanted to know about some beautiful applique works. pls help.
jolly