


Well, I’m sorry to say I missed the round up for the Stitch Challenge, but here are my results of messing around with herringbone stitch. I’ve always seen herringbone worked mostly in lines. Sometimes, we get creative with it and wave it up a bit by changing the lengths of the “arms” … but I figured it would be fun to see how herringbone works out in the round – that is, stitched in a circle.
Sticking with my resolutions, I dug for some fabric, and came up with the same old velveteen I’ve been working on all year. Eventually, I will get rid of this stuff! But I like red, so I wasn’t too distraught. I didn’t want to use linen or evenweave of any kind. After all, there’s little point in evenweave when working around a circle!
Using a compass, I drew several concentric circles on tissue paper and marked off spots at even intervals around the circumference of each circle. I then transferred the dots to the fabric using a pencil. This would at least give me reference points for stitches. After all, drawing a circle free-hand is hard enough – stitching one? I’m pretty sure I couldn’t do it!
Here’s an overall view of my results with the whole stitching adventure. As you can see, I didn’t do anything too wild and crazy with the stitch.
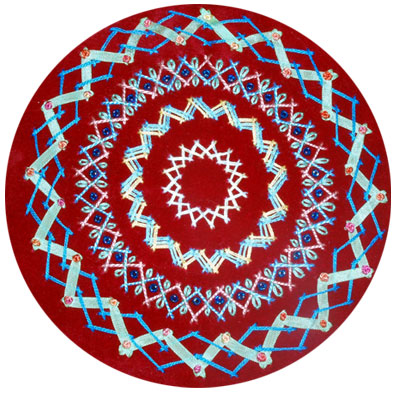
I began with the inside circle, and worked outwards. The interior circle is double herringbone stitch, worked in an overdyed stranded cotton. You can see how working in a circle slightly distorts the shape of the stitch, giving it a larger base on the inside diamond shape, with a narrower tip.
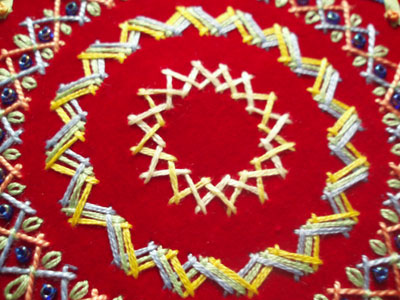
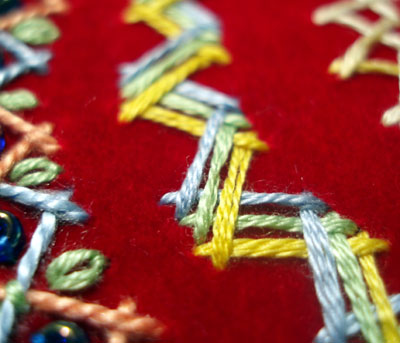
The second circle is herringbone stitch, woven and worked right next to each other in three colors. I wove the right side of the “V” of each stitch (the “up” thread) underneath the one stitched previously, to give an overlapping, folded look to the stitch.
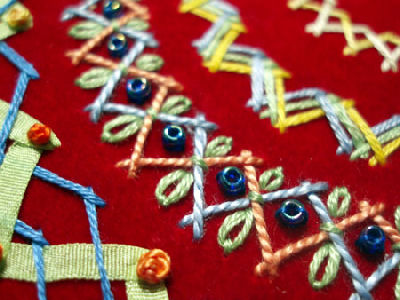
The third circle is double herringbone, worked in #5 perle cotton (pink and blue). I stitched a straight stitch in green stranded cotton over the middle intersection of each double herringbone, and two lazy daisy stitches shooting out from the intersection. Then, for the fun of it, I stitched a single blue bead in the middle. Unfortunately, I didn’t have the proper thread in my stash for securing beads, but I kept to my resolution and used only what was in my stash – color-matching as best as I could to a stranded floss, and using one strand to secure the beads.
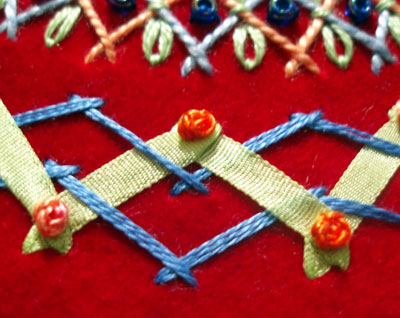
The last circle is made of two rows of very wide herringbone stitches worked in blue stranded cotton, and then the double part of the herringbone was created using a green silk ribbon. After stitching the herringbone in ribbon, I added a French knot on each tip of the green ribbon. The knots are in an overdyed cotton, the size of #5 perle.
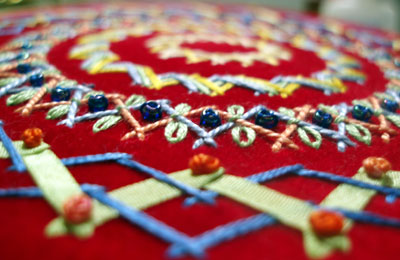
I always like to take shots of my work at or close to eye level, while it’s still in the hoop or frame. I don’t know – I just think it’s kind of neat.
So there’s my experiment with herringbone in the round. I’m looking forward to seeing what’s up for the challenge this Tuesday, though if I keep missing the round up, I don’t think I’ll bother with the pressure of keeping up, since I’ve only got a short few hours on the weekends to work on this, and can’t post until Sunday. We’ll just have to wait and see!
If you want to check out all those included in this week’s round up, check out the inaminuteago blog.
The herringbone circles are lovely, mandala like! Love the red background!
beautiful work!
How beautiful! That looks GORGEOUS!
I’m sorry you missed the round-up, because your work is (no surprise) beautiful, your pictures excellent, and your commentary very helpful. Thank you for such a detailed post, and here’s a plea from the peanut gallery: please keep up with the weekly “pressure”, because your loyal fans/students need you and want you!
By the way, your rules for yourself (the 6″ hoop, the use of the stash, the time limit) were useful for me, too.Thank you for those as well.
Your sample is wonderful and what great instructions.
I am a beginner at this blogging game and would be dissapointed not to see your work in future.
I love your herringbone circle! I am only a beginner, so I’ll stick with straight lines LOL.
Beautiful job!
Love this piece! It makes me want to get out everything and try it myself…. I might just do that!
Thanks Mary – just browsing through the site over lunch break and you’ve solved a problem for me! I have a round windowframe to embroider as part of a piece I’m working on, and using herringbone stitch in this way will be perfect! To get my spots in the right place I’m going to try marking of dots through a round piece of plastic canvas. The canvas itself is ‘in the round’ so I’m hoping that that will work!
No me caso de ver sus creaciones, son maravillosas, le agradezco mucho su generosidad al compartirlas con todo el mundo. soy una admiradora de su excelente trabajo, y me a servido mucho para hacer algunos sencillos bordados sobre mezclilla
Hi Mary,
Now that I see this beautiful work I noticed you did it on Felt. May I ask do you put the felt in a Hoop?
Thank you
Jenn G.
I think this one is done on velveteen. When I work on velvet or velveteen, I always use a hoop or frame. When I work on felt, I never use a hoop or frame. Hope that helps! ~MC