


This past week, I began a practice embroidery project featuring goldwork and beetlewings. I began the project last week, and I thought the design transferring process might be interesting or helpful to you, so I took pictures. Here’s a “how to” on transferring a hand-embroidery design onto the fabric, using the prick and pounce method.
Prick and pounce is an old, old method for transferring embroidery designs. It’s not really necessary (of even ideal) for transferring every kind of embroidery, but it’s great on certain types of fabric – though even then, there are alternatives!
But I like using the prick and pounce method, as it is accurate and it gives you a chance to make corrections before your embroidery design is set in stone (or at least paint).
So, here’s what I did to transfer this goldwork and beetle wing design onto red cotton velveteen.
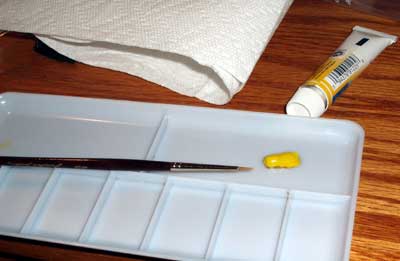
After finalizing my pattern, I traced it onto tracing paper. I didn’t do a great job tracing it, but I figured I could make corrections as I went. Then, I got out the tools I use to prepare the paper: a paper piercing tool and a foam pad (also for paper piercing).
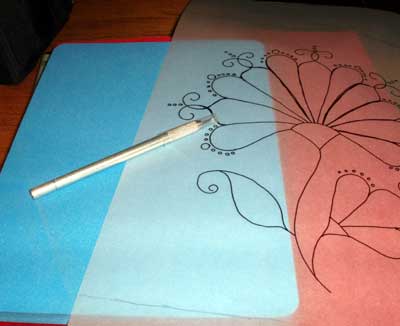
Both of these tools are really handy! You can find both of them at Nordic Needle. Alternately, you can use a couple layers of craft felt and a needle with the eye-end stuck in a cork. The tool is nice, though – easier on the hands! The method for piercing the paper is simple: just pierce all around the design, in close increments (about 1/8″ apart). Make sure you don’t miss any lines in your pattern (like I did!) by holding it up to a sunny window or a light to check it.
Once you’ve pierced the pattern all over, you pin it or tape it to your fabric, which is already framed up and ready to go. I admit – I use scotch tape. I just find it easier than pinning the pattern on the fabric, and, if you go gently, you don’t have to worry about the pattern moving about.

Then I lay down a paper towel and carefully open up my pounce container and get out my pouncer. I never open that stuff until the design is pricked and ready to go! It’s dusty, and, if spilled, not only would it be wasted, but it would be a jolly mess to clean up. White pounce is made out of ground cuttlefish bone (like the cuttlefish things you hang in a bird cage!) Dark grey powder is cuttlefish bone and charcoal mixed. I think you could make your own pounce out of a cuttlefish bone from the pet store, but I have tried it out of regular ground chalk, but it doesn’t work well, as it doesn’t grind to that nice, soft dustiness. You can purchase pounce and the pouncer from Lacis. But you can make your own, and instead of the pouncer, you can just roll up a small strip of craft felt and use it.
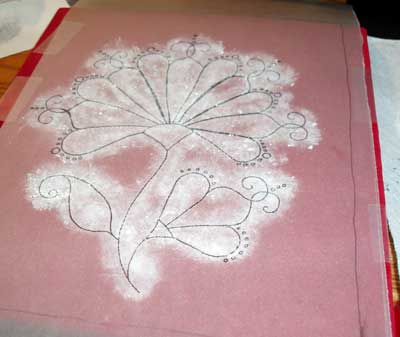
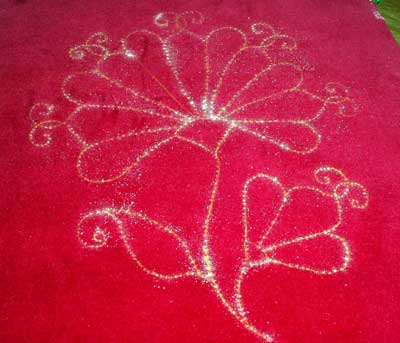
Gently pounce all over your design, using the powder rather liberally, although it really doesn’t take that much. It seems like you’re using a lot, but I’ve had this stuff for years, and have hardly made a dent in it! Pounce gently over each line in your design. With the pouncer, the nice thing is that the weight of it (it’s light, but not as light as a piece of felt!) will do just the right pouncing for you. Hold it right above your pattern, close, and sort of drop it on. And that’s all there is to it. After you’ve pounced your first area of the design (preferably near a corner), gently lift the corner and look underneath the paper to make sure the design is transferring. But don’t move the whole pattern! Just lift and peek! When you’re finished, your project will look like the photo above.
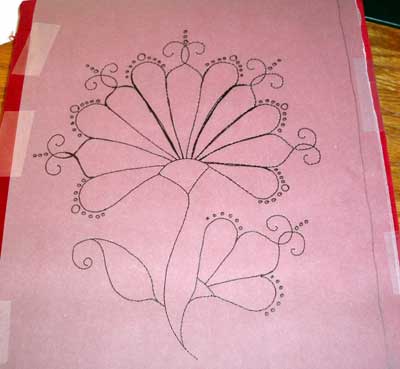
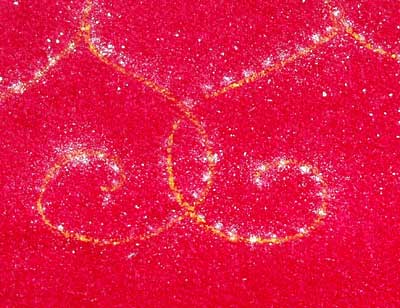
Then you gently lift the paper off – and there’s your pattern! Notice that I missed pricking one of the lines in the large flower (the right side of the fourth petal on the left). I will fill that in during the next step.
The next step requires a fine-tipped paintbrush (I use a small liner) and watercolor paint. I used yellow for this. Connect all your pounce dots with the watercolor, using a light hand and keeping the line as fine as possible! The paint will actually have to be rather wet, so use water to dilute it. Velveteen seems to absorb more than linen does, so I had to get used to that and work on getting the right consistency. Draw the brush lightly over the fabric, barely touching it. You will find that the pounce gums up the brush a bit, so rinse your brush often.
This is the fabric with the design painted, and with the pounce still on it.
And here’s a close up of the painted lines and the pounce.
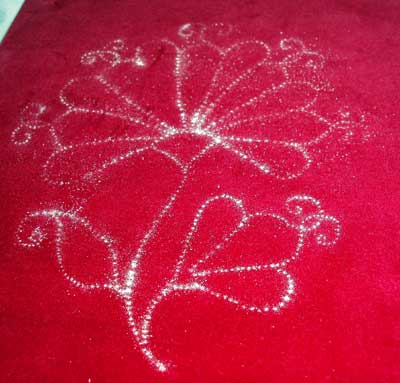
After you finishing painting in your lines, pick up your project and, holding it in one hand, click it on the back with your fingers, like you’re flicking something. Do this until the pounce is gone.
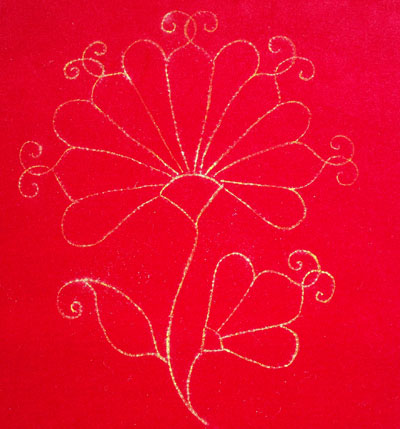
And here’s the design with the pounce flicked off. If any remains (you can see some white still in the design, sort of stuck to the paint), take a soft brush and gently brush it away. Now I don’t have to worry about smudging my lines or my pattern fading off over time, or anything like that.
And that’s how you transfer an embroidery design using the prick and pounce method!It actually took me only about half an hour to do this – but the design is relatively small, and my fabric was already framed up. What think you? Worth the trouble?
Hi Mary I will have to try that I use the same but use a lead pencil to prick in each hole then join them up after using pencil lines, I must say yours is much better as the pencil can make the your stitching a bit dirty at times and then your project has to be washed
Have a great day Joyce
Hi, Meeta –
I sometimes use pencil, too, for tracing designs, either with a light box or a sunny window. I only use it, though, when I’m working a project in colored thread. If it’s all white thread, I’ll usually use a blue pencil. But on certain fabrics, or for certain “big” projects, I like the prick & pounce & paint method!
A lot of people tell me that transferring the design is the worst part of a project for them. I always see the transferring part as a hurdle, but once I get going on it, I love doing it! It’s the finishing work that I have the worst time with!
Mary, your lines came out so nice and sharp. Do you have any problems with the paint bleeding (spreading)?
Hi, Margaret – no, not at all. I haven’t had that problem with any fabric that I’ve worked on (yet), including cotton, linen, silk, and now this velveteen. The key, I think, is the correct consistency in the paint (not “too” watery) and a very light touch – you barely touch the fabric with the paint brush.
Just looking up “spangles” again and found this :
http://tinyurl.com/yv9bb6
piccies of the process using charcoal dust
animated lessons on couching and satin stitch, but I just get blank pages with “Done”.
hello Margaret…
So a tip from the Famed Lesage broiderie in Paris:
Use a combo of resin powder mixed w/ chalk.. Pounce then spray with denatured alcohol…done.
saw them do this in 5 min flat.
et
Indeed, I read on a French forum that the powder is not just any old powdered charcoal or cuttlefish, but that is has a sticky component named “colophane” that makes the tracing stay put after being pounced, if alcohol is sprayed on. So there is no need to retrace everything with a paint brush! It’s hit and run, so to speak, or rather, pounce and run.
Aware of the magic ingredient in the powder I splurged on two eensie-weensie vials of the stuff, one blue, one white, manufactured by Canetta in Italy, and sold for 10.30€ each, which is horribly expensive as the vials are no bigger than miniature jam jars, 10gram of powder by the look of it (weight not indicated).
After forking out the €€ I have found some of this colophane sold by an online “droguiste” at a much cheaper price. Colophane is a residue of resin that oozes from some pine trees. The substance is also used by ballet dancers, they dip the tip of their toe-shoes in it before dancing to reduce drag and increase velocity when they spin.
I will try some combinations of cuttlefish powder (and also blue laundry powder) with colophane and expect after som trials to find the optimal dosage at a total cost much lower than the Canetta “spolvero”.
Hi Mary, I’ve been following your posts and articles recently, they are awesome and very fruitful with knowledge. I’ve been so interested in goldwork and ur exquisite work and detailed explanation made me more eager to try it. I just managed to make my own pounce powder from scratch and I thought if I would share it with you. I purchased from my local artshop Derwent Willow Charcoal Chunky XL and a Derwent Sprinkler and with a little of elbow grease I had roughly more than 180g of super fine silky powder. Next I’m planing on doing the same with white charcoal. This is the perfect way to make instant pounce from scratch that cost next to nothing.
Great idea! When you get a chance to use it, let me know how it goes!
Hello,
Could you please explain how you decide whether to use a watercolor paint and fine brush, or a 003 micron pigma pen? I saw you listed these materials to transfer designs on fabrics that cannot be wet or washed.
I am looking to embroider on poly satin and velvet, but the design is very thin and small (using ~3cm square fabric), so I am looking for the best method. The other method I am considering is stitching through tissue paper, but since the lines will be so thin, the stitching may be too thick to cover. Any advice and wisdom you can give would be very appreciated! This is my first project. Thank you!
Sorry, I thought of other related questions:
Would using black/smoke invisible sewing thread (fabric is dark purple and purple) be advisable for stitching through tissue paper? Can sewing thread be used to stitch trace in addition to basting the tissue paper, or should only embroidery thread should be used? Thanks so much!
I think a stronger sewing thread works well when using the tacking method. Embroidery thread – especially when you pick the stitches out – is a bit fuzzy. Not sure about the dark thread on dark fabric. Personally, I wouldn’t do it. The whole point of transferring the design this way is making it visible, and I think it would be hard to see a dark thread on dark fabric.
If I use the micron pen, I always iron the fabric face down right before stitching it. However, with a polyester blend and with velvet, this wouldn’t be the best approach. In fact, if you’re using velvet, the micron pen won’t do it for you, I don’t think. You might test a bit of the fabric with both methods to see which one gives you the better transfer line. When you use the tissue paper tacking method, you can remove your tacking stitches as you approach that area of the design. I’d definitely test stitching on your chosen fabrics first. Stitching on any fabric with a pile is going to yield different results, depending on your approach. Embroidery stitches tend to sink into velvet, and they can get lost, especially if you’re doing very fine stitches with single strands of floss.
I used to make my own powder pounce out of a fine mesh fabric, filled with talc powder just with a rubber band to hold it. That was for textile design drawing to set/dry wet paint. It felt like an old friend