


I’ve had buttonhole filling on my embroidery video list for a long time! It’s been one of those “unlinked” stitches that’s been nagging me. I finally got around to filming the stitch – in two varieties, detached and attached.
In detached buttonhole filling, you don’t pass through the fabric as you work the buttonhole filling. In attached, you do. Attached buttonhole filling gives you more scope, I think, for varying the placement of stitches, so that you can create effective filling patterns. The detached buttonhole, though, gives you a bit more room for dimensional effects, since you can take out part of your foundation fillings and fold the buttonhole area back on itself – or make petals or leaves that stand away from the fabric.
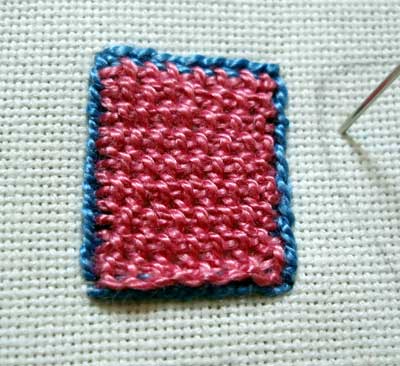
Here’s a photo of the filling. I worked the edge and the filling in contrasting colors for the sake of clarity.
And here are some in-progress photos of a leaf-shaped area filled with the buttonhole filling.
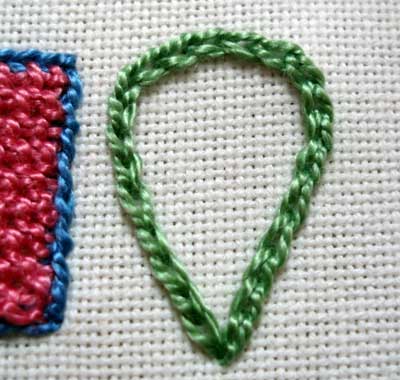
First you start by outlining the shape.
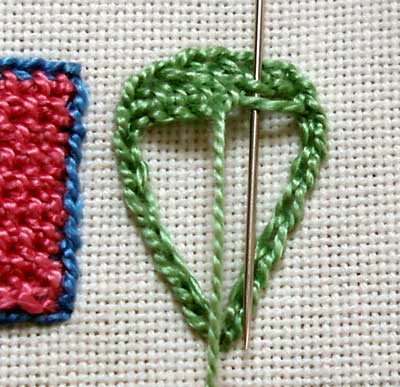
Then you begin to fill it from the wide part to the narrow part.
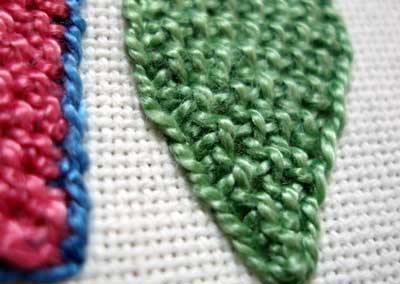
You have to decrease the number of stitches in the rows as you work towards the tip.
The stitch begins with outlining your shape to be filled, using either a reversed chain stitch, like I do in the video, or you can regular chain stitch, split stitch, or even backstitch. The advantage of the reverse chain is that it provides you with the loops to catch your buttonhole stitch in, and it tends to be a bit rounder or fuller than a regular chain.
The stitch is not so complicated, but if you aren’t familiar with how buttonhole stitch works, you might want to take a look at the buttonhole video tutorial. This will help you get the knack for buttonhole, especially where the working thread goes in relation to the needle.
Here’s the video:
For more video tutorials, please visit my collection of how-to videos for hand embroidery.
Have fun with it!
Looking for inspiration & information on hand embroidery?
There are all kinds of reasons to sign up for the Needle ‘n Thread daily newsletter! Check them out and sign up today!
If you like what you see on Needle ’n Thread, if you want to be a part of keeping the website thriving (and free of annoying network advertising), why not become a patron on Patreon? Check out my Patreon page here, where I’ll occasionally add special needlework bonuses for patrons.
If you shop on Amazon, you can support Needle ’n Thread without any extra expense to you by visiting my Amazon Recommendations page here, where you’ll find books and sundries for the needleworker available on Amazon.
yay i just found a new stitch to go on my sketch book cover!…great work Mary ..keep em’ coming___;)_____Macabrechaos
Mary,
Do you think detached buttonhole filling would look good for hibiscus petal for a dimensional look? I’ve been thinking about it and your opinion would be helpful.
Deepa
Mary, I love this stitch! Nice texture and it looks like fun too! Sean and Grace enjoyed watching the square get filled in. Sean was very concerned about you being careful with the needle though! Keep those tutorials coming. It’s so much easier to figure out a stitch when someone actually shows you!
Hi, Deepa –
It would have to be a very plain looking hibiscus – You couldn’t achieve, for example, the nice shading that makes a hibiscus so beautiful – or the ruffly edge of the petals. Also, the petals overlap.
If you were looking for a stylized hibiscus, you could probably use it. You can change your thread while using the buttonhole filling, so you could get some different shades in there, but I don’t think you’d get a realistic looking hibiscus.
You’re specifically wanting to do a dimensional stitch? I’ll have to look around to see if there’s anything else I could recommend.
On the bright side, like I said, you can overlap these – it would take a little work, and you’d have to use an outline that’s chain on one side, and couching on the other (so you can cut the couching stitches away so the petal picks up off the fabric). Then you could fold that back, work the next petal underneath the previous, and so on around the flower.
Hope that helps!
Yep, Sean – embroidery can be really dangerous with all those sharp needles around! It’s really more fun to watch the square fill up when you can put the video on fast forward!
Re : “it would take a little work, and you’d have to use an outline that’s chain on one side, and couching on the other (so you can cut the couching stitches away so the petal picks up off the fabric). Then you could fold that back, work the next petal underneath the previous, and so on around the flower.”
– in Stumpwork technique work, I learnt to do buttonhole stitching around the edge, and cutting (very) carefully around that to detach it.
Couching is a new idea for me. You’d have to be awfully careful not to cut the couching stitches.
You say “so the petal picks up off the fabric” – do you mean fully detached on that side? And still on the fabric on the other side with the chain stitch edging.
Even tho you are overlapping the petals, aren’t you going to get partial holes in your background fabric?
I need words of one syllable, I’m afraid!!! It sounds neat, but I don’t quite get it!
Hi, Megan –
Actually, you’d be couching down only part of the outline. The part that remains fixed to the fabric could still be, for example, chain stitch.
The part that you want to be be free of the fabric, you’d use a couched line as your outline. You’d catch the couched thread with the buttonholes. When you’re finished with your filling, you’d turn the work over, and cut the couching threads, so that the couched thread is no longer attached, leaving that area of the buttonhole filling detached from the fabric.
Hope that helps!
Thanks Mary,but I went through the bh samples you’ve done here and just got the feeling that it may not look so good on hibiscus,just as you said.Long and short is another option.But then the petals won’t be dimensional.Any ideas?
Deepa
Hi, Deepa –
Well, off the top of my head, nothing. I would automatically have said “long and short stitch” – needlepainting, and so forth, but you’re right – that’s not really dimensional embroidery. I’ll ponder it a bit!
MC
Aha!
Alison Coles’book All That Glitters has good instructions for detatched petals in stump work which may help with your hibiscus the second edition has been published by Search Press and they are distibuting it inseveral countries including USA
And of course, detached buttonhole outlined with reverse chain stitch is what the embroiderer’s at Plymouth Colony are using to reproduce the 17th century jacket called “the Laton Jacket”. Their experiences and lots of pictures are at “The Embroiderer’s Story”
I know you know the blog well, Mary 🙂
oh man, brilliant stitch! very well executed.
Hi Mary,
Your website has been a great reference for me. I’m working with my friend Wendy on a project with interactive embroideries that react as buttons when you touch them. We’ve been freewheeling for a while, but quickly understood the need for correct stitching patterns when we ran out of DMC… (we’re using mayflower instead by the way) I’ll get some images online soon, so if you’d be interested to see what you’ve enabled us to produce, please feel free to.
greetings from Belgium,
Dennis
These stitches look very beautiful and are easy to do with some imagination. How helpful is it to me! I will try it with my students. Thank you.
Hi Mary,
I am interested in doing this in the shape of a leaf, how do you decrease the stitches? I have not seen or read about that technique before.
Thanks!
Christi
gracias por compartir el don que le regalo el señor .
Thank you for the video on detached buttonhole stitch. I am finding it a challenge to achieve this but with your help I hope to be successful!