One of my goals this weekend was to sit down with the new Gilt Sylke Twist and try it out with different embroidery stitches. I didn’t get very far, but at least I started!
First, I mused about what to embroider. I didn’t want to work random stitches. The thread is a bit dear to use on random stitching. But then, I didn’t want to spend a lot of time thinking up or sketching out a design, either. I just wanted to get to the stitching!
I had a piece of good linen already framed up that I was “trying” a different failed experiment on (more on that later), so I salvaged a corner of that, took a pencil, and drew whatever came to mind straight on the linen.
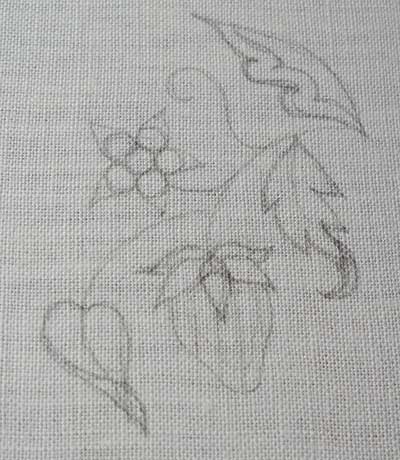
There’s nothing too naturally accurate here – stylized leaves, an attempt at some sort of blossom, and a strawberry. Spring must be coming – I’ve had strawberries on my mind lately!
My plan was to embroider the strawberry in red GST, in satin stitch, with a lattice over it in pink GST. That’s still my plan. I just didn’t do the strawberry first, but I’m thinking I should have.
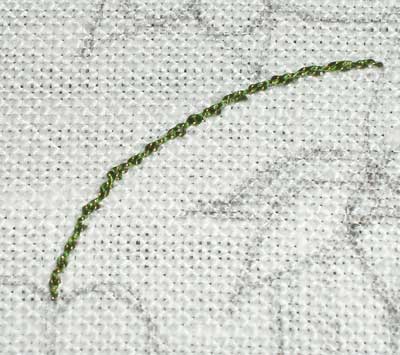
To get familiar with the GST, I thought I’d stitch a line of stem stitch. I began with a #7 hand-made Japanese needle, but I think it was too small. I switched to a #10, which seems a little big, especially when working the stitches in the picture below. But it was ok for the stem stitch.
You can see that the stem stitch is a bit on the wobbly looking side. It took me a bit to get used to the thread. It’s quite stiff. I should have been a little more careful and a little more patient.
One you get used to the thread, though, it’s great to work with. I don’t suggest a “sewing method” with stem stitch. Take your thread all the way to the front, all the way to the back (“stab” method). I like the noise the thread makes passing through the fabric, actually. It’s a barely there kind of zipper sound!
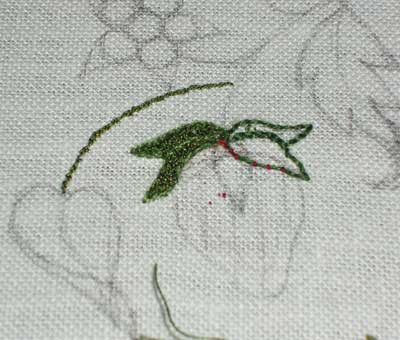
I’m pretty sure I’m working this out of proper order. But I wanted to lift the strawberry leaves above the strawberry itself, and to do that, I figured I’d have to stitch the leaves, leaving part of them detached, lift them up, and stitch the strawberry underneath. I now wonder if I’ve left enough room to manage that, but we’ll see.
The middle leaf may be abandoned altogether. We’ll see on that, too!
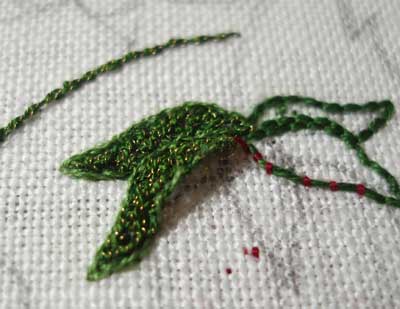
Here’s a close-up, so you can see the sparkle. The Japanese #10 is not ideal for the detached buttonhole in a tiny space – it’s too fat, in my opinion! I outlined the leaves in backstitch in a matching dark green, and couched the area of the outline of the leaf where I wanted to lift it up from the ground fabric. You can see the red couching stitches in the leaf outline on the right. After filling the leaves with the GST, I took a barely lighter green – one strand – and stem-stitched around the leaves to give them a finished edge. I whip-stitched the part of the outline that was couched, so that I could still lift the leaf off the ground fabric.
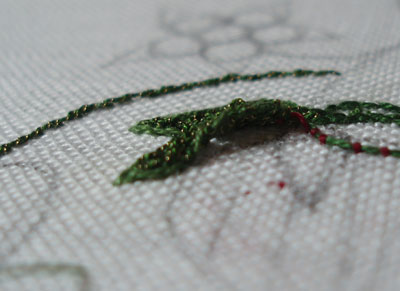
And that’s a little bit of an angled close-up so you can see the dimension.
My plan from this point: finish the leaves, then do the strawberry (in padded satin stitch with a lattice over it). Some of the leaves will be long-and-short stitch with regular stranded silk, but I will probably edge them and add veins with the GST.
I haven’t quite decided what to do with that ridiculous-looking “blossom” yet. I’m open to suggestions!
And the stems and vines will be worked in different line and chain-type stitches. The main stem, I think, will either be worked in chain stitch or in heavy chain stitch – or perhaps just a wider band of stem stitch worked as a filling, so that I can add some shading. We’ll see!
More updates later – back to my needle and thread!


Maybe you could satin stitch the dots on the blossom in stranded silk, then use the GST somehow behind or around the petals.
Looks good so far!
Mary it’s very pretty so far. I looked at the cap that was done in GST and found it shows the thread qualities best. It looks like needlepoint tent stitch or gobelin stitch. Even using a stronger tighter weave fabric would really show off the personality of the thread to its best look, I think.
Trellis stitch in a spiral as the centre of the flower?
I got Jane Zimmerman’s Art of Embroidery yesterday, so I actually understand all the methods you are talking about! 🙂 🙂
It looks lovely.
I’ve decided that I want some green, to use on leaves so it gets spread everywhere, and I wonder how it’d go on canvas if I were to use some on my central slip, in tent stitch??? (I was thinking purple there)
And some Japanese needles.
Thankyou SO much for experimenting with this. The needle issue alone would have stopped me in my tracks when I tried to use it.
Mary, this made me smile. I bought red and green GST and was trying to figure out what to do with them. I also thought of a strawberry; the colours seem such a good fit.
Keep going! I can’t wait to see what you come up with.
I just recently did a tablecloth with strawberries and the flowers were mostly white with touches of lavender on the edges and yellow in the centres.
Lovely,especially the dimensional part.Could you please do a step by step on that?
Thanks, all!
Laura, I thought about tent stitch – I may work that in somehow!
Megan – Good book choice!!
Margaret – yeah, I don’t know what the thing is with strawberries lately. I noticed some on Just String this week, too!
It worked out “ok” with satin stitch. Close ups later!
I’ll try to do a step-by-step on the dimensional part, though I don’t think I took pictures at every step. But I can write it up when I post the next set of pics!
Thanks for the comments!
MC
It is a lovely project and has motivated me to order some GST.
I can find where you were musing about what stitch to do the main stem in but I can't find what you ended up using… can you tell me?
Thanks so much,
Jeanine in Canada
Hi, Jeanine – I'm sitting here looking at the finished piece right now! The main stem is worked in heavy chain stitch. You can find the video tutorial here:
Heavy Chain Stitch
Enjoy!
MC
Thanks so much Mary, I'm anxiously awaiting the GST to arrive in the mail!