


The trellis stitch is a filling stitch used in hand embroidery. It’s detatched from the fabric, like the detached buttonhole, but it makes a fuller filling than the buttonhole. It can be worked closely packed, with a firmer tension on your stitches, or you can pull the stitches out a little bit to give your embroidery the trellis look, with larger open holes between the stitches.
The trellis stitch is used in stumpwork quite a bit. It’s a good stitch for adding dimension, especially when stitched in a circle. An excellent example of trellis stitch worked in a circle (spiral trellis stitch) can be found on Just String, where Jeanne worked up a gorgeous photo tutorial, using an amazing sampler she’s working on, to show you how to do the spiral trellis. She even shows you how to make your circle stand up from your fabric, or lay flatter. It’s really a terrific tutorial and her stitching, as always, is minutely perfect, so do check that out when you get a chance.
Another great source of information on the trellis stitch can be found at The Embroiderers’ Story, the blog associated with the recreation of a 17th-century embroidered jacket at Plimoth Plantaion. There, you’ll find several posts about the trellis stitch, and if you take time to stroll through the website, you’ll probably find even more, as there are lots of photos of motifs worked with trellis stitch. You’ll also find, in PDF form, some photo instructions for trellis stitch, worked out by Tricia Wilson Nguyen. The stitch method is slightly different from the method I’m showing you below, although it is the same stitch. If you check out Tricia’s directions and look at her up-close photos, you’ll see a difference in the way the threads set up – the loop on mine stays more or less vertical, while hers cross into each other a little more. They look more distinctly like a trellis. But you’ll notice on the lower right hand section of her finished trellis stitch photo (in the PDF) that the stitches look vertical there. I think it has to do with the wrapping and pulling of the thread. I lay my thread on the fabric and pull the stitch down. In the Plimoth Plantation directions, the needle points upwards, and the working thread is wrapped around the needle for each stitch.
I learned the trellis stitch through Erica Wilson’s Embroidery Book, which is no longer in print, but can be found used through Amazon and other used book sources. Although the book is mostly in black and white (including the illustrations), it is an excellent resource for learning stitches, especially if you are interested in historical embroidery. The stitches are shown through drawn diagrams, but they are very clear, and have lots of good explanations along with them. I think this is one of my favorite older stitch dictionaries. BUT – be warned – it doesn’t have the same kind of “eye candy” as the new books today have.
Here are some photos for you – they’re super-up-close…
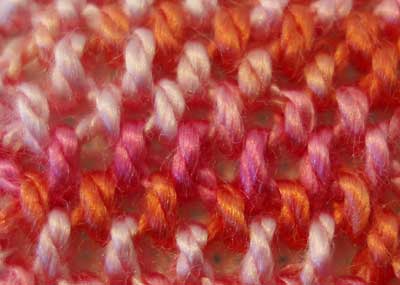
This is the little rectangle worked in the video. The stitches are kept pretty close together, and you can see the vertical direction on the loop.
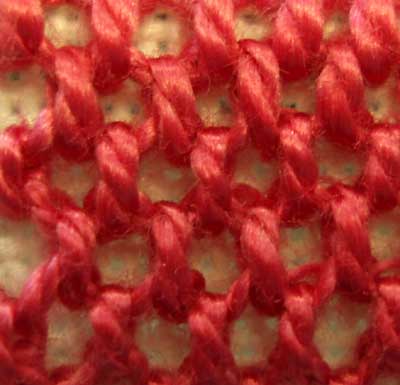
These stitches are pulled a little apart, so you can see more of the ground fabric, as the holes between the stitches are bigger.
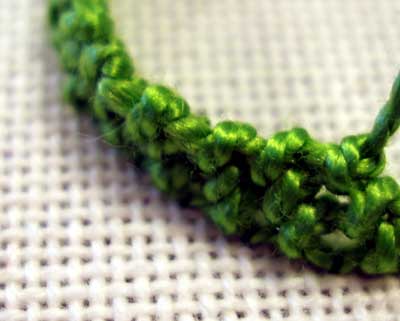
Here, I started building a circle. The “wall” goes pretty much straight up at this point, because I hadn’t begun to decrease, by leaving out a stitch. If you vary where you begin your decreasing, you can get different dimensional effects.
Before you watch the video, a few notes:
1. Let it buffer a bit before playing. The video is almost 10 minutes long (sorry)! And … yes … I do manage to prattle most of the time (sorry!). Oh, and do ignore the end – “That’s pretty good!” What was I thinking?? But having just managed to record almost 10 minutes of audio instructions off the cuff (well, ok – it was about the fifth time through it, after making all kinds of silly blunders and starting over!), I just couldn’t re-do it, just because I sound like a dork at the end.
2. Try to ignore my ever twisting thread. The disadvantage of filming, especially long sequences, is that I can’t drop my thread to let it untwist!
3. I’m using perle cotton #5. Trellis stitch works well with all kinds of threads, though, and the results can be a lot finer and “airy” looking if you use a lighter thread – it just depends on the look you want.
4. It’s not a hard stitch, and it works along pretty quickly once you get the rhythm going. Don’t be intimidated by it!
5. Have fun with it!
Here’s the video:
For more video tutorials of hand embroidery stitches, please feel free to visit my collection of how-to videos for hand embroidery, where you’ll find a whole bunch of embroidery stitch videos!
Enjoy!
Looking for inspiration & information on hand embroidery?
There are all kinds of reasons to sign up for the Needle ‘n Thread daily newsletter! Check them out and sign up today!
If you like what you see on Needle ’n Thread, if you want to be a part of keeping the website thriving (and free of annoying network advertising), why not become a patron on Patreon? Check out my Patreon page here, where I’ll occasionally add special needlework bonuses for patrons.
If you shop on Amazon, you can support Needle ’n Thread without any extra expense to you by visiting my Amazon Recommendations page here, where you’ll find books and sundries for the needleworker available on Amazon.
Well, come on Mary, it IS pretty good! Don’t be afraid to say so!
What a pretty filling stitch that is. I’ve referred my embroidery students to your site and they love it! One of them finished her piece between the second and third classes by looking up the stitches on your site. I’ll post pictures of the finished projects on my site after tonight’s class.
Thanks for all the great embroidery information you share!
MGM
Well, that’s a little bit of magic to watch the last row go in and all the stitching sort of blooms and settles into place. Very cool, Mary!…Love those spiral trellis flowers on Just String!
-Jeannine
Dork?
Yeah, right…..
hee hee hee
I think you sounded calm and very patient – even after spending so much time just to create the video. That is not dorky at all! My thank you for taking the time sounds insuffient – so I will give you a WOOOOOW! Linda K
thank for the new video tutorial
I’m new at this comment posting…I hope I got this right…I’m commenting on wool felting. I’ve never tried it. Some years ago a friend told me she decided to felt the piece she was knitting and use it to make a purse. I’d never heard of felting and was intrigued. She showed me several lovely things she felted and I’ve wanted to try it ever since. I’ve recently become an empty nester and want to try my hand at several new things now that, in theory at least, I’ll have more time. The mind is willing but the body can only stay awake so long in any one day. I wish sleep wasn’t necessary. I’d get so much more done in a day!
Thank you for this wonderful demo. Linda
Hi Mary!
Thank you for the tutorial. I saw trellis stitch on the pintangle but didn’t feel I could try it until I saw your video, which she mentions. I’m one of those visual people so seeing how the stitch is made in a moving film helps a lot.
I’m going to give it a try!
Thanks!
Absolutely wonderful! Prattle on!
And that “That’s pretty good!” comment? I love it. That’s exactly how I feel when my embroidery turns out right. 🙂
Hey mary…… its your favorite nubie embroiderer… (is that a word…lol0
i have a new cool project im doing (more like planning) and i want to use really cool stiches besides the regular ones i use (stem stich and satin) so i was thinking of using the trellis stich. I love the way your version comes out. Its easy on the eyes and quick to learn. I was just worried about how to use it for odd shapes….decreasing one row and increasing the next???? could you please explain that to me????
i and i would say everyone who uses this website appriciates the time and effort u take to create these tutorials
….hope to hear from u soon
jules
Hi, Jules!
Yep – it works fine for increasing and decreasing. You just … well! You decrease into the shape, by skipping a stitch (or two – if two, skip one at the beginning of the row and one at the end – depends on the “incline” of the decrease). To increase, you add stitches – an extra one in the same loop at the end of a row, or one at the beginning and one at the end. I find (personally) that it’s easier to decrease and keep the stitches looking right than it is to increase, but they both work!
Hope that helps!
Best regards,
MC
I am finding your videos very enlighting. To read a book or view a web page the has written directions can sometimes be confusing but,Can’t miss when you can see how it is done! Thank you for all of your hard work.
Hey Mary,
How well do you think that this would take to curves? I’m going to do a snake and I really like how the trellis looks. It looks just the right amount of scale-y.
Erin
Hi, Erin – It’ll do well on curves – easier on “gentle” curves than tight ones, but it works well! ~MC
I am fascinated with your website, which I came across yesterday. I have been looking through the tutorial videos but some of them, for instance the bullion knot and trellis stitch to name a few say “here is the video” but the space is in blank so I am unable to see the video. I find the videos that I have been able to see very well explained and helpful. For this reason I am very sorry I am unable to see all of them.
GJ
Wow, Mary, you have saved my shredded sanity. I have been trying to work a butterfly on a crazy quilt, and trying is the word. First it was long and short stitch with overdyed silk. Not so good; out it came. Then I tried shading with different coloured threads and I am not sure why, but it looked terrible too – mostly due to my dreadful stitching (unusually dreadful). Now I am trying to fill it with lines of chain stitch in different shades, but this – this is perfect for it, as long as I can cope with the increasing and decreasing. I think my butterfly will look splendid, and if he does I’ll send a photo (not that you need another photo of some amateur’s work, right?) Also your comment at the end of the video is – what do the kids say – right on! Yes, right on, man!
Oh, DOOOOO send a photo!!!
Glad the video came in handy!
MC
Really happy.Very clear and able to understand without any doubt. Thanks a lot.
Do you have a tutorial on how to make the wall like you did with the green? And there wasn’t a thing wrong with that video. Much better than some who natter along, 100 miles an hour, just because they think there can’t be any place on the video with no talking. lol
I watched the video on YouTube. Twice. I tried the stitch. Thrice. The problem I was having was with the little “bridges” on each end where the thread bridge is connected to the last (or first) knot and then anchored.
If we stitch those bridges we end up with an extra stitch on each line. You don’t address this. You actually say you missed the first bridge on the second line.
When I stitch one end and skip the other on each line I end up with the right amount of stitches.
Is this how you do it?