


Here’s a little photo tutorial for another common way of beginning your threads when you embroider. This is a good method to use when you’re going to be stitching on tighter curves, but you can also use it on straight lines, or filling, or any time you start a thread!
I call this an “Away Waste Knot,” to distinguish between it and the waste knot I described earlier. “Away Waste Knot” doesn’t have a very good ring, though, does it?
The Away Waste Knot: Method of Work
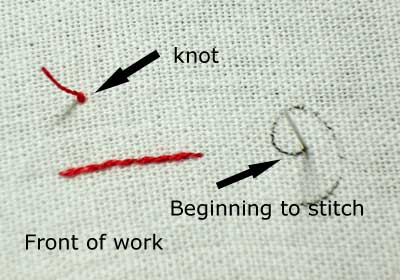
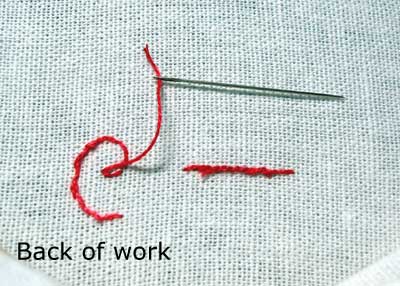
I’m going to stitch around that curly shape on the right. Start with your fabric up, a knot in the end of your thread, and take your needle down into your fabric from the top a few inches away from the point you intend to start stitching, so that your knot is on top of your fabric (as shown above).
Now, it will make things a whole lot easier if you take your thread down into your fabric at least three inches (and possibly more) away from your starting point. It is also wise to make sure your thread isn’t crossing the design, if there are “blank” areas in the middle of the design. To eliminate any difficulty of catching your thread with your stitches after your thread has crossed over a blank area (risking visibility on the front), make sure the path between the knot and where you’re starting isn’t in line with your stitching.
I didn’t do that, and you’ll see what happens here – but it isn’t a big deal on a design this small…
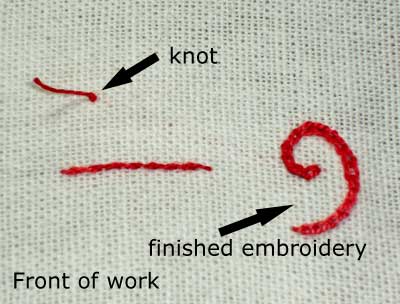
Well, that was easy enough, wasn’t it? Stitch whatever you intended to stitch….
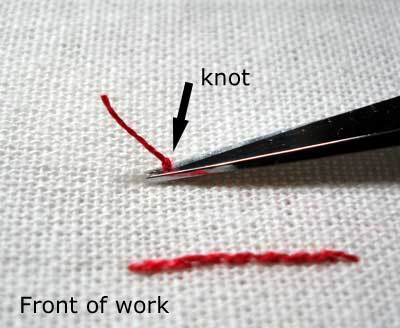
… and then pull up on your knot, and snip it close to the fabric. You need to pull up a bit on these knots before you clip them close to the fabric – you want the tension from pulling up on them to “boing” the thread back under the fabric for you.
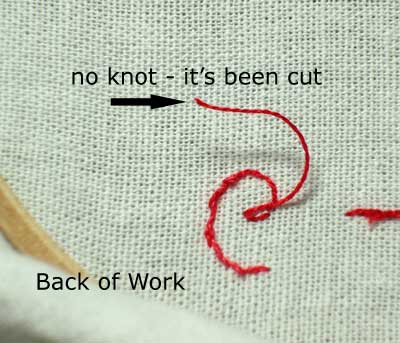
This is the back of the work. You can see that I’ve cut the knot off, and the thread is just hanging there, waiting. It isn’t stitched over (except for one tiny stitch, where it crossed over the design).
Thread the thread back onto your needle. With the limited length of your thread here, a needle threader would come in really handy.
I suppose you’ve probably noticed that my thread here is really too short for much manipulation with the needle. If your length of thread is longer, then at this point, you would simply take your threaded needle, and, passing under the back of the stitches, you’d wrap your threads on the back of the stitches to secure them.
I don’t like using a super long length of thread with this type of knot. Well – I take that back – it depends on the thread. But if I’m working with a more expensive thread, or a specialty thread that I don’t have much of, I don’t want to waste a lot of it.
But, if the thread is too short, you’re not going to be able to manipulate your needle… and you won’t be able to wrap around the back threads. So what do you do? I have two different approaches.
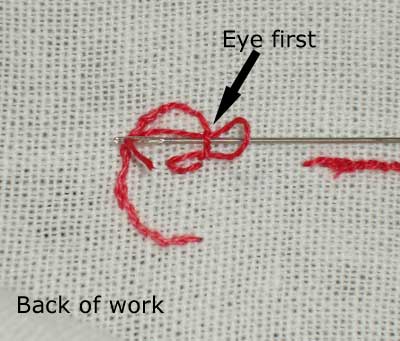
The first approach is to take the needle eye first through the back of the stitches. But this can be really incovenient, because it means you have to un-thread and re-thread in order to move your needle around.
So, in comes the tool….
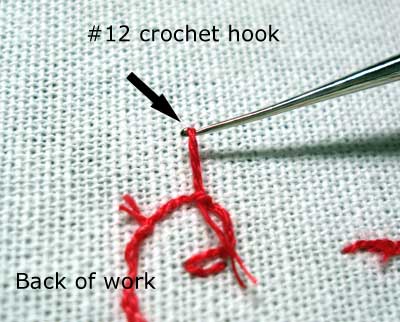
I use a tiny crochet hook that I keep in my tool box, just for this. It’s a #12, so it’s small enough to slide under (hook face down) behind the back threads, grap the thread, and pull it through beneath the stitches. You can very quickly pass your short thread underneath 5 or 6 stitches with ease this way.
They make tools for this, too – specialty tools. But I crochet hook will cost about a dollar, and it comes in handy for lots of little things, so it’s nice to have one on hand. The disadvantage of the crochet hook is that it graduates in size up the handle, so it isn’t suitable for passing under a long row of stitches. But it works great for passing behind one or two stitches.
Ok, so, last step: Trim up the little tails of your threads to neaten.
Pros of the Away Waste Knot:
1. It’s easy. You don’t have to mess with anchoring the beginning thread right away, so you can launch straight into stitching. You also don’t have to worry about crossing over the thread as you stitch, as with the regular waste knot.
2. It is a good way to secure threads neatly, after you’re finished stitching with that thread.
3. It works great when you’re stitching something on a tight curve, where a regular waste knot wouldn’t work.
Cons of the Away Waste Knot:
1. It can make you a lazy stitcher. I do know people who riddle their work with these kinds of knots, planning to cut them at the end. Unfortunately, in the meantime, they’ve stitched over the crossing threads on the back…. and over them again… and so forth, until the back of the work is a mess. I think, in their eagerness to keep stitching, they don’t stop to think that, at the end, they’re going to have to take probably even more time to finish off threads, since they have a clean-up job to do, too. It’s just better not to be lazy about starting and ending threads correctly. You’ll be much happier with the finished results of your work if you take the time to run your threads under with each thread, or at least with each section or motif of a larger work.
2. It can be very wasteful! It uses up more thread than most methods of starting your threads. If you want to use this waste knot the easy way, you’d allow yourself a minimum of three inches (and really, for ease, probably more like four) to work with at the end. Considering there are ways of starting a thread that take up less than an inch of thread, this approach comes off as pretty wasteful. Now, if you’re working with a thread that’s inexpensive and readily available, and in fact you have a surplus of it yourself, it’s not a big deal. But when you’re working with a thread that costs $3 – $5 (or more!)…. well. Three or four extra inches every time you start a thread can really add up!
3. It can be inconvenient if the knot is not far enough away. If you don’t have a tool to pull that thread under, it can be a regular pain in the neck. You could use the eye of your needle just to “scrape” the thread under if you had to, but that really is a pain, and you can distort your stitches on the front, doing so.
But, though the cons seem to outweigh the pros, the away waste k
not has its place and can be quite convenient to use. So … try it! See what you think! And let me know how you liked it, if you do give it a try!
You can find more ways of starting and ending your threads under Tips and Tricks for Hand Embroidery, in the article titled Starting and Ending Threads.
I have used the away knot and run into the difficulties you describe. Usually I put the needle threader under the stitch to pull the thread through, but it’s a lot of work. The crochet hook is a great idea; I think I’ll get one.
I like the “petites” needles when my thread runs short… or is expensive and you don’t want to waste an inch more of it than necessary. They’re usually only 1″ or 1 1/4″ long. They’re tapestry needles (22-28), but just right for weaving in ends. And I’ve used the ol’ crochet hook, too.
Tess
Wow! I have learned so many things from your website and I have only just started. Thank-you so much! I cant wait to get home from work, pick up my needle and try out what I have just learned.
Thank you for the excellent instructions on Away Waste Knots (especially the tip about a #12 crochet hook). I’m trying out an embroidery pattern from a book that instructed to start the pattern with an Away Waste Knot but then failed to provide any instruction whatsoever in the book on what an Away Waste Knot was let alone how to do one.
Hello Mrs Corbet:
I’m fascinated with your videos, I’m a beginner , I bought the materials .
Will be very helpful video for beginners . Some people can learn fast,
others like me we need more time to learn.
Thank You .
I’ve been looking at hiding knots and find it quite exciting. Go figure! I like this one a lot for inexpensive fibres. My granddaughter and I are making a Christmas tree ornament of a clear ball filled with orts. This is just perfect. Thank you, once again, for the lovely lovely site you create and curate. Warm regards, April in Ottawa
can I use weavers cloth to do tambour embroidery.
Hi, Nirmala – There’s no reason why you can’t use it, as far as I can tell. I know it’s used for punch needle sometimes. Tambour can pretty much be done on any type of fabric!
You are as ever the brightest star Mary, even though there are now many sites yours is still the best. I was looking for how to start off lazy daisy. Having not found what I wanted elsewhere (bring your thread up through the fabric!) google sent me here. I usually use little stab stitches to secure work but resorted to knots with the lazy daisy. How to secure threads with isolated detached chain stitch I wonder? My current design has too many of those!
Sometimes I wonder why we make things so hard for ourselves? Having been brought up with the idea that knots are very bad, I find it hard to admit defeat and use them. Do you know though sometimes I think they are as neat as any other method and neater than some. All for something no one else will see, but I will know (as well as those imaginary embroidery police sitting on my shoulder). I wish I could use knots with the same happy abandon as many modern stitchers. I’ve also started watching Japanese stitchers on youtube and the work is just lovely. However, I don’t think I have ever seen someone start without a knot.
Thank you very much for being the fount of all embroidery knowledge, over the years you have helped me so much.
I use that crochet hook for both starting and finishing, and yes, please do it every time you end a thread. 1″ is tricky, but it really can be done easily, 1.5″ is better. Have a variety of those steel hooks and it makes it a breeze; you just have to get the hang of it.
Thanks for this! It really helped clarify and I liked the light-hearted way you explain things! I will be getting a #12 crochet hook!