


The purpose of today’s article is both instructional and inspirational! I usually post reader’s embroidery projects because I find them particularly interesting or inspirational, and I think it’s nice to see what others out there are doing with their needles and thread. Here’s a beautiful metal-thread embroidery project which features satin stitching…
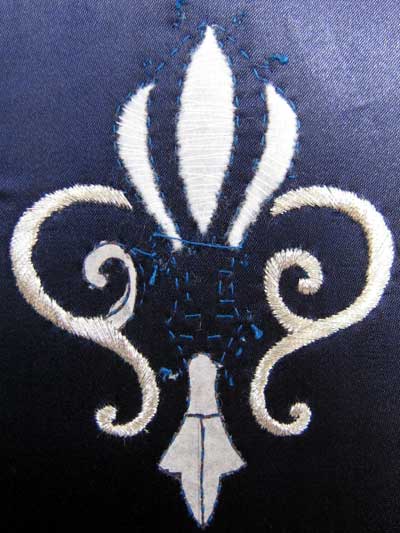
Christiana embroidered this fleur-de-lis in satin stitch, using #1 silver Jap. The design she’s using is from Tanja Berlin – one of the elements on her goldwork sampler. But Christi says she doesn’t like filling with purl, so she wanted to try satin stitching instead, using the #1 silver Jap, which is a very fine metal thread.
She chose a blue silk ground, which sets off the silver beautifully.
In communicating over this project, we sent pictures back and forth and discussed the methods and so forth, and she took notes on what she was doing, which she subsequently scanned and sent along, too. So what I’ve done here is put together her project so that you can see how she did it, and maybe pick up some tips and tricks along the way.
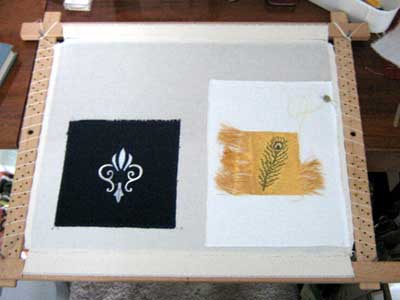
Christi was working on her goldwork feather and the fleur-de-lis at the same time, so both projects were set up on a slate frame. Notice that the slate frame is dressed with linen, then the ground fabric (blue silk in this case) is basted onto the linen, so that she is working through both the linen and the silk. This is normal for most ecclesiastical work – and goldwork in general – that, behind the ground fabric, there is another layer of supporting fabric. Specifically, in ecclesiastical work, it is typical to set up a slate frame with a piece of linen, then mount the finer ground fabric on the linen. Often, when several small motifs are being worked, they’ll be set up on one frame to save time and linen.
She used tissue paper to tansfer the design, tracing the design onto the tissue paper then using dark blue thread to stitch over the design to transfer the pattern. Using the dark blue (same color, more or less) as the ground fabric eliminates problems later, if the tacking threads can’t all be removed. They aren’t as noticeable!
For the top part of the fleur-de-lis, thin felt is used to pad the shapes. Christi stitched over the felt with a fine white thread to secure the felt to the fabric. This method of securing the felt differs from person to person and technique to technique. When I secure felt, I generally stitch very tiny stitches along the outside of the felt. This causes the felt to stand up a bit in the middle. Stitching over the felt as Christi has done helps minimize the height of the felt, which is what she wanted.
Instead of using felt on the arms of the fleur-de-lis, which are narrow and spindly, she discovered something: when removing the tissue paper from transferring the pattern, she noticed that the tacking threads held the tissue paper pretty firmly in place on the arms of the fleur-de-lis. She wanted the arms to be less padded than the top part of the design, and she thought that perhaps the tissue paper would serve to barely lift the thread off the fabric, to provide a white background behind the silver, and to give her a sharp edge for satin stitching. Maybe she didn’t have to use felt on the arms after all, and this could save her a step!
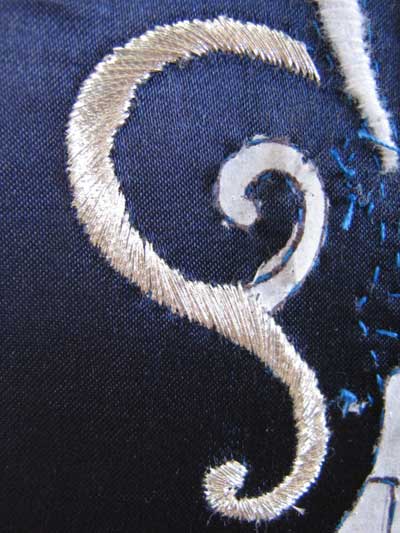
And that’s what she did – she left the tissue paper from the transfer on the pattern and stitched over it. She said it worked really well and it’s a technique she’ll use again. You can see in the photo above the tissue paper still attached to the fabric…
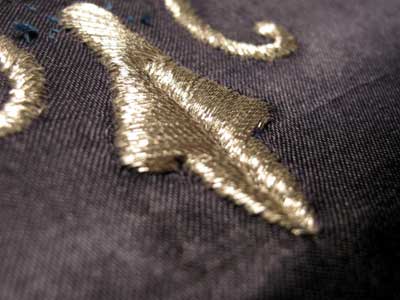
Here are the two arms and the base completed. Funny how the cameral makes the threads look more gold than silver… but really, it’s silver!
Now, with the base of the design, Christi said she had some problems deciding how to stitch it, and here are her notes on the subject. You can click on them to see a larger version.
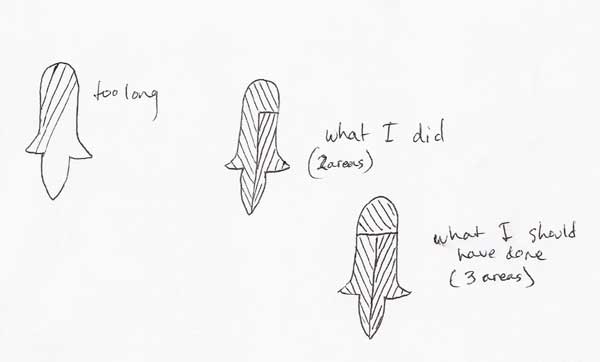
When satin stitching different shapes, it’s important to take into consideration the length the stitches will cover in the longer parts of the shape. Stitches that are too long can loosen over time. Also, they don’t always lie well. So this was good thinking, to split up the design!
You can see here the base of the design. I think it looks good, but I understand why it would have been better to split the design into three, instead of two, stitching areas.
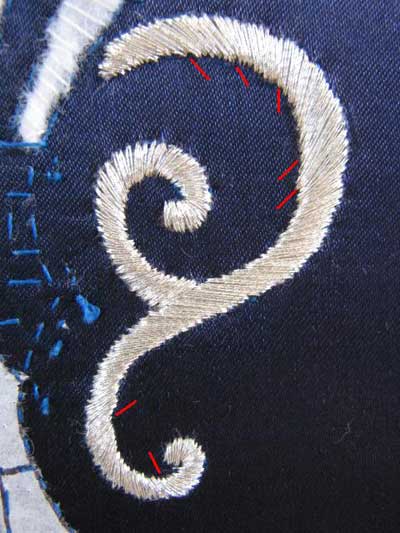
Satin stitching around curves can be tricky, and one of the most common problems is keeping “perfect” stitch direction. Christi didn’t like her shifting stitch direction in the areas marked, so she noted that for future improvement. Um…. well, the truth is, we always look at our own work more critically. I think this looks good.
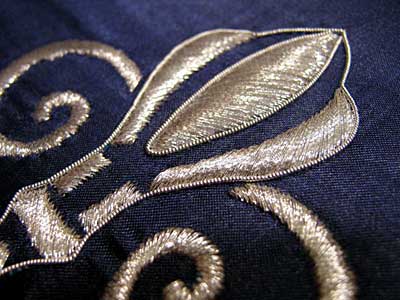
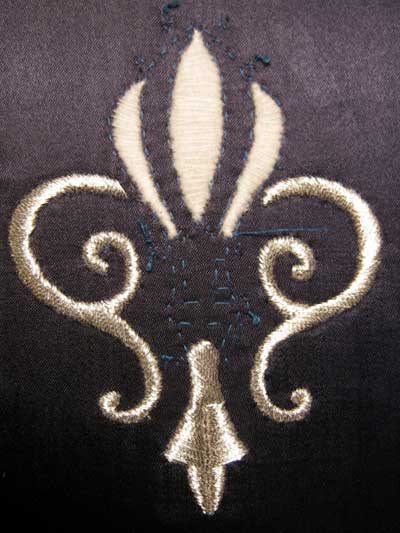
After finishing the satin stitching, she outlined the main part of the design with silver pearl purl.
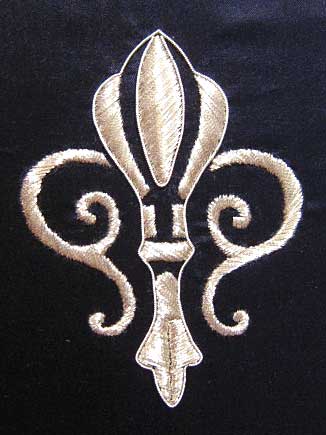
And here’s the finished piece – really beautiful!
Tha
nks, Christi, for sending the pictures along and the explanation of work!
I hope you enjoyed seeing this project, and that you picked up some ideas from her experiences working it!
Feel free to ask any questions…
Beautiful work, Christiana!
Thanks for sharing
Christiana, congratulations on a lovely piece of work and I, too, want to thank you for sharing the process.
wow!
And thankyou for the great commentary, Mary
Thank you Mary, and thank you Christi.
This post above all others really does make me wish this website was around 17 yrs ago. I began a project (which is still ongoing) which entailed stitching over a printed design. The idea was to quilt the design, but using colours of the pattern to edges the flowers and leaves.
Sadly, I used foam to back the piece of material, discovering 15 yrs ago, I should have used needle punch. Which is why it is still ongoing. but I have had this out over the last week (funny what you find when turning out) and I have been doig more work as I am nearly finished.
I am not taking the needle all the way through the foam (I had done too much to start again with needle punch) but I am still getting a ‘quilted’ look. Taking the needle aall the way through the foam was too hard on my fingers – and using a thimble was no help at all.
I will take photos tonight of what I have done and write notes, then send it later this week.
Christiana, this is very beautiful and so interesting to read about. Thank you. Mary, when you say that Christiana wanted a “sharp edge for satin stitching,” what does that mean?
Hi Christi and Mary,
thanks for sharing this. I LOVE the pearl purl as a finishing edge, thanks for the great pictures and commentary.