


This weekend, as usual, I had “plans” to get a goodly amount of stitching done, but sometimes, plans and “plans” tend to conflict! It was a busy weekend, and I got a lot accomplished, but not necessarily with needle ‘n thread! One thing I did manage to do was make a card.
I like embroidering on paper – I think it’s a great way to make a card that doubles as a simple gift. This weekend, I attended a 25th anniversary party (“no gifts, please”) and took along this card:

Though simple enough, I’m always surprised that embroidering greeting cards takes longer than I initially think it will! I spent about 2.5 hours on this one. But the end results are worth it – most people I know are delighted by hand made cards, and this is a great way to make them!
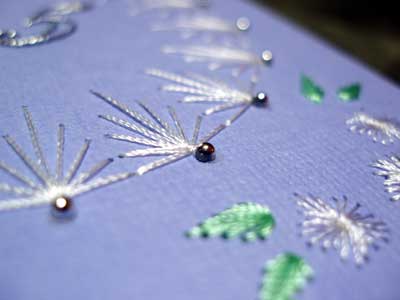
For thread, I use machine embroidery thread (Sulky or whatever brand I happen to find that’s not too expensive). Machine embroidery thread comes in a magnificent range of colors, and it’s a perfect size for very delicate designs on hand embroidered cards, though it can easily be doubled if you want a bolder line. I doubled the thread for most of the elements on this card
Little accents like these silver beads add a nice touch to embroidered cards. These little adhesive half-beads are available in the scrapbooking section of most large hobby stores. Surprisingly enough, you may find a better supply of them at places like Michael’s or Hobby Lobby than you would at specialty scrapbooking shops (that’s my experience, anyway).
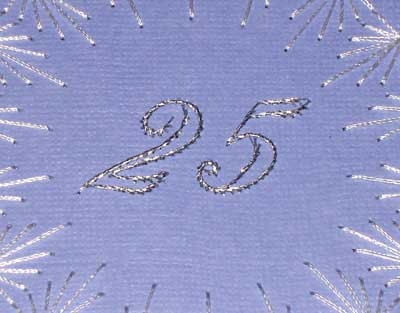
For metallic threads that have a nice sparkle, that are easy to stitch with, and that hold up well to passing through the paper, use machine embroidery metallic threads. They’re much more supple than metallic threads (like the metallic stranded DMC) made for hand embroidery. They stand up to passing through the holes in the paper with nary a fray! For the “25,” I used two strands of metallic silver (by Sulky, I think).
Design-wise, I generally scout through the books I have on the subject of embroidered cards. Sometimes, I might make my own design, but normally it’s just quicker to find a nice pattern in a book and then combine it with other elements.
One of these days, I’d like to spend a week or so just making and embroidering cards. It’d be really nice to pre-make a bunch of cards for various occasions throughout the year instead of doing this last minute, I-need-a-card-now thing. It occured to me that a “workshop” over several days with youngsters (12 – 15 year-olds), concentrating solely on card-making, might be fun, too. I might consider that for one of my summer activities this year. Any suggestions or ideas for that kind of thing for kids?
I’ve got a few posts on embroidery on paper here on Needle ‘n Thread, if you’re interested in reading further. If you want to design your own card, check out this tutorial on designing your own embroidered cards. You can also check out any of the Erica Fortgens books listed in my bookstore, if you’re looking for good design resources, idea books, or specific instruction on making embroidered cards.
Lovely Mary,
My daughter and SIL recently celebrated their 25th and I made the same card except I stamped and embossed the “25” in the center. I too find the machine thread desirable to the metallic emb. thread.
Barb
Mary, your card is beautiful.
I have 2 questions. Did you pre-draw the design? and did you make the holes for the needle and thread before stitching?
I probably couldhave searched for more info, but I am supposed to be studying for a small exam this afternoon. I needed something to relax my mind while eating lunch, your site is the perfect place.
Hi, Marian –
I used two different designs from one of Erica Fortgens’s books. The designs are already printed in the books, and they are presented as ‘dot’ designs, where you prick the paper. So I scanned the two designs I wanted to use (one was the circle border, the other was the flower corners, and then I also scanned the ’25’), and then put them together into one design, which I then printed out. Then, I layered the card, covered with the pricking pattern, on a pricking mat (you can buy these, specially made for card pricking, or you can just buy a really inexpensive sheet of craft foam, which works just as well!), and pricked the design, using the dots as a guide.
You don’t have to scan and arrange designs, normally. The easiest way (and quickest) is just to photocopy the design you want, so that you have a pricking pattern for the card you want to make.
Simple! And fun!
Best,
Mary
Thank you Mary. I am going to make one for my niece whose birthday is at the end of May. Plenty of time.
Can you tell me if you have sweet 16 birthday patter for pin stitching? Or a site I could try?