


The little motif on the back of my current project – this embroidered needlebook – is finished. There are some hiccups. Lately, and I don’t know why, I always have hiccups in my needlework. Despite them, though, I like the little design on the back. For this part of the needlebook, I adopted part of the counted cross stitch design given in the kit, and then added my own surface stitching to finish the motif. I’ll show you my adjustments…
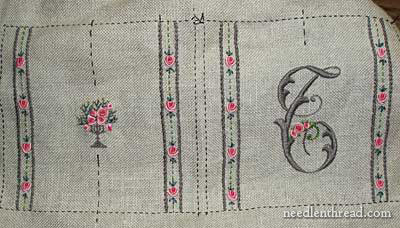
In the original needlebook kit, a cross stitch pattern is supplied for the motif on the back of the needlebook, an urn filled with roses. I kept the urn, though I adjusted the count on it, and then I filled the urn with bullion rose buds and feather stitch and French knot greenery.
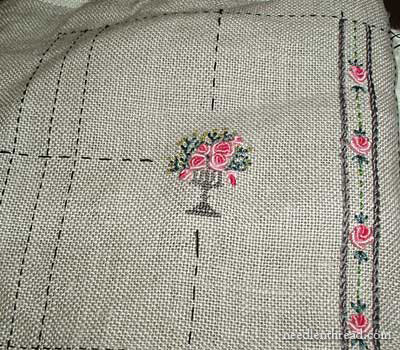
This is a distant shot of the urn and flowers. The flowers are one of the hiccups. I wanted them to be in approximately the same place they were plotted on the counted cross stitch chart that came with the kit. But I started them in the wrong place, and things got a bit discombobulated.
The little urn is supposed to be stitched over two threads of fabric. I decided to keep it small and stitch it over one.
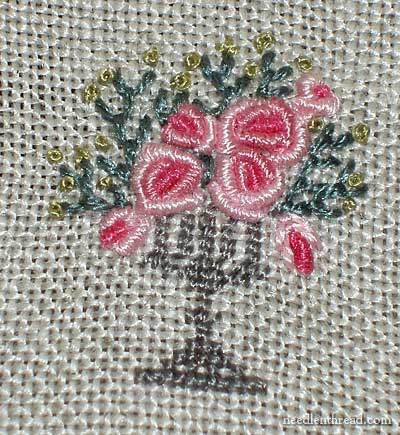
At first, at the very base, I went with cross stitch, with one strand of Soie d’Alger, but you know what? It didn’t work! The single thread was a bit too thick to manage a whole cross stitch, so after the base, I resorted to tent stitch, which actually worked out ok. In a macro shot, you can really see the stitches, but in person, the stitches are really too tiny to see perfectly, so you get the overall look of the urn just fine, without seeing where the tent stitches didn’t quite do the job!
I like the urn a lot, even stitched as it is – half cross stitch, half tent stitch.
The roses bug me a bit, though – but NOT enough to take out and re-do them! I tried to keep them more bud-like, than full-blown roses, and so I started with the long bullion center. For a regular, full-blown bullion rose, it’s easier to start with a round center. Anyway, my roses came out a little bit angular. And do you notice something about the drooping bud on the right? It’s true, I resorted to two fly stitches around the dark bullion center. Why? Well, it was a combination of factors:
One, I was sick of doing bullions.
Two, I worked one there and it looked awful. I picked it out.
I stitched it again. It still looked silly. I picked it out.
I tried two bullions, overlapping. The didn’t fit – they looked heavy and all wrong. I picked them out.
I stitched two fly stitches.
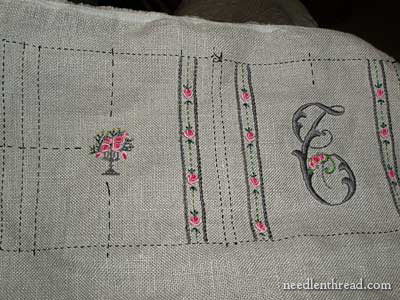
And here ’tis – the embroidery finished on the back. Now, it’s quite done – I still have to backstitch around the outside edge (where the basting thread is) in black linen thread. The backstitching will mark and define the edge, and also provide the base for some needlelace scallops around the outside of the needlebook.
I’m not making it through this kit as quickly as I thought I would. This isn’t because of the kit so much as it is a matter of having time to really stitch. I’m pleased with the kit so far – I really like it! I’m looking forward to the construction part!
Hi there Mary,
What a beautiful kit and how wonderfully you have executed it………..
…………can you put me out of my misery. Having re-read your postings about the journey to completion, I have re-learned that the actual monogram wasn't in the kit(! hiss boo).
I am hoping to spoil myself come the New Year and take on the challenge of this project………………where do I find the lovely monogram style that you used??
I personally think that it would be good if they did actually add the a-z of the monogram in the kit, but that's just me!LOL
Thanks again, for talking us through. For sure, you have made me want to buy the kit and do it!!
Hugs in this the most wonderful month of the year.
Marysia.
Hi, Marysia –
It's a nice kit! The recommended monogram is a Sajou one – and it's counted, not surface embroidery.
The one that I used is also actually a Sajou monogram from a pamphlet that I have that I haven't yet converted to website-ready monograms. However, you can find scans of the monogram style online here:
Sajou Monogram Pamphlet #345
Funny – it was posted shortly on Pattern Maker shortly after I began this project!
I adjusted the design only a little bit, to accommodate bullion roses instead of the flowers that are on the monogram.
Enjoy the kit!
MC
Hi Mary,
Just discovered your site and have spent hours perusing it; wonderful!Am delighted in seeing your ecclesiastical embroidery. You should write your own book!
Carla
discombobulated??!!! ….dictionary please 😉
Great work,Mary.Looking forward to the construction part.
It's great!Beautiful!
Deepa discombobulate is a strange word indeed, but I found it in my both on-line dictionaries Dicionário Editora and Babylon 🙂
(i couldn't read so many English blogs without them…) :))
Mary usually I am not one for kits but this is real charmer.